6700 SERIES REPLACEMENT OVEN CONTROL KITS - Exact ...
6700 SERIES REPLACEMENT OVEN CONTROL KITS - Exact ...
6700 SERIES REPLACEMENT OVEN CONTROL KITS - Exact ...

You also want an ePaper? Increase the reach of your titles
YUMPU automatically turns print PDFs into web optimized ePapers that Google loves.
<strong>6700</strong> <strong>SERIES</strong> <strong>REPLACEMENT</strong> <strong>OVEN</strong> <strong>CONTROL</strong> <strong>KITS</strong><br />
Electrical Rating: 240 VAC, BAKE 17 amps, BROIL 15 amps resistive load<br />
General<br />
WARNING! Electrical Shock Hazard<br />
To avoid risk of electrical shock,<br />
personal injury or death; disconnect<br />
electrical power before servicing.<br />
THIS KIT IS INTENDED FOR USE BY QUALIFIED SERVICE<br />
PERSONNEL ONLY. IMPROPER INSTALLATION OF THE NEW<br />
<strong>CONTROL</strong> CAN PRESENT ELECTRICAL SHOCK, SERIOUS<br />
PERSONAL INJURY OR FIRE HAZARDS.<br />
Do not attempt disassembly of the oven control.<br />
Be sure all terminals at the rear of new oven control are at a safe<br />
distance from covers and panels. Insulate and protect all wiring as<br />
necessary.<br />
Before disconnecting and removing the old oven control from the<br />
appliance, identify and mark the wiring so it can be correctly<br />
reconnected to the new control.<br />
Kit Features<br />
This kit is designed to accommodate most installation configurations. The<br />
capillary is 152.5cm (60.0”) long (plus the 28cm (11.0”) bulb sensor), and<br />
the control has a 4.5cm (1-3/4”) break-off shaft. AUTOMATIC PRE-HEAT,<br />
VARIABLE BROIL and SIGNAL LIGHT circuits are on all models (except<br />
6725S0011). The shafts of all models turn clockwise (except 6725 series) to<br />
increase the oven temperature, and certain kits also contain a “four-way”<br />
knob.<br />
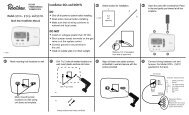
Installation Instructions<br />
1. Determine the correct shaft length by measuring from the front<br />
mounting plates of the old and new oven controls. (For “bush and nut”<br />
mounting applications, measure from the bush mounting bracket on<br />
the new control and the mounting plate on the old control). Measure<br />
the amount (if any) that the new shaft needs to be shortened. If this<br />
length falls between two break-off grooves, mark the groove providing<br />
the longer length. NOTE: (If the original knob is to be replaced).<br />
Before cutting the new shaft; check the depth of the cavity where the<br />
shaft enters into the new knob. Any variation can be compensated for<br />
by lengthening (or shortening) the new shaft.<br />
2. Position a suitable pair of pliers at either side of the marked groove.<br />
Hold the pliers very firmly at the control body side of the groove.<br />
With the other pair of pliers, carefully snap off the excess amount of<br />
shaft. (See Figure 2) Caution: DO NOT HOLD, OR PLACE ANY<br />
STRAIN ON THE BODY OF THE <strong>CONTROL</strong>.<br />
3. Place and snap the knob clip spring into the wide flat channel of the<br />
shaft. The straight end of the knob clip spring must point towards the<br />
knob end of the shaft. (See Figure 3)<br />
4. Determine the appropriate mounting method and install the new<br />
HARPCO <strong>6700</strong> series control (as indicated in 4a or 4b following). The<br />
new control may be installed in any position (3, 6, 9 or 12 o’clock) that<br />
will provide the required shaft alignment for the knob OFF position.<br />
(See Figure 4)<br />
Bushing Mounting<br />
a) Place the bushing over the oven control shaft. Attach the bracket to<br />
the oven control using the 2 screws provided. Install the new oven<br />
control. Make sure that the control shaft is properly oriented to align<br />
with the OFF position on the appliance’s control panel. Use the “PAL-<br />
NUT” provided to secure the oven control to the control panel.<br />
Screw Mounting<br />
b) Place the new oven control into position. Make sure that the control<br />
shaft is properly oriented to align with the OFF position on the<br />
appliance’s control panel. Use the 2 screws provided to attach the<br />
oven control onto the control panel.<br />
Knob - Oven Control<br />
5. Included with your kit is an electric thermostat knob replacement kit.<br />
The only insert you will need from this kit is the yellow insert. Place<br />
the yellow insert onto the control shaft. Install the knob onto the<br />
yellow insert and rotate the knob counterclockwise to the OFF<br />
position. Remove the adhesive backing from the inlay depicted in<br />
Figure 1. Place the inlay over the knob so the OFF aligns with the<br />
corresponding mark on the control panel.<br />
Inlay<br />
FIGURE 1<br />
Yellow insert<br />
Capillary Tube<br />
6. Carefully route the capillary tube through to its original location inside<br />
of the oven. Locate the capillary bulb into the original retaining clips<br />
inside the oven. Make sure that the bulb does not touch any oven sur<br />
face. Be careful not to kink the capillary line as this will affect the<br />
proper operation of the oven control. Coil any excess capillary line<br />
outside of the oven and away from all electrical components and<br />
terminals.<br />
Replacing HARPER Oven Controls<br />
7. If you are replacing a “HARPER” oven control, reconnect the wiring to<br />
the same numbered terminals on the new oven control. On some<br />
double-pole (6711 - 6715) oven controls, L1 and L2 may be found to<br />
be reversed from the <strong>6700</strong> series kits. This will not present any<br />
difficulty, as the line polarity for the oven circuit is not critical in this<br />
application.<br />
Replacing Other Oven Controls<br />
8. To replace other oven controls, refer to the CROSS REFERENCE and<br />
TERMINAL WIRING CHARTS.<br />
Variable Broil<br />
9. The <strong>6700</strong> kit oven controls feature a “VARIABLE BROIL” - the option<br />
to broil at full heat or a user selected lower heat. To use this feature,<br />
turn the knob to BROIL, and then back to the desired temperature.<br />
After the variable broil has been used, the knob MUST be turned to<br />
the OFF position to turn the broil element off.<br />
Calibration - Oven Control<br />
10. The oven control has been carefully calibrated at the time of<br />
manufacture and is accurate. However, if re-adjustment should ever<br />
become necessary, use the following procedure:<br />
Place the end of a thermocouple (connected to a suitable temperature<br />
meter of known accuracy) into the geometric center of the oven cavity.<br />
Set the oven temperature to 350˚F (175˚C) and turn the oven on.<br />
Allow the oven to cycle OFF and ON at least three times. DO NOT<br />
OPEN THE <strong>OVEN</strong> DOOR DURING TEST.<br />
AFTER THE FIRST THREE CYCLES, commence making a note of the<br />
OFF - ON temperature readings, AND the total number of OFF - ON cycles.<br />
To obtain the actual oven temperature:<br />
EXAMPLE: <strong>OVEN</strong> SET AT 350˚F (AFTER THE FIRST 3 CYCLES)<br />
Method 1st + 2nd + 3rd = Total Divide by 3, Divide by 2<br />
Cycles 1st 2nd 3rd Total By 3 Result<br />
OFF 390 375 370 1135 378 705<br />
ON 315 330 335 980 327 (378,327)<br />
<strong>OVEN</strong><br />
TEMP<br />
352<br />
IS001 (10/06)
If the average oven temperature varies by more than 25˚F either side<br />
of the set temperature. (In the case of 350˚F the allowable<br />
temperature tolerance would be 325˚F - 375˚F).<br />
To adjust the oven control: Insert a suitable (slotted) screwdriver into<br />
the center of the control shaft. Rotating the adjusting screw 20˚ will<br />
change the oven temperature by approximately 10˚F. Do not allow the<br />
shaft to turn while making the adjustment. Turn the adjusting screw<br />
counterclockwise to increase, and clockwise to decrease the oven<br />
temperature.<br />
Stem Configurations**<br />
Wiring Diagrams<br />
Kit No.<br />
**Stem<br />
Configuration<br />
Knob<br />
Included<br />
Replaces<br />
<strong>6700</strong>S0001 A No<br />
<strong>6700</strong>S0002 B No<br />
Most Harper single and double pole 6702-6715 controls<br />
<strong>6700</strong>S0003 C No<br />
<strong>6700</strong>S0011 A Yes<br />
<strong>6700</strong>S0012 A No<br />
6725S0011 A No<br />
Most Harper 6702-6715 controls; many Hart 276 controls; Ranco<br />
N-1 and N-3 controls; Robertshaw RA, RB, RC, RD, OP controls<br />
and Uni-Line 5430-175, 5440-175/6/7, 5545-275/6<br />
Most Harper 6701 Series controls and many Robertshaw EA<br />
and EG and Ranco G-1 Series<br />
Harper 6725 controls; Robertshaw RE, ON and Uni-Line 5445-277<br />
controls; Westinghouse Q162221 thru Q162225 controls<br />
FIGURE 2<br />
FIGURE 3<br />
FIGURE 4<br />
TO BAKE<br />
Turn Oven Control Knob just to desired temperature. Both Broil<br />
(Top) and Bake (Bottom) elements will come on for fast pre-heat.<br />
Broil element will turn off automatically when<br />
temperature is reached.<br />
CAUTION: If oven door is left open for a long time, broil<br />
element may come on again.<br />
TO BROIL<br />
Turn Oven Control Knob until it “clicks” into BROIL setting. For<br />
maximum broil heat, leave at BROIL. For slower<br />
broiling, turn knob back (counterclockwise) to desired<br />
setting. Leave oven door open (at Broil Stop position) for all broiling<br />
operations.<br />
NOTE: Before oven can be used for baking, Control Knob<br />
MUST be turned to “OFF” to turn off Broil element.<br />
IS001 (10/06)