Series 2000 Install.pdf - Aztec
Series 2000 Install.pdf - Aztec
Series 2000 Install.pdf - Aztec

You also want an ePaper? Increase the reach of your titles
YUMPU automatically turns print PDFs into web optimized ePapers that Google loves.
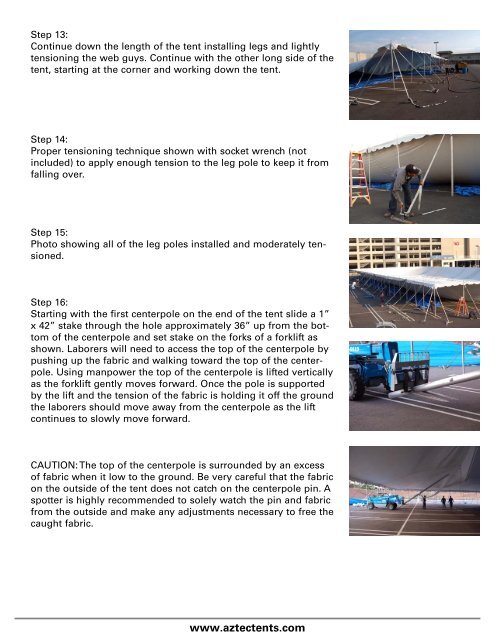
Step 13:<br />
Continue down the length of the tent installing legs and lightly<br />
tensioning the web guys. Continue with the other long side of the<br />
tent, starting at the corner and working down the tent.<br />
Step 14:<br />
Proper tensioning technique shown with socket wrench (not<br />
included) to apply enough tension to the leg pole to keep it from<br />
falling over.<br />
Step 15:<br />
Photo showing all of the leg poles installed and moderately tensioned.<br />
Step 16:<br />
Starting with the first centerpole on the end of the tent slide a 1”<br />
x 42” stake through the hole approximately 36” up from the bottom<br />
of the centerpole and set stake on the forks of a forklift as<br />
shown. Laborers will need to access the top of the centerpole by<br />
pushing up the fabric and walking toward the top of the centerpole.<br />
Using manpower the top of the centerpole is lifted vertically<br />
as the forklift gently moves forward. Once the pole is supported<br />
by the lift and the tension of the fabric is holding it off the ground<br />
the laborers should move away from the centerpole as the lift<br />
continues to slowly move forward.<br />
CAUTION: The top of the centerpole is surrounded by an excess<br />
of fabric when it low to the ground. Be very careful that the fabric<br />
on the outside of the tent does not catch on the centerpole pin. A<br />
spotter is highly recommended to solely watch the pin and fabric<br />
from the outside and make any adjustments necessary to free the<br />
caught fabric.<br />
www.aztectents.com