Blackheart board - P8ntbox
Blackheart board - P8ntbox
Blackheart board - P8ntbox

Create successful ePaper yourself
Turn your PDF publications into a flip-book with our unique Google optimized e-Paper software.
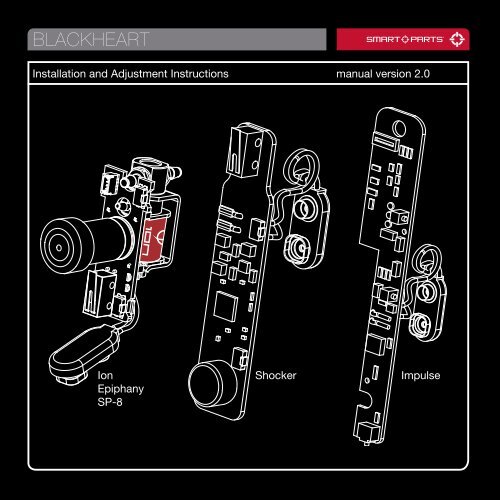
BLACKHEART<br />
Installation and Adjustment Instructions manual version 2.0<br />
Ion<br />
Epiphany<br />
SP-8<br />
Shocker<br />
Impulse
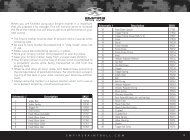
TABLE OF CONTENTS<br />
Installation 02<br />
Shocker Operation/Adjustment 03-05<br />
Ion Operation/Adjustment 06-08<br />
Impulse Operation/Adjustment 09-11<br />
Mode Descriptions 12-14<br />
Tournament Settings 15<br />
The <strong>Blackheart</strong> circuit <strong>board</strong><br />
upgrade is available for the<br />
Smart Parts Impulse, Ion,<br />
SP-8, Epiphany, Shocker<br />
SFT, Nerve and Shocker<br />
NXT. It provides a significant<br />
increase in electronic control,<br />
adjustment and ease of<br />
programming.<br />
While every effort has been made to ensure that the information<br />
contained in this guide is accurate and complete, no liability can<br />
be accepted for errors or omissions. Smart Parts, Inc. reserves<br />
the right to change the specifications of the <strong>Blackheart</strong> at any<br />
time without prior notice. The latest version of this manual may be<br />
downloaded free of charge at www.SmartParts.com.<br />
800.922.2147 www.smartparts.com<br />
01
INSTALLATION<br />
PLEASE READ CAREFULLY<br />
BLACKHEART SELECTION<br />
The <strong>Blackheart</strong> upgrade is in the form of a replacement for your marker’s stock circuit<br />
<strong>board</strong>. It is available in three versions for use with different Smart Parts markers. The<br />
Ion version is designed for use with Ion, SP-8 and Epiphany markers. The Shocker<br />
version is compatible with the Shocker NXT, Shocker SFT and Nerve. As its name<br />
implies, the Impulse <strong>Blackheart</strong> <strong>board</strong> works with the Impulse.<br />
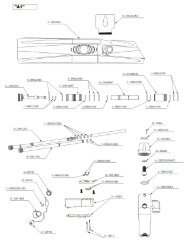
INSTALLING THE BLACKHEART<br />
To install the <strong>Blackheart</strong>, follow the disassembly instructions in your marker’s manual,<br />
remove the circuit <strong>board</strong>, and replace it with the <strong>Blackheart</strong>. It is recommended that<br />
you download the most recent manual for your marker at www.SmartParts.com.<br />
OPTIMIZING DWELL<br />
The default Dwell settings of the <strong>Blackheart</strong> <strong>board</strong> are designed to provide reliable<br />
operation with your marker. Optimizing the dwell setting will maximize the gas efficiency<br />
of your marker. Using the adjustment instructions in this manual, follow the<br />
dwell optimization procedure in your marker’s manual to achieve the ideal dwell setting<br />
for your particular marker configuration.<br />
EPIPHANY NOTES<br />
Ion <strong>Blackheart</strong> <strong>board</strong>s manufactured after the Fall of 2006 are equipped with hoses<br />
and a solenoid valve that are rated to operate in the pressure ranges utilized by the<br />
Epiphany as well as the Ion. These newer <strong>board</strong>s are easily identified by the protective<br />
wrapping on their solenoid coil. Epiphany certified <strong>Blackheart</strong> <strong>board</strong>s have a black<br />
Ion logo on a red background. Older <strong>Blackheart</strong> <strong>board</strong>s have a black wrap with a red<br />
logo, and should not be used in an Epiphany or Epiphany converted Ion or SP-8.<br />
800.922.2147 www.smartparts.com<br />
02
SHOCKER OPERATION<br />
These Instructions Apply to<br />
the <strong>Blackheart</strong> Upgrade for<br />
the Shocker NXT, Shocker<br />
SFT And Nerve<br />
Pressing and holding both<br />
buttons for 1 second activates<br />
the Shortcut Key. This<br />
will automatically calculate<br />
and set the correct ROFDelay<br />
setting necessary to cap<br />
your marker’s rate of fire just<br />
below 15 balls per second.<br />
The <strong>board</strong> will chirp, and the<br />
red and yellow LEDs will stay<br />
on to identify that the 15 bps<br />
cap has been activated.<br />
OPERATION<br />
Press the Power Button. The <strong>board</strong> will chirp and then power on, entering Vision firing<br />
mode. Press and hold the button for two seconds to power off the marker.<br />
If your Vision eyes become blocked by paint or debris, you may wish to switch to<br />
non-vision firing mode until you have time to clean and inspect them. The Power Button<br />
can be used to switch back and forth from non-Vision firing mode to Vision mode<br />
by pressing the button quickly and observing the chirp and change in light pattern<br />
from a steady glow to an interrupted blinking sequence.<br />
800.922.2147 www.smartparts.com<br />
03
SHOCKER ADJUSTMENT<br />
See the Modes section to<br />
learn what affect each <strong>Blackheart</strong><br />
adjustment will have on<br />
your marker.<br />
ADJUSTMENT TABLE<br />
Modes Light Color Mode Down Button Mode Up Button Range<br />
Dwell Solid Yellow Down Up 3ms-20.5ms; .25ms steps<br />
ROF (Rate of Fire) Delay Solid Red Down (faster) Up (slower) 15-70ms; 1ms steps<br />
Firing Modes Single Blink Yellow Down Up 1 – 4<br />
Debounce Single Blink Red Down Up 0 – 25<br />
BSA (Bolt Stick Adjust) Double Blink Yellow Down Up 0 – 25<br />
Kick-In Rate Adjust Double Blink Red Down Up 1sps – 10sps<br />
Sustain Rate Adjust Fast Blink Yellow Down Up 1sps – 10sps<br />
Number of Shots to Enter Firing Mode Fast Blink Red Down Up 1 pull – 10 pulls<br />
Vision Type Long Blink Yellow Down Up 1 – 4*<br />
Shortcut Key - hold both buttons Yellow & Red 15 bps cap 15 bps cap N/A<br />
*Vision Modes 3 and 4 are only available on <strong>Blackheart</strong> Boards manufactured after August 2006.<br />
ADJUSTMENT<br />
To access the Mode Buttons inside the grip frame, remove the screws from the<br />
rubber grip on the left side of the gun. By pressing the Mode Down Button once,<br />
the <strong>board</strong> will enter into an Adjustment Mode. A solid yellow light indicates you are<br />
in Dwell Adjustment Mode. As you continue pressing the Mode Down Button, you<br />
will cycle through the modes which are each defined by a specific color and flash<br />
sequence (see table).<br />
800.922.2147 www.smartparts.com<br />
04
SHOCKER ADJUSTMENT<br />
These Instructions Apply to<br />
the <strong>Blackheart</strong> Upgrade for<br />
the Shocker NXT, Shocker<br />
SFT And Nerve<br />
ADJUSTMENT (cont.)<br />
While in any of these modes, wait 4 seconds and the speaker will chirp to identify the<br />
current setting value for that mode. For example, if it was in the Dwell Setting Mode<br />
and the Dwell was set to 30, after 4 seconds the speaker would chirp 30 times.<br />
If you decide to leave the adjustment table without making any changes, simply pull<br />
and release the trigger one time, and the <strong>board</strong> will go back into its base (non-Vision)<br />
firing mode. CAUTION: If there is air charged in the gun, it will not be able to fire<br />
while in an Adjustment Mode. However, as soon as you release the trigger, you<br />
will be able to fire the gun.<br />
To change settings while the <strong>board</strong> is in any of the modes listed in the adjustment<br />
table, complete the following steps:<br />
1. Pull and hold the trigger for 3 seconds; the speaker will chirp 5 times to indicate<br />
that you can make adjustments.<br />
2. While the trigger is still being held, make an adjustment by pressing the Mode<br />
Down Button to adjust down, or the Mode Up Button to adjust up. The speaker<br />
will make a high pitched chirp for each adjustment up, and a low pitched chirp for<br />
each adjustment down.<br />
3. Once you have reached your desired setting, releasing the trigger will put the<br />
<strong>board</strong> back into non-Vision firing mode and save your new setting. The <strong>board</strong><br />
will chirp rapidly when it can’t go any higher or lower in the adjustment range.<br />
800.922.2147 www.smartparts.com<br />
05
ION OPERATION<br />
These Instructions Apply to<br />
the <strong>Blackheart</strong> Upgrade for<br />
the Ion, SP-8, and Epiphany<br />
Pressing and holding both<br />
buttons for 1 second activates<br />
the Shortcut Key. This<br />
will automatically calculate<br />
and set the correct ROFDelay<br />
setting necessary to cap<br />
your marker’s rate of fire just<br />
below 15 balls per second.<br />
The <strong>board</strong> will chirp, and the<br />
red and yellow LEDs will stay<br />
on to identify that the 15 bps<br />
cap has been activated.<br />
OPERATION<br />
Press the Power Button. The <strong>board</strong> will chirp and then power on, entering Vision firing<br />
mode. Press and hold the button for two seconds to power off the marker.<br />
If your Vision eyes become blocked by paint or debris, you may wish to switch to<br />
non-vision firing mode until you have time to clean and inspect them. The Power Button<br />
can be used to switch back and forth from non-Vision firing mode to Vision mode<br />
by pressing the button quickly and observing the chirp and change in light pattern<br />
800.922.2147 www.smartparts.com<br />
06
ION ADJUSTMENT<br />
ADJUSTMENT TABLE<br />
See the Modes section to<br />
learn what affect each <strong>Blackheart</strong><br />
adjustment will have on<br />
your marker.<br />
Modes Light Color Mode Down Button Power Button Range<br />
Dwell Solid Yellow Down Up 8-52ms - .5 ms steps<br />
ROF (Rate of Fire) Delay Solid Red Down (faster) Up (slower) 25-70ms - .5ms steps<br />
Firing Modes Single Blink Yellow Down Up 1 – 4<br />
Debounce Single Blink Red Down Up 0 – 25<br />
BSA (Bolt Stick Adjust) Double Blink Yellow Down Up 0 – 25<br />
Kick-In Rate Adjust Double Blink Red Down Up 1sps – 10sps<br />
Sustain Rate Adjust Fast Blink Yellow Down Up 1sps – 10sps<br />
Number of Shots to Enter Firing Mode Fast Blink Red Down Up 1 pull – 10 pulls<br />
Shortcut Key - Hold both buttons Yellow & Red 15 bps cap 15 bps cap N/A<br />
ADJUSTMENT<br />
To access the Mode Buttons inside the grip frame, remove the screws from the<br />
rubber grip on the left side of the gun. By pressing the Mode Down Button once,<br />
the <strong>board</strong> will enter into an Adjustment Mode. A solid yellow light indicates you are<br />
in Dwell Adjustment Mode. As you continue pressing the Mode Down Button, you<br />
will cycle through the modes which are each defined by a specific color and flash<br />
sequence (see table).<br />
800.922.2147 www.smartparts.com<br />
07
ION ADJUSTMENT<br />
These Instructions Apply to<br />
the <strong>Blackheart</strong> Upgrade for<br />
the Ion, SP-8, and Epiphany<br />
ADJUSTMENT (cont.)<br />
While in any of these modes, wait 4 seconds and the speaker will chirp to identify the<br />
current setting value for that mode. For example, if it was in the Dwell Setting Mode<br />
and the Dwell was set to 30, after 4 seconds the speaker would chirp 30 times.<br />
If you decide to leave the adjustment table without making any changes, simply pull<br />
and release the trigger one time, and the <strong>board</strong> will go back into its base (non-Vision)<br />
firing mode. CAUTION: If there is air charged in the gun, it will not be able to fire<br />
while in an Adjustment Mode. However, as soon as you release the trigger, you<br />
will be able to fire the gun.<br />
To change settings while the <strong>board</strong> is in any of the modes listed in the adjustment<br />
table, complete the following steps:<br />
1. Pull and hold the trigger for 3 seconds; the speaker will chirp 5 times to indicate<br />
that you can make adjustments.<br />
2. While the trigger is still being held, make an adjustment by pressing the Mode<br />
Down Button to adjust down, or the Mode Up Button to adjust up. The speaker<br />
will make a high pitched chirp for each adjustment up, and a low pitched chirp for<br />
each adjustment down.<br />
3. Once you have reached your desired setting, releasing the trigger will put the<br />
<strong>board</strong> back into non-Vision firing mode and save your new setting. The <strong>board</strong><br />
will chirp rapidly when it can’t go any higher or lower in the adjustment range.<br />
800.922.2147 www.smartparts.com<br />
08
IMPULSE OPERATION<br />
These Instructions Apply<br />
to the Impulse <strong>Blackheart</strong><br />
Upgrade.<br />
MODE DOWN BUTTON<br />
MODE UP BUTTON<br />
Pressing and holding both<br />
buttons for 1 second activates<br />
the Shortcut Key. This<br />
will automatically calculate<br />
and set the correct ROFDelay<br />
setting necessary to cap<br />
your marker’s rate of fire just<br />
below 15 balls per second.<br />
The <strong>board</strong> will chirp, and the<br />
red and yellow LEDs will stay<br />
on to identify that the 15 bps<br />
cap has been activated.<br />
OPERATION<br />
Press the Power Button. The <strong>board</strong> will chirp and then power on, entering Vision firing<br />
mode. Press and hold the button for two seconds to power off the marker.<br />
If your Vision eyes become blocked by paint or debris, you may wish to switch to<br />
non-vision firing mode until you have time to clean and inspect them. The Power Button<br />
can be used to switch back and forth from non-Vision firing mode to Vision mode<br />
by pressing the button quickly and observing the chirp and change in light pattern<br />
from a steady glow to an interrupted blinking sequence.<br />
800.922.2147 www.smartparts.com<br />
09
IMPULSE ADJUSTMENT<br />
See the Modes section to<br />
learn what affect each <strong>Blackheart</strong><br />
adjustment will have on<br />
your marker.<br />
ADJUSTMENT TABLE<br />
Modes Light Color Mode Down Button Mode Up Button Range<br />
Dwell Solid Green Down Up 1-89<br />
ROFDelay Solid Red Down (faster) Up (slower) 1-91<br />
Firing Modes Single Blink Green Down Up 1 – 4<br />
Debounce Single Blink Red Down Up 0 – 25<br />
BSA (Bolt Stick Adjust) Double Blink Green Down Up 0 – 25<br />
Kick-In Rate Adjust Double Blink Red Down Up 1sps – 10sps<br />
Sustain Rate Adjust Fast Blink Green Down Up 1sps – 10sps<br />
Number of Shots to Enter Firing Mode Fast Blink Red Down Up 1 pull – 10 pulls<br />
Shortcut Key - Hold both buttons Green & Red 15 bps cap 15 bps cap N/A<br />
ADJUSTMENT<br />
To access the Mode Buttons inside the grip frame, remove the screws from the<br />
rubber grip on the left side of the gun. By pressing the Mode Down Button once,<br />
the <strong>board</strong> will enter into an Adjustment Mode. A solid yellow light indicates you are<br />
in Dwell Adjustment Mode. As you continue pressing the Mode Down Button, you<br />
will cycle through the modes which are each defined by a specific color and flash<br />
sequence (see chart).<br />
800.922.2147 www.smartparts.com<br />
10
IMPULSE ADJUSTMENT<br />
These Instructions Apply<br />
to the Impulse <strong>Blackheart</strong><br />
Upgrade.<br />
ADJUSTMENT (cont.)<br />
While in any of these modes, wait 4 seconds and the speaker will chirp to identify the<br />
current setting value for that mode. For example, if it was in the Dwell Setting Mode<br />
and the Dwell was set to 30, after 4 seconds the speaker would chirp 30 times.<br />
If you decide to leave the adjustment table without making any changes, simply pull<br />
and release the trigger one time, and the <strong>board</strong> will go back into its base (non-Vision)<br />
firing mode. CAUTION: If there is air charged in the gun, it will not be able to fire<br />
while in an Adjustment Mode. However, as soon as you release the trigger, you<br />
will be able to fire the gun.<br />
To change settings while the <strong>board</strong> is in any of the modes listed in the adjustment<br />
table, complete the following steps:<br />
1. Pull and hold the trigger for 3 seconds; the speaker will chirp 5 times to indicate<br />
that you can make adjustments.<br />
2. While the trigger is still being held, make an adjustment by pressing the Mode<br />
Down Button to adjust down, or the Mode Up Button to adjust up. The speaker<br />
will make a high pitched chirp for each adjustment up, and a low pitched chirp for<br />
each adjustment down.<br />
3. Once you have reached your desired setting, releasing the trigger will put the<br />
<strong>board</strong> back into non-Vision firing mode and save your new setting. The <strong>board</strong><br />
will chirp rapidly when it can’t go any higher or lower in the adjustment range.<br />
800.922.2147 www.smartparts.com<br />
11
MODE DESCRIPTION<br />
PLEASE READ CAREFULLY<br />
DWELL<br />
This adjusts how long solenoid valve is activated for each shot, and how long the bolt<br />
stays forward on each firing cycle. Too low of a Dwell will not allow the marker to fire,<br />
or cause it to fire with inconsistent velocity. If the Dwell is set too high you will lose<br />
gas efficiency. Refer to your marker’s manual for instructions to optimize your Dwell<br />
value.<br />
ROFDELAY<br />
This adjusts the minimum time the marker must wait between shots. Increasing the<br />
ROFDelay will raise the pause, slowing down how fast the marker can fire. Lowering<br />
the ROFDelay will decrease the pause, allowing the marker to shoot faster.<br />
FIRING MODE<br />
There are 4 different modes that you can cycle through while in the Firing Mode<br />
adjustment stage. Here are the different modes and their descriptions:<br />
1. [Semi-Auto] This mode is strictly semi-auto only. The kick-in rate and sustain rate<br />
are not applicable in this mode. Use this mode for playing in the NPPL Super 7 or any<br />
other field or event which doesn’t allow any ramping software. This mode is adjustable<br />
with DEBOUNCE and ROF.<br />
2. [3-Shot Burst] This firing mode is mostly for fun, and generally not legal at any tournaments<br />
or most paintball fields. For each pull of the trigger the gun will fire 3 shots.<br />
This mode is adjustable with ROF.<br />
3. [NXL Full-Auto] The name is just what it suggests, it fires one shot per trigger pull<br />
initially until a set number of trigger pulls have been completed, at which point holding<br />
down the trigger will result in repeated firing. If you happen to release the trigger, you<br />
have just under one second to pull it again and jump right back into Full Auto without<br />
the normally required kick-in shots. This mode is fully adjustable with KICK-IN RATE,<br />
NUMBER OF SHOTS TO ENTER FIRING MODE and ROF.<br />
800.922.2147 www.smartparts.com<br />
12
MODE DESCRIPTION<br />
PLEASE READ CAREFULLY<br />
4. [Rebound] This firing mode makes it much easier for any user to fire as fast as<br />
possible. It fires one shot per trigger pull at low rates of fire, but as the user pulls the<br />
trigger more frequently, Rebound responds by firing more rapidly. Rebound mode<br />
can be fully adjusted with KICK-IN RATE, SUSTAIN RATE, NUMBER OF SHOTS TO<br />
ENTER FIRING MODE and ROF.<br />
DEBOUNCE<br />
This setting will affect all firing modes, although it is normally only effective in Semi-<br />
Auto Mode. The lower you set the Debounce, the more sensitive it makes the trigger.<br />
If you set the Debounce too low and pull the trigger slowly, the kick of the marker<br />
might make it shoot more than once, which is not allowed in some tournaments and<br />
paintball fields. If you set the Debounce to 0, a Full Auto condition will result, which is<br />
prohibited at many fields and tournaments.<br />
BSA (Bolt Stick Adjustment)<br />
This setting affects all firing modes and is used to help compensate for any first shot<br />
drop-off (FSDO.) FSDO is when a gun’s first shot is very low in velocity compared to<br />
the subsequent shots - usually due to the bolt sticking in place. After the gun sits for<br />
10 seconds, the <strong>board</strong> will increase the Dwell setting to alleviate any first shot drop.<br />
The increase is based on the value of your BSA setting. If you do not experience any<br />
drop-off, then you should be at the lowest setting within the BSA to avoid the risk of<br />
hot gun penalties.<br />
KICK-IN RATE<br />
This setting affects REBOUND and NXL FULL AUTO; it refers to the shots per second<br />
you must reach by pulling the trigger before the <strong>board</strong> will “kick-in” to NXL Full Auto or<br />
Rebound. The higher the setting, the harder it will be to kick into either of the modes.<br />
The lower the setting, the easier it will be to kick in.<br />
800.922.2147 www.smartparts.com<br />
13
MODE DESCRIPTION<br />
PLEASE READ CAREFULLY<br />
SUSTAIN RATE<br />
This setting affects REBOUND; it refers to the shots per second you must sustain by<br />
pulling the trigger to keep the <strong>board</strong> “kicked in” to Rebound. The higher the setting,<br />
the faster you will have to pull the trigger to sustain the Rebound.<br />
NUMBER OF SHOTS TO ENTER FIRE MODE<br />
This setting affects REBOUND and NXL FULL AUTO; it adjusts how many shots are<br />
needed to be pulled in order for it to kick into Full Auto or Rebound Modes. You can<br />
adjust it from 1–10 pulls. This means that if it is set to 10, you must pull the trigger 10<br />
times before it will kick into the chosen mode.<br />
VISION TYPE (Shocker Version Only)<br />
This setting tells the <strong>Blackheart</strong> what type of Vision eye it will use. Type 1 - Shocker<br />
SFT Reflective Vision. Type 2 - Nerve. Type 3 - Shocker NXT Breakbeam Vision.<br />
Type 4 - Shocker NXT Toggle Vision. Types 3 and 4 are only supported on <strong>Blackheart</strong><br />
<strong>board</strong>s manufactured after August 2006. See the Shocker NXT manual for more<br />
information on Vision options.<br />
SHORTCUT KEY<br />
This affects all firing modes and is a handy feature. The Shortcut key will read the<br />
Dwell value and automatically calculate and set the ROF value to cap your marker at<br />
a maximum of 14.7 balls per second, for use where tournaments allow a maximum of<br />
15 balls per second. The Shortcut Key allows for a 0.3 bps margin of error. If you wish<br />
to bypass this margin of error and get as close as possible to a 15 ball per second cap<br />
as possible, adjust the ROFDely value manually.<br />
800.922.2147 www.smartparts.com<br />
14
TOURNAMENT SETTINGS<br />
PLEASE READ CAREFULLY<br />
IDEAL SETTINGS FOR MAJOR TOURNAMENT LEAGUES<br />
These settings are based on 2007 season rules. Check leagues for rule updates.<br />
NXL<br />
PSP<br />
NPPL<br />
Mode: NXL<br />
Kick-In Rate: 1<br />
Number of Shots to Enter Firing Mode: 3<br />
Use Shortcut Key to calculate and set ROFDelay for 15 bps limit<br />
Mode: Rebound<br />
Kick-In Rate: 1<br />
Sustain Rate: 1<br />
Use Shortcut Key to calculate and set ROFDelay for 15 bps limit<br />
Number of Shots to Enter Firing Mode: 3.<br />
Mode: Semi-auto<br />
Rebound: As low as possible without causing the trigger to “bounce”<br />
ROFDelay: minimum value that provides reliable operation.<br />
Millennium Mode: Rebound<br />
Series Kick-In Rate: 8<br />
Sustain Rate: 8<br />
Use Shortcut Key to set ROF<br />
Number of Shots to Enter Firing Mode: 3.<br />
CFOA<br />
Mode: Rebound<br />
Kick-In Rate: 1<br />
Sustain Rate: 1<br />
Use Shortcut Key to calculate and set ROFDelay for 15 bps limit<br />
Number of Shots to Enter Firing Mode: 3<br />
800.922.2147 www.smartparts.com<br />
15