Pre-Paint>Fuselage>Undercarriage>Assemble main gear - Jabiru
Pre-Paint>Fuselage>Undercarriage>Assemble main gear - Jabiru
Pre-Paint>Fuselage>Undercarriage>Assemble main gear - Jabiru

You also want an ePaper? Increase the reach of your titles
YUMPU automatically turns print PDFs into web optimized ePapers that Google loves.
<strong>Jabiru</strong> J160 Constructors Manual<br />
<strong>Pre</strong>-Paint>Fuselage>Undercarriage><strong>Assemble</strong> <strong>main</strong> <strong>gear</strong><br />
<strong>Pre</strong>-Paint>Fuselage>Undercarriage><strong>Assemble</strong> <strong>main</strong> <strong>gear</strong><br />
Objectives of this task:<br />
In this task you will assemble the <strong>main</strong> undercarriage legs, which includes fitting the axles,<br />
disc brakes and wheels and adjusting the brakes.<br />
Materials required:<br />
Cards # J8 ‘Dual Brakes’ and J21 ‘Main wheels’<br />
Brake fluid for assembly of disc brake pistons<br />
Spat brackets<br />
Fit the retained nuts to the spat mounting brackets<br />
using countersunk 3/32” rivets. There are 4 retained<br />
nuts (arrowed) on each bracket. Countersink the<br />
actual screw holes where the spat will be fitted: the<br />
countersinks will help to guide the screws into the<br />
holes when fitting the spats.<br />
Fit the axles and backing plates<br />
Slip the stub axle (from the ‘Main wheels’<br />
card) through the mounting plate with the<br />
brake unit facing towards the front of the<br />
aircraft and fit to the <strong>main</strong> <strong>gear</strong> leg as shown<br />
in the photo at right. The chamfered face of<br />
the plate is on the side that faces the <strong>gear</strong> leg.<br />
Align the bolt hole in the outboard end of the<br />
stub axle (arrowed in green at right)<br />
vertically and fix the plate in place 2 x AN5-<br />
16A bolts at the top and 2 x AN5-15A bolts<br />
at the bottom. The longer bolts are used at<br />
the top to allow for the spat bracket.<br />
Fit the spat bracket to the AN5 bolts with the<br />
captive nuts facing towards the wheel and<br />
with the notched surface to the bottom as<br />
shown below right.<br />
Fix in place with one Nyloc nut and washer<br />
on the top front bolt.<br />
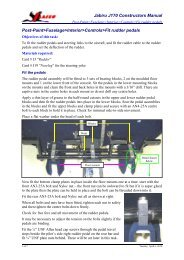
The <strong>gear</strong> leg shown in the photos on this<br />
page is a right-hand <strong>gear</strong> leg.<br />
Front of aircraft<br />
Front of aircraft<br />
Fit Nyloc nuts and flat washers to the 2 bottom bolts and a Nyloc nut with a penny washer to<br />
cover the adjustable slot at the top rear bolt. This slot will allow the spat to be moved up or<br />
down during final assembly. The slot must face the rear of the aircraft.<br />
Check that the bolt hole in the outboard end of the stub axle is positioned up and down before<br />
tightening the nuts firmly.<br />
Use a permanent marker to identify each leg as being either a right or left leg at this point – it<br />
can save confusion when you come to fit the <strong>gear</strong> legs in the next task.<br />
1 of 6 Friday, January 9, 2009
<strong>Assemble</strong> the brake pads<br />
<strong>Jabiru</strong> J160 Constructors Manual<br />
<strong>Pre</strong>-Paint>Fuselage>Undercarriage><strong>Assemble</strong> <strong>main</strong> <strong>gear</strong><br />
Fit the brake pads to the backing plates: there are 2 types of backing plates – flat and U<br />
channel.<br />
Both types take the same pads, but the shorter rivets are used on the flat backing plate.<br />
Face the angled side of the pad to the outside of the backing plate as shown in the photo of<br />
completed pads below right. Each brake pad is held in place by 3 rivets and the fitting process<br />
is as follows: fit all 3 rivets from the recessed hole in the pad through the pad and though the<br />
backing plate. Note that fitting the third rivet may need a slight touch with a drill to ease the<br />
rivet through the last hole.<br />
Seat the rivets by tapping the<br />
heads to make sure that each<br />
rivet is fully through the pad and<br />
the backing plate, then turn the<br />
assembly over and rest the head<br />
of the rivet on a protrusion* and<br />
flare the rivet using a tapered<br />
punch then use a flat punch to mushroom the end of the<br />
rivet over. The rivets should not be able to move when<br />
correctly fitted.<br />
*In the factory we use a simple jig that holds the backing<br />
plates over studs at each end and has 3 raised screws to<br />
hold the rivets up – you can see it in the riveting photos<br />
above.<br />
You could make up something similar in your workshop<br />
by screwing 3 screws into a solid wooden bench (use a<br />
backing plate for the spacing), all at the same height so<br />
that the brake pad just clears the bench and the head of<br />
each screw touches the head of each rivet, then place each brake pad and backing plate over<br />
them and use them to punch against.<br />
Check each brake pad and backing plate assembly carefully to see if there are any cracks in<br />
the pad, particularly around the end rivet holes. If there are any cracks call your dealer for a<br />
replacement pad and rivets: do not fit a cracked brake pad.<br />
The brake pad and backing plate assembly will be referred to as simply a pad from this point<br />
on. The U channel pad is the outer pad and the flat plate pad is the inner pad.<br />
2 of 6 Friday, January 9, 2009
<strong>Assemble</strong> the brake calipers<br />
In this step you will assemble the hydraulic disc brake calipers.<br />
<strong>Jabiru</strong> J160 Constructors Manual<br />
<strong>Pre</strong>-Paint>Fuselage>Undercarriage><strong>Assemble</strong> <strong>main</strong> <strong>gear</strong><br />
Cleanliness is essential when working with hydraulic brake parts, so clean your working area<br />
and your hands thoroughly before starting this step.<br />
Use compressed air to clean any dust and dirt from the inside of the brake calipers and<br />
pistons. Apply brake fluid to the O-rings and fit one to each piston, then apply a smear of<br />
brake fluid to the inside of the caliper and fit the pistons to the calipers: press the piston gently<br />
into the caliper with the cupped side of the piston facing outwards.<br />
Thread and tighten a bleed<br />
nipple into the lower fitting on<br />
the caliper (under the <strong>Jabiru</strong><br />
logo) and push a blanking plug<br />
into the top fitting as shown at<br />
right – the brake lines will be<br />
fitted later in Post-Paint and the<br />
blanking plug will keep the<br />
caliper sealed until then.<br />
Wash any brake fluid off your hands with soap and water – it can irritate sensitive skin.<br />
Refer to the drawing on the next page for an overview of the brake system.<br />
3 of 6 Friday, January 9, 2009
<strong>Jabiru</strong> J160 Constructors Manual<br />
<strong>Pre</strong>-Paint>Fuselage>Undercarriage><strong>Assemble</strong> <strong>main</strong> <strong>gear</strong><br />
4 of 6 Friday, January 9, 2009
<strong>Assemble</strong> the brake and wheel<br />
Firstly and very importantly place the alloy washer<br />
(#6A028B0D on the ‘Main wheels’ card) on the stub axle<br />
with the tapered inner side towards the <strong>gear</strong> leg and away<br />
from the wheel – this washer (circled at right) provides a<br />
square surface for the inner wheel bearing to butt up to.<br />
Now we can fit the appropriate wheel (left or right) to each<br />
<strong>gear</strong> leg and then fit the brake system.<br />
<strong>Jabiru</strong> J160 Constructors Manual<br />
<strong>Pre</strong>-Paint>Fuselage>Undercarriage><strong>Assemble</strong> <strong>main</strong> <strong>gear</strong><br />
Fit the wheel to the stub axle and secure with the axle extension, fitting an AN3-12A bolt<br />
though the extension and the axle from the top with a lock nut on the bottom.<br />
Take the U channel backing plates and the<br />
steel lock nuts. Fit a bolt through the<br />
backing plate from the pad side and into the<br />
nut and very carefully apply a drop of<br />
Superglue to 2 opposite flats of the steel<br />
lock nut and then pull the steel lock nut<br />
back into the U channel as shown arrowed<br />
at right to glue the nut into the U channel:<br />
Take care not to glue the bolt into the nut!<br />
Look carefully at the drawing on the<br />
previous page to see how the brake assembly fits together.<br />
Pull bolt back this way<br />
Glue nut<br />
in here<br />
As you can see from the drawing the outer pad goes on the outside of the wheel disc, while<br />
the inner pad goes between the wheel disc and the brake mounting plate and the hydraulic<br />
caliper goes behind or inboard of the inner mounting plate.<br />
2 AN4-14A bolts, each with a washer, secure the whole assembly and each bolt has a spring<br />
that is fitted over the bolt and which holds the brake pads apart. In the factory we fit the top<br />
bolt first with no spring in order to get the correct alignment and then fit the bottom bolt and<br />
spring, then go back to the top bolt and fit the spring.<br />
5 of 6 Friday, January 9, 2009
Adjust the brakes<br />
<strong>Jabiru</strong> J160 Constructors Manual<br />
<strong>Pre</strong>-Paint>Fuselage>Undercarriage><strong>Assemble</strong> <strong>main</strong> <strong>gear</strong><br />
The objective is to have a wheel that will turn freely while at the same time not having the<br />
brake pads too far away from the disc.<br />
In order to achieve this it may be necessary to slightly bend the brake mounting plate away<br />
from the disc – loosen the <strong>main</strong> bolts just enough that the outer pads are 1 or 2mm away from<br />
the disc and check just the clearance between the inner backing plate and inner pads.<br />
If the inner pad is rubbing and making it difficult to turn the wheel, gently bend the brake<br />
mounting plate slightly away from the disc until the wheel can turn freely but with the pad<br />
just touching the disc.<br />
Now tighten the <strong>main</strong> bolts up until the outer pad just starts to bind on the disc and then back<br />
the bolts off slightly, perhaps one third to one half of a turn. At this point the wheel should<br />
turn freely and the brake pads should still be very close to the disc.<br />
In the photo at right you<br />
can see the finished brake<br />
assembly, fully adjusted.<br />
Note that there is very little<br />
clearance between the disc<br />
and the brake pads.<br />
Note also the springs on<br />
the bolts that hold the pads<br />
apart.<br />
At the left of the photo you<br />
can see the spat bracket<br />
with the captive nut visible.<br />
Brake mounting<br />
plate<br />
Brake disc<br />
Brake caliper<br />
Inner pad<br />
Outer pad<br />
Main bolt<br />
Tire<br />
This completes the <strong>Pre</strong>-Paint>Fuselage>Undercarriage><strong>Assemble</strong> <strong>main</strong> <strong>gear</strong> task.<br />
6 of 6 Friday, January 9, 2009