Hardie Slim-Dial Controller Owner's Manual - Irrigation Direct
Hardie Slim-Dial Controller Owner's Manual - Irrigation Direct
Hardie Slim-Dial Controller Owner's Manual - Irrigation Direct

You also want an ePaper? Increase the reach of your titles
YUMPU automatically turns print PDFs into web optimized ePapers that Google loves.
Operator’s <strong>Manual</strong><br />
6 VALVE INDOOR CONTROLLER<br />
mI<br />
James <strong>Hardie</strong><br />
<strong>Irrigation</strong>
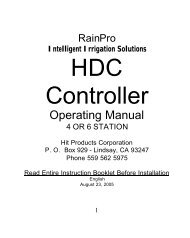
1. Introduction What is a Watering Cycle?<br />
Each watering cycle opens and closes all the valves ossigned to a program, in sequence,<br />
starting with the lowest valve number. For example, in the sample watering plan shown,<br />
program A has two start times which initiate two watering cycles. All four valves in the program<br />
water in sequence, two times each day, once at 7:OOam and once at 5:OOpm. This controller<br />
is designed to operate up to six valves. It can be set to start two watering cycles per program.<br />
Each of the two programs are completely independent of each other giving you the freedom<br />
to include any combination of valves<br />
in each program and the ability to<br />
select different watering days and<br />
start times for each program. After<br />
programming, write your watering<br />
plan in pencil on the back of the<br />
programming reference card, located<br />
in the controller pull-out pocket. For<br />
the days you have selected in<br />
programs A and B, each programmed<br />
start time turns on each selected valve<br />
in sequence, from the lowest valve<br />
number to the highest valve number.<br />
05<br />
1 I I<br />
Sample Watering Plan<br />
Valve Run<br />
Program & Water Start Times V!/ Time Duration<br />
A Su, Tu, Th, FR (#l) 7:OOom 1, 2, 3, 5 10 minutes (1, 3, 5)<br />
15 minutes (2)<br />
(#2) 5:OOpm Same as above Same as above<br />
B Odd Days (#l) 5:OOam 4,5,6 10 minutes each (4,5,6)<br />
II. Guided Programming (Optional)<br />
In guided programming, the controller display prompts you to enter data for items by flashing<br />
the appropriate A. It automatically prompts you to supply information about the current<br />
time and date, program start time(s), valve run time(s) and watering days for program A<br />
and program B. After all items are entered, an “OK” will be flashed five times to verify<br />
programming is complete. If you have not entered the required data during the guided<br />
programming session, the controller will flash the message "- - - -", and prompt you for<br />
the missing data. The purpose of guided programming is to allow you to enter a program<br />
without this manual.
Note: Programs A and B - Each program is simply a set of instructions that direct which<br />
valves to run for how long and on which days , If you need four start times or<br />
extra long watering times, you will need to use both programs. However, in most<br />
roses one program will be sufficient.<br />
III. <strong>Dial</strong> Programming<br />
Use dial programming to set all elements of your program without the help of guided<br />
programming or to simply review and update existing program information.<br />
To begin, set dial to GUIDED PROGRAM. Th‘IS will lead you through five easy steps.<br />
Use the + and - buttons to increase or decrease times. Use the 4 button to enter your<br />
selection and to advance to the next step. After setting the time and date, program A<br />
(or B) will flash. You will be prompted to complete program A. If required, you may<br />
continue with program B by pressing the A/B button. After the final programming step,<br />
the controller will flash “OK”. You will then be prompted to set-up the other program, B<br />
(or A), if desired. After all desired programming is done, set dial to RUN position to begin<br />
automatic operation.<br />
Hint: Plug in 9 volt alkaline battery to allow progromming at your kitchen table. Mount<br />
the controller after programming by battery.<br />
Setting Time and Date<br />
I.<br />
2.<br />
3.<br />
4.<br />
5.<br />
Set the dial to the TIME/DATE position.<br />
Year: Use the + and - buttons to change the year.<br />
Month: Press the 4 button to set the month. Use the + and - buttons to change<br />
the month.<br />
Day: Press the 4 button to set the day of the month. Use the + and - buttons to<br />
change the day of the month. The day of the week (e.g. Sunday, Tuesday, etc.) IS<br />
automatically indicated by the A pointing to the correct day.<br />
Time: Press the 4 button to set the time. The hour, minute, and AM or PM will<br />
flash. Use the + and - buttons to change the time shown on the display.<br />
(Continuous pressure on the button longer than 3 seconds causes rapid change.)<br />
Guided Programming Steps<br />
1.<br />
1. TIME/DATE Enter the year, the month, the date and the time. This will set the<br />
controller’s internal timing. Use + and - buttons to increase or decrease values and<br />
the 4 button to go to the next step.<br />
2.<br />
3.<br />
4.<br />
5.<br />
PROGRAM A or B. Select either program A or B. Press the A/B button to select.<br />
Press the 4 button to go to the next step.<br />
START TIME. Enter the program watering start time(s). Each program can hove up<br />
to two start times. (Two start times allow watering twice a day.)<br />
VALVE RUN TIME. Enter the length of time that each valve is to run. You may<br />
select a few minutes for aCI light sprinkling, or you may set the valve to remain open<br />
for up to four hours for applications such as drip. (The valve is off when the run time<br />
is set to zero minutes and the display shows “OFF”). Press + or - buttons to increase<br />
or decrease the minutes of run time per valve. Press the 4 button to go to the<br />
next valve or to the next step.<br />
WATER DAYS. Enter which days should be watering days. You may select particular<br />
days of the week, all odd days or all even days. Press the + button to turn days on and the<br />
- button to turn days off. Press the 4 button to go to the next day or to the next step.<br />
Return the dial to the RUN position after you have completed programming<br />
3
Selecting Program Start Times<br />
Each program has two start times available. You may use the second start time to<br />
water more than once per day.<br />
1. Set the dial to the START TIME position.<br />
2. Select program A or B by pressing the A/B button.<br />
3. Use the + and - buttons to change the start time.<br />
(Continuous pressure on the button, longer than 3 seconds,<br />
causes rapid change.)<br />
4. Press the 4 button to select the next start time.<br />
Setting Valve Run Times<br />
Follow the steps below to program how long each valve will water.<br />
1.<br />
2.<br />
3.<br />
4.<br />
Set the dial to the VALVE RUN TIME position.<br />
Select program A or B.<br />
The display will flash the valve number , the run time for<br />
that valve, and will show the program letter selected (A or B)<br />
Use the + and - buttons to change the time shown on the<br />
display. (Continuous pressure on the button, longer<br />
than 3 seconds, causes rapid change.)<br />
5.<br />
6.<br />
7.<br />
Press the 4 button to advance to the next valve.<br />
Repeat steps 4 and 5 for each valve.<br />
You may set valve run times from zero minutes to four hours.<br />
Canceling a Program Start Time<br />
1. With the dial set to the START TIME position, use the +<br />
and - buttons to set the start time to Off, (which is between<br />
the times of 11:59pm and 12:OOam). (E.g. 11:58pm...<br />
11 :59pm... OFF... 12:00am... 12:Ol am...). To accomplish<br />
this, you can go forward or backward in time.<br />
2. If a program has both start times turned off, then that<br />
program is Off. (All other program details are retained).<br />
Because there are no start times, there will be no watering<br />
with that program. This is a convenient way to stop one<br />
program without turning the dial to the OFF position.<br />
You may need the other program to water.<br />
Selecting Days to Water<br />
1. Set the dial to WATER DAYS.<br />
2. Select program A or B.<br />
3. The controller displays currently programmed day information.<br />
This dial positron provides three different water day options<br />
specific days of the week, odd days, or even days.<br />
Selecting Specific Days of the Week<br />
1. Press the + button to turn on a particular day of the week<br />
to water. Press the - button to turn watering off that day.<br />
2. Press the 4 button to advance to the next day of the week.<br />
3. Repeat steps I and 2 until all desired days have been selected. The selected days A’s<br />
will show at the top of the display to indicate their status as ON.<br />
5
off<br />
Use this dial position to turn off watering, such as when it is raining or you don’t want<br />
watering. As long as the dial is in the OFF position, watering programs will not be<br />
activated automatically. The OFF position is also used to terminate all running program<br />
A and B watering cycles, whether manual or automatic.<br />
1. Set the dial to the OFF position. Valves currently watering will be turned off after dial<br />
is in OFF position for at least two seconds. All active programs are discontinued<br />
and watering is stopped.<br />
2. To return controller to normal automatic operation, simply<br />
return dial to RUN position.<br />
Selecting Odd or Even Days<br />
1. Press the 4 button for Odd Days and once again for Even Days. The A will flash<br />
under your choice.<br />
2. Press the + button to select or the - button to cancel either Odd Days or Even Days.<br />
The previously selected days of the week will revert to if Odd Days or Even Days<br />
is canceled.<br />
Note: The 31st of any month and the 29th of February of a leap year, are always treated<br />
as Off days in Odd Days watering.<br />
R U/J<br />
After programming, set dial to RUN to enable automatic execution of all selected programs<br />
and start times.<br />
Warning: In warm weather you may experience landscape damage if the dial is<br />
left unintentionally in the OFF position for extended periods of time. Always return<br />
the dial to RUN posifion if automatic operation is desired.<br />
Program Review<br />
You can review the contents of programs A and B by setting the dial to OFF position and<br />
then pressing the 4 button. The display will first show you the contents of program A<br />
including which start times are activated, which valves are activated, and which watering<br />
days are activated. Each active element will have a A or a number illuminated. By<br />
pressing the 4 button again you will see the active elements of program B. Always<br />
remember to set the dial to RUN position to return to automatic operation.<br />
Ten Second Valve Delay<br />
Note: During operation you will notice a 10 second delay between the time a valve shuts off<br />
and the next valve opens. This is to prevent water pressure damage to your system.<br />
6<br />
7
<strong>Manual</strong> Program Cycle<br />
Use this feature to manually start a program. For example, this can be used to start a program<br />
an extra time on a particularly hot day.<br />
Select the valves to water and their watering duration by repeating step 2 for<br />
the remaining valves.<br />
Set the dial to the RUN position. Valves will water sequentially for the set time<br />
with the operating valve’s A blinking during its manual watering operation.<br />
Turn the dial to OFF position for longer than 2 seconds to discontinue the manual<br />
valve program. (Always return dial to RUN position to enable automatic operation).<br />
5.<br />
6.<br />
Set the dial to the MANUAL PROGRAM CYCLE position.<br />
Select program A or B<br />
Press the + button to select manual program cycle<br />
Press the 4 button until the desired starting valve is displayed. That valve and all<br />
subsequent valves in the selected program will water in sequence.<br />
Return the dial to the RUN position to begin the manual watering cycle. Display shows<br />
MANUAL PROGRAM CYCLE A, program A or B, valve number A, and counts<br />
down the run time for each active valve.<br />
Turn the dial to the OFF position for longer than 2 seconds to discontinue the manual<br />
program cycle. (Always return dial to RUN position to enable automatic operation.)<br />
NOTE: You may advance through a running cycle by pressing the 4 button to skip any<br />
undesired valve(s). (This is handy during system testing.)<br />
V. Installation<br />
Selecting an Installation Site<br />
Install the controller with the display at eye level. If you will be using a pump, the controller<br />
must be mounted at least 15 feet (4.5m) away from your pump start relay and pump. Do not<br />
plug the controller into any power circuit serving a refrigerator, a pump or an air conditioner.<br />
WARNING: This controller is designed for indoor installation only. Installing this<br />
controller outdoors will void the warranty and may result in an electric shock hazard.<br />
<strong>Manual</strong> Valve<br />
Use this feature to start one or more valves watering sequentially for a selected<br />
period of time.<br />
To Select Valves for Timed <strong>Manual</strong><br />
1. Set the dial to the MANUAL VALVE position.<br />
2. The valve 1 A will flash. You may use the + and - buttons to select the amount of<br />
time for valve 1 to water or you may skip to the next valve by pressing the 4 button.<br />
Mounting the <strong>Controller</strong><br />
To mount the controller use the mounting template sheet included or the following<br />
instructions.<br />
1. Determine mounting height and center position. From this location mark a point 3 l/2”<br />
(89 mm) to the right and 3 l/2” (89mm) to the left. Drive a screw into the wall at each<br />
point leaving approximately l/2” (13mm) of the screw exposed. (Pre-drill holes for these<br />
screws to make the iob easier.) Hang the controller on the two exposed screw heads.<br />
2. To secure the controller, remove door and drive the third screw through the bottom<br />
mounting hole in the controller. (Pre-drill a hole for the securing screw as you did<br />
for the first two screws.)<br />
8<br />
9
Do not plug transformer into power source until the controller is mounted and ALL<br />
valves have b een connected.<br />
3. If you have not already done so, connect a 9-volt alkaline battery to battery clip.<br />
DO NOT use a rechargeable battery The display will Illuminate under normal conditions.<br />
If any unexpected display characters show, simply disconnect and reconnect the battery.<br />
After a few minutes the display will go blank under battery power. Turn dial to illuminate<br />
display. The battery is designed as a memory retention feature only. Valves will only<br />
operate with power supplied by the transformer<br />
WARNING:<br />
A maximum load of 6 VA (which is equivalent to one <strong>Hardie</strong> or Richdel valve) may be<br />
connected to each numbered valve terminal. A maximum load of 12 VA may operate<br />
simultaneously (i.e. one valve at a time in addition to the master valve or pump start relay).<br />
I- - <strong>Slim</strong><strong>Dial</strong> T<br />
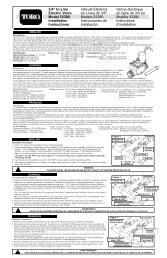
Connecting the Valves & Transformer<br />
DO NOT try to connect the controller directly to an outlet. This WILL destroy the controller<br />
and may result in electric shock or fire hazard. Please use only single strand multi-colored<br />
irrigation wire for your installation.<br />
1<br />
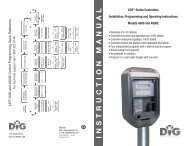
Connecting a Pump Start Relay<br />
The controller must be mounted at least 15 feet (4.5m) away from both the pump start<br />
relay and the pump. When a pump is to be operated by the controller, a pump start relay<br />
must be used. The relay coil should be connected to the master valve output terminal marked<br />
MV and the common terminal C at the controller. The relay coil must be rated for 24 VAC at<br />
250 mA maximum. The relay contacts will be connected to the pump start terminals and must<br />
be rated for use with your particular pump. (See diagram). In addition, a high pressure relief<br />
mechanism is recommended. See your pump dealer for more information.<br />
1., . Connect the transformer wires to the two screws marked AC. Do not plug in<br />
transformer until after all valves have been connected.<br />
2. Connect valve #l wire to screw marked 1 and the “valve common” wire to main common<br />
wire which feeds back to the controller. Typically, you will have all of your valves grouped<br />
together. From this valve group you will send your multi-colored wire bundle back to<br />
the controller. Then, the single common wire is connected to the common terminal<br />
screw marked C. (See diagram.) In some cases, you may have more than one common<br />
wire. One from the front yard and one from the back yard. All commons get connected<br />
to the terminal screw marked C. If a number of commons are required, you may need to<br />
use a “wire nut” to combine these commons together with a lead wire. The single lead wire<br />
is then connected to the common terminal screw marked C. Back screw out until head<br />
is l/8” above plastic partition. Bend bare copper wire in clockwise hook (only expose l/2”<br />
I ,<br />
_<br />
ot bare copper trom end ot wire to reduce short circultlng of two adjacent wires). Slip wire<br />
hook under screw head and tighten screw until wire is secure.<br />
3. Repeat step 2 for all valves.<br />
WARNING: Make sure the power transformer is unplugged while making connections to any<br />
station terminal or the master valve/pump terminal.<br />
PUMP START RELAY<br />
CONTACTS MUST<br />
ACCOMMODATE PUMPS<br />
ELECTRICAL RATING<br />
Master Valve/Pump Start<br />
The Master Valve/Pump Start will operate whenever any valve is on. This allows a pump<br />
to draw water from a well or other source, or opens the master valve whenever watering<br />
occurs. The practice of using a pump is common in some areas and rare in others. (If<br />
you do not have a pump start or master valve installed, you will not notice this feature.)<br />
PUMP<br />
10<br />
11
WARNING: If a pump start relay is installed you must use a jumper wire from each unused<br />
terminal screw to a numbered terminal screw in use. This is<br />
damaging<br />
your pump,<br />
which may burn out the pump motor.) Neglecting to jumper<br />
damage your pump during default program execution.<br />
Note: This controller is only intended for use in an automatic irrigation system.<br />
This controller is equipped with a circuit breaker that automatically protects the controller<br />
if a short circuit occurs. With a back-up battery in use, If the controller indicates that valves<br />
are running but no watering is taking place, a short circuit might exist in either the wiring<br />
or the valves. With no back-up battery in use (or a discharged battery), the controller will<br />
react as though it has experienced a power failure every day. The controller circuit breaker<br />
will protect the controller by shutting off all operations and resetting to factory defaults.<br />
DO NOT connect the master valve terminal directly to the pump terminals. This WILL damage<br />
the controller.<br />
Wiring Skirt/Conduit Adapter<br />
The Wiring Skirt/Conduit<br />
Adapter is used to hide all of the<br />
valve wires. You may run your<br />
valve wires up the wall inside<br />
3/4” PVC pipe and then fit the<br />
Wiring Skirt/Conduit Adapter<br />
over your wires and attach to<br />
the wall with the two screws<br />
included.<br />
3/4” PVC Pipe<br />
To<br />
1.<br />
2.<br />
3.<br />
4.<br />
5.<br />
6.<br />
7.<br />
8.<br />
9.<br />
10.<br />
11<br />
diagnose and resolve a short circuit follow the steps below:<br />
Unplug the transformer and battery, and wait one minute.<br />
Now plug in the transformer but not the battery.<br />
Set the controller dial to MANUAL VALVE position.<br />
Set each valve to 1 minute of run time.<br />
Return the dial to RUN position.<br />
Watch the display as each valve completes its run time.<br />
Normally, only one valve will be faulty. Soon after the faulty valve’s 10 second delay,<br />
the controller display will go blank. (See page 6 which discusses 10 second delay.)<br />
The valve that causes the display to go blank is faulty. Typically, either the<br />
wiring to this valve or the solenoid for this valve has a short circuit<br />
Disconnect the wire to this valve at the controller terminal screw and confirm that<br />
without this valve your system is working properly. Repeat steps 1 through 6 to confirm<br />
that the display does not go blank with any other valves. (If using a pump, you must<br />
jumper any unused controller terminal screws to a terminal screw that is functioning<br />
properly. See page 12 which discusses the use of a jumper).<br />
Notify your irrigation professional to complete repairs, If necessary.<br />
After repairs are completed reconnect battery and reset programs and time.<br />
Wires from<br />
VCllWS<br />
Power failures<br />
Due to the possibility of power failures, the controller has a factory-set safety default program<br />
which assures watering even if your programs have been lost due to a discharged or missing<br />
back-up battery. The default program is set to run all six valves for ten minutes each, every<br />
day of the week. The default is factory set in Program A.<br />
Technical Assistance<br />
For additional assistance, call our Customer Service Hot-line at l-800-231-5117.<br />
Note: You may change Program A fo suit your needs without affecting the default. you may<br />
change all the programs to suit your specific needs, without effecting the factory default values.<br />
There is no factory default required for program B.<br />
12<br />
13
This equipment has been tested and found to comply with the limits for a class B digital device,<br />
pursuant to Part 15 of the FCC Rules. These limits are designed to provide reasonable protection<br />
against harmful interference in a residential installation. This equipment generates, uses and<br />
can radiate radio frequency energy and, if not installed and used in accordance with the<br />
instructions, may cause harmful interference to radio communications. However, there is no<br />
guarantee that interference will not occur in a particular installation. If this equipment does<br />
cause harmful interference to radio or television reception, which can be determined by turning<br />
the equipment off and on, the user is encouraged to try to correct the interference by one or<br />
more of the following measures:<br />
• Reorient or relocate the receiving antenna.<br />
• Increase the separation between the equipment and receiver.<br />
• Connect the equipment into an outlet on a circuit<br />
different from that to which the receiver is connected<br />
• Consult the dealer or an experienced radio/TV<br />
technician for help.<br />
This equipment has been verified to comply with the limits for a class B computing device,<br />
pursuant to FCC rules. In order to maintain compliance with FCC regulations, shielded cables<br />
must be used with this equipment. Operation with non-approved equipment or unshielded<br />
cables is likely to result in interference to radio and TV reception. The user is cautioned that<br />
changes and modifications made to the equipment without the approval of manufacturer could<br />
void the user’s authority to operate this equipment.<br />
q<br />
James<br />
<strong>Hardie</strong><br />
<strong>Irrigation</strong><br />
In U.S.A.:<br />
James <strong>Hardie</strong> <strong>Irrigation</strong>, Inc.<br />
27631 La Paz Road<br />
Laguna Niguel, CA 92656<br />
U.S.A.<br />
For Technical Support<br />
Call: l-800-231-5117<br />
In Australia:<br />
James <strong>Hardie</strong> <strong>Irrigation</strong> Pty Limited<br />
A.C.N. 007 0664 315<br />
53 Howards Road<br />
Beverley SA 5009<br />
PO Box 40<br />
Kilkenny SA 5009<br />
Australia<br />
Telephone: 13 1588<br />
Fax: (08) 243 2488<br />
Part Number 851701 Rev. A<br />
0 James <strong>Hardie</strong> <strong>Irrigation</strong> 1/95<br />
14