Installation and Operation Manual - Neptronic
Installation and Operation Manual - Neptronic
Installation and Operation Manual - Neptronic

You also want an ePaper? Increase the reach of your titles
YUMPU automatically turns print PDFs into web optimized ePapers that Google loves.
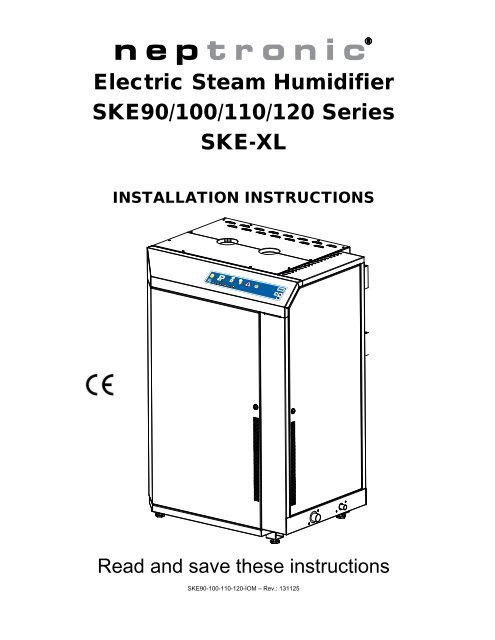
Electric Steam Humidifier<br />
SKE90/100/110/120 Series<br />
SKE-XL<br />
INSTALLATION INSTRUCTIONS<br />
Read <strong>and</strong> save these instructions<br />
SKE90-100-110-120-IOM – Rev.: 131125
SKE90/100/110/120 Steam Humidifier<br />
Safety<br />
ELECTRICITY All work concerned with electrical installation MUST only be performed by skilled <strong>and</strong><br />
qualified technical personnel (e.g. electrician or technician with appropriate training).<br />
The customer is always responsible for ensuring the suitability of the technical<br />
personnel.<br />
Please observe the local regulations concerning the provision of electrical<br />
installations.<br />
HEALTH &<br />
SAFETY<br />
<strong>Neptronic</strong> ® has considered aspects of the design of their humidification systems to<br />
reduce as far as possible the risk of Legionnaires’ disease <strong>and</strong> other similar<br />
conditions but it is important that users are also aware of their responsibilities.<br />
To prevent the growth of Legionella, users are required to:<br />
Avoid water temperature that favors the growth of Legionella 20-45˚C.<br />
Avoid water stagnation.<br />
Clean <strong>and</strong> disinfect the humidification system.<br />
<br />
Have a competent person carry out a risk assessment of the water system<br />
supplying the humidifier to ensure the water supply is of an acceptable<br />
quality<br />
CORRECT USE <strong>Neptronic</strong> ® systems <strong>and</strong> products are designed only for humidification use.<br />
Any other application is not considered use for the intended purpose. The<br />
manufacturer cannot be made liable for any damage resulting from incorrect use.<br />
ACCESS NEVER LEAVE SKE-XL CABINET KEYS IN THE DOORS AS UNAUTHORIZED<br />
ACCESS TO LIVE ELECTRICAL PARTS MAY BE GAINED – ALWAYS STORE<br />
KEYS CENTRALLY WITH NOMINATED RESPONSIBLE PERSON.<br />
WATER <strong>Neptronic</strong> ® systems are designed to be used with mains, reverse osmosis,<br />
demineralized or partially softened water. On no account attempt to introduce any<br />
other fluid or chemical into the system without first consulting <strong>Neptronic</strong> ® or its<br />
authorized distributor.<br />
Water supply must not exceed the max pressure of 480 kPa, or pressure limits laid<br />
out in the Specification <strong>and</strong> <strong>Installation</strong> Instructions, <strong>and</strong> should comply with local<br />
regulations.<br />
1
SKE90/100/110/120 Steam Humidifier<br />
Foreword<br />
Foreword This installation <strong>and</strong> operation manual has been developed to facilitate the<br />
installation <strong>and</strong> the operation of the SKE-XL series electric steam humidifier. The<br />
strict application of these instructions will ensure the conformity of the installation<br />
<strong>and</strong> operation to the manufacturer's recommendations.<br />
The application of these instructions is one of the conditions of the warranty.<br />
The application of these instructions does not ensure at any time conformity with the<br />
rules in force of the country of destination.<br />
This product has been declared to conform to applicable European safety <strong>and</strong><br />
electromagnetic compatibility st<strong>and</strong>ards <strong>and</strong> directives <strong>and</strong> bear to CE mark. The<br />
certificate of conformity CE is available up request to the manufacturer.<br />
Copyright © 2013: All rights reserved, this document cannot be reproduced totally or<br />
partially by any means whether, electronic, mechanical, photocopy, recording or<br />
other, without prior written authorization of National Environmental Products Ltd.<br />
Manufacturer<br />
Presentation<br />
National Environmental Products Ltd (NEP) is the owner of the <strong>Neptronic</strong> ® br<strong>and</strong><br />
NEP develops, manufactures <strong>and</strong> services a complete line of:<br />
Electric Steam humidifiers for Residential application,<br />
Gas fired Steam humidifiers for Commercial application,<br />
Steam to Steam <strong>and</strong> Direct Injection Steam humidifiers for Commercial<br />
application,<br />
Actuators to regulate air dampers or valves,<br />
Electric heaters,<br />
Humidistats, thermostats <strong>and</strong> other control peripherals used to control HVAC<br />
equipment,<br />
For more information about our products, visit our web site at www.neptronic.com<br />
Each <strong>Neptronic</strong> ® product benefits from over 25 years of experience of our qualified<br />
staff. From the inspiration to realization, innovation has been the st<strong>and</strong>ard in design.<br />
As the result of this dedication, NEP Ltd. owns several patents, notably the Anti<br />
Foaming Electronic Controller (AFEC).<br />
Manufacturing is conducted on the premises of our modern 7 000m 2 (80,000 sq.ft)<br />
facility in Montreal, Canada.<br />
Our quality system is built on the ISO 9001 model.<br />
Our vision ''Customer for Life'' is realized by listening to customer needs <strong>and</strong> by<br />
supplying products, which exceed expectations in quality, functionality <strong>and</strong> durability.<br />
<strong>Neptronic</strong> ®<br />
Toll free in North America: 1 800 361-2308<br />
Tel.: (1) (514) 333-1433<br />
Fax: (1) (514) 333-3163<br />
Customer service Fax: (514) 333-1091<br />
Business hours: from Monday to Friday, 8:00am to 5:00pm (Eastern time)<br />
2
SKE90/100/110/120 Steam Humidifier<br />
Table of content<br />
Safety .................................................................................................................................................... 1<br />
Foreword ............................................................................................................................................... 2<br />
Table of content ................................................................................................................................... 3<br />
Technical Specifications ..................................................................................................................... 4<br />
Dimensions & Weights ........................................................................................................................ 5<br />
<strong>Installation</strong> Overview ........................................................................................................................... 7<br />
Stage 1 – Unit Positioning <strong>and</strong> Mounting .......................................................................................... 8<br />
Stage 2 – Steam Distribution <strong>Installation</strong> .......................................................................................... 9<br />
Stage 3 – Water Supply <strong>Installation</strong> ................................................................................................. 12<br />
Stage 4 – Water Drain Connection ................................................................................................... 13<br />
Stage 6 –Electrical Control Connections ......................................................................................... 15<br />
Humidity signal set-up ...................................................................................................................... 19<br />
Initial verification & Start up ............................................................................................................. 21<br />
Commissioning – <strong>Operation</strong> description ......................................................................................... 22<br />
<strong>Operation</strong> display ............................................................................................................................... 23<br />
List of alarms ...................................................................................................................................... 24<br />
Programming mode ........................................................................................................................... 25<br />
Wiring diagram ................................................................................................................................... 27<br />
General conditions of sales & warranty .......................................................................................... 28<br />
3
SKE90/100/110/120 Steam Humidifier<br />
Technical Specifications<br />
Model<br />
Steam cap.<br />
[kg/h]<br />
Power<br />
(kW)<br />
3D opened view<br />
(Illus.1)<br />
Current (A)<br />
400V / 3ph<br />
Nb of<br />
outlets<br />
Multi-Steam<br />
header diam.<br />
[mm]<br />
SKE90 90 66 96 1 Ø76 mm<br />
SKE100 100 74 107 1 Ø76 mm<br />
SKE110 110 82 119 2 Ø76 mm<br />
SKE120 120 90 130 2 Ø76 mm<br />
Notes: Maximum static duct pressure is 1.25 kPa. For higher static duct pressures please consult <strong>Neptronic</strong> ® or its<br />
authorized distributor.<br />
4
SKE90/100/110/120 Steam Humidifier<br />
Dimensions & Weights<br />
C<br />
E<br />
D<br />
B<br />
Power<br />
supply inlet<br />
A<br />
Electrical<br />
controls<br />
inlet<br />
H<br />
I<br />
L<br />
K<br />
G<br />
F<br />
J<br />
Front view<br />
(Illus. 2)<br />
Back view<br />
(Illus. 3)<br />
General Dimension & Weight<br />
Model<br />
SKE90<br />
SKE100<br />
SKE110<br />
SKE120<br />
Dimensions in mm<br />
Weight in kg<br />
Full of<br />
A B C Empty<br />
water<br />
1221 838 635 145 200<br />
Water Inlet, Steam <strong>and</strong> main Drain outlets Dimensions<br />
Model<br />
SKE90<br />
SKE100<br />
SKE110<br />
SKE120<br />
No of<br />
Steam<br />
Outlets<br />
Steam<br />
Outlet<br />
Diam.<br />
D<br />
Dimensions in mm<br />
Drain Water<br />
E Outlet Inlet<br />
Diam Diam<br />
1 Ø76 462 n/a Ø20<br />
2 Ø76 462 230 Ø20<br />
5<br />
1/2”<br />
NPT<br />
1/2"<br />
NPT<br />
F<br />
G<br />
383 190<br />
383 190<br />
Note: Drain outlet <strong>and</strong> water supply inlet are located on the right h<strong>and</strong> side of the humidifier. Left h<strong>and</strong> side location of any of<br />
is available upon request.<br />
Electrical inlets <strong>and</strong> Pan drain outlet Dimensions<br />
Model<br />
SKE90<br />
SKE100<br />
SKE110<br />
SKE120<br />
Electrical<br />
KO Diam.<br />
Dimensions in mm<br />
Pan Drain<br />
H I J<br />
Outlet Diam.<br />
Ø22 & 35 670 569 55 Ø15 488 25<br />
K<br />
L
SKE90/100/110/120 Steam Humidifier<br />
H<strong>and</strong>ling & Unpacking<br />
!<br />
H<strong>and</strong>ling <strong>and</strong><br />
Lifting<br />
Lifting or h<strong>and</strong>ling MUST only be carried out by trained <strong>and</strong> qualified personnel. Ensure<br />
that the lifting operation has been properly planned, risk assessed <strong>and</strong> that all<br />
equipment has been checked by a skilled <strong>and</strong> competent Health & Safety<br />
representative <strong>and</strong> effective control measures put in place.<br />
It is the customer’s responsibility to ensure that operators are trained in h<strong>and</strong>ling heavy<br />
goods <strong>and</strong> to enforce the relevant lifting regulations.<br />
Refer to Dimensions & Weight section for system dry weights.<br />
The SKE-XL Steam Humidifier MUST always be h<strong>and</strong>led <strong>and</strong> lifted with care <strong>and</strong><br />
should remain in its original packaging for as long as possible prior to installation<br />
The SKE-XL Steam Humidifier package may be carried using a forklift from the<br />
underside. Caution should be exercised to ensure balanced load before lifting.<br />
Lifting sling angle should be greater than 30˚ to the horizontal.<br />
Unpacking SKE-XL Steam Humidifier is shipped on a wooden crate.<br />
Remove packing wooden crate <strong>and</strong> skids prior to installation.<br />
List of<br />
accessories<br />
supplied<br />
St<strong>and</strong>ard enclosure<br />
2 sets of keys.<br />
2 adjustable steam hose collars per<br />
steam outlet.<br />
The present <strong>Installation</strong> Instructions.<br />
Wiring diagram affixed onto the interior of the electrical compartment door.<br />
6
!<br />
<strong>Installation</strong> method<br />
statement<br />
SKE90/100/110/120 Steam Humidifier<br />
<strong>Installation</strong> Overview<br />
All installation work must comply with local regulations.<br />
All work related to the installation of the SKE-XL Steam Humidifier MUST<br />
only be performed by skilled <strong>and</strong> qualified technical personnel (e.g.<br />
qualified gas installer, fitters, electricians, plumbers or technicians with<br />
appropriate training).<br />
The customer is responsible for ensuring their suitability.<br />
For the installation of the SKE-XL Steam Humidifier <strong>and</strong> associated<br />
components there should be no special tooling requirements above that of<br />
a fitter’s toolkit.<br />
Stage1: Unit Positioning <strong>and</strong> Mounting<br />
Stage 2: Steam Distribution <strong>Installation</strong><br />
Stage 3: Water Supply <strong>Installation</strong><br />
Stage 4: Water Drain Connection<br />
Stage 5: Electrical Supply <strong>and</strong> <strong>Installation</strong><br />
Stage 6: Electrical Control Connections<br />
Stage 2<br />
Stage 5<br />
Stage 6<br />
SKE-XL<br />
Stage 3<br />
Stage 1<br />
Water<br />
supply<br />
Stage 4<br />
(Illus. 4)<br />
7
General<br />
considerations<br />
!<br />
Positioning the<br />
Humidifier<br />
SKE90/100/110/120 Steam Humidifier<br />
Stage 1 – Unit Positioning <strong>and</strong> Mounting<br />
Any installation work MUST be carried out by suitably qualified personnel.<br />
The following considerations should be taken into account before deciding on the<br />
location for the SKE-XL Steam Humidifier:<br />
Plan a location easy to access in order to permit an easy inspection <strong>and</strong><br />
servicing of the humidifier.<br />
Do not install humidifier where failure of the appliance could cause damage<br />
to the building structure or to costly equipment.<br />
Location area should be well ventilated, ambient temperature should not<br />
exceed 30˚C.<br />
The humidifier must be installed to ensure the steam hose length is kept to the<br />
shortest possible length.<br />
For flexible steam hose: the total steam line length should not exceed 5<br />
meters. For longer distances use insulated hard piping.<br />
For insulated hard piping: the total steam line length should not exceed 15<br />
meters. For longer steam line runs, consult factory.<br />
Observe the minimum access distances as shown in Illustration 5.<br />
510 mm<br />
minimum<br />
600 mm<br />
minimum<br />
800 mm<br />
minimum<br />
(Illus. 5) St<strong>and</strong>ard enclosure<br />
Minimum<br />
Clearances<br />
Minimum clearances are :<br />
Top: 510mm minimum<br />
Electrical panel side: 600mm minimum<br />
Front: 800mm minimum<br />
The humidifier is designed to be installed directly on the floor.<br />
Provide a level, solid foundation for the humidifier.<br />
Ensure that the floor beneath the humidifier is water proof to withst<strong>and</strong> any water<br />
spillage during servicing or if a problem occurs.<br />
The humidifier is provided with adjustable legs in order to ensure proper level.<br />
8
Fundamental Design<br />
Concepts<br />
!<br />
SKE90/100/110/120 Steam Humidifier<br />
Stage 2 – Steam Distribution <strong>Installation</strong><br />
1. Maximum steam velocity in a pipe should not exceed 12m/s velocity.<br />
Velocities above this will generate noise.<br />
2. Minimum steam pipe gradient should be 125mm rise in 1m run.<br />
3. The lowest point of any steam hose or rigid pipe must be the humidifier.<br />
A steam separator (S trap) should be installed higher than the static<br />
pressure of the system by at least 50mm.<br />
4. Total length of the flexible steam hose should not exceed 5 m or<br />
insulated rigid piping should not exceed 15 m.<br />
5. Whenever possible use rigid copper piping, flexible steam hose can be<br />
used for short runs or for interconnecting between rigid pipe runs, ensure<br />
that there is no kink in the flexible hose.<br />
When using rigid copper pipe, insulation should be used to diminish<br />
condensation build up.<br />
Correct <strong>Installation</strong><br />
SKE-XL humidifier<br />
with Multisteam.<br />
Correct <strong>Installation</strong><br />
SKE-XL humidifier with 2 SAMB E2 manifolds<br />
Min. 7°<br />
Min. 7°<br />
Static pressure<br />
+ 50 mm<br />
Static pressure<br />
+ 50 mm<br />
(Illus. 6)<br />
(Illus. 7)<br />
Incorrect <strong>Installation</strong><br />
(Illus. 8)<br />
6. Connection pipe sizes between SKE-XL <strong>and</strong> steam distributor in the duct<br />
should be 108mm up to 240kg/h<br />
7. All Humidifiers above 100kg/h capacity should use Multi-Steam.<br />
9
SKE90/100/110/120 Steam Humidifier<br />
Stage 2 – Steam Distribution <strong>Installation</strong><br />
Selection of<br />
Multi-Steam<br />
1. For all Multi-Steam units use the <strong>Neptronic</strong> ® Humidisoft program to size the unit.<br />
2. Where two Multi-Steam units are required, duties in excess of 240kg/h make<br />
your selection using the following rules:<br />
Divide the air volume flow in half.<br />
Divide the AHU / air Duct width in half.<br />
Height of the duct must remain at 100% its height.<br />
This will size Multi-Steam units so that they can be placed side by side.<br />
3. For installation of Multi-Steam units please refer to <strong>Neptronic</strong> ® Multi-Steam<br />
<strong>Installation</strong> Instructions<br />
Air duct<br />
Mounting bracket must be level horizontally<br />
Rod, bolt, nut <strong>and</strong><br />
washer assembly<br />
Min. 50 mm<br />
Min 50 mm<br />
Min. 50 mm<br />
Steam supply hose or<br />
rigid pipe to Humidifier<br />
Ø15 mm<br />
Static pressure<br />
+ 50 mm<br />
Condensate drain pipe to steam trap<br />
Header must be pitched toward condensate drain<br />
Horizontal duct (Illus. 9)<br />
Air duct<br />
Air flow<br />
Rod, bolt, nut <strong>and</strong><br />
washer assembly<br />
Min. 10º<br />
Steam supply hose or<br />
rigid pipe to Humidifier<br />
Air flow<br />
Header must be pitched toward condensate drain<br />
Static pressure<br />
+ 50 mm<br />
Vertical duct (Illus. 10)<br />
10
Steam pipe work to Duct connections<br />
SKE90&100<br />
SKE90/100/110/120 Steam Humidifier<br />
Stage 2 – Steam Distribution <strong>Installation</strong><br />
Min. 7° pipe slope<br />
Insulated pipe<br />
Min. 2/5 H<br />
Air<br />
Duct<br />
Ø76 mm<br />
H<br />
Ø15 mm<br />
Static pressure<br />
+ 50 mm<br />
Min 100 mm<br />
(llus. 11)<br />
A single Ø76mm feed pipe should be connected to a single Multi-Steam with a suitable<br />
reduction at the lowest point to allow a Ø15mm condensate drain from the main steam<br />
supply.<br />
SKE110&120<br />
Air<br />
Duct<br />
Insulated<br />
pipe<br />
Min.<br />
7° pipe<br />
slope<br />
Ø130 mm<br />
min<br />
7° pipe slope<br />
Ø15 mm<br />
Ø76mm<br />
Ø76mm<br />
Static pressure<br />
+ 50 mm<br />
(Illus. 12)<br />
Two Ø76mm steam outlets to a single Ø130mm feed pipe should be connected to a single<br />
Multi-Steam with a suitable reduction at the lowest point to allow a Ø15mm condensate<br />
drain from the main steam supply.<br />
11
SKE90/100/110/120 Steam Humidifier<br />
Stage 3 – Water Supply <strong>Installation</strong><br />
!<br />
Water supply installation should conform to local codes <strong>and</strong> regulations.<br />
Any installation work must be carried out by suitably qualified personnel.<br />
Water inlet<br />
Specifications<br />
<strong>Neptronic</strong> ® SKE-XL Humidifier is designed to be used with mains, reverse osmosis, deionized<br />
<strong>and</strong> de-mineralized water.<br />
Maximum water supply pressure: 70 to 480kPa<br />
Minimum water temperature: +4˚C<br />
Maximum water temperature: +40˚C<br />
Model<br />
SKE90<br />
SKE100<br />
SKE110<br />
SKE120<br />
Water inlet<br />
Connection size<br />
Ø 15 mm<br />
Water supply<br />
line <strong>Installation</strong><br />
To facilitate servicing, a shut off valve (not supplied) should be installed in the water<br />
line, within 1m of the humidifier.<br />
Feed Water supply line<br />
¼ turn Shut off Valve<br />
Gasket<br />
Gasket<br />
SKE-XL<br />
Flexible Hose<br />
120 mm<br />
Water Inlet connection<br />
(Illus. 13)<br />
12
SKE90/100/110/120 Steam Humidifier<br />
Stage 4 – Water Drain Connection<br />
!<br />
Water Drain<br />
Specification<br />
Water Drain<br />
<strong>Installation</strong><br />
Water Drain installation should conform to local codes <strong>and</strong> regulations.<br />
Any installation work must be carried out by suitably qualified personnel.<br />
Water Drain temperature: 60˚C<br />
Model<br />
SKE90<br />
SKE100<br />
SKE110<br />
SKE120<br />
Water Drain Outlet<br />
Connection size<br />
Ø 20mm<br />
Pan Drain Outlet<br />
Connection size<br />
Ø 15mm<br />
Water drain outlet connection should be connected to drain pipe of sufficient size.<br />
We recommend the use of Ø 20mm minimum st<strong>and</strong>ard copper hydraulic pipes.<br />
Minimum water drain pipe gradient should be 1.5mm in 1m horizontal run.<br />
No drain trap is required.<br />
SKE-XL<br />
Ø 20mm<br />
120mm<br />
Ø 38mm<br />
minimum<br />
(Illus. 14)<br />
13
Electrical Power<br />
Supply<br />
SKE90/100/110/120 Steam Humidifier<br />
Stage 5 –Electrical Supply <strong>and</strong> <strong>Installation</strong><br />
The SKE-XL Steam Humidifier requires 400V three phase supply.<br />
Model<br />
Current (A)<br />
SKE90 96<br />
SKE100 107<br />
SKE110 119<br />
SKE120 130<br />
!<br />
Electrical<br />
connection<br />
All incoming power supplies MUST be externally fused for over current protection.<br />
The electrical supply should also be isolated for the purpose of emergency <strong>and</strong><br />
servicing. A disconnect switch should typically be installed within one meter of the<br />
humidifier.<br />
The isolator must have a contact separation of at least 3mm.<br />
All work related to electrical installation MUST only be performed by skilled <strong>and</strong><br />
qualified technical personnel (e.g. electrician or technicians with appropriate<br />
training).<br />
Please observe local codes <strong>and</strong> regulations concerning the provision of electrical<br />
installations.<br />
<br />
<br />
WARNING. Risk of electric Shock. Ensure that the electrical supply is<br />
isolated before beginning any installation.<br />
WARNING: RISK OF FIRE. Do not interchanges the power terminal block<br />
designated L1, L2 <strong>and</strong> L3 with Low voltage terminal block designated 1, 2 <strong>and</strong> 3.<br />
The installation engineer must ensure the following:<br />
Use of copper power conductor only.<br />
Size of the power conductors are suitable for the maximum current supplied.<br />
Incoming power cable is secured via suitably sized cable gl<strong>and</strong>.<br />
Each terminal connection is secured firmly with a cable ferrule.<br />
The ground conductor should be equipped with ring terminal <strong>and</strong> should be<br />
connected directly to the electrical panel on the indicated location.<br />
Humidifier cabinet has an uninterrupted or unbroken electrical ground.<br />
Electrical panel SKE-XL<br />
L1<br />
L2<br />
L3<br />
(Illus. 15)<br />
14
Humidifier<br />
Interlocks<br />
SKE90/100/110/120 Steam Humidifier<br />
Stage 6 –Electrical Control Connections<br />
<strong>Neptronic</strong> ® SKE-XL Steam Humidifier has one interlock entry:<br />
2<br />
1<br />
Differential pressure switch<br />
5 Vdc<br />
High limit humidistat<br />
Low voltage control<br />
5<br />
4<br />
3<br />
2<br />
1<br />
terminal block<br />
5 Vdc<br />
Fuse<br />
(Illus. 16)<br />
High level humidistat contact should be wired in series with P.D. Switch contact<br />
<strong>and</strong> humidistat signal between terminals TB1 & 2<br />
In case of opening of any on this contact. <strong>Operation</strong> of humidifier will stop <strong>and</strong> Alarm<br />
message will be displayed.<br />
Humidifier<br />
Control with<br />
humidity<br />
controller<br />
<strong>Neptronic</strong> ® SKE-XL modulating Steam Humidifier can be installed in conjunction with<br />
<strong>Neptronic</strong> ® HRO <strong>and</strong> SHC humidity controller.<br />
HRO20<br />
humidistat<br />
SK300<br />
Control terminal<br />
block wiring<br />
F 1 2 3 4<br />
COM<br />
24 VAC<br />
MOD<br />
%RH<br />
13<br />
14 15<br />
16<br />
High limit<br />
Pressure Differential<br />
switch<br />
6 7 8 9<br />
(Illus. 17)<br />
15
SKE90/100/110/120 Steam Humidifier<br />
Humidifier<br />
Control with<br />
humidity<br />
controller <strong>and</strong><br />
room or duct<br />
sensor<br />
Stage 6 –Electrical Control Connections<br />
<strong>Neptronic</strong> ® SKE-XL Steam Humidifier can be controlled with <strong>Neptronic</strong> ® HRO20 or<br />
HRO20 + SHR10 or SHC80 humidity sensors.<br />
HRO20<br />
humidistat<br />
SK300<br />
Control terminal<br />
block wiring<br />
F 1 2 3 4<br />
+<br />
SHR10<br />
or<br />
SHC80<br />
COM<br />
24 VAC<br />
3<br />
COM<br />
24 VAC<br />
%RH<br />
12<br />
%RH input<br />
High limit<br />
Pressure Differential<br />
switch<br />
13 14 15 16<br />
MOD<br />
%RH<br />
6 7 8 9<br />
(Illus. 18)<br />
Humidifier<br />
Control with<br />
humidity sensors<br />
<strong>Neptronic</strong> ® SKE-XL Steam Humidifier can be installed in conjunction with <strong>Neptronic</strong> ®<br />
SHR10 or SHC80 humidity sensors.<br />
SKE-XL Humidifier<br />
F<br />
1<br />
2<br />
3<br />
4<br />
5<br />
6 7 8 9<br />
To Term. #3<br />
To Term. #F<br />
To Term. #6<br />
1 COMMON<br />
2<br />
3<br />
SHR10<br />
or<br />
SHC80<br />
24 VAC OR VDC<br />
0-10 VDC OUTPUT<br />
(Illus. 19)<br />
16
SKE90/100/110/120 Steam Humidifier<br />
Stage 6 –Electrical Control Connections<br />
VAV System <strong>Neptronic</strong> ® SKE-XL modulating Steam Humidifier can be installed in conjunction with<br />
a VAV system, in this case <strong>Neptronic</strong> ® SHC Duct humidity sensor will act as a Hi<br />
level Duct Humidity sensor. Humidity will be controlled by <strong>Neptronic</strong> ® SHR or SHC<br />
Room or Duct humidity controller.<br />
SKE-XL Humidifier<br />
F<br />
1<br />
2<br />
3<br />
4<br />
SHC80<br />
5<br />
6 7 8 9<br />
To Term. #3<br />
1 COMMON<br />
SHR10<br />
or<br />
SHC80<br />
To Term. #F<br />
To Term. #4<br />
2<br />
3<br />
24 VAC OR VDC<br />
0-10 VDC OUTPUT<br />
COMMON 1<br />
24 VAC OR VDC 2<br />
0-10 VDC OUTPUT 3<br />
To Term. #F<br />
To Term. #3<br />
To Term. #6<br />
(Illus. 20)<br />
Dry Contacts 2 volt free contacts are provided :<br />
<strong>Operation</strong> (fan) contacts:<br />
One normally connected to common <strong>and</strong> one normally open contact<br />
These contacts should be used to switch a low voltage control, up to 24Vac or Vdc,<br />
with a switching current of no more than 3 A.<br />
F<br />
1<br />
2<br />
3<br />
4<br />
5<br />
6 7 8 9<br />
(Illus. 21)<br />
Common<br />
Normally Open<br />
Normally Closed<br />
17
air<br />
SKE90/100/110/120 Steam Humidifier<br />
Controls<br />
placement<br />
Stage 6 –Electrical Control Connections<br />
Typical humidifier control system should include along with the humidifier:<br />
<br />
A wall or return duct humidistat<br />
<br />
A high limit duct humidistat,<br />
<br />
An air proving switch.<br />
Placement of these devices is critical to proper operation of the overall system.<br />
<br />
The return duct humidistat must always be located before any<br />
outside air intake, in order to ensure accurate sensing of the air from the<br />
humidified space.<br />
<br />
Alternatively a room humidistat can be used. The room humidistat<br />
should be located on an inside wall or column. It should not be near any<br />
discharge air from supply ducts or sources of heat or cold.<br />
<br />
The airflow switch must be positioned to accurately open on a loss<br />
of air flow, to prevent the humidifier from running when there is no air to absorb<br />
humidity.<br />
<br />
The high limit humidistat must be positioned far enough - minimum<br />
1.8m - downstream of the steam dispersion manifold(s) to prevent it from getting<br />
wet, but still allows it to accurately prevent over humidification of the duct that<br />
could result in condensation.<br />
air<br />
Min 1.8m<br />
air air<br />
Return SHC80<br />
Humidity sensor<br />
Or room HRO20<br />
humidistat<br />
(Illus. 22)<br />
Air flow switch<br />
Steam dispersion<br />
manifold<br />
High limit SHC80 for<br />
VAV application only<br />
High limit humidistat<br />
18
SKE90/100/110/120 Steam Humidifier<br />
Terminal Block<br />
Humidity signal set-up<br />
Modulating Printed Circuit Board<br />
Humidity signal 0-10 Vdc<br />
PCB970819<br />
REV. C<br />
Extra jumper<br />
F<br />
1<br />
2<br />
3<br />
4<br />
5<br />
High limit<br />
Humidistat<br />
-<br />
+<br />
6 7 8 9 0-10 Vcc<br />
Pressure Differential<br />
Switch<br />
CONTROL<br />
INPUT<br />
4-20mA<br />
0-10V<br />
2-10V<br />
HUMIDITY<br />
INPUT<br />
4-20mA<br />
2-10V<br />
0-10V<br />
TOP PCB<br />
MODULATING<br />
Jumper on<br />
0-10V<br />
5 Vdc<br />
(Illus. 23)<br />
Humidity signal 2-10 Vdc<br />
(Illus. 26)<br />
PCB970819<br />
REV. C<br />
Extra jumper<br />
F<br />
1<br />
2<br />
3<br />
4<br />
5<br />
-<br />
+<br />
6 7 8 9 2-10 Vcc<br />
CONTROL<br />
INPUT<br />
4-20mA<br />
0-10V<br />
2-10V<br />
HUMIDITY<br />
INPUT<br />
4-20mA<br />
2-10V<br />
0-10V<br />
Jumper on<br />
2-10V<br />
High limit<br />
Humidistat<br />
Pressure Differential<br />
Switch<br />
TOP PCB<br />
MODULATING<br />
5 Vdc<br />
(Illus. 24)<br />
Humidity signal 4-20 mA<br />
(Illus. 27)<br />
PCB970819<br />
REV. C<br />
F<br />
1<br />
2<br />
3<br />
4<br />
5<br />
High limit<br />
Humidistat<br />
-<br />
+<br />
6 7 8 9 4-20 mA<br />
Pressure Differential<br />
Switch<br />
CONTROL<br />
INPUT<br />
4-20mA<br />
0-10V<br />
2-10V<br />
HUMIDITY<br />
INPUT<br />
4-20mA<br />
2-10V<br />
0-10V<br />
Jumpers on<br />
4-20mA & 2-10V<br />
5 Vdc<br />
(Illus. 25)<br />
TOP PCB<br />
MODULATING<br />
(Illus. 28)<br />
19
SKE90/100/110/120 Steam Humidifier<br />
Terminal Block<br />
Control Signal set-up<br />
Modulating Printed Circuit Board<br />
Control signal 0-10 Vdc<br />
PCB970819<br />
REV. C<br />
Extra jumper<br />
F<br />
1<br />
2<br />
3<br />
4<br />
5<br />
High limit<br />
Humidistat<br />
6 7 8 9<br />
Pressure Differential<br />
Switch<br />
+ - 0-10 Vcc<br />
CONTROL<br />
INPUT<br />
4-20mA<br />
0-10V<br />
2-10V<br />
HUMIDITY<br />
INPUT<br />
4-20mA<br />
2-10V<br />
0-10V<br />
Jumper on<br />
0-10V<br />
5 Vdc<br />
(Illus. 29)<br />
TOP PCB<br />
MODULATING<br />
Control signal 2-10 Vdc<br />
(Illus. 32)<br />
PCB970819<br />
REV. C<br />
Extra jumper<br />
F<br />
1<br />
2<br />
3<br />
4<br />
5<br />
High limit<br />
Humidistat<br />
6 7 8 9<br />
Pressure Differential<br />
Switch<br />
5 Vdc<br />
(Illus. 30)<br />
+ - 2-10 Vcc<br />
CONTROL<br />
INPUT<br />
4-20mA<br />
0-10V<br />
2-10V<br />
HUMIDITY<br />
INPUT<br />
4-20mA<br />
2-10V<br />
0-10V<br />
TOP PCB<br />
MODULATING<br />
Control signal 4-20 mA<br />
(Illus. 33)<br />
Jumper on<br />
2-10V<br />
PCB970819<br />
REV. C<br />
F<br />
1<br />
2<br />
3<br />
4<br />
5<br />
6 7 8 9<br />
+ -<br />
4-20 mA<br />
CONTROL<br />
INPUT<br />
4-20mA<br />
0-10V<br />
2-10V<br />
HUMIDITY<br />
INPUT<br />
4-20mA<br />
2-10V<br />
0-10V<br />
Jumpers on<br />
4-20mA & 2-10V<br />
High limit<br />
Humidistat<br />
Pressure Differential<br />
Switch<br />
TOP PCB<br />
MODULATING<br />
5 Vdc<br />
(Illus. 31)<br />
(Illus. 34)<br />
20
SKE90/100/110/120 Steam Humidifier<br />
!<br />
Clearance<br />
Electrical<br />
Water<br />
Steam<br />
Controls<br />
Initial verification & Start up<br />
Initial verification <strong>and</strong> start up – commissioning – should be carried out by suitable<br />
qualified personnel.<br />
1. Ensure that the humidifier cabinet is installed in a location where the<br />
humidifier can be serviced correctly.<br />
2. Check that the power supply (voltage) conforms to the appliance name plate<br />
on the humidifier side.<br />
3. Confirm that 24Vac is present between tab 1&2 of Control terminal, located<br />
on the control connection PCB. Remove the front top cover to get to this<br />
PCB.<br />
4. Ensure that water is supplied to the humidifier. A shut-off valve should be<br />
outside the humidifier.<br />
Once the water shut-off valve is turned ON, ensure that there are no<br />
apparent leaks.<br />
5. Confirm that Drain piping is properly connected with a pitch of least 1.5mm<br />
per 1m.<br />
6. Check that steam distributors are properly installed into the ventilation duct.<br />
7. Verify that the flexible steam hoses <strong>and</strong> rigid steam supply pipes are shorter<br />
length than 5m in total <strong>and</strong> properly sloped <strong>and</strong> have condensation P traps<br />
wherever required.<br />
8. Ensure that a High limit duct humidistat is installed, properly connected to<br />
the humidifier <strong>and</strong> set point properly adjusted.<br />
9. Verify that Room humidistat or returned air duct humidistat is installed,<br />
properly connected to the humidifier <strong>and</strong> set point properly adjusted<br />
10. Turn Power ON at the disconnect switch<br />
11. Confirm the control signal is matching control signal jumper on Main PCB.<br />
12. Proceed to start-up the Humidifier, as follows:<br />
a) Open the front access door of the humidifier cabinet; make sure that manual drain<br />
valve is closed.<br />
b) Verify that there is a humidity dem<strong>and</strong>.<br />
Humidity dem<strong>and</strong> is displayed on the humidifier LCD screen.<br />
c) Start up the humidifier by putting rocker switch located on the humidifier control<br />
panel at the ON position<br />
d) Water will start to flow in <strong>and</strong> slowly rise in the water level sight glass located on<br />
Start-up<br />
the side of the evaporation chamber.<br />
Observe for water leak along the water line.<br />
e) Humidifier LCD screen will display the water level with 3 information:<br />
Alarm level / Control level / High level<br />
f) As soon as Control level is reached, contact will be activated <strong>and</strong> heater elements<br />
powered.<br />
From a cold start steam will be produced 3 to 5 minutes after contactors closing<br />
g) Observe for water <strong>and</strong> steam leaks.<br />
13. Check the location of the air flow switch in the system <strong>and</strong> its operation by<br />
stopping the fan.<br />
Safety test<br />
With no air movement in the air duct, the humidifier should automatically stop the<br />
combustion burner(s).<br />
14. Turn the humidifier OFF, by putting rocker switch of the control panel to the 0<br />
(middle) position<br />
15. Execute a manual drain, by putting rocker switch of the control panel to the Drain<br />
Drain <strong>and</strong> Reset position<br />
A water jet directed on the water level sensor located in the water level sight glass<br />
should start <strong>and</strong> create bubbles around it.<br />
16. Reset Air flow switch <strong>and</strong> humidistat(s) to the proper value, if needed.<br />
End 17. Humidifier is ready for normal operation.<br />
21
SKE90/100/110/120 Steam Humidifier<br />
Control Panel<br />
Description<br />
Commissioning – <strong>Operation</strong> description<br />
Control panel of <strong>Neptronic</strong> ® SKE-XL Steam humidifier is equipped with a user<br />
friendly LCD display <strong>and</strong> extensive access to status, alarms, <strong>and</strong> set-up menus.<br />
8<br />
7<br />
6<br />
5<br />
4<br />
3<br />
2<br />
1<br />
NEP 3.6<br />
SKE110<br />
1<br />
2<br />
3<br />
4<br />
5<br />
6<br />
7<br />
8<br />
Alphanumeric Display:<br />
Indicates all operation parameters <strong>and</strong> the error messages.<br />
Push button<br />
<br />
<br />
, <strong>and</strong> <br />
button gives access into program mode.<br />
Up <strong>and</strong> Down button:<br />
Used to increase or decrease the controlled parameters of the humidifier.<br />
''POWER'' indicator<br />
O The humidifier is powered by electricity <strong>and</strong> the switch is at the AUTO position.<br />
O The humidifier is disconnected from the power supply.<br />
"CHECK" indicator<br />
The "CHECK" indication is normally off. It will go on as a warning against abnormal<br />
O conditions of operation. For details consult the Alphanumeric Display<br />
(see section 9.1.3 Diagnostic mode).<br />
O Maintenance is required. The Running hours have exceeded the Service hours.<br />
blinking (see section 12 – Service).<br />
O No abnormal conditions of operation.<br />
"FILL" indicator<br />
O Indication that the water supply (fill) valve is open.<br />
O<br />
Indication that the water supply (fill) valve is closed.<br />
"STEAM" indicator<br />
ON/OFF model, the STEAM indicator lights when the<br />
O<br />
contactor is closed <strong>and</strong> steam is being generated.<br />
O<br />
blinking<br />
Modulating model, the STEAM indicator blinks ON <strong>and</strong> OFF in proportion to the<br />
percentage of steam output the humidifier is generating. (The proportion is<br />
displayed on the alphanumeric display (1)). For 100% the indicator will be lit with no<br />
blink.<br />
O There is no steam being produced.<br />
Switch "AUTO/OFF/DRAIN"<br />
Position AUTO (I):<br />
AUTO<br />
Humidifier will generate steam based on dem<strong>and</strong> from the humidistat.<br />
Position OFF (O):<br />
OFF<br />
Humidifier will shut off.<br />
Position DRAIN:<br />
DRAIN Humidifier will stop operating <strong>and</strong> the evaporation chamber will drain the water out.<br />
This will be done typically at regular service.<br />
Indicator "DRAIN"<br />
Drain valve is opened, whether as a result of an automatic drain cycle or because<br />
O<br />
the front panel switch is manually set to DRAIN.<br />
O Drain valve is closed.<br />
22
SKE90/100/110/120 Steam Humidifier<br />
<strong>Operation</strong> display<br />
Description display modes<br />
''OFF'' Mode<br />
When the rocker switch is in the ''OFF'' position, the display shows the model of<br />
the humidifier <strong>and</strong> the program version number.<br />
(Illus. 35)<br />
Scroll Mode<br />
When the rocker switch is in the auto position, the display scrolls the following information every 6 seconds:<br />
Display Description Comment<br />
RH 25%<br />
DCT 68%<br />
Display Space <strong>and</strong> Duct Relative<br />
Humidity readings.<br />
Only on modulating humidifiers (suffix M).<br />
If no High limit Duct sensor is installed second line<br />
is left blank<br />
Quantity of steam produced by<br />
the humidifier<br />
I.e.: The actual output of the humidifier at that<br />
moment is 13 kg/hr.<br />
ALARM<br />
LEVEL<br />
Low water level.<br />
Below this water level, the humidifier shuts off<br />
<strong>and</strong> the water supply valve is activated until<br />
sufficient level is reached.<br />
CONTROL<br />
LEVEL<br />
Water level is controlled<br />
The water supply valve is activated below this<br />
level.<br />
HIGH<br />
LEVEL<br />
Water at maximum level.<br />
The water supply valve is automatically<br />
deactivated.<br />
23
SKE90/100/110/120 Steam Humidifier<br />
When the following conditions occur, the diagnostic messages override the scrolling information:<br />
Display Description Comment<br />
List of alarms<br />
NO<br />
DEMAND<br />
No dem<strong>and</strong><br />
Modulating humidifier: No analog signal to the humidifier.<br />
On/Off humidifier: Humidity level has exceeded the set point<br />
of the humidistat or humidity level has exceeded the set<br />
point on the high limit humidistat or airflow is not detected by<br />
the air pressure switch.<br />
SAFETY<br />
OPEN<br />
DRAIN<br />
CYCLE<br />
Safety open<br />
Drain cycle<br />
Humidity level has exceeded the set point on the high limit<br />
humidistat or airflow is not detected by the air pressure<br />
switch (modulating humidifier only).<br />
The humidifier is in the automatic drain mode.<br />
CONTACT<br />
DELAY<br />
OVER<br />
HEATED<br />
Contact delay<br />
Overheated<br />
15 second delay for the power contactor to be activated.<br />
The temperature inside the container has exceeded the<br />
boiling temperature. The humidifier has automatically shut<br />
off.<br />
PROBE<br />
DEFECTED<br />
Defected probe<br />
The water level sensor is not operational. The humidifier has<br />
automatically shut off.<br />
NO<br />
LEVEL<br />
FOAMING<br />
CYCLE<br />
DRN/PROB<br />
BLOCK<br />
No water<br />
Drain foam<br />
Drain or probe block<br />
Water has not reached the level probe<br />
AFEC (Anti Foam Energy Conservation) detects foam.<br />
The humidifier drains for a few minutes <strong>and</strong> returns to<br />
normal operation.<br />
The humidifier drains but the water level does not decrease,<br />
the humidifier has automatically shut off.<br />
Verify<br />
RH Sens<br />
Verify RH sensor<br />
Signal from either SHR10 or SHC80 used as space sensor<br />
is lower than 0.49 Vdc to terminal # 6 of humidifier.<br />
There might be a connection problem or a defective sensor.<br />
Verify<br />
DCT Sens<br />
Verify Duct sensor<br />
Signal from SHC80 used as Hi limit duct sensor is lower<br />
than 0.49 Vdc to terminal # 4 of humidifier.<br />
There might be a connection problem or a defective sensor.<br />
24
01<br />
SETPOINT<br />
OUT 30%<br />
Out: Output set point to<br />
HRO20<br />
Int: Internal.<br />
Value : from 00 to 100%<br />
Default: Out 30%<br />
SKE90/100/110/120 Steam Humidifier<br />
Programming mode<br />
To enter into programming mode, please push button at any time, to advance the program function to the next<br />
programming step in the menu push the same button twice.<br />
Unless other instructions, you can make a selection by using & buttons on control panel.<br />
Step Display Description Comment<br />
To enable set point to humidifier display<br />
Press the button to reach step 5, the RUNNING<br />
message will appear.<br />
Press <strong>and</strong> hold the TEST button located on Main Pc<br />
board inside electrical compartment for 10 seconds.<br />
Set point RH origin Release the TEST button then press the RESET button<br />
on the same main pc board. Set point is now displayed<br />
on the humidifier display.<br />
02<br />
optional<br />
03<br />
optional<br />
04<br />
SETPOINT<br />
VAV OFF<br />
PROPBAND<br />
3%<br />
DRAIN<br />
8 HRS<br />
Set point VAV allows Hi<br />
limit Duct humidity control<br />
OFF: Duct humidity<br />
control disable.<br />
65%: High limit Duct<br />
humidity set point value.<br />
Default: OFF<br />
Prop B<strong>and</strong> allows the set<br />
up of proportional b<strong>and</strong>.<br />
From 3 to 9%<br />
Default: 3%<br />
Drain frequency.<br />
From 1 to 24 hours<br />
Default: 4 Hrs<br />
If Output is selected, the set point is sent from the humidifier<br />
to the humidistat HRO20.<br />
If SHR10 or SHC80 is connected with humidifier, please<br />
select Internal, this will allow you to set up RH set point<br />
directly from Humidifier.<br />
To switch between Output <strong>and</strong> Internal Set point:<br />
Press <strong>and</strong> hold the TEST button located on Main Pc<br />
board inside electrical compartment until the change of<br />
the value.<br />
If Set point VAV is disabling, no humidity signal from the VAV<br />
Duct will be considered. If a Set point VAV value is set, the<br />
humidity output will be controlled by both space <strong>and</strong> High<br />
limit duct humidity signal.<br />
To allow Set point VAV value:<br />
Press <strong>and</strong> hold the TEST button located on Main Pc board<br />
inside electrical compartment until OFF is disappeared.<br />
You can then select the VAV Set point value desired by<br />
using & buttons on control panel.<br />
Note: This Step will appear only if Internal has been selected at step<br />
01<br />
Proportional b<strong>and</strong> can be set from 3% to 9% of the humidity<br />
set points values (Space <strong>and</strong> High limit duct).<br />
Select the appropriate value by using & buttons on<br />
control panel.<br />
Note: This Step will appear only if Internal has been selected at step<br />
01<br />
Choose the initiation of a drain cycle for 1 to 24 hours.<br />
In general, harder the water is, more often the drain cycle<br />
should be.<br />
Drain cycle setting does not affect the AFEC system.<br />
05<br />
RUNNING<br />
0645HRS<br />
Number of running hours<br />
Information only, no<br />
possible set up.<br />
The humidifier has operated 645 hours since the last service.<br />
After service, press simultaneously & buttons for 15<br />
seconds to reset the number of hours of operation to zero.<br />
This procedure will stop the CHECK indicator from flashing.<br />
06<br />
SERVICE<br />
1000HRS<br />
Hour span between<br />
servicing.<br />
From 400 to 1500<br />
hours.<br />
Default: 1000 Hrs<br />
You can set the number of hours of operation before the<br />
humidifier will call for service (blinking of CHECK light every<br />
4 seconds) from 400 to 1500 hours.<br />
In general, harder the water is, lower the number of hours of<br />
operation before service should be.<br />
07<br />
LOCK ON<br />
80% PWR<br />
Output Span.<br />
From 00 to 100%.<br />
Default: 100%<br />
This option is available only on modulating model.<br />
i.e.: In this case, the humidifier will deliver 80% of its<br />
maximum rated output when at full dem<strong>and</strong>.<br />
Note: Any changes made in the Program Mode are saved into a non-volatile memory.<br />
When the humidifier is anywhere in the Menu Driven Program Mode, the normal operation of the humidifier is<br />
halted.<br />
To resume normal operation, exit the menu program mode by pressing the button until the alphanumeric<br />
display is clear. (This happens after step 7)<br />
25
SKE90/100/110/120 Steam Humidifier<br />
Control PC Board<br />
Main Printed circuit board designated is common to all SKE-XL series humidifier, ON/OFF or modulating; this pc<br />
board is equipped with an advanced microprocessor which controls all the humidifier functions.<br />
The Printed circuit board which is directly connected onto the main pc board is installed only on modulating<br />
model (suffix M).<br />
Staging PC Board (HEC002SK) is controlling the 2 on/off stages (Contactor 2 <strong>and</strong> Contator3)<br />
Main p.c. board<br />
<br />
<br />
<br />
<br />
There are 3 water level L.E.D.’s in the upper right h<strong>and</strong><br />
side. They indicate the relative water height as sensed<br />
by the water level sensor.<br />
o If HI is illuminated: water supply valve shuts off,<br />
o If LO is off: An evaporation chamber filling is ordered,<br />
water supply valve opens.<br />
o If LA is off: No water is detected by the water level<br />
sensor, the power to the elements is shot off.<br />
The 3 status L.E.D.’s at the center left side operate as<br />
follows:<br />
o FILL indicates that the water supply valve is feeding<br />
water.<br />
o DRAIN indicates the drain valve empties the<br />
container.<br />
o CONT indicates that power is supplied to the<br />
elements <strong>and</strong> the humidifier is producing steam.<br />
TEST button should be used when commissioning the<br />
humidifier; this will initiate a pre-programmed start-up<br />
cycle. The start up cycle cleans the supply water <strong>and</strong><br />
the evaporation chamber (see section 11 – start-up).<br />
This button enable also the set point control of the<br />
humidistat to humidifier display (see section 9.2 –<br />
Programming) (this is available only on Modulating<br />
model).<br />
RESET button enable the bypass of start up sequence.<br />
CONTROL<br />
INPUT<br />
4-20mA<br />
0-10V<br />
2-10V<br />
HUMIDITY<br />
INPUT<br />
4-20mA<br />
2-10V<br />
0-10V<br />
TOP PCB<br />
MODULATING<br />
(Illus. 36)<br />
PCB970819<br />
REV. C<br />
Modulating p.c. board<br />
The 3 jumpers at the center of the p.c. board (Control Input) are used for proper selection of the incoming<br />
control signal. See section Control signal set-up<br />
The 3 jumpers at the bottom of the p.c. board (Humidity Input) are used for proper selection of the<br />
incoming humidity signal. See section Humidity signal set up.<br />
Staging p.c. board<br />
This PCB does not require any set-up, it is connected to the contactor 2 <strong>and</strong> contactor 3 controlling the 2 on/off<br />
stages.<br />
26
SKE90/100/110/120 Steam Humidifier<br />
Wiring diagram<br />
Contactor stage 2<br />
Black<br />
Black<br />
Black<br />
Red<br />
Contactor stage 3<br />
Black<br />
Black<br />
Black<br />
Red<br />
Black<br />
Black<br />
Black<br />
Purple<br />
Black<br />
Black<br />
Black<br />
Purple<br />
1<br />
2<br />
7<br />
8<br />
3<br />
Heating<br />
element<br />
9<br />
Marine<br />
Purple<br />
Marine<br />
Red<br />
Red<br />
Purple<br />
Red<br />
24 VAC GND COM<br />
Q1<br />
Q2 -SSR +SSR<br />
Relay<br />
NW HEC002SK<br />
Contactor stage 1<br />
Black<br />
Black<br />
Black<br />
Red<br />
Red<br />
Black<br />
Black<br />
Black<br />
Purple<br />
Heating element<br />
SSR 4<br />
5<br />
Red<br />
Purple<br />
6<br />
Brown<br />
Modulating PCB<br />
COM<br />
Yellow<br />
INPUT<br />
X-100<br />
A16 A17 A18 A19<br />
Red<br />
AC IN<br />
Display terminal<br />
Flat cable to display PCB<br />
PCB970819<br />
REV. C<br />
Red<br />
Yellow<br />
Marine<br />
Red<br />
Grey<br />
Red<br />
Transformer<br />
24 Vac<br />
Green<br />
Marine<br />
Level<br />
sensor PCB<br />
Level<br />
sensor<br />
Drain pump<br />
Purple<br />
Fill valve #1<br />
Purple<br />
Fill valve #2<br />
Purple<br />
High temp limit switch<br />
(Klixon)<br />
Orange<br />
White<br />
Black<br />
Purple<br />
Red<br />
Yellow<br />
Blue<br />
Purple<br />
Blue<br />
Red<br />
Brown<br />
Red<br />
Control Panel<br />
OFF<br />
STEAM<br />
DRAIN<br />
FILL<br />
CHECK<br />
POWER ON<br />
CONTROL<br />
INPUT<br />
4-20mA<br />
0-10V<br />
2-10V<br />
HUMIDITY<br />
INPUT<br />
4-20mA<br />
2-10V<br />
0-10V<br />
TOP PCB<br />
MODULATING<br />
AUTO<br />
DRAIN<br />
Rocker switch<br />
White<br />
Orange<br />
Black<br />
White<br />
LED<br />
No F<br />
No 1 & 2<br />
24 Vac Input for modulating control(s)<br />
To high limit switch <strong>and</strong> differential<br />
pressure switch<br />
Green<br />
Black<br />
Black<br />
Black<br />
Fuse<br />
Marine<br />
Blue<br />
Red<br />
Red<br />
Purple<br />
Marine<br />
Red<br />
Orange<br />
Black<br />
White<br />
No 3<br />
No 4<br />
0-10 Vdc<br />
common<br />
0-10 Vdc<br />
Control Signal<br />
2-10 Vdc<br />
common<br />
2-10 Vdc<br />
4-20 mA<br />
- 4-20 mA<br />
+ 4-20 mA<br />
No 6<br />
RH%<br />
L1 L2 L3 F 1 2 3 4 6<br />
7 8 9<br />
No 7<br />
Alarm Normally close<br />
Terminal connection<br />
No 8<br />
No 9<br />
Alarm Normally open<br />
Alarm common<br />
27
SKE90/100/110/120 Steam Humidifier<br />
General conditions of sales & warranty<br />
1. General<br />
Unless otherwise arranged, in writing, the acceptance<br />
of the Order Confirmation by the purchaser includes<br />
acceptance of the "General Conditions of Sale <strong>and</strong><br />
Warranty" of National Environmental Products, Ltd hereafter<br />
referred to as NEP.<br />
2. Incoterms<br />
The international rules for interpretation of trade terms<br />
"Incoterms" as defined by the ICC Incoterms publication no.<br />
460 from 1990, shall apply to the commercial terms used<br />
herein.<br />
3. Confirmation of Order<br />
NEP shall not be deemed to have accepted an order<br />
until written "Order Confirmation" from NEP is issued to the<br />
purchaser.<br />
It is the responsibility of the purchaser to verify that all<br />
information concerning his/her order is correct <strong>and</strong> to notify<br />
NEP In writing, of any discrepancy prior to the order being<br />
shipped. In the event of a change or correction to an existing<br />
order, a second "Order Confirmation" will be issued by NEP.<br />
4. Price<br />
Our prices are net, Ex-works Montreal in U.S.<br />
Currency, unless stated otherwise.<br />
Minimum orders shall be $50.00 minimum.<br />
Shipping <strong>and</strong> H<strong>and</strong>ling charges are $5.00 minimum<br />
per order unless the shipment is billed to the purchaser's<br />
account or shipped freight collect.<br />
NEP reserves the right to adjust accepted prices in the<br />
event of alterations in rates of exchange, variations in costs<br />
of materials, changes in wages, interference on the part of<br />
the Government or similar conditions over which NEP has<br />
no control.<br />
5. Payments terms<br />
Major credit cards, C.O.D., Prepayment.<br />
For open account, invoices are payable within 30 days<br />
from the date of invoice without no deduction, unless specify<br />
otherwise.<br />
An interest charge of 2% per month will be included on<br />
all overdue payments.<br />
No new order will be process if invoices are not paid<br />
within 45 days.<br />
6. Transfer of ownership<br />
The goods shall remain the property of NEP until the<br />
full payment for the goods has been received by NEP.<br />
7. Delivery terms<br />
Shipments are Ex-works 400 Lebeau, Montreal,<br />
Quebec, H4N 1R6, CANADA unless notified otherwise.<br />
Unless special instructions, the order will be delivery in<br />
the way which NEP deems best without guaranteeing this to<br />
be the cheapest way of transport.<br />
For International Order, a written designation naming<br />
the freight forwarding agent is required <strong>and</strong> will remain in<br />
effect until notified otherwise.<br />
Any discrepancy, damage or breakage should be<br />
reported in writing both to NEP <strong>and</strong> to the Carrier within 5<br />
working days from the receipt date.<br />
8. Risk<br />
From the moment of delivery, the purchaser shall bear<br />
all risks for the goods <strong>and</strong> NEP shall not be responsible for<br />
loss <strong>and</strong> damage incurred during transportation.<br />
9. Delivery time<br />
Delivery time is stated approximately <strong>and</strong> depends on<br />
the product ordered, please allow a minimum of:<br />
2 weeks for processing North American order.<br />
6 weeks for processing International order.<br />
We will make every effort to adhere to our delivery<br />
promises, but will not accept order or contract cancellation or<br />
any liability for any direct or indirect losses that may arise for<br />
any reason whatsoever as a result of our failure to adhere to<br />
such promises.<br />
10. Return of good<br />
Goods received by the purchaser cannot be returned<br />
unless a completed "R.M.A. Form" (Return Material<br />
Authorization Form) has been issued by NEP's Customer<br />
Service.<br />
Any returned goods must be sent to NEP 400 Lebeau,<br />
Montreal, Quebec, H4N 1R6, CANADA, unless stated<br />
otherwise by the R.M.A. Form, accompanied with the<br />
completed "R.M.A. Form", the R.M.A. number shall be<br />
prominently displayed on the shipping box. Unauthorized<br />
returns will be refused.<br />
Any returned goods must be sent freight prepaid. Any<br />
goods that come to us freight collect will be refused <strong>and</strong><br />
returned to sender unless previously agreed to by us in<br />
writing on the "R.M.A. Form".<br />
Goods returned for credit shall be in condition for<br />
resale in the original box <strong>and</strong> properly packaged. Units,<br />
accessories or components that have been installed are not<br />
returnable <strong>and</strong> not refundable. Credit is subject to an<br />
overhead charge of 30% of the invoice plus shipping &<br />
h<strong>and</strong>ling if returned within 30 days of the invoice date <strong>and</strong><br />
50% from 30 to 60 days. Credit may only be applied against<br />
existing or future purchases.<br />
Non st<strong>and</strong>ard product (SK units with special feature),<br />
Multisteam manifolds <strong>and</strong> any DI unit are not returnable <strong>and</strong><br />
not refundable.<br />
11. Warranty<br />
Provided that the terms of payment are observed, the<br />
purchaser is offered a warranty of 24 months from the<br />
original purchase date of delivery for any NEP's st<strong>and</strong>ard<br />
product, provided the equipment has been properly installed<br />
<strong>and</strong> operated in accordance with NEP instructions.<br />
The warranty covers faulty manufacture, design <strong>and</strong>/or<br />
defective materials <strong>and</strong> is limited to the equipment <strong>and</strong><br />
components. The warranty shall cease to be valid in the<br />
event of misapplication, incorrect installation, improper<br />
maintenance or any other incorrect uses or misuse of the<br />
product.<br />
For the SK series, the warranty furthermore ceases to<br />
be valid if the user disconnects or removes any electronic or<br />
mechanical components prior disconnecting the input power.<br />
NEP assumes no responsibility for repairs made on<br />
equipment, unless performed by NEP's authorized<br />
personnel.<br />
The defective product or component shall be returned<br />
in accordance with the paragraph 10 (Returns of goods) as<br />
described in this document.<br />
NEP agrees under the warranty to repair or replace (at<br />
the discretion of NEP) such st<strong>and</strong>ard product or component,<br />
which upon examination by NEP are found to be defective.<br />
Product or component replaced or repaired under<br />
warranty will be sent back to the purchaser, st<strong>and</strong>ard freight<br />
paid by NEP<br />
Expenses in connection with travelling time,<br />
dismantling <strong>and</strong> mounting shall not be paid by NEP<br />
Guarantee for products or components sold but not<br />
manufactured by NEP, is only given to the same extent as<br />
given to NEP, however, not exceeding the normal NEP<br />
warranty.<br />
Parts used for repairs are warranted for the balance of<br />
the term of the warranty on the original humidifier or 90<br />
days, whichever is longer.<br />
Any repair made, after the original warranty period; at<br />
the NEP facilities are warranted for 1 month from the date of<br />
repair.<br />
12. Proper law <strong>and</strong> jurisdiction<br />
This contract is <strong>and</strong> shall be deemed to have been<br />
made in the province of Quebec, CANADA, <strong>and</strong> shall in all<br />
respects, be governed by the province of Quebec laws.<br />
28
<strong>Neptronic</strong> ®<br />
Head office:<br />
400 Blvd Lebeau, Montreal, Qc, H4N 1R6, CANADA<br />
Tel.: (1) 514 333-1433<br />
Fax: (1) 514 333-3163<br />
www.neptronic.com<br />
©2013