Propeller Technical Manual - Jabiru
Propeller Technical Manual - Jabiru
Propeller Technical Manual - Jabiru

You also want an ePaper? Increase the reach of your titles
YUMPU automatically turns print PDFs into web optimized ePapers that Google loves.
<strong>Propeller</strong> <strong>Technical</strong> <strong>Manual</strong><br />
JPM0001-1<br />
<strong>Jabiru</strong> Aircraft Pty Ltd<br />
4A482U0D And 4A484E0D <strong>Propeller</strong>s<br />
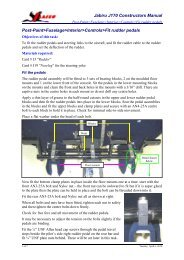
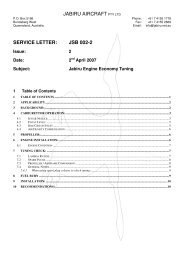
<strong>Propeller</strong> balancing vertically<br />
Balance jig – steel rulers mounted level.<br />
<strong>Propeller</strong> balance shaft (in this case an<br />
unserviceable but balanced crankshaft<br />
<strong>Propeller</strong> balancing horizontally<br />
Figure 9 – <strong>Propeller</strong> Balancing<br />
5.4 Overhaul Sequence<br />
1. Remove the propeller from the aircraft<br />
2. Thoroughly clean & inspect the propeller.<br />
3. Discard and replace all hardware (nuts & bolts) with new parts. Note that aircraft grade hardware<br />
must be used.<br />
4. Carry out the standard inspections (propeller removed) detailed in Section 5.5.<br />
5. Carry out any necessary repairs as detailed in Section 5.6.<br />
6. Carry out a final balance of the propeller as detailed in Section 5.6.1.<br />
7. Re-fit the propeller to the aircraft as detailed in Section 4.7.3.<br />
8. Ensure the propeller blades and spinner are tracking correctly - Section 4.7.6 & 4.7.7.<br />
5.5 <strong>Propeller</strong> Removed Inspections<br />
Whenever the propeller is removed from the engine, the following inspections are to be carried out:<br />
1. Drive bush fit into hub – should be a good fit. The bush should not need to be forced into the hub<br />
and there must be no slop once the bush is fitted.<br />
2. Balancing – Balance in accordance with Section 5.3.1. Alternatively, operators seeking more<br />
accurate balance may return both propeller blades to the manufacturer for fine balancing.<br />
3. Hub condition inspection – whenever the propeller is off the engine the general condition of the<br />
hub should be visually inspected. Section 5.6.2 gives details.<br />
4. Dye Penetrant Inspection - Carry out a Dye Penetrant inspection of the front and rear hubs. If<br />
cracking or defects are identified provide clear photographs to <strong>Jabiru</strong> Aircraft Pty Ltd for assessment.<br />
This document is controlled while it remains on the <strong>Jabiru</strong> server. Once this no longer applies the document becomes uncontrolled.<br />
ISSUE 1 Dated : 1st Feb 2013 Issued By: DPS Page: 30 of 32<br />
L:\files\<strong>Manual</strong>s_For_Products\<strong>Propeller</strong>_<strong>Manual</strong>s\JPM0001-1_Prop_<strong>Manual</strong> (1).doc