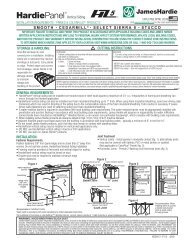
INSTALLATION REQUIREMENTS - Barker Lumber Co.
INSTALLATION REQUIREMENTS - Barker Lumber Co.
INSTALLATION REQUIREMENTS - Barker Lumber Co.

You also want an ePaper? Increase the reach of your titles
YUMPU automatically turns print PDFs into web optimized ePapers that Google loves.
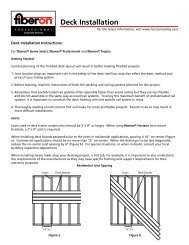
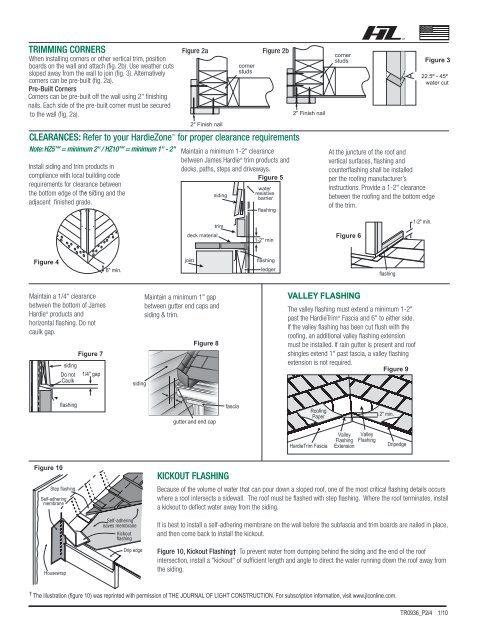
TRIMMING CORNERS<br />
When installing corners or other vertical trim, position<br />
boards on the wall and attach (fig. 2b). Use weather cuts<br />
sloped away from the wall to join (fig. 3). Alternatively<br />
corners can be pre-built (fig. 2a).<br />
Pre-Built <strong>Co</strong>rners<br />
<strong>Co</strong>rners can be pre-built off the wall using 2" finishing<br />
nails. Each side of the pre-built corner must be secured<br />
to the wall (fig. 2a).<br />
Install siding and trim products in<br />
compliance with local building code<br />
requirements for clearance between<br />
the bottom edge of the siding and the<br />
adjacent finished grade.<br />
Figure 2a<br />
2" Finish nail<br />
siding<br />
corner<br />
studs<br />
Figure 2b<br />
CLEARANCES: Refer to your HardieZone for proper clearance requirements<br />
Note: HZ5 = minimum 2" / HZ10 = minimum 1" - 2" Maintain a minimum 1-2" clearance<br />
between James Hardie ® trim products and<br />
decks, paths, steps and driveways.<br />
Figure 5<br />
water<br />
resistive<br />
barrier<br />
flashing<br />
2" Finish nail<br />
corner<br />
studs<br />
At the juncture of the roof and<br />
vertical surfaces, flashing and<br />
counterflashing shall be installed<br />
per the roofing manufacturer’s<br />
instructions. Provide a 1-2" clearance<br />
between the roofing and the bottom edge<br />
of the trim.<br />
Figure 3<br />
22.5º - 45º<br />
water cut<br />
deck material<br />
trim<br />
1-2" min<br />
Figure 6<br />
1-2" min.<br />
Figure 4<br />
6" min.<br />
joist<br />
flashing<br />
ledger<br />
flashing<br />
Maintain a 1/4" clearance<br />
between the bottom of James<br />
Hardie ® products and<br />
horizontal flashing. Do not<br />
caulk gap.<br />
siding<br />
Do not<br />
Caulk<br />
Figure 7<br />
1/4" gap<br />
siding<br />
Maintain a minimum 1" gap<br />
between gutter end caps and<br />
siding & trim.<br />
Figure 8<br />
VALLEY FLASHING<br />
The valley flashing must extend a minimum 1-2"<br />
past the HardieTrim ® Fascia and 6" to either side.<br />
If the valley flashing has been cut flush with the<br />
roofing, an additional valley flashing extension<br />
must be installed. If rain gutter is present and roof<br />
shingles extend 1" past fascia, a valley flashing<br />
extension is not required.<br />
Figure 9<br />
flashing<br />
1"<br />
gutter and end cap<br />
fascia<br />
Roofing<br />
Paper<br />
2" min.<br />
HardieTrim Fascia<br />
Valley<br />
Flashing<br />
Extension<br />
Valley<br />
Flashing<br />
Dripedge<br />
Figure 10<br />
Step flashing<br />
Self-adhering<br />
membrane<br />
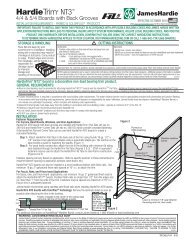
KICKOUT FLASHING<br />
Because of the volume of water that can pour down a sloped roof, one of the most critical flashing details occurs<br />
where a roof intersects a sidewall. The roof must be flashed with step flashing. Where the roof terminates, install<br />
a kickout to deflect water away from the siding.<br />
Housewrap<br />
Self-adhering<br />
eaves membrane<br />
Kickout<br />
flashing<br />
Drip edge<br />
It is best to install a self-adhering membrane on the wall before the subfascia and trim boards are nailed in place,<br />
and then come back to install the kickout.<br />
Figure 10, Kickout Flashing† To prevent water from dumping behind the siding and the end of the roof<br />
intersection, install a "kickout" of sufficient length and angle to direct the water running down the roof away from<br />
the siding.<br />
† The illustration (figure 10) was reprinted with permission of THE JOURNAL OF LIGHT CONSTRUCTION. For subscription information, visit www.jlconline.com.<br />
TR0936_P2/4 1/10