HardieTrim 5-4 Installation Inst_HZ5_1
HardieTrim 5-4 Installation Inst_HZ5_1
HardieTrim 5-4 Installation Inst_HZ5_1

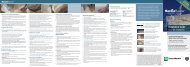
You also want an ePaper? Increase the reach of your titles
YUMPU automatically turns print PDFs into web optimized ePapers that Google loves.
4/4 & 5/4 Boards with Back Grooves<br />
EFFECTIVE OCTOBER 2010<br />
INSTALLATION REQUIREMENTS - PRIMED & COLORPLUS ® PRODUCTS<br />
Visit www.jameshardie.com for the most recent version.<br />
IMPORTANT: FAILURE TO INSTALL AND FINISH THIS PRODUCT IN ACCORDANCE WITH APPLICABLE BUILDING CODES AND JAMES HARDIE WRITTEN<br />
APPLICATION INSTRUCTIONS MAY LEAD TO PERSONAL INJURY, AFFECT SYSTEM PERFORMANCE, VIOLATE LOCAL BUILDING CODES, AND VOID THE<br />
PRODUCT ONLY WARRANTY. BEFORE INSTALLATION, CONFIRM THAT YOU ARE USING THE CORRECT HARDIEZONE INSTRUCTIONS.<br />
TO DETERMINE WHICH HARDIEZONE APPLIES TO YOUR LOCATION, VISIT WWW.HARDIEZONE.COM OR CALL 1-866-942-7343 (866 9HARDIE)<br />
STORAGE & HANDLING:<br />
CUTTING INSTRUCTIONS<br />
Store flat and keep dry and<br />
OUTDOORS<br />
INDOORS<br />
covered prior to installation. <strong>Inst</strong>alling 1. Position cutting station so that wind will blow dust away from user - NEVER use a power saw indoors<br />
siding wet or saturated may result in and others in working area.<br />
- NEVER use a circular saw blade that does not carry the HardieBlade saw blade trademark<br />
2. Use one of the following methods:<br />
shrinkage at butt joints. Carry product<br />
- NEVER dry sweep – Use wet suppression or HEPA Vacuum<br />
b. Better: i. Dust reducing circular saw equipped with a<br />
on edge. Protect edges and corners<br />
HardieBlade ® saw blade and HEPA vacuum extraction<br />
from breakage. James Hardie is not c. Good: i. Dust reducing circular saw with a HardieBlade saw blade<br />
responsible for<br />
(only use for low to moderate cutting)<br />
damage caused<br />
by improper<br />
Important Note: For maximum protection (lowest respirable dust production), James Hardie recommends always using “Best”-level cutting methods where feasible.<br />
storage and<br />
NIOSH-approved respirators can be used in conjunction with above cutting practices to further reduce dust exposures. Additional exposure information is available<br />
handling of the product.<br />
at www.jameshardie.com to help you determine the most appropriate cutting method for your job requirements. If concern still exists about exposure levels or you<br />
do not comply with the above practices, you should always consult a qualified industrial hygienist or contact James Hardie for further information. SD083105<br />
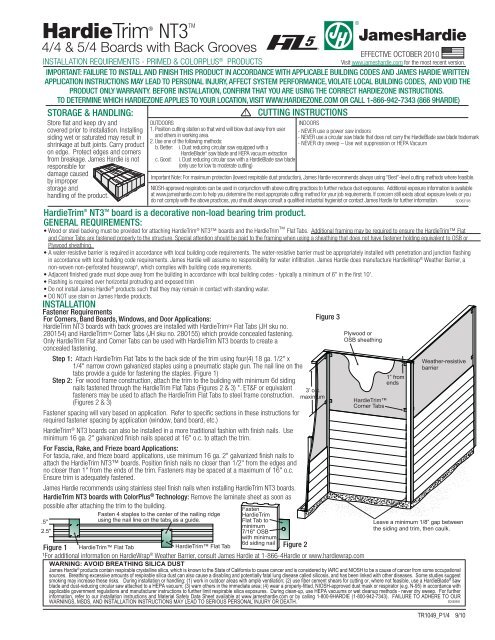
<strong>HardieTrim</strong> ® NT3 TM board is a decorative non-load bearing trim product.<br />
GENERAL REQUIREMENTS:<br />
• Wood or steel backing must be provided for attaching <strong>HardieTrim</strong> ® NT3 boards and the <strong>HardieTrim</strong> Flat Tabs. Additional framing may be required to ensure the <strong>HardieTrim</strong> Flat<br />
and Corner Tabs are fastened properly to the structure. Special attention should be paid to the framing when using a sheathing that does not have fastener holding equivalent to OSB or<br />
Plywood sheathing.<br />
• A water-resistive barrier is required in accordance with local building code requirements. The water-resistive barrier must be appropriately installed with penetration and junction flashing<br />
in accordance with local building code requirements. James Hardie will assume no responsibility for water infiltration. James Hardie does manufacture HardieWrap ® Weather Barrier, a<br />
non-woven non-perforated housewrap¹, which complies with building code requirements.<br />
• Adjacent finished grade must slope away from the building in accordance with local building codes - typically a minimum of 6" in the first 10'.<br />
• Flashing is required over horizontal protruding and exposed trim<br />
• Do not install James Hardie ® products such that they may remain in contact with standing water.<br />
• DO NOT use stain on James Hardie products.<br />
INSTALLATION<br />
Fastener Requirements<br />
For Corners, Band Boards, Windows, and Door Applications:<br />
<strong>HardieTrim</strong> NT3 boards with back grooves are installed with <strong>HardieTrim</strong> TM Flat Tabs (JH sku no.<br />
280154) and <strong>HardieTrim</strong> TM Corner Tabs (JH sku no. 280155) which provide concealed fastening.<br />
Only <strong>HardieTrim</strong> Flat and Corner Tabs can be used with <strong>HardieTrim</strong> NT3 boards to create a<br />
concealed fastening.<br />
Step 1: Attach <strong>HardieTrim</strong> Flat Tabs to the back side of the trim using four(4) 18 ga. 1/2" x<br />
1/4" narrow crown galvanized staples using a pneumatic staple gun. The nail line on the<br />
tabs provide a guide for fastening the staples. (Figure 1)<br />
Step 2: For wood frame construction, attach the trim to the building with minimum 6d siding<br />
nails fastened through the <strong>HardieTrim</strong> Flat Tabs (Figures 2 & 3) *. ET&F or equivalent<br />
fasteners may be used to attach the <strong>HardieTrim</strong> Flat Tabs to steel frame construction.<br />
(Figures 2 & 3)<br />
Fastener spacing will vary based on application. Refer to specific sections in these instructions for<br />
required fastener spacing by application (window, band board, etc.)<br />
<strong>HardieTrim</strong> ® NT3 boards can also be installed in a more traditional fashion with finish nails. Use<br />
minimum 16 ga. 2" galvanized finish nails spaced at 16" o.c. to attach the trim.<br />
For Fascia, Rake, and Frieze board Applications:<br />
For fascia, rake, and frieze board applications, use minimum 16 ga. 2" galvanized finish nails to<br />
attach the <strong>HardieTrim</strong> NT3 boards. Position finish nails no closer than 1/2" from the edges and<br />
no closer than 1" from the ends of the trim. Fasteners may be spaced at a maximum of 16" o.c.<br />
Ensure trim is adequately fastened.<br />
James Hardie recommends using stainless steel finish nails when installing <strong>HardieTrim</strong> NT3 boards.<br />
<strong>HardieTrim</strong> NT3 boards with ColorPlus ® Technology: Remove the laminate sheet as soon as<br />
possible after attaching the trim to the building.<br />
.5"<br />
2.5"<br />
NT3 TM<br />
Fasten 4 staples to the center of the nailing ridge<br />
using the nail line on the tabs as a guide.<br />
Fasten<br />
<strong>HardieTrim</strong><br />
Flat Tab to<br />
minimum<br />
7/16" OSB<br />
with minimum<br />
3’ o.c.<br />
maximum<br />
Figure 3<br />
Plywood or<br />
OSB sheathing<br />
6d siding nail<br />
Figure 1 <strong>HardieTrim</strong> Flat Tab<br />
<strong>HardieTrim</strong> Flat Tab<br />
Figure 2<br />
¹For additional information on HardieWrap ® Weather Barrier, consult James Hardie at 1-866-4Hardie or www.hardiewrap.com<br />
<strong>HardieTrim</strong><br />
Corner Tabs<br />
Weather-resistive<br />
barrier<br />
Leave a minimum 1/8” gap between<br />
the siding and trim, then caulk.<br />
James Hardie ® products contain respirable crystalline silica, which is known to the State of California to cause cancer and is considered by IARC and NIOSH to be a cause of cancer from some occupational<br />
sources. Breathing excessive amounts of respirable silica dust can also cause a disabling and potentially fatal lung disease called silicosis, and has been linked with other diseases. Some studies suggest<br />
smoking may increase these risks. During installation or handling: (1) work in outdoor areas with ample ventilation; (2) use fiber cement shears for cutting or, where not feasible, use a HardieBlade ® saw<br />
blade and dust-reducing circular saw attached to a HEPA vacuum; (3) warn others in the immediate area; (4) wear a properly-fitted, NIOSH-approved dust mask or respirator (e.g. N-95) in accordance with<br />
applicable government regulations and manufacturer instructions to further limit respirable silica exposures. During clean-up, use HEPA vacuums or wet cleanup methods - never dry sweep. For further<br />
information, refer to our installation instructions and Material Safety Data Sheet available at www.jameshardie.com or by calling 1-800-9HARDIE (1-800-942-7343). FAILURE TO ADHERE TO OUR<br />
WARNINGS, MSDS, AND INSTALLATION INSTRUCTIONS MAY LEAD TO SERIOUS PERSONAL INJURY OR DEATH.<br />
SD050905<br />
1” from<br />
ends<br />
TR1049_P1/4 9/10
TRIMMING CORNERS<br />
<strong>HardieTrim</strong> ® NT3 boards with back grooves are installed around corners by pre-building the corner off the wall with the <strong>HardieTrim</strong> Corner Tabs (JH sku no.<br />
280155).<br />
• Attach <strong>HardieTrim</strong> Corner Tabs to the back side of the trim using eight(8) - 18 ga. 1/2" x 1/4" narrow crown galvanized staples using a pneumatic stapler.<br />
Ensure the <strong>HardieTrim</strong> Corner Tabs are fastened tight and straight to the trim boards. (Figure 4)<br />
• For wood frame construction, attach trim to building using min. 6d siding nails fastened through the <strong>HardieTrim</strong> Corner Tabs attached to minimum 7/16" OSB *.<br />
(Figure 5)<br />
• Attach a <strong>HardieTrim</strong> Corner Tab 1" from each ends and every 3' o.c.<br />
• TIP: Creating a jig for the work station is recommended to ensure corners are fastened securely and straight. (Figure 7)<br />
<strong>HardieTrim</strong><br />
Corner Tab<br />
Use 4 staples per piece<br />
of trim to fasten the<br />
L-shaped tab to the<br />
pre-built corner. Use<br />
the nail line on the<br />
tabs as a guide.<br />
Siding nail<br />
Figure 4 Figure 5<br />
<strong>HardieTrim</strong> NT3 boards with back<br />
grooves can also be installed directly to the<br />
building corners using minimum 16 ga. 2"<br />
galvanized finish nails 16" o.c.<br />
corner<br />
studs<br />
Corner studs<br />
<strong>HardieTrim</strong><br />
Corner Tab<br />
CLEARANCES When installing James Hardie ®<br />
products, all clearance details need to be followed.<br />
<strong>Inst</strong>all siding and trim products in compliance with<br />
local building code requirements for clearance<br />
between the bottom edge of the siding and the<br />
adjacent finished grade.<br />
22.5º - 45º<br />
weather cut<br />
Maintain a minimum 2" clearance between<br />
James Hardie ® trim products and decks,<br />
paths, steps and driveways.<br />
Joist<br />
<strong>HardieTrim</strong><br />
Corner Tabs<br />
Figure 6 Figure 7<br />
Deck material<br />
<strong>HardieTrim</strong> ®<br />
NT3 Boards<br />
HardiePlank ® siding<br />
1/4" gap<br />
Flashing<br />
<strong>HardieTrim</strong> ®<br />
NT3 board<br />
Fasten 2” x 4”<br />
timber blocks<br />
to a work bench<br />
Fasten 2” x 8” stud<br />
to the timber blocks<br />
Waterresistive<br />
barrier<br />
<strong>HardieTrim</strong><br />
Flat Tab<br />
2" min<br />
Figure 8<br />
2" Finish nail<br />
Figure 9<br />
6"<br />
Figure 10<br />
Flashing<br />
Ledger<br />
At the juncture of the roof and vertical<br />
surfaces, flashing and counterflashing<br />
shall be installed per the roofing<br />
manufacturer’s instructions. Provide a 2"<br />
clearance between the roofing and the<br />
bottom edge of the trim.<br />
2" min.<br />
Maintain a 1/4" clearance between the bottom<br />
of James Hardie ® products and horizontal<br />
flashing. Do not caulk gap.<br />
HardiePlank ® siding<br />
Do not caulk<br />
Flashing<br />
1/4" gap<br />
Maintain a minimum 1" gap<br />
between gutter end caps and<br />
siding & trim.<br />
Figure 13<br />
Figure 11<br />
VALLEY FLASHING<br />
The valley flashing must extend a minimum 2" past<br />
the <strong>HardieTrim</strong> ® Fascia and 6" to either side. If the<br />
valley flashing has been cut flush with the roofing, an<br />
additional valley flashing extension must be installed. If<br />
rain gutter is present and roof shingles extend 1" past<br />
fascia, a valley flashing extension is not required.<br />
Figure 14<br />
Flashing<br />
Figure 15<br />
<strong>HardieTrim</strong> ® NT3 board<br />
Figure 12<br />
<strong>HardieTrim</strong> Flat Tab<br />
Housewrap<br />
Step<br />
flashing<br />
Kickout flashing<br />
HardiePlank ®<br />
siding<br />
1"<br />
Gutter and end cap<br />
<strong>HardieTrim</strong> ®<br />
Fascia<br />
KICKOUT FLASHING<br />
Because of the volume of water that can pour down a<br />
sloped roof, one of the most critical flashing details<br />
occurs where a roof intersects a sidewall. The roof must<br />
be flashed with step flashing. Where the roof terminates,<br />
install a kickout to deflect water away from the siding.<br />
It is best to install a self-adhering membrane on the wall<br />
before the subfascia and trim boards are nailed in place,<br />
and then come back to install the kickout.<br />
Roofing<br />
Paper<br />
<strong>HardieTrim</strong>® Fascia<br />
Valley<br />
Flashing<br />
Extension<br />
Valley<br />
Flashing<br />
2" min.<br />
Dripedge<br />
Self-adhering<br />
eaves membrane<br />
Drip edge<br />
Figure 15, Kickout Flashing To prevent water from<br />
dumping behind the siding and the end of the roof<br />
intersection, install a "kickout" of sufficient length and<br />
angle to direct the water running down the roof away<br />
from the siding.<br />
TR1049_P2/4 9/10
TRIM APPLICATION FOR WINDOWS, DOORS<br />
& OTHER OPENINGS<br />
Trim the opening prior to the installation of the siding (Figure 16).<br />
For openings less than 4' in size, place a <strong>HardieTrim</strong> Flat Tab at the end of each trim<br />
board and one tab in the center of each trim. Attach the trim boards and <strong>HardieTrim</strong><br />
Flat Tabs around the opening as shown in Figures 15 and 16. Use 16 ga. galvanized 2"<br />
finish nails to ensure proper fastening if needed.<br />
For openings greater than 4' in size, place a <strong>HardieTrim</strong> Flat Tab at the end of each<br />
trim board and one tab for each framing member at a maximum of 24" o.c. Attach the<br />
trim boards and <strong>HardieTrim</strong> Flat Tabs around the opening as shown in Figures 16<br />
and 17. Use 16 ga. galvanized 2" long finish nails to ensure proper fastening if needed.<br />
Figure 16 Figure 17<br />
Header piece spans the window<br />
including the side trim pieces.<br />
Side trim pieces go to<br />
the top of the window.<br />
Flashing needs to be<br />
tucked under the water<br />
resistive barrier and over<br />
the <strong>HardieTrim</strong> Flat Tabs.<br />
Water-resistive Barrier<br />
Do not caulk between the<br />
siding and the flashing.<br />
1/4" gap<br />
Bottom trim piece<br />
is the width of the<br />
window.<br />
NOTE: Follow your window/door manufacturers<br />
installation instructions.<br />
1/8" caulked gap is left between<br />
siding and the side trim pieces.<br />
Figure 18<br />
BAND BOARDS, FRIEZE BOARDS, RAKE TRIM & FASCIA<br />
<strong>HardieTrim</strong> ® NT3 boards may also be used as band boards, frieze boards,<br />
rake trim or fascia (Figure 19).<br />
2x sub fascia<br />
Figure 19 Soffit panel<br />
<strong>HardieTrim</strong> ® NT3<br />
board<br />
FASCIA & RAKE<br />
For fascia and rake applications, a flashing is required over top of the<br />
fascia (Figure 21).<br />
Figure 21<br />
Roof sheathing<br />
Roofing<br />
Roof underlayment<br />
<strong>HardieTrim</strong> ® NT3<br />
board<br />
Flashing<br />
Roof framing<br />
Drip edge flashing<br />
<strong>HardieTrim</strong> ®<br />
NT3 TM board (ensure<br />
adequate fastening)<br />
Finishing nails<br />
<strong>HardieTrim</strong> ® NT3<br />
Band Board<br />
Soffit<br />
Subfascia<br />
FRIEZE BOARDS<br />
Plywood or<br />
OSB<br />
sheathing<br />
Leave a minimum 1/8" gap, then caulk.<br />
Frieze board<br />
Water-resistive barrier<br />
Terminate frieze board<br />
into <strong>HardieTrim</strong> ® NT3 TM Board<br />
Fasten frieze board<br />
to framing utilizing<br />
16 galvanized 2"<br />
long finish nails.<br />
Ensure proper<br />
fastening.<br />
Figure 22<br />
Birdhouse Detail<br />
Ensure that<br />
all birdhouse<br />
trim is<br />
adequately<br />
fastened to a<br />
solid<br />
substrate.<br />
HardieSoffit ® Panel<br />
2x sub fascia<br />
<strong>HardieTrim</strong> ® NT3 TM board<br />
HardiePlank ® Siding<br />
<strong>HardieTrim</strong> ®<br />
NT3 TM Board<br />
Figure 20<br />
<strong>HardieTrim</strong> ® Fascia<br />
HardieSoffit ® Panels<br />
TR1049_P3/4 9/10
BAND BOARD<br />
A flashing is required over the trim and <strong>HardieTrim</strong> Flat Tabs. (Figure 23) Terminate ends of the<br />
Band Board into Trim or Siding or miter cut the edges of the trim at the corners of the building.<br />
Place a <strong>HardieTrim</strong> Flat Tab at the end of each trim board and one tab every stud at a maximum<br />
of 24" o.c. The <strong>HardieTrim</strong> Flat Tabs should be attached to the trim in an alternating pattern to<br />
the top and bottom of the band board (Figure 24, 25). Use 16 ga. galvanized 2" long finish nails to<br />
ensure proper fastening if needed. Fasten 4 staples to the center of the nailing ridge<br />
<strong>HardieTrim</strong> Flat Tabs<br />
24" o.c. max<br />
<strong>HardieTrim</strong> Flat Tabs<br />
Figure 24<br />
Blocking<br />
Figure 23<br />
Sheathing<br />
Weather-resistive barrier<br />
HardiePlank ® Siding<br />
1/4" gap. Do not caulk.<br />
Flashing<br />
<strong>HardieTrim</strong> ® NT3 TM Board<br />
24" o.c. max<br />
GENERAL FASTENING REQUIREMENTS<br />
PNEUMATIC FASTENING:<br />
<strong>HardieTrim</strong> ® NT3 TM boards with the back groove can be fastened with a<br />
pneumatic tool. All fasteners should be driven flush to the <strong>HardieTrim</strong> Flat<br />
and Corner Tabs (Figure 26). A flush mount attachment on the pneumatic<br />
tool is recommended. This will help control the depth the fastener is driven.<br />
If setting the depth proves difficult, choose a setting that under drives the<br />
fastener. (Drive under driven fasteners snug with a smooth faced hammer -<br />
Does not apply for installation to steel framing).<br />
CUT EDGE TREATMENT<br />
Caulk, paint or prime all field cut<br />
edges.<br />
CAULKING<br />
Figure 25<br />
Fasteners must be corrosion resistant, galvanized, or stainless steel.<br />
Electro-galvanized are acceptable but may exhibit premature corrosion.<br />
James Hardie recommends the use of quality, hot-dipped galvanized<br />
fasteners. James Hardie is not responsible for the corrosion resistance<br />
of fasteners. Stainless steel fasteners are recommended when installing<br />
James Hardie ® products near the ocean, large bodies of water, or very<br />
humid climates.<br />
Flush<br />
<strong>HardieTrim</strong> <br />
Flat and<br />
Corner Tabs<br />
Siding nail<br />
attaches tab<br />
to the wall.<br />
For best results use an Elastomeric Joint Sealant complying<br />
with ASTM C920 Grade NS, Class 25 or higher or a Latex<br />
Joint Sealant complying with ASTM C834. Caulking/Sealant<br />
must be applied in accordance with the caulking/sealant<br />
manufacturer’s written instructions or ASTM C1193.<br />
• Drive fasteners perpendicular to the trim and framing.<br />
• Do not drive fasteners at an angle.<br />
• For wood framing, under driven fasteners should be hit flush to the <strong>HardieTrim</strong><br />
Flat and Corner Tabs with a hammer (for steel framing, remove and replace nail).<br />
• Do not use aluminum fasteners, staples, or clipped head nails to attach the<br />
product directly to the building.<br />
Figure 26<br />
<strong>HardieTrim</strong> Flat Tabs<br />
<strong>HardieTrim</strong> <br />
Flat and Corner Tabs<br />
Do not<br />
under<br />
drive nails.<br />
PAINTING<br />
Only use staples to<br />
fasten <strong>HardieTrim</strong> Flat and<br />
Corner Tabs to the trim boards.<br />
DO NOT use stain on James Hardie ® products. James<br />
Hardie products must be painted within 180 days for<br />
primed product and 90 days for unprimed.<br />
100% acrylic topcoats are recommended.<br />
Do not paint when wet. For application rates refer to paint<br />
manufacturers specifications.<br />
Back-rolling is recommended if the siding is sprayed.<br />
COLORPLUS ® TECHNOLOGY CAULKING, TOUCH-UP & LAMINATE<br />
• Touch up nicks, scrapes and nail heads using the ColorPlus ® Technology touch-up applicator. Touch-up paint should be used sparingly.<br />
If large areas require touch-up, replace the damaged area with new <strong>HardieTrim</strong> NT3 TM board with ColorPlus Technology.<br />
• Laminate sheet must be removed immediately after installation of each trim board.<br />
• Terminate non-factory cut edges into trim where possible, and caulk. Color matched caulks are available from your ColorPlus ® product dealer.<br />
• Treat all other non-factory cut edges using the ColorPlus Technology edge coaters, available from your ColorPlus product dealer.<br />
PAINTING JAMES HARDIE ® SIDING AND TRIM PRODUCTS WITH COLORPLUS ® TECHNOLOGY<br />
When repainting ColorPlus ® products, James Hardie recommends the following regarding surface preparation and topcoat application:<br />
• Ensure the surface is clean, dry, and free of any dust, dirt, or mildew<br />
• Repriming is normally not necessary<br />
• 100% acrylic topcoats are recommended<br />
• DO NOT use stain or oil/alkyd based paints<br />
• Apply finish coat in accordance with paint manufacturers written instructions regarding coverage, application methods, and application temperature<br />
RECOGNITION: <strong>HardieTrim</strong> NT3 TM boards may be installed as an equal alternative to conventional trim permitted for use in; the 2003 International Residence Code for One - and Two - Family - Dwellings, Section R703.1.<br />
the 2003 International Residence Code for One - and Two - Family - Dwellings, Section R703.1.<br />
Caulk<br />
© 2010 James Hardie Technology Limited. All rights reserved.<br />
TM, SM, and ® denote trademarks or registered trademarks of<br />
James Hardie Technology Limited. is a registered<br />
trademark of James Hardie Technology Limited.<br />
Additional <strong><strong>Inst</strong>allation</strong> Information,<br />
Warranties, and Warnings are available at<br />
www.jameshardie.com<br />
TR1049_P4/4 9/10