HardieTrim 5-4 Installation Inst_HZ5_1
HardieTrim 5-4 Installation Inst_HZ5_1
HardieTrim 5-4 Installation Inst_HZ5_1

Create successful ePaper yourself
Turn your PDF publications into a flip-book with our unique Google optimized e-Paper software.
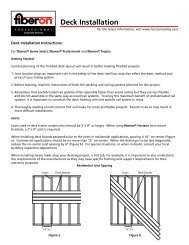
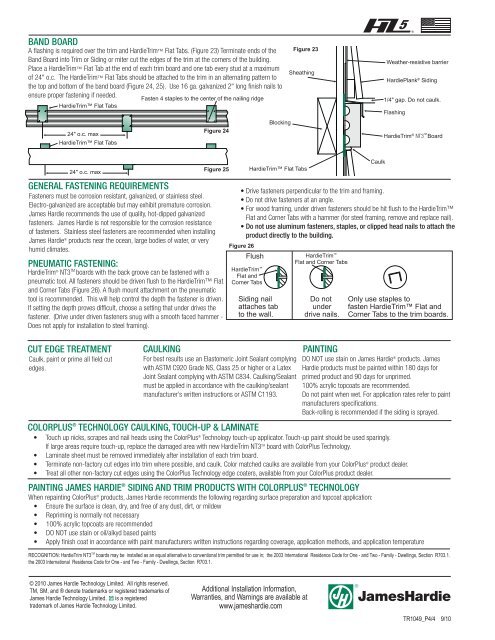
BAND BOARD<br />
A flashing is required over the trim and <strong>HardieTrim</strong> Flat Tabs. (Figure 23) Terminate ends of the<br />
Band Board into Trim or Siding or miter cut the edges of the trim at the corners of the building.<br />
Place a <strong>HardieTrim</strong> Flat Tab at the end of each trim board and one tab every stud at a maximum<br />
of 24" o.c. The <strong>HardieTrim</strong> Flat Tabs should be attached to the trim in an alternating pattern to<br />
the top and bottom of the band board (Figure 24, 25). Use 16 ga. galvanized 2" long finish nails to<br />
ensure proper fastening if needed. Fasten 4 staples to the center of the nailing ridge<br />
<strong>HardieTrim</strong> Flat Tabs<br />
24" o.c. max<br />
<strong>HardieTrim</strong> Flat Tabs<br />
Figure 24<br />
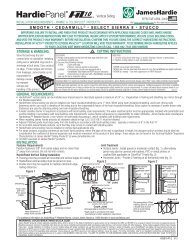
Blocking<br />
Figure 23<br />
Sheathing<br />
Weather-resistive barrier<br />
HardiePlank ® Siding<br />
1/4" gap. Do not caulk.<br />
Flashing<br />
<strong>HardieTrim</strong> ® NT3 TM Board<br />
24" o.c. max<br />
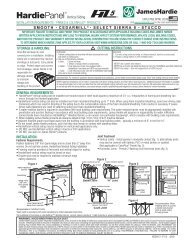
GENERAL FASTENING REQUIREMENTS<br />
PNEUMATIC FASTENING:<br />
<strong>HardieTrim</strong> ® NT3 TM boards with the back groove can be fastened with a<br />
pneumatic tool. All fasteners should be driven flush to the <strong>HardieTrim</strong> Flat<br />
and Corner Tabs (Figure 26). A flush mount attachment on the pneumatic<br />
tool is recommended. This will help control the depth the fastener is driven.<br />
If setting the depth proves difficult, choose a setting that under drives the<br />
fastener. (Drive under driven fasteners snug with a smooth faced hammer -<br />
Does not apply for installation to steel framing).<br />
CUT EDGE TREATMENT<br />
Caulk, paint or prime all field cut<br />
edges.<br />
CAULKING<br />
Figure 25<br />
Fasteners must be corrosion resistant, galvanized, or stainless steel.<br />
Electro-galvanized are acceptable but may exhibit premature corrosion.<br />
James Hardie recommends the use of quality, hot-dipped galvanized<br />
fasteners. James Hardie is not responsible for the corrosion resistance<br />
of fasteners. Stainless steel fasteners are recommended when installing<br />
James Hardie ® products near the ocean, large bodies of water, or very<br />
humid climates.<br />
Flush<br />
<strong>HardieTrim</strong> <br />
Flat and<br />
Corner Tabs<br />
Siding nail<br />
attaches tab<br />
to the wall.<br />
For best results use an Elastomeric Joint Sealant complying<br />
with ASTM C920 Grade NS, Class 25 or higher or a Latex<br />
Joint Sealant complying with ASTM C834. Caulking/Sealant<br />
must be applied in accordance with the caulking/sealant<br />
manufacturer’s written instructions or ASTM C1193.<br />
• Drive fasteners perpendicular to the trim and framing.<br />
• Do not drive fasteners at an angle.<br />
• For wood framing, under driven fasteners should be hit flush to the <strong>HardieTrim</strong><br />
Flat and Corner Tabs with a hammer (for steel framing, remove and replace nail).<br />
• Do not use aluminum fasteners, staples, or clipped head nails to attach the<br />
product directly to the building.<br />
Figure 26<br />
<strong>HardieTrim</strong> Flat Tabs<br />
<strong>HardieTrim</strong> <br />
Flat and Corner Tabs<br />
Do not<br />
under<br />
drive nails.<br />
PAINTING<br />
Only use staples to<br />
fasten <strong>HardieTrim</strong> Flat and<br />
Corner Tabs to the trim boards.<br />
DO NOT use stain on James Hardie ® products. James<br />
Hardie products must be painted within 180 days for<br />
primed product and 90 days for unprimed.<br />
100% acrylic topcoats are recommended.<br />
Do not paint when wet. For application rates refer to paint<br />
manufacturers specifications.<br />
Back-rolling is recommended if the siding is sprayed.<br />
COLORPLUS ® TECHNOLOGY CAULKING, TOUCH-UP & LAMINATE<br />
• Touch up nicks, scrapes and nail heads using the ColorPlus ® Technology touch-up applicator. Touch-up paint should be used sparingly.<br />
If large areas require touch-up, replace the damaged area with new <strong>HardieTrim</strong> NT3 TM board with ColorPlus Technology.<br />
• Laminate sheet must be removed immediately after installation of each trim board.<br />
• Terminate non-factory cut edges into trim where possible, and caulk. Color matched caulks are available from your ColorPlus ® product dealer.<br />
• Treat all other non-factory cut edges using the ColorPlus Technology edge coaters, available from your ColorPlus product dealer.<br />
PAINTING JAMES HARDIE ® SIDING AND TRIM PRODUCTS WITH COLORPLUS ® TECHNOLOGY<br />
When repainting ColorPlus ® products, James Hardie recommends the following regarding surface preparation and topcoat application:<br />
• Ensure the surface is clean, dry, and free of any dust, dirt, or mildew<br />
• Repriming is normally not necessary<br />
• 100% acrylic topcoats are recommended<br />
• DO NOT use stain or oil/alkyd based paints<br />
• Apply finish coat in accordance with paint manufacturers written instructions regarding coverage, application methods, and application temperature<br />
RECOGNITION: <strong>HardieTrim</strong> NT3 TM boards may be installed as an equal alternative to conventional trim permitted for use in; the 2003 International Residence Code for One - and Two - Family - Dwellings, Section R703.1.<br />
the 2003 International Residence Code for One - and Two - Family - Dwellings, Section R703.1.<br />
Caulk<br />
© 2010 James Hardie Technology Limited. All rights reserved.<br />
TM, SM, and ® denote trademarks or registered trademarks of<br />
James Hardie Technology Limited. is a registered<br />
trademark of James Hardie Technology Limited.<br />
Additional <strong><strong>Inst</strong>allation</strong> Information,<br />
Warranties, and Warnings are available at<br />
www.jameshardie.com<br />
TR1049_P4/4 9/10