

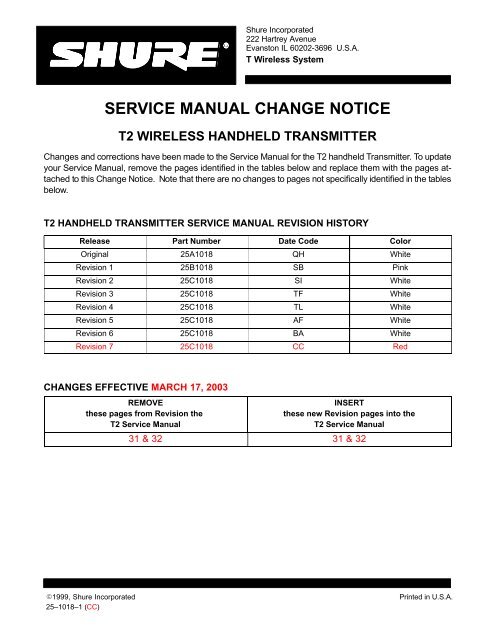
SERVICE MANUAL CHANGE NOTICE
shure
shure

Create successful ePaper yourself
Turn your PDF publications into a flip-book with our unique Google optimized e-Paper software.
Shure Incorporated<br />
222 Hartrey Avenue<br />
Evanston IL 60202-3696 U.S.A.<br />
T Wireless System<br />
<strong>SERVICE</strong> <strong>MANUAL</strong> <strong>CHANGE</strong> <strong>NOTICE</strong><br />
T2 WIRELESS HANDHELD TRANSMITTER<br />
Changes and corrections have been made to the Service Manual for the T2 handheld Transmitter. To update<br />
your Service Manual, remove the pages identified in the tables below and replace them with the pages attached<br />
to this Change Notice. Note that there are no changes to pages not specifically identified in the tables<br />
below.<br />
T2 HANDHELD TRANSMITTER <strong>SERVICE</strong> <strong>MANUAL</strong> REVISION HISTORY<br />
Release Part Number Date Code Color<br />
Original 25A1018 QH White<br />
Revision 1 25B1018 SB Pink<br />
Revision 2 25C1018 SI White<br />
Revision 3 25C1018 TF White<br />
Revision 4 25C1018 TL White<br />
Revision 5 25C1018 AF White<br />
Revision 6 25C1018 BA White<br />
Revision 7 25C1018 CC Red<br />
<strong>CHANGE</strong>S EFFECTIVE MARCH 17, 2003<br />
REMOVE<br />
these pages from Revision the<br />
T2 Service Manual<br />
INSERT<br />
these new Revision pages into the<br />
T2 Service Manual<br />
31 & 32 31 & 32<br />
1999, Shure Incorporated Printed in U.S.A.<br />
25–1018–1 (CC)
Á ÁÁ<br />
ÁÁ Á<br />
ÁÁ<br />
Á<br />
®<br />
T2 Vocal Artist Microphone-Transmitter<br />
Service Manual<br />
25C1018 (CC)<br />
Characteristics<br />
General<br />
This section tells how to service and align the Shure Vocal Artist T2<br />
Microphone-Transmitter (Figure 1). The single-channel, crystal-controlled<br />
transmitter operates in the 169 MHz to 216 MHz (FCC-approved<br />
models) or 173–240 MHz (ETSI-approved models) VHF band. (The differences<br />
between the two versions of this product are explained on the next<br />
page.)<br />
Á<br />
ÁÁÁÁÁÁ<br />
ÁÁÁÁ<br />
Á<br />
ÁÁ<br />
ÁÁÁÁ<br />
ÁÁÁÁ<br />
ÁÁÁ<br />
ÁÁÁÁ<br />
ÁÁÁÁ<br />
Figure 1.<br />
ÁÁÁÁ<br />
Service Note: Shure recommends that all service procedures be<br />
performed by a factory-authorized service center or that the product<br />
be returned directly to Shure Brothers Inc.<br />
Á Á<br />
ÁÁÁÁ<br />
Licensing: Operation may require a user license. Frequency or<br />
power-output modifications may violate this product’s approvals.<br />
Contact your country’s communications authorities.<br />
1999, Shure, Inc.<br />
Printed in U.S.A.<br />
25C1018 (CC)<br />
1 Characteristics
Shure T2 Vocal Artist Microphone Transmitter<br />
Circuit Description<br />
This unit contains two interconnected circuit boards that comprise<br />
the audio and RF sections, respectively. It is intended for use with the<br />
matching T3 and T4 receivers.<br />
FCC-Approved vs. ETSI-Approved Models: Models approved by<br />
the Federal Communications Commission (assembly number 90–8690,<br />
with boards marked 34A8494) have different sections from those approved<br />
by the European Telecommunications Standards Institute (assembly<br />
number 90–8705, with boards marked 34A8538). The FCC-approved<br />
version, sold in North America and many other places, uses only<br />
the frequencies listed in Table 3 on page 12. The ETSI-approved version,<br />
sold in Europe and many other places, uses only the frequencies listed<br />
in Table 4 on page 13. Hence, the following circuit descriptions have separate<br />
sections for the two RF boards. The audio sections are the same<br />
for all T2 models.<br />
Audio Section<br />
Input: The microphone element converts the sound source into an<br />
electrical signal, which then enters the audio board through the center<br />
contact of the head board (Figure 5, page 16).<br />
Preamplifier Stage: This is centered in one section of operational<br />
amplifier U102C. Externally accessible potentiometer R175 adjusts the<br />
voltage gain of this stage over a 25 dB range.<br />
Passive Pre-emphasis Network and Compandor: The network<br />
(R145, C110, C111, C112, and R115) has a pole at 63 microseconds and<br />
a zero at 12 microseconds. The NE571D integrated circuit compander<br />
(U101A) provides 2:1 logarithmic compression of the audio signal.<br />
Noise, Distortion, and Limiting: U102A lowers the noise floor, and<br />
internal potentiometer R130 nulls the system audio distortion. Operational<br />
amplifier U102B, operating as a two-pole, active low-pass filter,<br />
restricts the bandwidth of the system to the audio frequencies. PNP transistors<br />
Q103 and Q104 limit the level of the audio signal leaving the<br />
audio section via U102B.<br />
5 Vdc Bias and LED Drive Circuits: The NE571D’s identical second<br />
channel (U101B) supplies regulated, low-noise 5 Vdc bias to various<br />
audio and RF circuit points. Transistor Q105 provides “reverse battery<br />
protection” to the circuit. Q106 drives LED D101 (“Power 0n”), and Q107<br />
drives LED D102 (“Low Battery”).<br />
RF Section: FCC-Approved Models<br />
Audio Input: Processed audio enters R217, an internal potentiometer<br />
that is adjusted for 15 kHz deviation (100% modulation) when the<br />
audio section provides a –2.2 dBV, 1 kHz tone.<br />
Oscillation: The audio then goes to varactor diode D201, which is<br />
part of the modulated oscillator-tripler stage (Q201). The latter’s baseemitter<br />
circuit operates as a crystal-controlled Colpitts oscillator in the<br />
Characteristics<br />
2<br />
25C1018 (CC)
Shure T2 Vocal Artist Microphone Transmitter<br />
20 MHz region. Fundamental-mode crystal Y201 is tuned 10 kHz below<br />
series resonance by the series combination of frequency-netting coil<br />
L209, diode D201, capacitor C214, and capacitor divider C224 and<br />
C230.<br />
Frequency and Temperature Stability: To ensure frequency stability<br />
despite changes in the battery voltage, regulated 5 Vdc bias is applied<br />
to the varactor diode and to the base of Q201. C224, C230, and<br />
C214 provide temperature compensation.<br />
Tuned Circuits (FCC-Approved Models)<br />
Stage 1: The collector circuit of Q201 is tuned to the third harmonic<br />
of the oscillator frequency (approximately 60 MHz) by L205, C225, C234,<br />
L202, C217, C237, and C233. (The latter components also form a capacitively<br />
tapped voltage divider for matching into the base of Q203.)<br />
The output is double-tuned to provide high spectral purity. Regulated dc<br />
bias is again employed to minimize changes in loading on the oscillator<br />
stage and to stabilize the drive levels.<br />
Stage 2: Q203 operates as a frequency tripler, with the collector circuit<br />
tuned to the output frequency (for example, 180 MHz). In this case,<br />
L204, C216, C238, C236, L210, C235, and C222 perform tuning and<br />
impedance-matching functions. As in the preceding stage, regulated dc<br />
bias is applied to the base circuit to stabilize the drive level, and the<br />
output is double-tuned to provide spectral purity.<br />
Stage 3: Q204 operates as a tuned amplifier. Resistive loading on<br />
the input provides stability. The output circuit consists of a resonant tank<br />
circuit (L203 and C213) capacitively coupled to a low-pass filter (C219,<br />
L206, and C218). C213 and C219 provide a capacitively tapped voltage<br />
divider for matching into the low-pass filter.<br />
Final Output (FCC-Approved Models)<br />
Transmitter: This can deliver up to +17 dBm (50 milliwatts) to the<br />
antenna. No user adjustments permit this value to be exceeded. Testpoint<br />
I110 provides a termination point for the 50 Ω output. C211 and<br />
L207 act as a series resonating network for the battery, which acts as the<br />
antenna. The unit should be powered exclusively by a 9 Vdc dry battery<br />
(an alkaline type like the Duracell MN1604 is recommended).<br />
Voltage Measurements: With 9 Vdc applied to the unit, the following<br />
voltages should appear at the terminals of the output transistor:<br />
<br />
<br />
<br />
<br />
<br />
<br />
<br />
Vc = 8.88 Vdc<br />
Vb = .450 Vdc<br />
Ve = .473 Vdc<br />
Base current = 0.29 mAdc<br />
Emitter current = 21.5 mAdc<br />
Collector current = 21.8 mAdc<br />
Power input = 183 mW<br />
25C1018 (CC)<br />
3 Characteristics
Shure T2 Vocal Artist Microphone Transmitter<br />
The output power is +16.5 dBm (44.7 mW) into a 50 Ω load, at a frequency<br />
of 169.4445 MHz. At the lowest acceptable battery voltage of<br />
6 Vdc, the final collector current drops to 15 mAdc and the output power<br />
to +13.9 dBm (24.4 mW).<br />
Spurious Emissions: To minimize the production and radiation of<br />
spurious emissions and harmonic energy, and to promote stable operation,<br />
the collector of each RF stage is separately decoupled from the 9 V<br />
supply by ferrite chokes, resistors, and bypass capacitors. The base circuits<br />
are similarly decoupled except they use resistor-capacitor (R-C)<br />
networks, whose higher-impedance levels are more appropriate.<br />
RF Section: ETSI-Approved Models<br />
Audio Input: Processed audio enters R201, an internal potentiometer<br />
that is adjusted for 15 kHz deviation (100% modulation) when the<br />
audio section provides a –2.2 dBV, 1 kHz tone.<br />
Oscillation: The audio then goes to varactor diode D201, which is<br />
part of the modulated oscillator-tripler stage (Q201). The latter’s baseemitter<br />
circuit operates as a crystal-controlled Colpitts oscillator in the<br />
20 MHz region. Fundamental-mode crystal Y201 is tuned 10 kHz below<br />
series resonance by the series combination of frequency-netting coil<br />
L201, diode D201, capacitor C203, and capacitor divider C206 and<br />
C207.<br />
Frequency and Temperature Stability: To ensure frequency stability<br />
despite changes in the battery voltage, regulated 5 Vdc bias is applied<br />
to the varactor diode and to the base of Q201. C203, C206, and<br />
C207 provide temperature compensation.<br />
Tuned Circuits (ETSI-Approved Models)<br />
Stage 1: The collector circuit of Q201 is tuned to the third harmonic<br />
of the oscillator frequency (approximately 60 MHz) by L202, C208, C244,<br />
C210, L203, C214, C213, and C215. (The latter components also form a<br />
capacitively tapped voltage divider for matching into the base of Q202.)<br />
The output is double-tuned to provide high spectral purity. Regulated dc<br />
bias is again employed to minimize changes in loading on the oscillator<br />
stage and to stabilize the drive levels.<br />
Stage 2: Q202 operates as a buffer, with the collector circuit tuned to<br />
the output frequency (for example, 60 MHz). In this case, L204, C216,<br />
C245, C218, L205, C222, C221, and C224 perform tuning and impedance-matching<br />
functions. As in the preceding stage, regulated dc bias is<br />
applied to the base circuit to stabilize the drive level, and the output is<br />
double-tuned to provide spectral purity.<br />
Stage 3: Q203 operates as a frequency tripler, with the collector circuit<br />
tuned to the output frequency (for example, 180 MHz). In this case,<br />
L206, C226, C227, C229, L207, C230, and C232 perform tuning and<br />
impedance-matching.<br />
Stage 4: Q204 operates as a tuned amplifier. Resistive loading on<br />
the input provides stability. The output circuit consists of a resonant tank<br />
Characteristics<br />
4<br />
25C1018 (CC)
Shure T2 Vocal Artist Microphone Transmitter<br />
circuit (L203 and C213) capacitively coupled to a low-pass filter (C219,<br />
L206, and C218). C213 and C219 provide a capacitively tapped voltage<br />
divider for matching into the low-pass filter.<br />
Final Output (ETSI-Approved Models)<br />
Transmitter: This can deliver up to +11.5 dBm (14 milliwatts) to the<br />
antenna. No user adjustments permit this value to be exceeded. Testpoint<br />
TP6 provides a termination point for the 50 Ω output. C243 and<br />
L211 act as a series resonating network for the battery, which acts as the<br />
antenna. The unit should be powered exclusively by a 9 Vdc dry battery<br />
(an alkaline type like the Duracell MN1604 is recommended).<br />
Voltage Measurements: With 9 Vdc applied to the unit, the following<br />
voltages should appear at the terminals of the output transistor:<br />
Vc = 8.83 Vdc<br />
Vb = .097 Vdc<br />
Ve = .32 Vdc<br />
Base current = 0.27 µAdc<br />
Emitter current =9.67 mAdc<br />
Collector current = 9.67 mAdc<br />
Power input = 87 mW<br />
The output power is +9.5 dBm (8.9 mW) into a 50 Ω load, at a frequency<br />
of 169.4445 MHz. At the lowest acceptable battery voltage of<br />
6 Vdc, the final collector current drops to 8.84 mAdc and the output<br />
power to +7.3 dBm (5.4 mW).<br />
Spurious Emissions: To minimize the production and radiation of<br />
spurious emissions and harmonic energy, and to promote stable operation,<br />
the collector of each RF stage is separately decoupled from the 9 V<br />
supply by ferrite chokes, resistors, and bypass capacitors. The base circuits<br />
are similarly decoupled except they use resistor-capacitor (R-C)<br />
networks, whose higher-impedance levels are more appropriate.<br />
25C1018 (CC)<br />
5 Characteristics
Shure T2 Vocal Artist Microphone Transmitter<br />
Notes<br />
Notes<br />
6<br />
25C1018 (CC)
Shure T2 Vocal Artist Microphone Transmitter<br />
Preliminary Tests<br />
Listening Tests<br />
Functional Test<br />
Before disassembling the unit, operate it to determine whether it is<br />
functioning normally.<br />
Focused Testing: First and most important: Review any customer<br />
complaint or request and focus your tests on any reported problem for<br />
both listening and functional tests. For example, many complaints are for<br />
“short range” and “drop-outs.” In such cases, perform only the RF tests in<br />
this section to verify the problem. If the unit passes these, there is a<br />
strong indication that the customer is using the product incorrectly (e.g.,<br />
not keeping the transmitter in the receiver’s line of sight, not avoiding<br />
metal enclosures or TV interference). Return the unit to the customer<br />
together with an explanation of the proper set-up procedures.<br />
For complaints of distortion or other audio problems, try a “standard”<br />
microphone cartridge (you should have one of each cartridge on-hand<br />
for testing) and perform the audio tests in this section.<br />
Note: Most of the following tests can be performed without disassembling<br />
the unit.<br />
RF Tests<br />
1. Install a fresh 9 V battery in the T2, mute its audio, and turn it on.<br />
2. Measure current drain: it should not exceed 35 mA.<br />
3. Maximize the signal received on the spectrum analyzer by attaching<br />
a telescoping whip antenna to it. Then measure the<br />
near-field output power: it should be 7 dBm (FCC-approved<br />
model) or 3 dBm (ETSI-approved model).<br />
(If you are unsure of the results you obtained here, measure the<br />
output power conductively by soldering a 50 Ω cable to the output<br />
of the transmitter. Verify that the output power is 15 dBm,<br />
2 dBm [FCC-approved model] or 10 dBm, 2 dBm [ETSI-approved<br />
model].)<br />
4. Verify that the carrier frequency of the transmitter varies from its<br />
nominal value by no more than 6 kHz.<br />
5. Check for an intermittent problem by shaking the transmitter and<br />
tapping on it. As you do so, try to keep it at a constant distance<br />
from the spectrum analyzer. Verify that the output power on the<br />
spectrum analyzer shows no large and sudden drops in power<br />
level (it will, however, vary a few dB with hand position).<br />
6. Turn off the T2.<br />
If the transmitter passes the above tests, its RF circuits are<br />
working as designed.<br />
25C1018 (CC)<br />
7 Preliminary Tests
Shure T2 Vocal Artist Microphone Transmitter<br />
Audio Tests<br />
Units That Pass<br />
A: Verify the Matching Receiver<br />
1. Make sure that the receiver is turned off. Connect the signal<br />
generator to the receiver through a 50 Ω cable. Tack-solder the<br />
center conductor to the antenna input and ground the shield of<br />
the cable to pcb ground. Turn on the receiver.<br />
2. Set the RF signal generator as follows:<br />
Amplitude: –50 dBm<br />
Modulation: 1 kHz<br />
Deviation: 15 kHz<br />
Frequency: T2 operating frequency<br />
3. Connect the audio from the unbalanced output to the audio analyzer<br />
with a 3.3 kΩ load. Turn the Volume control all the way up.<br />
4. Engage the 400 Hz and 30 kHz filters on the audio analyzer.<br />
Verify the following:<br />
For the T3 and T4 the audio level is 400 mVrms (90 mV)<br />
For the T4N the audio level is 626 mVrms (120 mV)<br />
thd =
Shure T2 Vocal Artist Microphone Transmitter<br />
Disassembly and Assembly<br />
To access the printed circuit (pc) boards, disassemble the transmitter<br />
(refer to Figures 2 and 3 on pages 9 and 10).<br />
CAUTION<br />
Observe precautions when handling this static-sensitive device.<br />
Disassembly<br />
1. Turn off the Power switch.<br />
2. Unscrew the transmitter battery cup and remove the battery.<br />
3. Unscrew the microphone cartridge.<br />
4. If necessary, remove the microphone-transmitter subassembly:<br />
(a)<br />
(b)<br />
Use snap ring pliers to remove the retaining ring from inside<br />
the microphone handle.<br />
Remove the bezel by carefully inserting a small screwdriver<br />
into the microphone handle, pressing the blade against the<br />
plastic bezel tab, and prying it up (Figure 2). Remove the<br />
label plate and switch actuators (Figure 3, page 10).<br />
Note: Newer bezels have the labeling printed directly on<br />
their faces; there are no separate label plates.<br />
(c)<br />
As you slide out the transmitter subassembly (audio, RF,<br />
and head circuit boards) from the handle, note how it was<br />
positioned in the internal guides.<br />
bezel<br />
handle<br />
tab<br />
tab<br />
(Right-side view)<br />
circuit-board<br />
subassembly<br />
Figure 2.<br />
Removing the Bezel<br />
25C1018 (CC)<br />
9 Disassembly and Assembly
Shure T2 Vocal Artist Microphone Transmitter<br />
Reassembly<br />
1. Insert the transmitter subassembly (audio, RF, and head circuit<br />
boards) into the internal guides of the handle (Figure 3).<br />
2. Orient the retaining ring so its gap will fit over the flat edge of the<br />
head board (to avoid shorting the board). Use snap-ring pliers to<br />
insert the retaining ring into the groove inside the handle.<br />
3. Drop in the switch actuators and position the label plate (older<br />
bezels only) over them. Position the bezel over the switches<br />
then press until it snaps into place.<br />
4. Screw on the microphone cartridge and ball screen. Install a battery<br />
(if desired) and screw on the battery cup.<br />
ball screen<br />
Á<br />
A<br />
retaining<br />
ring<br />
RF<br />
circuitboard<br />
head<br />
board<br />
switches<br />
microphone<br />
cartridge<br />
SM 58<br />
Á<br />
audio<br />
circuitboard<br />
gain<br />
control<br />
ÁÁÁ<br />
ÁÁÁ<br />
ÁÁÁÁ<br />
ÁÁÁÁ<br />
label plate<br />
(older bezels only)<br />
A<br />
bezel<br />
ball screen<br />
Á<br />
Á<br />
Á<br />
microphone<br />
cartridge<br />
BG 3.1<br />
ÁÁÁ<br />
ÁÁÁ<br />
ÁÁ<br />
ÁÁ<br />
Figure 3.<br />
circuitboard<br />
guides<br />
handle<br />
ÁÁÁ<br />
ÁÁÁ<br />
ÁÁÁ<br />
ÁÁÁ<br />
ÁÁ(older, BG 3.0<br />
A cartridge)<br />
ÁÁ<br />
access<br />
to gain<br />
control<br />
9 V alkaline<br />
battery<br />
switch<br />
actuators<br />
ÁÁÁÁ<br />
battery<br />
cup<br />
ÁÁÁÁ<br />
ÁÁÁÁ<br />
ÁÁÁÁ<br />
Á<br />
ÁÁÁÁÁÁ<br />
ÁÁÁÁ<br />
Disassembly and Assembly<br />
10<br />
25C1018 (CC)
Shure T2 Vocal Artist Microphone Transmitter<br />
Service Procedures<br />
Reference Material<br />
The Shure Wireless System T Series User’s Guide describes the<br />
product, tells how to operate it, and provides troubleshooting and technical<br />
data.<br />
Special Equipment and Tools<br />
In addition to the standard items described in the Wireless Service<br />
Equipment manual, you will need:<br />
<br />
<br />
<br />
<br />
to verify that the system is working properly, obtain the receiver<br />
with which the transmitter is used (usually a T3 or T4); otherwise,<br />
use the modified SC4 receiver described in the equipment<br />
manual<br />
a small flat-blade screwdriver to remove the bezel<br />
snap-ring pliers to remove and re-insert the retaining ring<br />
hand-made high-impedance probe (see the Service Equipment<br />
manual)<br />
System Operating Frequencies<br />
Each transmitter circuit board is marked with a group letter that identifies<br />
the range of frequencies on which the transmitter can operate. Note<br />
that Table 1 applies only to T2 transmitters that are FCC-approved, and<br />
Table 2 applies only to T2 transmitters that are ETSI-approved.<br />
Frequency Coverage: Earlier models used the same family of RF<br />
boards (with Groups A, B, and C) for all the frequencies offered worldwide<br />
at that time. Now there are separate board assemblies for units approved<br />
by the ETSI. If you have a frequency from Table 4, you have an<br />
ETSI-approved model; if you have a frequency from Table 3, you have an<br />
FCC-approved model.<br />
Table 1<br />
Pc Board Groups for<br />
FCC-Approved Models<br />
Group<br />
A<br />
B<br />
C<br />
Frequency Range<br />
169.000–183.975 MHz<br />
184.000–198.975 MHz<br />
199.000–215.975 MHz<br />
Used with pcb assembly 90_8690<br />
(pcb marking 34A8494).<br />
25C1018 (CC)<br />
11 Service Procedures
Shure T2 Vocal Artist Microphone Transmitter<br />
Table 2<br />
Pc Board Groups for<br />
ETSI-Approved Models<br />
Group<br />
A<br />
B<br />
C<br />
D<br />
E<br />
F<br />
G<br />
H<br />
Frequency Range<br />
169.000–173.975 MHz<br />
174.000–180.975 MHz<br />
181.000–187.975 MHz<br />
188.000–194.975 MHz<br />
195.000–201.975 MHz<br />
202.000–208.975 MHz<br />
209.000–215.975 MHz<br />
216.000–222.975 MHz<br />
K 216.000–239.975<br />
Used with pcb assembly 90_8705<br />
(pcb marking 34A8538).<br />
Tables 3 and 4 provide information for identifying the system frequency.<br />
The Crystal Letter Code, when used with the appropriate Shure<br />
model number, identifies a specific operating frequency for both transmitters<br />
and receivers. Note that, although a Crystal Letter Code always designates<br />
a specific frequency, it may be used with different Group Letters<br />
on other products.<br />
Table 3<br />
T2 System Operating Frequencies for<br />
FCC-Approved Models<br />
Group<br />
Crystal<br />
Code<br />
Operating<br />
Freq. (MHz)<br />
A V 169.445<br />
A W 171.845<br />
A CA 176.200<br />
A CC 177.600<br />
A CE 182.200<br />
A CF 183.600<br />
B CG 186.200<br />
B CL 192.200<br />
C CQ 202.200<br />
C CV 208.200<br />
Used with pcb assembly 90_8690<br />
(pcb marking 34A8494).<br />
Service Procedures<br />
12<br />
25C1018 (CC)
Shure T2 Vocal Artist Microphone Transmitter<br />
Table 4<br />
T2 System Operating Frequencies for ETSI-Approved Models<br />
Group<br />
Crystal<br />
Code<br />
Operating<br />
Freq. (MHz)<br />
A AQ 173.800<br />
B ZZ 174.500<br />
B BB 175.000<br />
B NB 175.000<br />
B ND 176.600<br />
B NE 177.600<br />
C NH 182.000<br />
C NK 183.600<br />
C NL 184.600<br />
C S 184.000<br />
D NP 189.000<br />
D NR 190.600<br />
E NX 197.600<br />
E NY 198.600<br />
E NZ 200.350<br />
E PU 201.650<br />
F PB 203.000<br />
F PD 204.600<br />
H PP 217.000<br />
H PR 218.600<br />
H PS 219.600<br />
K PV 232.825<br />
K PX 233.125<br />
K PY 234.625<br />
K PZ 237.325<br />
Used with pcb assembly 90_8705<br />
(pcb marking 34A8538).<br />
Changing the Frequency<br />
The operating frequency of the T2 transmitter may be changed within<br />
a specific Group by changing the crystal on the pc board. (For Group<br />
information, see the preceding subsection). Check the transmitter for<br />
proper operation before changing its operating frequency. After installing<br />
the new crystal, perform the alignment procedures. Then run an operational<br />
test to ensure that the transmitter is functioning properly. Finally,<br />
update the label to show the new frequency and letter identification code.<br />
25C1018 (CC)<br />
13 Service Procedures
Shure T2 Vocal Artist Microphone Transmitter<br />
Note: To ensure proper operation, obtain the crystal from Shure and<br />
verify that it operates within the frequency range of the pc board.<br />
Since crystals are marked with the nominal oscillating frequency, not<br />
with a letter code, you can use the following equation to determine<br />
the frequency at which a transmitter will operate with a given crystal:<br />
FCC- and ETSI-Approved Models<br />
Carrier Frequency = (9 x nominal crystal freq. in MHz) – .09<br />
To accommodate the different frequencies and requirements, Shure<br />
supplies the T2 with different RF boards for FCC-approved models (used<br />
in North America and other places) and ETSI-approved models (used in<br />
Europe and other places). Although the RF alignment procedures are<br />
similar for the two boards, there are some differences, especially in the<br />
number of tuning stages and in the numbering of components and test<br />
points. The audio-alignment procedures are the same for both versions<br />
of the T2.<br />
Note: Before the introduction of a distinct RF board for ETSI 300 922<br />
requirements, all units shared the same RF and audio boards.<br />
Drawings for Different Versions<br />
At the back of this manual are diagrams of the circuit boards and<br />
schematics for the original versions of the audio and RF boards as well<br />
as for the current versions of the audio board, FCC-approved RF board,<br />
and ETSI-approved RF board. Refer to the circuit-board diagrams for the<br />
test points.<br />
Alignment<br />
The RF and audio alignments are generally done together, as a<br />
single, continuous procedure. Before beginning, do the setup described<br />
in the following subsection, “Test Conditions.” Unless specified for FCCor<br />
ETSI-approved models, the alignment procedures apply to all models.<br />
Test Conditions<br />
The following test conditions apply to all versions unless otherwise<br />
specified:<br />
<br />
<br />
<br />
An external 9-volt supply is connected to the battery terminals<br />
(J101 and J102).<br />
The Gain pot (R125) is set to its mid-range position.<br />
The audio analyzer’s 400 Hz high-pass and 30 kHz low-pass<br />
filters are pressed in.<br />
FCC-Approved Units<br />
1. Obtain a 50 Ω test cable for connecting the circuit boards to various<br />
test equipment. (To construct this cable, see “50 Ω Test<br />
Cable Assembly” in the Wireless Service Equipment manual.)<br />
Service Procedures<br />
14<br />
25C1018 (CC)
Shure T2 Vocal Artist Microphone Transmitter<br />
2. Tack-solder the cable to side 1 of the RF circuit board as follows:<br />
<br />
<br />
Center conductor to the 50 Ω solder pad, I210<br />
Shielding to I2GN (on older versions, IGND)<br />
ETSI-Approved Units<br />
1. Obtain a 50 Ω coaxial test cable for connecting the circuit boards<br />
to various test equipment. (To construct this cable, see “50 Ω<br />
Test Cable Assembly” in the Wireless Service Equipment manual.)<br />
2. Tack-solder the cable to the bottom of the RF circuit board as follows:<br />
<br />
<br />
Center conductor to the 50 Ω solder pad, TP6<br />
Shielding to TP7 (ground)<br />
High-Impedance Probe for TP5: When measuring test point 5,<br />
fashion a high-impedance probe on the end of the test cable by connecting<br />
a 50 Ω resistor between the center conductor and the shield, and a<br />
0.5 pF capacitor to the end of the center conductor (see the following<br />
illustration).<br />
0.5 pF<br />
shield<br />
50 Ω<br />
ÌÌ<br />
Figure 4.<br />
High-Impedance Probe for ETSI-Approved Models<br />
All Units<br />
3. Carefully remove C240 (domestic units) or C242 (ETSI units) from<br />
the RF board.<br />
Note: This disconnects the battery antenna to allow accurate<br />
conductive-power measurements.<br />
Display Checks<br />
1. Connect the 9 Vdc power supply to the audio board: the positive<br />
lead to I140 (the positive battery terminal), and the negative lead<br />
to I145 (ground).<br />
2. Slide S101 (Power) to “On” (toward the board number), and<br />
S102 (Mic) to “Off” (away from S101): the green LED should<br />
glow. If it doesn’t, there is a circuit malfunction.<br />
3. Reduce the power-supply voltage to 6 Vdc: the red LED should<br />
glow.<br />
4. Return the power supply voltage to 9 Vdc.<br />
25C1018 (CC)<br />
15 Service Procedures
Ç<br />
Ç<br />
Shure T2 Vocal Artist Microphone Transmitter<br />
Audio Board (top)<br />
Power<br />
(green)<br />
D103<br />
Low battery<br />
(red)<br />
D101 C107<br />
+<br />
U101<br />
R125<br />
J102<br />
–<br />
+<br />
Ç<br />
Ç<br />
J101<br />
Power<br />
On/Off<br />
S101<br />
R130<br />
Mic<br />
On/Off<br />
S102<br />
U102<br />
Head Board (front view)<br />
Audio Out<br />
(to RF<br />
board)<br />
+5 V<br />
Audio In<br />
(from audio board)<br />
+9 V<br />
Gnd<br />
+9 V<br />
(to cartridge)<br />
ÇÇÇÇ<br />
Gnd<br />
Gnd<br />
ÇÇ ÇÇ<br />
+9 V<br />
Audio In<br />
(to audio board)<br />
+9 V<br />
Gold-plated contacts<br />
Audio In<br />
(from cartridge)<br />
FCC-Approved Model RF Board (top)<br />
Ç<br />
Ç<br />
Ç<br />
Ç<br />
Ç<br />
Ç<br />
Ç<br />
L209 R217 Y201 C217 C216<br />
ETSI-Approved Model RF Board (top)<br />
TP5 (base of<br />
Q202)<br />
I210<br />
IGnd<br />
TP6<br />
J101<br />
+<br />
–<br />
J102<br />
J101<br />
+<br />
Ç<br />
Ç<br />
Ç<br />
–<br />
TP7<br />
J102<br />
L201 R201 Y201 C214 C216 C222 C226<br />
Figure 5.<br />
Major Components Referred to in the Alignment Procedures<br />
Service Procedures<br />
16<br />
25C1018 (CC)
Shure T2 Vocal Artist Microphone Transmitter<br />
RF Alignment: FCC-Approved Models<br />
Do not apply modulation during the following RF alignment procedures.<br />
Note: If you cannot achieve any of the settings described in these<br />
procedures, see “Bench Checks,” starting on page 23.<br />
1. Make sure that the Mic switch (S102) is turned to ”Off.”<br />
2. On the spectrum analyzer, set the center frequency to the frequency<br />
of the T2. Then make the following settings:<br />
Span: 1 MHz<br />
Reference level: +20 dBm<br />
Scale: 10 dB/div.<br />
3. Connect the 50 Ω output cable to the spectrum analyzer.<br />
A: Output Power (FCC-Approved Models)<br />
1. With a yellow Toray non-conductive tuning tool, adjust C217 and<br />
C216 for maximum (peak) output power on the spectrum analyzer.<br />
If the signal is very near the top of the screen, switch the<br />
scale to 2 dB/div.<br />
2. The output power should be 15 dBm, ±2 dBm (compensate for<br />
cable losses in this calculation).<br />
B: Frequency Adjustment (FCC-Approved Models))<br />
1. Connect the 50 Ω output cable to the frequency counter through<br />
the 20 dB attenuator. With a pink Toray driver, adjust L209 to set<br />
the RF carrier frequency to the operating frequency<br />
(±1 kHz—see Table 3 on page 12).<br />
2. Reconnect the 50 Ω output cable to the spectrum analyzer. Confirm<br />
that the output power remains within specification. If not,<br />
readjust C217 and C216 as described in the preceding “Output<br />
Power” subsection.<br />
C: Spurious Emissions (FCC-Approved Models)<br />
1. Set the spectrum analyzer as follows:<br />
Scale: 10 dB/div<br />
Start Frequency: 10 MHz<br />
Stop Frequency:1 GHz<br />
Reference level: 20 dBm<br />
2. Check the level of spurious emissions: All must be at least<br />
30 dB below the carrier level. If necessary, retune C217 and<br />
C216.<br />
25C1018 (CC)<br />
17 Service Procedures
Shure T2 Vocal Artist Microphone Transmitter<br />
D: Current Drain (FCC-Approved Models)<br />
1. With a digital multimeter, measure the current drain of the transmitter:<br />
it should be less than 35 mA. If it is too high, try detuning<br />
C216, but make sure that the power and spurious response remain<br />
within specification.<br />
2. Check for 9 Vdc (±0.35 Vdc) at +9 V on the head board (I133 on<br />
the audio board).<br />
RF Alignment: ETSI-Approved Models<br />
Do not apply modulation during the RF alignment procedures.<br />
Note: If you cannot achieve any of the settings described in these<br />
procedures, see “Bench Checks,” starting on page 23.<br />
1. Slide the Mic switch (S102) to the ”Off” position.<br />
2. On the spectrum analyzer, set the center frequency to one-third<br />
the frequency of the T2. Then make the following settings:<br />
Span: 30 MHz<br />
Reference level: +20 dBm<br />
Scale: 10 dB/div.<br />
3. Connect the high-impedance probe to the spectrum analyzer.<br />
A: Output Power (ETSI-Approved Models)<br />
1. Connect the high-impedance probe to TP5 (the base of Q202).<br />
2. With a yellow Toray non-conductive screwdriver, adjust C214 for<br />
maximum (peak) output power on the spectrum analyzer. For<br />
better resolution while tuning, switch the scale to 2 dB/div and<br />
adjust the reference level to the center of the screen.<br />
3. Remove the high-impedance probe. Connect the standard 50 Ω<br />
output cable to TP6 (before antenna-matching).<br />
4. Plug the BNC end of the 50 Ω cable into the spectrum analyzer.<br />
5. Set the center frequency to the frequency of the T2.<br />
6. Adjust C216 and C222 for maximum (peak) output power on the<br />
spectrum analyzer.<br />
Note: C216 is not tuneable on earlier ETSI-approved units.<br />
B: Frequency and Final Output Power (ETSI-Approved<br />
Models)<br />
1. Connect the 50 Ω output cable to the frequency counter. With a<br />
pink Toray driver, adjust L201 to set the RF carrier frequency to<br />
within ±1 kHz of the operating frequency (see Table 4, page 13).<br />
2. Reconnect the 50 Ω output cable to the spectrum analyzer. Peak<br />
C226 for maximum output power on the spectrum analyzer.<br />
3. Confirm that the output power is 9.5 dBm (±2 dBm).<br />
Service Procedures<br />
18<br />
25C1018 (CC)
Shure T2 Vocal Artist Microphone Transmitter<br />
C: Spurious Emissions (ETSI-Approved Models)<br />
1. Set the spectrum analyzer as follows:<br />
Scale: 10 dB/div<br />
Start Frequency: 10 MHz<br />
Stop Frequency:1 GHz<br />
Reference level: 20 dBm<br />
2. Check the level of spurious emissions: All must be at least<br />
44 dB below the carrier level. If necessary, retune C226.<br />
D: Current Drain (ETSI-Approved Models)<br />
1. With a digital multimeter, measure the current drain of the transmitter:<br />
it should be less than 35 mA. If it is too high, try detuning<br />
C226, but make sure that the power and spurious response remain<br />
within specification.<br />
2. Check that 9 Vdc (±0.35 Vdc) is present at the head board +9 V<br />
location (I133 on the audio board).<br />
Audio Alignment (Both Models)<br />
The audio boards on the FCC-approved and ETSI-approved models<br />
are identical except for the pcb number printed on the board. (These<br />
numbers differ because the boards are made as parts of larger assemblies<br />
for the two different models.)<br />
The audio board has changed relatively little in the history of the T2.<br />
Two examples of changes are the renumbering of the LEDs (the green<br />
used to be D101, and the red, D102) and some slightly different designations<br />
(e.g., I1GN used to be IGND).<br />
E: Setup<br />
1. Disconnect the power supply from the T2.<br />
2. Unsolder the test cable.<br />
3. Replace C240 (domestic units) or C242 (ETSI units) on the RF<br />
board.<br />
4. Slide the board assembly, battery terminals first, into the test<br />
handle: be sure to align the sides of the assembly with the handle’s<br />
inner tracks. Alternatively, slide the assembly through the<br />
test ring.<br />
5. Screw the audio test head into the handle or ring. Connect a<br />
BNC-to-BNC cable between the audio analyzer and the test<br />
head.<br />
6. Reconnect the 9 V power supply to the battery terminals of the<br />
T2.<br />
7. Place the Mic switch in the “On” position. Verify that the green<br />
power LED (D103) lights steadily.<br />
25C1018 (CC)<br />
19 Service Procedures
Shure T2 Vocal Artist Microphone Transmitter<br />
F: Modulation Calibration<br />
1. Set the output of the audio analyzer as follows:<br />
Frequency: 1 kHz<br />
Amplitude: 230 mV<br />
Measurement: Ac Level<br />
Filters: 400 Hz and 30 kHz on<br />
2. Adjust the Gain (R125) so the output at the positive side of C107<br />
is 0 dBu, ±0.1 dB (775 mV, ±50 mV). See Figure 5, page 16.<br />
Note: At this point you may want to press the Log/Lin button on<br />
the audio analyzer (to measure in dBm) and then press the Ratio<br />
button to perform the relative measurement for frequency response.<br />
G: Frequency Response<br />
1. Set the audio analyzer as follows:<br />
Frequency: 100 Hz<br />
400 Hz High-Pass filter: Disengaged<br />
2. Verify that the audio level at the positive side of C107 is<br />
–0.5 dB, ±0.5 dB, relative to the level you set in Step 2 of subsection<br />
F.<br />
3. Reset the audio analyzer as follows:<br />
400 Hz High-Pass filter: Engaged<br />
Frequency: 10 kHz<br />
4. Check that the audio level at the positive side of C107 is equal to<br />
3 dB, ±0.5 dB, relative to the level you set in Step 2 of subsection<br />
F.<br />
H: Deviation Reference Voltage<br />
1. Turn off the T2 Power switch.<br />
2. Obtain a receiver set to the same frequency as the T2 (this will<br />
probably be the T3 or T4 that came with the T2).<br />
Note: Alternatively, use a modified SC4 receiver for any transmitter.<br />
Instructions for modifying and using an SC4 are in the Wireless<br />
Service Equipment manual.<br />
3. Attach an antenna or an unshielded cable to the RF signal generator.<br />
Set the RF signal generator as follows;<br />
<br />
<br />
<br />
<br />
<br />
Frequency: Carrier<br />
Modulation: FM<br />
Modulation source: Int 1 kHz<br />
FM Deviation: ±15 kHz<br />
Amplitude: –38 dBm<br />
Service Procedures<br />
20<br />
25C1018 (CC)
Shure T2 Vocal Artist Microphone Transmitter<br />
4. Make sure that the receiver’s yellow RF LED lights.<br />
5. Set the receiver’s Volume control to the maximum position (full<br />
clockwise rotation) and apply power to the receiver. On the T4,<br />
set the Squelch control to its midpoint.<br />
6. Measure the rms voltage developed across the unbalanced output<br />
of the receiver. The reading should be approximately 0 dBu<br />
(775 mV), which corresponds to a deviation level of 15 kHz.<br />
Record this voltage as the Deviation Reference Voltage.<br />
Note: At this point you may want to press the Log/Lin button on<br />
the audio analyzer (to measure in dBm) and then press the Ratio<br />
button to perform the relative measurement in the next section.<br />
7. Turn off the RF output from the signal generator.<br />
I: Deviation Adjustment<br />
1. Make sure that C240 is on the RF board, so that the antenna is<br />
connected).<br />
2. Remove the power-supply leads and attach a new 9 V battery.<br />
3. Connect the output of the audio analyzer to the test head.<br />
4. Set the frequency of the audio analyzer to 1 kHz. Make sure that<br />
0 dBu (775 mV) is present at the positive side of C107.<br />
5. Measure the rms voltage at the unbalanced output of the receiver.<br />
Adjust R217 to obtain voltage within ±1 dB of the deviation<br />
reference voltage that you recorded earlier (see the end of the<br />
preceding subsection).<br />
J: Distortion Adjustment<br />
1. Set the audio analyzer for “Distn” (total harmonic distortion).<br />
2. Adjust R130 for minimum distortion out of the receiver (it should<br />
measure less than 1%).<br />
Note: This completes the alignment procedures. Refer to the “Reassembly”<br />
instructions earlier in this manual.<br />
25C1018 (CC)<br />
21 Service Procedures
Shure T2 Vocal Artist Microphone Transmitter<br />
Notes<br />
Notes<br />
22<br />
25C1018 (CC)
Shure T2 Vocal Artist Microphone Transmitter<br />
Bench Checks<br />
The tests for power and audio apply to all T2 units. Those involving<br />
the RF board differ for FCC-approved and ETSI-approved units; hence<br />
this section includes two separate sets of procedures for RF testing.<br />
Dc Power<br />
<br />
<br />
<br />
Verify that 9 Vdc (±0.35 Vdc) is present at I+9.0 (on the bottom<br />
of the audio board—see Figure 6, page 33). If this voltage is low,<br />
check it at I133. Trace the circuitry back to the power supply to<br />
see where the loss occurs. Check:<br />
power switch<br />
bias on Q105<br />
L101<br />
circuit-board ground for 0 V<br />
If you have a short to ground from 9 V, try isolating different parts<br />
of the circuit. Narrow it down to the RF or audio section. Look for<br />
foil shorts, solder bridges, and capacitors that have been<br />
installed backwards.<br />
Check for 5 Vdc (±0.25 Vdc) at I147. If the correct voltage is not<br />
present, check I+5 (pin 7 of U101). Then check:<br />
pin 13 of U101 for 9 V<br />
values of R133, R135, and R137<br />
Note: If you are measuring dc voltages at points where RF signals<br />
are present, use a 10 kΩ resistor at the probe to prevent<br />
loading the circuit. To remove the RF signal, remove the crystal.<br />
Audio<br />
All the steps in this section comprise a methodical way of determining<br />
where the audio signal is being interrupted:<br />
<br />
<br />
Check for audio at pin 7 of U102. If it is not present, check that<br />
the dc bias at pins 5, 6, and 7 of U102 is 4.5 Vdc (half the level<br />
of the supply voltage). If the correct voltage is not present:<br />
<br />
<br />
Trace the circuitry: this bias derives from the 9 V line through<br />
voltage divider R103 and R105, then through R106 to pin 5.<br />
Look for open vias (through-hole connections between board<br />
layers), foil shorts, incorrect parts, and bad connections.<br />
If there is audio at pin 7 of U102 but not at pin 14, check the dc<br />
bias at pins 12 and 13 (1.8 Vdc) and pin 1 (3.7 Vdc). If the<br />
correct voltage is not present:<br />
<br />
<br />
Trace the circuitry: this dc bias proceeds from pin 9 of U101<br />
through R107 to pin 12 of U102.<br />
Check (a) the parts in the feedback path from pin 14 to<br />
pin 13, (b) the parts connected to pin 7, and (c) the connections<br />
from U102 to U101.<br />
25C1018 (CC)<br />
23 Bench Checks
Shure T2 Vocal Artist Microphone Transmitter<br />
<br />
<br />
Check the connections from pin 14 of U102 to the next stage, to<br />
the limiter (Q103), and to pin 15 of U101.<br />
Check the bias voltage (4 Vdc) on pins 8, 9, and 10 of U102. If<br />
the correct voltage is not present:<br />
Make sure the Mic switch is set to “On.”<br />
<br />
<br />
Trace the bias circuit from the 5 V line through R104 to<br />
pin 10 of U102.<br />
Check the values in the feedback path from pin 8 to pin 9 of<br />
U102, and the path to Q104 and pin 16 of U101.<br />
Distortion<br />
<br />
<br />
<br />
Make sure the analyzer’s 400 Hz high-pass and 30 kHz lowpass<br />
filters are pressed in.<br />
Pin 9 of U101 should read 1.8 Vdc.<br />
As you turn R130, the dc level on its wiper should change from<br />
1.5 V to 3.5 V. If it does not, check R129, C125, R130, R141,<br />
R140, R126, and the parts tied to pin 9 of U101.<br />
Check the audio level.<br />
Lastly, replace D201 and Y201.<br />
Frequency Problem: FCC-Approved Units<br />
<br />
<br />
<br />
<br />
<br />
<br />
<br />
Make sure the RF carrier is at least 10 dB higher than the spurious<br />
emissions, to allow the frequency counter to lock on.<br />
Check L209 for the proper group and make sure its core is not<br />
cracked.<br />
Make sure the crystal (Y201) has the correct frequency.<br />
Check the dc bias for Q201 against the readings of a unit known<br />
to be operating correctly.<br />
Make sure that D201 is the correct varactor and has 5 Vdc on its<br />
cathode.<br />
Check the parts and values of the oscillator circuit (from I218 to<br />
I230).<br />
Look for shorts and opens.<br />
Low Output Power: FCC-Approved Units<br />
For these checks, terminate the transmitter’s output with a 50 Ω load<br />
between I210 and ground. If you have interconnected the audio and RF<br />
boards for testing, temporarily remove C240 to disconnect the battery<br />
antenna.<br />
Check the carrier output power after the oscillator stage (I230).<br />
If there is no signal, refer to the preceding subsection, “Frequency<br />
Problem.”<br />
The remaining steps perform basically similar diagnostics for each of<br />
the three RF stages:<br />
Bench Checks<br />
24<br />
25C1018 (CC)
Shure T2 Vocal Artist Microphone Transmitter<br />
<br />
<br />
<br />
<br />
<br />
<br />
Make sure the Board Group is the correct one for the desired<br />
frequency.<br />
Stage 1: Make sure that rotating C217 360 degrees in either direction<br />
produces two separate peaks in the carrier output amplitude.<br />
If there is only one peak, check the color (value) of C217<br />
and the values of L205, C225, C234, L202, and C233. Check<br />
the bias on Q201. Lastly, replace Q201.<br />
Stage 2: Make sure that rotating C216 360 degrees in either direction<br />
produces two separate peaks in the carrier output amplitude.<br />
If there is only one peak, check the color (value) of C216<br />
and the values of L204, C238, L210, C235, C222, and C226.<br />
Check the bias on Q203. Lastly, replace Q203.<br />
Stage 3: Check the dc bias on Q204 and the values of all the<br />
parts from the base of Q204 to I210. Lastly, replace Q204.<br />
If the power is slightly low and the spurious level is high, check<br />
for wrong or open coils at L202, L210, and L206.<br />
Check the emitter bypass capacitors (C226 and C223) and the<br />
collector bypass capacitors (C207 and C208), which can also<br />
affect the tuning and power gain of the RF stages. If RF level is<br />
not the same on both sides of one of these capacitors, that part<br />
is probably defective.<br />
Excessive Current Drain: FCC-Approved Units<br />
Deviation: FCC-Approved Units<br />
Try readjusting C216 for lower current drain while maintaining<br />
output power to specification. If the current drain is still excessive<br />
(the factory setting is 35 mA), check for the following:<br />
short<br />
wrong resistor value<br />
defective capacitor<br />
correct value of R219 for the frequency group<br />
As a last resort, try changing Q204.<br />
<br />
If R217 on the RF board cannot be adjusted to obtain a 15 kHz<br />
deviation, try to isolate the problem to the audio or RF section by<br />
doing the following:<br />
If I218 on the RF board does not measure –2.2 dBV<br />
(775 mV), refer to the “Audio” section, page 23.<br />
If I218 has the right level, check R217, C220, C227, R208,<br />
R216, D201, R209, L209, and C214. Also make sure that<br />
the cathode of D201 is being supplied with a 5 Vdc bias from<br />
the 5 V Line through R216 and R208. The value of C214 is<br />
critical to the deviation sensitivity.<br />
As a last resort, try replacing D201 and Y201.<br />
Make sure the carrier is good: you need that to get any deviation.<br />
25C1018 (CC)<br />
25 Bench Checks
Shure T2 Vocal Artist Microphone Transmitter<br />
Frequency Problem: ETSI-Approved Units<br />
Make sure the RF carrier is at least 10 dB higher than the spurious<br />
emissions, to allow the frequency counter to lock on.<br />
Check L201 for the proper group and make sure its core is not<br />
cracked.<br />
Make sure the crystal (Y201) has the correct frequency.<br />
Check the dc bias for Q201:<br />
V C = 8.83 V<br />
V B = 0.97 V<br />
V E = 0.32 V<br />
<br />
<br />
<br />
Make sure that D201 is the correct varactor and has 5 Vdc on its<br />
cathode.<br />
Check the parts and values of the oscillator circuit.<br />
Look for shorts and opens.<br />
Low Output Power: ETSI-Approved Units<br />
For these checks, terminate the transmitter’s output with a 50 Ω load<br />
between TP6 and ground. If you have interconnected the audio and RF<br />
boards for testing, temporarily remove C242 to disconnect the battery<br />
antenna.<br />
Check the carrier output power after the oscillator stage (TP5). If<br />
there is no signal, refer to the preceding subsection, “Frequency<br />
Problem.”<br />
The remaining steps perform basically similar diagnostics for each of<br />
the four RF stages:<br />
<br />
<br />
<br />
<br />
<br />
Make sure the Board Group is the correct one for the desired<br />
frequency.<br />
Stage 1: Make sure that rotating C214 360 degrees in either direction<br />
produces two separate peaks in the carrier output amplitude.<br />
If there is only one peak, check the values of C214, L202,<br />
C208, C244, C210, L203, C213, and C215. Check the bias on<br />
Q201. Lastly, replace Q201.<br />
Stage 2: Make sure that rotating C222 360 degrees in either direction<br />
produces two separate peaks in the carrier output amplitude.<br />
If there is only one peak, check the values of C222, L204,<br />
C216, C245, C219, L205, C221, and C224, Check the bias on<br />
Q202. Lastly, replace Q202.<br />
Stage 3: Make sure that rotating C226 360 degrees in either direction<br />
produces two separate peaks in the carrier output amplitude.<br />
If there is only one peak, check the values of C226, L206,<br />
C227, C229, L207, C230, and C232. Check the bias on Q203.<br />
Lastly, replace Q203.<br />
Stage 4: Check the dc bias on Q204 and the values of all the<br />
parts from the base of Q204 to TP6. Lastly, replace Q204.<br />
Bench Checks<br />
26<br />
25C1018 (CC)
Shure T2 Vocal Artist Microphone Transmitter<br />
<br />
<br />
If the power is slightly low and the spurious level is high, check<br />
for wrong or open coils at L205, L207, and L210.<br />
Check the collector bypass capacitors for the RF stages (C220,<br />
C227, and C234) and the collector bypass capacitor for Q203<br />
(C228), which can also affect the tuning and power gain of the<br />
RF stages:<br />
<br />
<br />
If RF level is not the same on both sides of one of these capacitors,<br />
that part is probably defective.<br />
The RF level between the collector of one transistor and the<br />
base of the next should drop approximately 10 dB. Check<br />
any stage that drops more than 12 dB.<br />
Excessive Current Drain: ETSI-Approved Units<br />
Deviation: ETSI-Approved Units<br />
Try readjusting C226 for lower current drain while maintaining<br />
output power to specification. If the current drain is still excessive<br />
(the factory setting is 35 mA), check for the following:<br />
short<br />
wrong resistor value<br />
defective capacitor<br />
value of R218 (that it is correct for the frequency group)<br />
As a last resort, try changing Q204.<br />
<br />
If R201 cannot be adjusted to obtain a 15 kHz deviation, try to<br />
isolate the problem to the audio or RF section by doing the following:<br />
If TP1 on the RF board (or I109 on the audio board) does not<br />
measure –2.2 dBV (775 mV), refer to the “Audio” section,<br />
page 23.<br />
If the preceding level is correct, check R201, C201, C202,<br />
R202, R203, D201, L201, and C203. Also make sure that<br />
the cathode of D201 is being supplied with a 5 Vdc bias from<br />
the 5 V line through R202 and R203.<br />
As a last resort, try replacing D201 and Y201.<br />
Make sure the carrier is good: you need that to get any deviation.<br />
25C1018 (CC)<br />
27 Bench Checks
Shure T2 Vocal Artist Microphone Transmitter<br />
Distortion: ETSI-Approved Units<br />
<br />
<br />
<br />
Make sure the analyzer’s 400 Hz high-pass and 30 kHz lowpass<br />
filters are pressed in.<br />
Pin 9 of U101 should read about 1.8 Vdc.<br />
As you turn R139, the dc level on its wiper should change from<br />
about 1.5 V to 3.5 V. If it does not, check R139, C1, R141, R140,<br />
R114, and the parts tied to pin 9 of U101.<br />
Check the audio level.<br />
Lastly, replace D201 and Y201.<br />
Bench Checks<br />
28<br />
25C1018 (CC)
Shure T2 Vocal Artist Microphone Transmitter<br />
Replacement Parts and Drawings<br />
Product Changes<br />
On the next page, the parts are listed according to the reference<br />
designations from the pc boards and schematics. Parts shown on the<br />
circuit diagram and not listed below are available at most electronic parts<br />
distributors.<br />
On the pages following the parts lists are the drawings of the printed<br />
circuit boards and the schematics.<br />
This section briefly describes significant changes as of this writing to<br />
the T2.<br />
RF Boards: The original RF board supported both North American<br />
and a limited number of European frequencies. There are now two RF<br />
boards. A slightly revised version of the original board, with a new layout,<br />
supports only the frequencies for FCC-approved units, and a new board<br />
supports a greatly expanded list of frequencies for ETSI-approved units.<br />
RF Tuning on ETSI-Approved Units: C216 has been changed to a<br />
variable capacitor, adding a stage in the tuning. Associated capacitor<br />
C245 has also been changed. See the schematic for the frequency-dependent<br />
values of this capacitor.<br />
Combined RF and Audio Board Numbers: Because the factory<br />
now assembles the two boards as a single panel before separating<br />
them, there is now a single part number for each combination: 90_8690<br />
for the RF and audio boards on FCC-approved units, and 90_8705 for the<br />
RF and audio boards on ETSI-approved units. When ordering, use the<br />
appropriate assembly number but specify whether you want just the RF<br />
board, just the audio board, or both. Note further that the audio boards<br />
from the two assemblies are identical except for the part number printed<br />
on the bottom.<br />
Quad Op Amp: The earlier part (manufactured by Raytheon) was<br />
replaced; the former value of associated resistor R107 was 100 kΩ.<br />
LEDs and Layout: The LEDs were rearranged and renumbered, and<br />
transistor Q108 and associated circuits were added. In addition, the audio<br />
layout was changed. These changes do not greatly affect the audio<br />
alignment.<br />
BG 3.1 Microphone: The earlier T230 models were supplied with<br />
BG 3.0 microphone cartridges. The newer T231 models are supplied with<br />
BG 3.1 cartridges. The earlier models will accept the new cartridges.<br />
ID Resistors: To help assemblers identify the RF board used on<br />
ETSI-approved units, the factory has added resistors R259 and R261.<br />
They are not functional.<br />
Frequency Changes: The “C” and “D” revisions to the ETSI RF<br />
boards primarily consist of minor corrections to the drawings, adding the<br />
“S” frequency and “K” group, and redesignating the “J” frequency “BB.”<br />
25C1018 (CC)<br />
29 Replacement Parts and Drawings
Shure T2 Vocal Artist Microphone Transmitter<br />
Parts Designations<br />
The following comments apply to the parts list and the schematic:<br />
Resistors: All are surface-mount, 1 / 10 W rating, and 1% tolerance.<br />
Capacitors: Unless otherwise noted, non-polarized capacitors are<br />
surface-mount NPO dielectric types with a 100 V capacity and 5% tolerance;<br />
polarized capacitors are tantalum types.<br />
Temperature-Compensating Capacitors (N750 designation):<br />
FCC-Approved RF Boards: C214, C224, C230.<br />
ETSI-Approved RF Boards: C203, C206, C207.<br />
Replacement Parts and Drawings<br />
30<br />
25C1018 (CC)
Shure T2 Vocal Artist Microphone Transmitter<br />
Table 1<br />
T2 Replacement Parts<br />
Reference<br />
Designation Description Shure Part No.<br />
A1<br />
A2<br />
FCC-approved RF/Audio programmed<br />
circuit board assembly<br />
ETSI-approved RF/Audio programmed<br />
circuit board assembly<br />
A3 Head pcb assembly 34A1090D<br />
MP1 Gold-plated spring contacts 53F2039A<br />
MP2 Actuators *old type* 65A8225<br />
MP3 Actuator *current oval type* 65C8298<br />
MP4 Battery cup 65A8206A<br />
T90__8690<br />
[in the underlined space, insert the proper<br />
frequency code-letters from Table 3 page 12,<br />
—e.g., T90CA8690]<br />
T90__8705<br />
[in the underlined space, insert the proper<br />
frequency code-letters from Table 4 page 13,<br />
—e.g., T90NE8705]<br />
MP5 Bezel * for older version handle * 65B8207A no longer available<br />
MP6 Bezel *current oval type* 65B8299<br />
MP7 Handle *** Old version *** 65A8220A not available<br />
MP8 Handle * Current type.* Uses oval 65C8427A<br />
Bezel and Actuators. *** Must<br />
replace Actuators and Bezel if<br />
replacing from Old version handle<br />
MP9 Kit contains: (2)Current type RPW614<br />
Actuators, clip ring and (3)gold mic<br />
contacts<br />
MP10 Retaining Clip ring 30A1314<br />
MP11 Compression disk 38A180<br />
J101 Battery snap (positive) 56A317<br />
J102 Battery snap (negative) 56A318<br />
Y201 Crystal 40_8006A [in the underlined space, insert the<br />
crystal-code from Table 3, page 12 (FCC) or<br />
Table 4, page 13 (ETSI)]<br />
25C1018 (CC)<br />
31 Replacement Parts and Drawings
Shure T2 Vocal Artist Microphone Transmitter<br />
Reference<br />
Designation<br />
Description<br />
Audio Circuit Board (both models)<br />
D101 LED, red (low battery) 184A18<br />
D103 LED, green (power) 184D18<br />
Q103, Q104 PNP transistor, MMBT5087L 183A01<br />
Shure Part No.<br />
Q105 PNP transistor, 2SA1252 183A07<br />
Q106, Q107, NPN transistor, MMBT5089L 183A38<br />
Q108<br />
R125 Potentiometer, 20 kΩ (log taper) 46B8049<br />
R130 Potentiometer, 20 kΩ, SMD 146F02<br />
S101 Slide switch, Power (SPDT) 55A178<br />
S102 Slide switch, Mic (SPDT) 55A178<br />
U101 Integrated circuit, compandor 188A01<br />
U102 Integrated circuit, quad op amp 188A49<br />
North American RF Circuit Board<br />
C216 Capacitor, variable 3–10 pF, 100 V 152C02<br />
D201 Diode, varactor 184A22<br />
L104 Ferrite bead 162A03<br />
Q201, Q203, NPN transistor<br />
183A03<br />
Q204<br />
R217 Potentiometer, 10 kΩ 146E02<br />
European RF Circuit Board<br />
C214, C222 Trimmer capacitor, 5–20 pF 152D03<br />
C216 Trimmer capacitor, 3–10 pF, 1% 152A03<br />
D201 Diode, varactor 184A22<br />
L201 Netting coil 82_8015 [in the underlined space, insert the<br />
proper group-letter from your frequency dependent<br />
components list on your RF schematic]<br />
LF208 Ferrite bead 162A12<br />
Q201, Q202, NPN transistor<br />
183A03<br />
Q203, Q204<br />
R201 Potentiometer, 10 kΩ, 1% 146E02<br />
Replacement Parts and Drawings<br />
32<br />
25C1018 (CC)
Shure T2 Vocal Artist Microphone Transmitter<br />
Audio Board (top)<br />
Audio Board (bottom)<br />
I102<br />
Figure 6.<br />
T2 Audio Board<br />
FCC-Approved RF Board (top)<br />
FCC-Approved RF Board (bottom)<br />
Figure 7.<br />
T2 FCC-Approved RF Board<br />
25C1018 (CC)<br />
33 Replacement Parts and Drawings
Shure T2 Vocal Artist Microphone Transmitter<br />
R251<br />
R250<br />
ETSI-Approved RF Board (top)<br />
R252<br />
R253<br />
R256<br />
R257<br />
R255<br />
R254<br />
Group “K” is indicated by resistors<br />
at “G” and “H” (R256 and R257).<br />
ETSI-Approved RF Board (bottom)<br />
Figure 8.<br />
T2 ETSI-Approved RF Board<br />
Replacement Parts and Drawings<br />
34<br />
25C1018 (CC)
Shure T2 Vocal Artist Microphone Transmitter<br />
Older Version Audio Board (top)<br />
Older Version Audio Board (bottom)<br />
Older Version RF Board (bottom)<br />
Ω<br />
<br />
Older Version RF Board (bottom)<br />
Figure 9.<br />
T2 Older Version Boards<br />
25C1018 (CC)<br />
35 Replacement Parts and Drawings
Shure T2 Vocal Artist Microphone Transmitter<br />
Schematics<br />
(Note to Printer: do not print this page)<br />
Please print the attached schematics in the order they are listed:<br />
<br />
<br />
<br />
<br />
<br />
T2 Earlier Version Audio Board (letter size)<br />
T2 Earlier Version RF Board (letter size)<br />
T2 Audio Board (ledger size)<br />
T2 FCC–approved RF Board (ledger size)<br />
T2 ETSI-approved RF Board (ledger size)<br />
Schematics<br />
36<br />
25C1018 (CC)
+9V<br />
R101<br />
10K<br />
N1<br />
R102<br />
4.99K<br />
R103<br />
100K<br />
N2<br />
+ C101 + C102<br />
47 X 47 X<br />
10V 10V<br />
+5V<br />
C103<br />
+ R105<br />
R106<br />
AUDIO OUT TO RF<br />
PIN 9 OF U101<br />
1.0 X 100K<br />
49.9K<br />
R104<br />
16V<br />
+9V<br />
100K<br />
I9<br />
MC33179DR2<br />
AUDIO IN I4 R107<br />
N9<br />
24.9K<br />
C104 + C107<br />
P101<br />
P102<br />
C105<br />
4 N5 R110<br />
N14<br />
12<br />
4<br />
C130<br />
+<br />
5<br />
1.0 X<br />
4<br />
N3<br />
N6<br />
150pF<br />
16V<br />
N8<br />
P102 N4<br />
.1 499<br />
C131 C113<br />
U102 C 7<br />
+ C106 U102 A 14<br />
4.7 X16V<br />
P101 150pF 150pF<br />
188A49<br />
1.0 X 188A49<br />
16V R109 10<br />
R111<br />
13<br />
11<br />
249<br />
1<br />
6<br />
N24 402K U102 B 8<br />
P101<br />
+9V TO MIC<br />
+9V N55 N16 R112 N12<br />
N7 C108<br />
188A49<br />
R142 C110<br />
N13 R113 R114<br />
11<br />
P101<br />
+<br />
3 16.5K R115<br />
N15 12 4.7 X<br />
N23 1.0 X16V C111<br />
–<br />
16V 10K 7.5K 9<br />
N10<br />
2.0K<br />
10 + C109<br />
C112<br />
P101<br />
2.0K<br />
N17<br />
R116<br />
R117<br />
2 + 4.7 X<br />
1K<br />
SHIELD I19<br />
CW .0039<br />
24.9K<br />
16V<br />
188A01<br />
330pF<br />
N19<br />
3<br />
R125<br />
1<br />
N18 R118<br />
P102<br />
1 R119<br />
20K LOG TAPER 14<br />
G<br />
N21<br />
10K<br />
P102<br />
+ C116<br />
1K<br />
GAIN<br />
C115<br />
+ C117<br />
4.7 X<br />
N20<br />
U101 A<br />
C118<br />
.0015<br />
C119<br />
1.0 X<br />
P102<br />
16V<br />
+<br />
3<br />
C121<br />
16V 4.7 X 16V +<br />
4.7 X 16V +<br />
C120<br />
15<br />
P102<br />
4.7 X16V<br />
* N25<br />
N26<br />
R122<br />
+5V<br />
R123<br />
R124<br />
R140<br />
N28<br />
75K<br />
1K<br />
1K N27<br />
0<br />
N29<br />
16<br />
9<br />
N51 R126 N30<br />
C123<br />
+9V TO RF I33<br />
+<br />
R127 R128<br />
183A01<br />
1.0 X16V<br />
60.4K<br />
C124<br />
Q103<br />
Q104<br />
P102<br />
2 N33 150pF 183A01<br />
N32<br />
1.5K 1.5K<br />
N54<br />
P102<br />
R129 N34 CW<br />
R141<br />
N35<br />
+9V 10K<br />
20K 10K<br />
183A07<br />
+9V R130<br />
N38<br />
AUDIO<br />
Q105<br />
+5V<br />
+ C125<br />
1.0 X<br />
2 3<br />
1 S101<br />
L101 C126<br />
+<br />
C127<br />
16V<br />
6 55A178 N36<br />
162A03<br />
N39 4.7 X .001<br />
5 4<br />
16V<br />
+9V<br />
L102<br />
R131<br />
N40<br />
4.02K<br />
R132<br />
J101<br />
1.8uH<br />
FUNCTIONAL TEST POINTS:<br />
N41<br />
+ 3.01K<br />
N42<br />
N43 R133<br />
+5V<br />
I47<br />
GREEN<br />
N44<br />
6<br />
+5V TO RF<br />
I4 = AUDIO INPUT<br />
I40<br />
R134<br />
R135<br />
I9 = AUDIO OUT TO RF BOARD<br />
R136 D101<br />
RED<br />
5<br />
13.3K<br />
R137<br />
L103<br />
3.01K<br />
6.19K 49.9K<br />
7<br />
N46<br />
N47 P101<br />
2<br />
I19 = Vcc TO MICROPHONE<br />
D102<br />
N49 100 I33 = Vcc TO RF BOARD<br />
J102<br />
L104<br />
N50<br />
+5V I47 = +5V DC TO RF BOARD<br />
N45 1.8uH<br />
188A01<br />
N52<br />
N53<br />
+9V<br />
I40 = Vcc INPUT (+9V DC)<br />
Q106<br />
Q107<br />
C128<br />
I45<br />
3 I45 = GROUND<br />
183A02<br />
183A02<br />
G<br />
150pF<br />
R138<br />
13<br />
681<br />
R139<br />
U101 B<br />
C129<br />
1K<br />
150pF<br />
4 2<br />
GND<br />
AUDIO<br />
GROUND<br />
1<br />
2<br />
S102<br />
55A178<br />
6<br />
5<br />
3<br />
4<br />
1999, Shure Brothers Inc.<br />
27B1018 (SB)<br />
1<br />
8<br />
T2 Earlier Version Audio Board
µ<br />
µ<br />
<br />
<br />
<br />
<br />
<br />
<br />
µ<br />
<br />
<br />
<br />
<br />
<br />
<br />
<br />
<br />
<br />
<br />
<br />
<br />
<br />
<br />
<br />
<br />
<br />
<br />
<br />
<br />
<br />
<br />
<br />
<br />
<br />
<br />
<br />
<br />
<br />
<br />
<br />
<br />
<br />
<br />
<br />
<br />
µ<br />
<br />
<br />
<br />
<br />
<br />
<br />
<br />
<br />
<br />
<br />
<br />
<br />
<br />
<br />
<br />
<br />
<br />
<br />
<br />
<br />
<br />
<br />
<br />
<br />
<br />
<br />
µ<br />
<br />
<br />
µ<br />
<br />
<br />
<br />
<br />
<br />
<br />
<br />
<br />
<br />
<br />
<br />
<br />
<br />
<br />
<br />
<br />
<br />
<br />
<br />
<br />
<br />
<br />
<br />
<br />
<br />
<br />
<br />
µ<br />
<br />
<br />
<br />
<br />
<br />
<br />
<br />
<br />
<br />
<br />
<br />
<br />
<br />
<br />
<br />
<br />
<br />
µ<br />
<br />
<br />
<br />
<br />
<br />
<br />
<br />
<br />
<br />
<br />
<br />
<br />
<br />
<br />
<br />
<br />
<br />
<br />
<br />
<br />
<br />
<br />
<br />
<br />
<br />
4<br />
3<br />
<br />
<br />
<br />
<br />
<br />
<br />
<br />
<br />
5<br />
2<br />
<br />
<br />
<br />
<br />
<br />
<br />
<br />
µ<br />
<br />
<br />
<br />
<br />
<br />
<br />
<br />
<br />
<br />
<br />
6<br />
1<br />
<br />
µ<br />
<br />
<br />
<br />
<br />
<br />
<br />
<br />
<br />
<br />
<br />
<br />
<br />
<br />
<br />
<br />
<br />
<br />
<br />
<br />
<br />
<br />
<br />
<br />
µ<br />
<br />
<br />
<br />
<br />
<br />
<br />
<br />
<br />
<br />
<br />
<br />
<br />
<br />
<br />
<br />
<br />
<br />
<br />
<br />
<br />
<br />
<br />
<br />
<br />
T2 Audio Board<br />
<br />
<br />
<br />
<br />
<br />
<br />
<br />
<br />
<br />
<br />
µ<br />
µ<br />
µ<br />
µ<br />
µ<br />
<br />
µ<br />
<br />
µ<br />
<br />
µ<br />
<br />
µ<br />
<br />
µ<br />
1999, Shure Brothers Inc.<br />
27B1018 (SB)
I1<br />
P202–4<br />
N1<br />
P202–2<br />
+9V<br />
C201<br />
560pF<br />
C203<br />
150pF<br />
C202<br />
.01<br />
I2<br />
N2 P201 – 4 +5V<br />
C205<br />
C239<br />
.01 R202<br />
560pF<br />
C206<br />
C204<br />
R203<br />
100<br />
L201<br />
560pF<br />
560pF<br />
100<br />
R204 N5<br />
162A03<br />
30.1K<br />
N4<br />
R205<br />
C207 6.81K<br />
R208 20K<br />
N7 L203* 560pF<br />
I6 N6<br />
J201–01<br />
R206<br />
560pF<br />
C208<br />
+<br />
10K .150<br />
L204* C241<br />
C216 C238*<br />
I10<br />
C211<br />
.056<br />
C212<br />
3–10pF 4.7pF<br />
150pF<br />
P201 –2<br />
.001 .470 C225* 3.9pF<br />
L205<br />
C213* L206<br />
N10 N11<br />
C240* L207*<br />
15pF<br />
N8 N9<br />
J202–02 –<br />
C237*<br />
I18<br />
I30 N13 C236* C235<br />
N14 12pF .082 8.2pF .220<br />
Q204<br />
N17<br />
N16<br />
22pF<br />
N18 N21<br />
C234 C217*<br />
.5pF 15pF<br />
183A03<br />
N30<br />
C219* C218<br />
N26<br />
Q203<br />
L210<br />
15pF 15pF<br />
N24<br />
R217<br />
C220 R216 C214 NOTE 5<br />
N25<br />
N22<br />
1pF 8–40pF<br />
183A03<br />
C222* R218 N23<br />
Q201<br />
.056 27pF 2.21K<br />
10K<br />
X10V<br />
27pF Y201<br />
L202 C233*<br />
LIN CW<br />
4.7uF 49.9K<br />
R222 N32<br />
IGND<br />
N750<br />
C224<br />
.220 100pF<br />
R219 C223<br />
7.5K<br />
C227<br />
47pF<br />
D201<br />
N28<br />
.001 R227 R220 C226<br />
33 560pF<br />
P202–01<br />
P201– 01<br />
N750<br />
184A22 49.9K R223<br />
200 150pF<br />
1<br />
1<br />
7.5K<br />
N29<br />
C230 R226<br />
P202–03<br />
P201– 03<br />
L209<br />
3<br />
3<br />
68pF<br />
402<br />
*<br />
N750<br />
VARIABLE<br />
COMPONENTS<br />
GROUP A<br />
GROUP B<br />
GROUP C 199.000 – 216.000 MHz<br />
162H06 .047 162B06 .100 162D06 .180 82C8015 150DA100CA 10 150DA820JA 82 150DA180KA 18<br />
*<br />
VARIABLE<br />
COMPONENTS<br />
FREQUENCY DEPENDENT PARTS BY GROUP AND COMPONENT NO.<br />
FREQUENCY RANGE<br />
169.000 – 184.000 MHz<br />
184.000 – 199.000 MHz<br />
FREQUENCY RANGE<br />
PART NO.<br />
162G06<br />
162G06<br />
L204<br />
C217<br />
PART NO.<br />
uH<br />
.056<br />
.056<br />
PART NO.<br />
pF<br />
162E06<br />
162B06<br />
L203<br />
uH<br />
.150<br />
.100<br />
C219<br />
PART NO.<br />
PART NO.<br />
162C06<br />
162D06<br />
L207<br />
pF<br />
uH<br />
.220<br />
.180<br />
L209<br />
SHURE PART NO.<br />
C237<br />
PART NO.<br />
82A8015<br />
82B8015<br />
pF<br />
C213<br />
PART NO.<br />
150DA120JA<br />
150DA120JA<br />
C236<br />
PART NO.<br />
pF<br />
12<br />
12<br />
pF<br />
C233<br />
PART NO.<br />
150DA101KA<br />
150DA101KA<br />
C240<br />
PART NO.<br />
pF<br />
100<br />
100<br />
pF<br />
C222<br />
PART NO.<br />
150DA270JA<br />
150DA220JA<br />
C238<br />
PART NO.<br />
pF<br />
27<br />
22<br />
pF<br />
LAST USED: N33<br />
C240<br />
R227<br />
L210<br />
C225<br />
PART NO.<br />
pF<br />
FUNCTIONAL TEST POINTS:<br />
I1 = +9 VDC<br />
I2 = +5 VDC<br />
I18 = AUDIO INPUT<br />
I10 = RF OUTPUT (50 OHMS)<br />
I6 = RF OUTPUT (ANTENNA)<br />
FIRST AND SECOND PRODUCTION UNITS<br />
WERE ASSEMBLED WITHOUT C241 AND<br />
R227<br />
LAST REVISION: 01/31/94<br />
GROUP A<br />
169.000 – 184.000 MHz<br />
152F01<br />
8–40<br />
150DA150JA<br />
15<br />
150DA220JA<br />
22<br />
150DA509CA<br />
0.5<br />
150DA828CA<br />
8.2<br />
150DA478CA<br />
4.7<br />
150DA150JA<br />
15<br />
GROUP B<br />
184.000 – 199.000 MHz<br />
152D01<br />
4–20<br />
150DA150JA<br />
15<br />
150DA220JA<br />
22<br />
150DA509CA<br />
0.5<br />
150DA100CA<br />
10<br />
N/A<br />
––<br />
150DA120JA<br />
12<br />
GROUP C<br />
199.000 – 216.000 MHz<br />
152D01<br />
4–20<br />
150DA120JA<br />
12<br />
150DA180KA<br />
18<br />
150DA108CA<br />
1.0<br />
150DA688CA<br />
6.8<br />
N/A<br />
––<br />
150DA828CA<br />
8.2<br />
1999, Shure Brothers Inc.<br />
27B1018 (SB)<br />
T2 Earlier Version RF Board
µ<br />
<br />
<br />
<br />
<br />
<br />
<br />
<br />
<br />
<br />
<br />
<br />
<br />
<br />
<br />
<br />
<br />
µ<br />
<br />
<br />
<br />
<br />
<br />
<br />
<br />
<br />
<br />
<br />
<br />
<br />
<br />
<br />
<br />
<br />
µ<br />
<br />
<br />
<br />
<br />
<br />
<br />
<br />
<br />
<br />
<br />
<br />
<br />
<br />
<br />
<br />
<br />
<br />
<br />
<br />
<br />
<br />
<br />
<br />
<br />
<br />
<br />
µ<br />
<br />
µ<br />
<br />
µ<br />
<br />
<br />
<br />
<br />
<br />
<br />
<br />
<br />
<br />
<br />
<br />
<br />
<br />
<br />
<br />
<br />
<br />
<br />
Ω<br />
<br />
<br />
<br />
<br />
<br />
<br />
<br />
<br />
<br />
<br />
<br />
<br />
<br />
<br />
<br />
Ω<br />
Ω<br />
Ω<br />
<br />
<br />
<br />
<br />
<br />
µ<br />
<br />
<br />
<br />
<br />
<br />
<br />
<br />
<br />
Ω<br />
<br />
<br />
<br />
Ω<br />
µ<br />
µ<br />
µ<br />
µ<br />
<br />
<br />
<br />
<br />
<br />
<br />
<br />
<br />
<br />
<br />
<br />
µ<br />
<br />
Ω<br />
Ω<br />
Ω<br />
µ<br />
<br />
<br />
<br />
<br />
<br />
<br />
<br />
<br />
<br />
<br />
<br />
<br />
<br />
<br />
<br />
<br />
<br />
<br />
<br />
<br />
<br />
<br />
<br />
µ<br />
<br />
<br />
<br />
<br />
<br />
<br />
<br />
<br />
<br />
<br />
<br />
µ<br />
<br />
<br />
<br />
<br />
µ<br />
<br />
<br />
<br />
<br />
<br />
<br />
<br />
<br />
<br />
<br />
Ω<br />
<br />
Ω<br />
<br />
<br />
<br />
<br />
<br />
<br />
<br />
<br />
<br />
<br />
<br />
<br />
Ω<br />
<br />
Ω<br />
<br />
<br />
Ω<br />
<br />
<br />
Ω<br />
<br />
<br />
<br />
<br />
<br />
µ<br />
<br />
<br />
<br />
<br />
<br />
<br />
<br />
<br />
<br />
<br />
<br />
<br />
<br />
<br />
<br />
<br />
<br />
<br />
<br />
<br />
<br />
<br />
T2 FCC-Approved RF Board<br />
(from 90_8690D-11)<br />
1999, Shure Brothers Inc.<br />
27B1018 (SB)
Frequency Groups<br />
1999, Shure Brothers Inc.<br />
27B1018 (SB)<br />
T2 ETSI-Approved RF Board
µ<br />
<br />
<br />
<br />
<br />
<br />
<br />
<br />
<br />
<br />
<br />
<br />
<br />
<br />
<br />
<br />
<br />
<br />
<br />
<br />
<br />
<br />
<br />
<br />
<br />
<br />
<br />
<br />
<br />
<br />
<br />
<br />
<br />
<br />
<br />
<br />
<br />
<br />
<br />
<br />
<br />
<br />
<br />
<br />
<br />
<br />
<br />
<br />
<br />
<br />
<br />
<br />
<br />
<br />
<br />
<br />
<br />
<br />
<br />
<br />
<br />
Frequency Groups<br />
<br />
Group<br />
Frequency Range<br />
(MHz)<br />
C208<br />
pF<br />
C210<br />
pF<br />
C213<br />
pF<br />
C215<br />
pF<br />
C221<br />
pF<br />
C224<br />
pF<br />
C227<br />
pF<br />
C230<br />
pF<br />
C232<br />
pF<br />
C234<br />
pF<br />
C239<br />
pF<br />
C241<br />
pF<br />
C242<br />
pF<br />
C244<br />
pF<br />
C245<br />
pF<br />
L201<br />
L206<br />
Shure Part No. (µH)<br />
L209<br />
Shure Part No. (µH)<br />
L211<br />
Shure Part No. (µH)<br />
R226<br />
Ω<br />
A<br />
169.000–173.975<br />
15<br />
1<br />
33<br />
100<br />
33<br />
100<br />
4.7<br />
27<br />
27<br />
15<br />
27<br />
22<br />
12<br />
not used<br />
8.2<br />
82A8015<br />
162G06 (0.56)<br />
162E06 (0.15)<br />
162C06 (0.22)<br />
750<br />
B<br />
174.000–180.975<br />
12<br />
1<br />
33<br />
100<br />
33<br />
010<br />
4.7<br />
18<br />
27<br />
22<br />
22<br />
33<br />
8.2<br />
1<br />
6.8<br />
82A8015<br />
162G06 (0.56)<br />
162E06 (0.15)<br />
162C06 (0.22)<br />
1000<br />
C<br />
181.000–187.975<br />
12<br />
1<br />
27<br />
100<br />
27<br />
100<br />
4.7<br />
15<br />
27<br />
22<br />
18<br />
33<br />
6.8<br />
not used<br />
6.8<br />
82A8015<br />
162G06 (0.56)<br />
162E06 (0.15)<br />
162C06 (0.22)<br />
1000<br />
D<br />
188.000–194.975<br />
12 1 22<br />
100 22<br />
100 not used<br />
15<br />
22 18 15<br />
6.8 3.3<br />
not used<br />
5.6 82B8015<br />
162G06 (0.56)<br />
162E06 (0.15)<br />
162C06 (0.22)<br />
1210<br />
E<br />
195.000–201.975<br />
10<br />
0.5<br />
22<br />
100<br />
22<br />
100 not used<br />
12<br />
22<br />
8.2<br />
15<br />
10<br />
6.8<br />
0.5<br />
5.6<br />
82B8015<br />
162G06 (0.56)<br />
162E06 (0.15)<br />
162D06 (0.18)<br />
1000<br />
F<br />
202.000–208.975<br />
8.2<br />
1<br />
22<br />
100<br />
22<br />
100 not used<br />
12<br />
22<br />
27<br />
18<br />
18<br />
5.6<br />
1<br />
3.3<br />
82B8015<br />
162G06 (0.56)<br />
162B06 (0.1)<br />
162D06 (0.18)<br />
1330<br />
G<br />
209.000–215.975<br />
6.8<br />
0.5<br />
18<br />
82<br />
18<br />
82<br />
not used<br />
12<br />
18<br />
15<br />
18<br />
22<br />
4.7<br />
1.5<br />
3.3<br />
82C8015<br />
162H06 (.047)<br />
162B06 (0.1)<br />
162D06 (0.18)<br />
1330<br />
H<br />
216.000–222.975<br />
6.8 0.5 18<br />
82 18<br />
82<br />
not used<br />
10<br />
27 15 15<br />
22 4.7<br />
1<br />
1 82C8015<br />
162H06 (.047)<br />
162B06 (0.1)<br />
162D06 (0.18)<br />
1000<br />
Notes:<br />
1. All resistors are 1 / 10 W, 1% tolerance, 0805 unless otherwise specified.<br />
2. Electrolytic capacitors are shown in F volts unless otherwise specified.<br />
3. All voltages shown are dc. Rf ground is indicated by the symbol .<br />
4. The “K” Group is marked by R256 and R257 (“G” and “H” resistors).<br />
K 230.975–235.975 6.8 0.5 15 82 15 82 not used 10 15 15 12 12 3.3 not used not used 82C8015 162H06 (.047) 162B06 (0.1) 162D06 (0.18) 1000<br />
1999, Shure Brothers Inc.<br />
27B1018 (SB)<br />
T2 ETSI-Approved RF Board<br />
(from 90_8705D-11)