

SERVICE MANUAL CHANGE NOTICE
shure
shure

You also want an ePaper? Increase the reach of your titles
YUMPU automatically turns print PDFs into web optimized ePapers that Google loves.
Shure T2 Vocal Artist Microphone Transmitter<br />
Disassembly and Assembly<br />
To access the printed circuit (pc) boards, disassemble the transmitter<br />
(refer to Figures 2 and 3 on pages 9 and 10).<br />
CAUTION<br />
Observe precautions when handling this static-sensitive device.<br />
Disassembly<br />
1. Turn off the Power switch.<br />
2. Unscrew the transmitter battery cup and remove the battery.<br />
3. Unscrew the microphone cartridge.<br />
4. If necessary, remove the microphone-transmitter subassembly:<br />
(a)<br />
(b)<br />
Use snap ring pliers to remove the retaining ring from inside<br />
the microphone handle.<br />
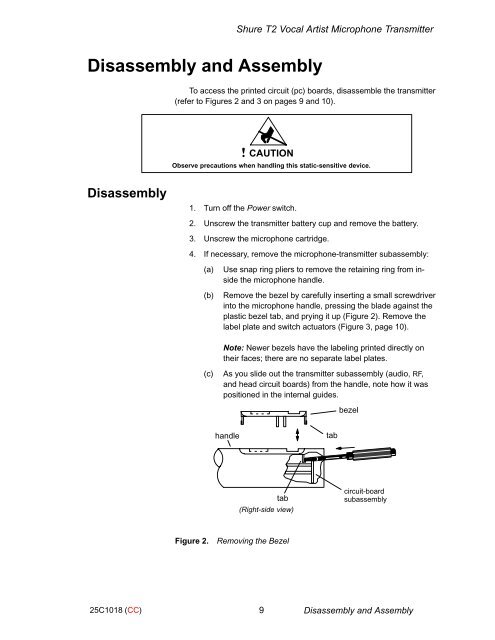
Remove the bezel by carefully inserting a small screwdriver<br />
into the microphone handle, pressing the blade against the<br />
plastic bezel tab, and prying it up (Figure 2). Remove the<br />
label plate and switch actuators (Figure 3, page 10).<br />
Note: Newer bezels have the labeling printed directly on<br />
their faces; there are no separate label plates.<br />
(c)<br />
As you slide out the transmitter subassembly (audio, RF,<br />
and head circuit boards) from the handle, note how it was<br />
positioned in the internal guides.<br />
bezel<br />
handle<br />
tab<br />
tab<br />
(Right-side view)<br />
circuit-board<br />
subassembly<br />
Figure 2.<br />
Removing the Bezel<br />
25C1018 (CC)<br />
9 Disassembly and Assembly