PS12 Clip Technical Bulletin - AEP Span
PS12 Clip Technical Bulletin - AEP Span
PS12 Clip Technical Bulletin - AEP Span

You also want an ePaper? Increase the reach of your titles
YUMPU automatically turns print PDFs into web optimized ePapers that Google loves.
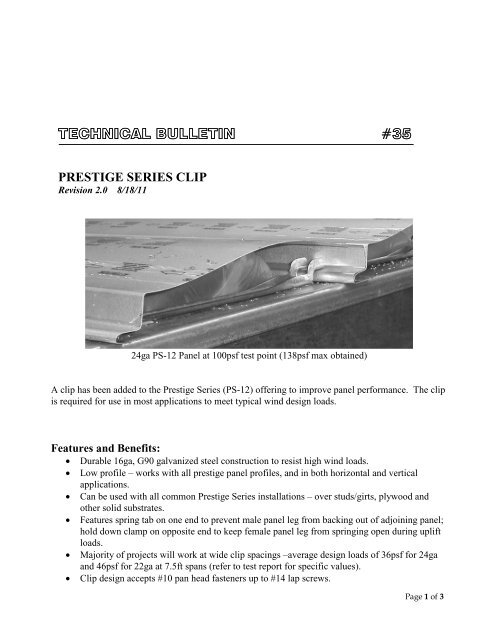
TECHNICAL BULLETIN #35<br />
PRESTIGE SERIES CLIP<br />
Revision 2.0 8/18/11<br />
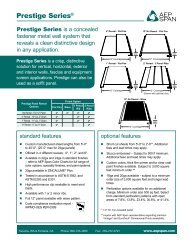
24ga PS-12 Panel at 100psf test point (138psf max obtained)<br />
A clip has been added to the Prestige Series (PS-12) offering to improve panel performance. The clip<br />
is required for use in most applications to meet typical wind design loads.<br />
Features and Benefits:<br />
• Durable 16ga, G90 galvanized steel construction to resist high wind loads.<br />
• Low profile – works with all prestige panel profiles, and in both horizontal and vertical<br />
applications.<br />
• Can be used with all common Prestige Series installations – over studs/girts, plywood and<br />
other solid substrates.<br />
• Features spring tab on one end to prevent male panel leg from backing out of adjoining panel;<br />
hold down clamp on opposite end to keep female panel leg from springing open during uplift<br />
loads.<br />
• Majority of projects will work at wide clip spacings –average design loads of 36psf for 24ga<br />
and 46psf for 22ga at 7.5ft spans (refer to test report for specific values).<br />
• <strong>Clip</strong> design accepts #10 pan head fasteners up to #14 lap screws.<br />
Page 1 of 3
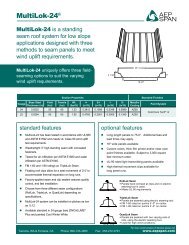
Fig. 1 <strong>Clip</strong> Details<br />
11.9”<br />
Spring Tab<br />
Hold Down<br />
16ga, G90 Galv.<br />
1.0”<br />
<strong>Clip</strong> Installation:<br />
• Locate clip mounting hole over fastener locating groove on adjoining panel (See Fig. 2).<br />
Drive fastener through clip and panel, and into substrate. Ensure that clip is perpendicular to<br />
panel edge. There is a centerline indicator stamped above and below the mounting hole to<br />
assist with perpendicular clip alignment (clip design allows for positioning of clip to be<br />
approximately 90° ± 3°). In vertical panel installations, or instances where second hand is not<br />
available to hold clip, the clip can be rotated into the perpendicular position after the fastener<br />
is partially driven.<br />
• Once clip has been positioned perpendicular to adjoining panel, fasten hold down end of clip<br />
with remaining fastener(s).<br />
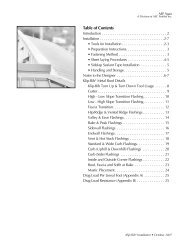
Fig. 2 <strong>Clip</strong> Installation<br />
Fastener Locating Groove<br />
<strong>Clip</strong> Mounting Hole<br />
Centerline Indicator<br />
Hold Down End<br />
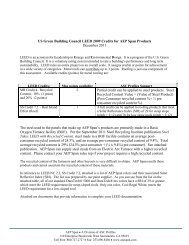
• Engage next Prestige Series panel by laying next to previously installed panel as shown in Fig.<br />
3 and slide together until completely engaged. An audible “click” will be heard when panel is<br />
fully locked behind clip. Because of the clip’s low profile design, this engagement is possible<br />
with panel ends contained within C-metal trims.<br />
Page 2 of 3
Fig. 3 Engagement of Panel<br />
Slide Into Position<br />
Fig. 4 Installed panel<br />
“CLICK”<br />
Notes:<br />
• PS-12 clip is required for use in most jobs that require engineering. 22 and 24ga panels<br />
without clips are only rated for design loads of approximately 15 and 10psf respectively (refer<br />
to test reports for specific values).<br />
• <strong>Clip</strong> is currently only available for use in 22 and 24ga applications. It has not been evaluated<br />
for use with 18 & 20ga panels (increased effort required to engage 18 & 20ga panels with this<br />
clip).<br />
• Shorter clip spacings will increase effort to engage panels – use the widest clip spacing that<br />
will still meet wind load requirements.<br />
Submitted by: B.Gough<br />
Date: 6/10/2009, Revised 8/18/11<br />
Page 3 of 3