DESCRIPTION DESCRIPTION - United Parachute Technologies
DESCRIPTION DESCRIPTION - United Parachute Technologies
DESCRIPTION DESCRIPTION - United Parachute Technologies

Create successful ePaper yourself
Turn your PDF publications into a flip-book with our unique Google optimized e-Paper software.
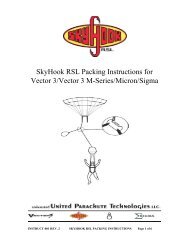
SIGMA TANDEM SYSTEM OWNER’S MANUAL<br />
THE SIGMA DROGUE COLLAPSE SEQUENCE<br />
The collapse sequence on the Sigma drogue is the same as on previous Vector drogues. The drogue partially collapses,<br />
at a controlled rate during bag lift-off, yielding just the right amount of force for an orderly deployment. However, the<br />
method of collapse is slightly different.<br />
The drogue bridle and kill line now both end at the same place, a rapid link connected to the top of the deployment<br />
bag. When the drogue is set (or cocked) during the packing sequence, the Kevlar drogue bridle below the disk is<br />
“scrunched up”, effectively making the bridle shorter than the kill line. When the drogue is deployed, it can inflate<br />
because the kill line is longer than the bridle. When a ripcord is pulled to end droguefall, the container opens and the<br />
disk is released, allowing the “scrunched up” section of the bridle below the disk to extend to its full length, thus<br />
making the bridle longer than the kill line. This inverts the drogue apex, collapsing the drogue.<br />
Because both the drogue bridle and kill line are made of non-stretch materials, the drogue collapse sequence is<br />
“stopped” automatically, at just the right point. No ring, slamming into a “stop ring” at high speed is needed, and the<br />
bridle moves over the kill line for a much shorter distance than on the previous design. This means less friction is<br />
generated, so everything lasts longer. And with no stop ring, the kill line is much less complicated and easier to<br />
replace. Also, because both the drogue bridle and kill line end at the same place, it is impossible to twist one independent<br />
of the other. This means no more time consuming untwisting of the kill line at pack time.<br />
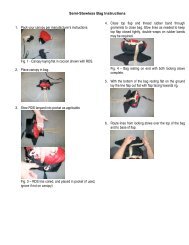
HOW TO CHECK IF YOUR DROGUE KILL LINE IS THE CORRECT<br />
LENGTH<br />
For this system to work correctly, a precise relationship between the length of the drogue bridle and the length of the<br />
kill line must be maintained. To check this relationship:<br />
Anchor the rapid link at the deployment bag end of the drogue bridle. Both the drogue bridle and kill line should be<br />
connected to this link.<br />
Extend the drogue bridle fully.<br />
Put a finger on either side of the kill line guide grommet at the base of the drogue, and apply about 10 lbs. of tension<br />
against the Kevlar bridle.<br />
With the other hand apply the same tension on the kill line by pulling on the kill line attachment bridle or the drogue<br />
handle. The larks head knot at the bottom of the kill line attachment bridle should be 1½ ” above the kill line guide<br />
grommet.<br />
You can notice this relationship less formally each time you pick up your drogue after landing.<br />
If this distance is more than 2” greater, the drogue may not fully collapse, yielding a higher snatch force, increased<br />
chance of malfunction due to line dump, and increased chance of canopy damage. If you notice a kill line that is over<br />
2” too long, a simple overhand knot, tied within the finger-locked section of the kill line, at the deployment bag end, will<br />
effectively shorten it almost 2”, and bring your drogue collapse system back into trim.<br />
If this distance is more than 1” less, the larks head knot will impact the guide grommet at high speed, quickly causing<br />
damage to both. However, in this instance, deployment, while slightly slower, will still happen more or less normally.<br />
Drouge collapse is calibrated for average weight and fall rates, if you feel the drouge is collapsing to far with longer<br />
than normal “trap door” you may Larkshead a PD Slink onto the bottom of the kill line to reduce the amount of<br />
collapse.<br />
Page 10:X Section 2: Equipment • Chapter 1 - Description 11301 - 00.00.0000