SkyHook RSL Packing Instructions for Vector 3/Vector 3 M-Series ...
SkyHook RSL Packing Instructions for Vector 3/Vector 3 M-Series ...
SkyHook RSL Packing Instructions for Vector 3/Vector 3 M-Series ...

Create successful ePaper yourself
Turn your PDF publications into a flip-book with our unique Google optimized e-Paper software.
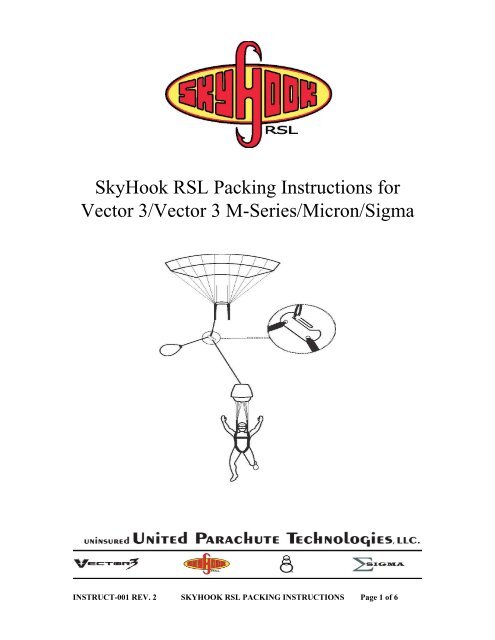
<strong>SkyHook</strong> <strong>RSL</strong> <strong>Packing</strong> <strong>Instructions</strong> <strong>for</strong><strong>Vector</strong> 3/<strong>Vector</strong> 3 M-<strong>Series</strong>/Micron/SigmaINSTRUCT-001 REV. 2 SKYHOOK <strong>RSL</strong> PACKING INSTRUCTIONS Page 1 of 6
A standard <strong>RSL</strong> does one thing. It pulls the reserve ripcord pinautomatically after a breakaway. The Skyhook <strong>RSL</strong> does this, and thengoes two steps further.A. It automatically releases the Left (non-<strong>RSL</strong>) riser, if the right (<strong>RSL</strong>)riser releases prematurely <strong>for</strong> any reason (Collins‘ Lanyard). (Youwouldn‘t want your reserve container opened with one riser stillattached, would you?)B. It then uses your departing main canopy as a super —pilot chute“ toget your reserve to line stretch faster than ever be<strong>for</strong>e. Breakaway, tocanopy-out-of-bag times are between ² and ½ of a second, dependingon the size of your reserve canopy. This is up to three times fasterthan a pilot chute can do it alone.If you have a main total malfunction, or your AAD fires, the SkyhookLanyard automatically releases, and there<strong>for</strong>e does nothing to hindernormal reserve deployment.The Skyhook <strong>RSL</strong> System has four parts:1. The <strong>RSL</strong> Lanyard (5/8 or 1“, black webbing) with a snap shacklethat connects to your right main riser at one end, and the Collins‘Lanyard loop at the other.2. The White Ripcord Lanyard, with one end sewn to the <strong>RSL</strong> loop, andthe reserve ripcord pin at the other.3. The Red Skyhook Lanyard, also sewn to the <strong>RSL</strong> loop, with theSkyhook attachment loop at its free end.4. The Skyhook itself, which is sewn to the reserve pilot chutebridle.(Because the <strong>RSL</strong> Lanyard, Collins‘ Lanyard, and SkyhookLanyard are all part of one integrated system, pulling the yellow tab onthe <strong>RSL</strong> snap shackle inactivates all three.)INSTRUCT-001 REV. 2 SKYHOOK <strong>RSL</strong> PACKING INSTRUCTIONS Page 2 of 6
INSTRUCT-001 REV. 2 SKYHOOK <strong>RSL</strong> PACKING INSTRUCTIONS Page 3 of 6
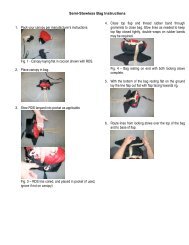
PACKING:1. Place the bagged reserve canopy in thecontainer as described in the <strong>Vector</strong> 3Owner’s Manual.2. S-Fold the 7-foot section of freebag bridle(up to the Green flex-tab) under pilot chutekicker flap #1, in the normal manner. Closeflap #2, and secure with the reserve closingloop and temporary pin. Make sure theremaining bridle exits the closed kicker flapsto the wearer’s LEFT (Right in Photos) of the#2 (upper) flap, with the flex-tab side up.3. Attach the RED Shyhook lanyard to flap #2by folding the stiffened section of the lanyardin half, and inserting it completely into theRED pocket on the flap. You may have to openthe pocket a little with a pencil be<strong>for</strong>e insertingthe flex-tab.INSTRUCT-001 REV. 2 SKYHOOK <strong>RSL</strong> PACKING INSTRUCTIONS Page 4 of 6
4. Fold the bridle over the edge of flap #2,and insert the GREEN flex-tab on thefreebag bridle into the GREEN pocket onthe #2 flap.5. Lay the bridle over flap #2 with theSkyhook facing up. Lift the Lexan coverslightly, rotate the Skyhook enough toslip the loop on the end of the red Skyhooklanyard over the Skyhook, androtate back into position. The Skyhookshould be held firmly in place betweenthe two pockets with less than ¼” ofPlay.(Note: It should take a <strong>for</strong>ce of5-7 lbs.to pull the red or green flex-tabout of its pouch, at a 180 degree angleto the mouth of the pouch.)INSTRUCT-001 REV. 2 SKYHOOK <strong>RSL</strong> PACKING INSTRUCTIONS Page 5 of 6
INSTRUCT-001 REV. 2 SKYHOOK <strong>RSL</strong> PACKING INSTRUCTIONS Page 6 of 6