DESCRIPTION DESCRIPTION - United Parachute Technologies
DESCRIPTION DESCRIPTION - United Parachute Technologies
DESCRIPTION DESCRIPTION - United Parachute Technologies

Create successful ePaper yourself
Turn your PDF publications into a flip-book with our unique Google optimized e-Paper software.
CHAPTER 1<br />
<strong>DESCRIPTION</strong>
SIGMA TANDEM SYSTEM OWNER’S MANUAL<br />
CONTAINER<br />
Cypres Inspection Window<br />
Turn Cypres on or off through<br />
clear window. Cypres condition<br />
can be checked at a glance.<br />
Reserve Pin<br />
Inspection Window<br />
Lexan window allows pin check<br />
at a glance, without opening<br />
reserve pin cover flap.<br />
Primary Drogue<br />
Release Handle<br />
Left hand pull, located on<br />
bottom of main container.<br />
Blue golf ball.<br />
Pull approximately 6” will<br />
release drogue.<br />
Drogue Deployment Handle<br />
Right hand pull, located on<br />
bottom of main container.<br />
Plastic ball attached to top of<br />
drogue.<br />
Page 2:X Section 2: Equipment • Chapter 1 - Description 11301 - 00.00.0000
SIGMA TANDEM SYSTEM OWNER’S MANUAL<br />
HARNESS<br />
Auxiliary Reserve Ripcord/Integrated Lanyard<br />
(Dual Purpose)<br />
A. Auxiliary Reserve Ripcord: Right hand pull. Ball handle on reserve static<br />
line next to 3-Ring on right hand side of rig. To be used if left hand is<br />
incapacitated in any way, and unable to pull reserve ripcord. Ball must be<br />
pulled straight up to release RSL connectoin and initiate reserve activation.<br />
B. Integrated Lanyard: RSL can be used prior to landing in the event of high<br />
ground winds.<br />
No Crytal Ball<br />
If the system has a Skyhook<br />
installed there will be no Crystal<br />
Ball.<br />
Top Student<br />
Attachment Point<br />
Two D-rings mounted<br />
inverted under the large<br />
harness ring on both sides of<br />
the main lift web.<br />
Cutaway Handle<br />
Right hand pull. Soft pillow<br />
handle (or loop-style handle)<br />
attached firmly in an<br />
outboard position on right<br />
main lift web. Handle color is<br />
green.<br />
Reserve Ripcord<br />
Left hand pull. Either a<br />
webbing loop handle (or soft<br />
pillow handle) attached firmly<br />
to the left main lift web in an<br />
outboard position. Handle<br />
color is red.<br />
Secondary Right Hand<br />
Drogue Release Handle<br />
Right hand pull. Orange golf<br />
ball.<br />
Bottom Student<br />
Attachment Point<br />
Consists of two RW-8 rings<br />
mounted sideways, threaded<br />
through each diagonal on the<br />
left and right sides.<br />
Main Lift Web Adjustment Points<br />
Webbing is adjusted through a<br />
pair of three bar adapters.<br />
11301 - 00.00.0000 Section 2: Equipment • Chapter 1 - Description<br />
Page 3:X
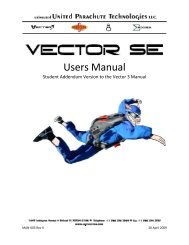
SIGMA TANDEM SYSTEM OWNER’S MANUAL<br />
THE STUDENT HARNESS<br />
The Sigma / Vector Student Harness is quite a departure from previous tandem student harnesses. It was designed,<br />
with the help of a cardiologist, to safely contain the human body without cutting off normal blood flow. Disrupted<br />
blood flow is why almost all students on older student harnesses were uncomfortable, and why some got sick or even<br />
passed out.<br />
A hip-hugging horizontal back and belt strap combination allows the main lift webs to be positioned, and held, more<br />
toward the front of the upper body than on other designs. This prevents the “squeezing” of the upper body and the<br />
inside of the upper legs which can cut off blood flow. It also automatically lifts the legs up and forward after opening,<br />
putting them in a safer position for landing.<br />
The Student Harness was designed to comfortably and safely fit a wide range of body sizes and types. To accomplish<br />
this, it has thirteen (13) points of adjustment. This wide range of adjustment means that it is possible to give a<br />
tandem student a truly comfortable experience on their tandem skydive. However, the harness must still be adjusted<br />
securely to fit the student’s body to prevent them from falling out in extreme situations and unusual body positions.<br />
While fitting this harness on a tandem student is not difficult, it is different from other harnesses you may have used<br />
in the past. The most important point to consider is the security of the student. You must insure that all straps are<br />
comfortably snug against the student’s body.<br />
Page 4:X Section 2: Equipment • Chapter 1 - Description 11301 - 00.00.0000
SIGMA TANDEM SYSTEM OWNER’S MANUAL<br />
THE STUDENT HARNESS<br />
Diagonal Back Strap<br />
Horizontal Back Strap<br />
Chest Strap<br />
Top Attachment Points<br />
(Snap Hooks)<br />
Side Attachment Points<br />
(Quick Ejectors)<br />
Adjustable Leg Straps<br />
Belly Strap<br />
11301 - 00.00.0000 Section 2: Equipment • Chapter 1 - Description<br />
Page 5:X
SIGMA TANDEM SYSTEM OWNER’S MANUAL<br />
THE MAIN CANOPY<br />
Canopy Nose<br />
Canopy Tail<br />
D-Line<br />
C-Line<br />
B-Line<br />
A-Line<br />
Standard Control Lines<br />
Long Gold Toggles<br />
Short Black<br />
Toggles<br />
Tandem Instructor Toggle<br />
Student Toggle<br />
Diagram shows loaded ribs only<br />
Page 6:X Section 2: Equipment • Chapter 1 - Description 11301 - 00.00.0000
SIGMA TANDEM SYSTEM OWNER’S MANUAL<br />
SUMMARIZING THE ADVANTAGES OF THE SIGMA TANDEM<br />
1. It takes fewer steps, with fewer potential errors, to close the main container.<br />
2. Accidentally snagging the drogue bridle will not open the container.<br />
3. Out-of-sequence deployments are eliminated.<br />
4. Its center-of-main-container drogue connection gives a more “natural” and comfortable drogue-fall position than<br />
other Tandem systems.<br />
5. The drogue release ripcords are automatically retracted after use, or accidental snagging, so that they are always<br />
where they should be, cannot be lost, and don’t have to be stowed after pulling.<br />
6. It has two redundant, fail-safe drogue release ripcords, one on the right, and one on the left.<br />
7. The drogue release/container opening pin is “locked” until you throw the drogue, preventing accidental high<br />
openings.<br />
8. No more time consuming untwisting of drogue kill line during packing. Kill lines can be easily replaced in the field.<br />
9. You still get a more or less normal deployment if the kill line breaks, and you don’t lose your drogue.<br />
10. It’s improved deployment bag means less canopy damage.<br />
11. It has an improved student harness, which means safer and more comfortable students, and their positive wordof-mouth<br />
advertising will increase your tandem business.<br />
12. Skyhook RSL with intergrated Collin’s Lanyard.<br />
13. It has tuck-tab main, reserve, and riser covers.<br />
14. Clear plastic windows make reserve pin checks and Cypres operation easier.<br />
15. It has “Wonderfoam” padding throughout.<br />
THE SIGMA IS MADE TO THE HIGHEST QUALITY STANDARDS IN THE INDUSTRY BY<br />
UNINSURED UNITED PARACHUTE TECHNOLOGIES<br />
11301 - 00.00.0000 Section 2: Equipment • Chapter 1 - Description<br />
Page 7:X
SIGMA TANDEM SYSTEM OWNER’S MANUAL<br />
DROGUE DEFINITIONS<br />
Exterior – Top Down<br />
1. Handle – The 1-5/8in ball, connected to the apex of the drogue envelope, used to deploy the drogue.<br />
2. Envelope – The fabric and mesh portion of the drogue. Its top is called the apex, its bottom the base.<br />
3. Bridle – The doubled, 1¾ ”, 4,000 lb. Kevlar section that leads from the envelope to the deployment bag<br />
connection loop.<br />
4. Safety Pin – A compound-curved pin connected to the bridle, designed to prevent accidental<br />
main container openings.<br />
5. Disk – A 5” aluminum disk, with a 1” flanged chimney.<br />
5.5 Disk Cover – Designed to protect disk..<br />
6. Disk Attachment Loop - A loop on the Kevlar drogue bridle to which the disk is attached with a stainless steel pin,<br />
held in place with two flat head screws. A 3/32” hex drive is required to tighten or loosen screws. (inclosed)<br />
7. Drogue Bridle Loop – The loop at the end of the Kevlar drogue bridle, to which the deployment bag is attached.<br />
8. Bag Attachment Loop – A loop of tubular Nylon at the top of the main deployment bag where both the bridle and<br />
kill line are attached by means of a #5 stainless rapid link.<br />
Interior – Top Down<br />
9. Kill Line Attachment Bridle – A 9” length of 1” Nylon tape that serves as an attachment point for the kill line, and<br />
limits the degree of collapse if a kill line is accidentally made too short.<br />
10. Kill Line – A length of 1,000 lb. Vectran/Spectra line, with a 1” loop at each end, that runs inside the Kevlar drogue<br />
bridle from the kill line attachment bridle to the rapid link at the bag attachment loop.<br />
11. Drogue Set Limiter Tapes –Two pieces of 1” Nylon tape that run from the drogue apex to the drogue skirt. This<br />
saves wear and tear on the drogue bridle and kill line by limiting the distance they slide on each other during<br />
drogue collapse.<br />
12. Kill Line Guide Grommet – A “0” stainless steel grommet at the base of the drogue envelope which directs the kill<br />
line into the Kevlar drogue bridle preventing wear. It also serves as an emergency stop for the kill line attachment<br />
bridle if the kill line is accidentally made too short.<br />
13. Disk Attachment Pin – A threaded stainless steel rod, used to attach the disk to the bridle, using 2, 3/32” hex drive<br />
screws.<br />
Page 8:X Section 2: Equipment • Chapter 1 - Description 11301 - 00.00.0000
SIGMA TANDEM SYSTEM OWNER’S MANUAL<br />
THE DROGUE<br />
11301 - 00.00.0000 Section 2: Equipment • Chapter 1 - Description<br />
Page 9:X
SIGMA TANDEM SYSTEM OWNER’S MANUAL<br />
THE SIGMA DROGUE COLLAPSE SEQUENCE<br />
The collapse sequence on the Sigma drogue is the same as on previous Vector drogues. The drogue partially collapses,<br />
at a controlled rate during bag lift-off, yielding just the right amount of force for an orderly deployment. However, the<br />
method of collapse is slightly different.<br />
The drogue bridle and kill line now both end at the same place, a rapid link connected to the top of the deployment<br />
bag. When the drogue is set (or cocked) during the packing sequence, the Kevlar drogue bridle below the disk is<br />
“scrunched up”, effectively making the bridle shorter than the kill line. When the drogue is deployed, it can inflate<br />
because the kill line is longer than the bridle. When a ripcord is pulled to end droguefall, the container opens and the<br />
disk is released, allowing the “scrunched up” section of the bridle below the disk to extend to its full length, thus<br />
making the bridle longer than the kill line. This inverts the drogue apex, collapsing the drogue.<br />
Because both the drogue bridle and kill line are made of non-stretch materials, the drogue collapse sequence is<br />
“stopped” automatically, at just the right point. No ring, slamming into a “stop ring” at high speed is needed, and the<br />
bridle moves over the kill line for a much shorter distance than on the previous design. This means less friction is<br />
generated, so everything lasts longer. And with no stop ring, the kill line is much less complicated and easier to<br />
replace. Also, because both the drogue bridle and kill line end at the same place, it is impossible to twist one independent<br />
of the other. This means no more time consuming untwisting of the kill line at pack time.<br />
HOW TO CHECK IF YOUR DROGUE KILL LINE IS THE CORRECT<br />
LENGTH<br />
For this system to work correctly, a precise relationship between the length of the drogue bridle and the length of the<br />
kill line must be maintained. To check this relationship:<br />
Anchor the rapid link at the deployment bag end of the drogue bridle. Both the drogue bridle and kill line should be<br />
connected to this link.<br />
Extend the drogue bridle fully.<br />
Put a finger on either side of the kill line guide grommet at the base of the drogue, and apply about 10 lbs. of tension<br />
against the Kevlar bridle.<br />
With the other hand apply the same tension on the kill line by pulling on the kill line attachment bridle or the drogue<br />
handle. The larks head knot at the bottom of the kill line attachment bridle should be 1½ ” above the kill line guide<br />
grommet.<br />
You can notice this relationship less formally each time you pick up your drogue after landing.<br />
If this distance is more than 2” greater, the drogue may not fully collapse, yielding a higher snatch force, increased<br />
chance of malfunction due to line dump, and increased chance of canopy damage. If you notice a kill line that is over<br />
2” too long, a simple overhand knot, tied within the finger-locked section of the kill line, at the deployment bag end, will<br />
effectively shorten it almost 2”, and bring your drogue collapse system back into trim.<br />
If this distance is more than 1” less, the larks head knot will impact the guide grommet at high speed, quickly causing<br />
damage to both. However, in this instance, deployment, while slightly slower, will still happen more or less normally.<br />
Drouge collapse is calibrated for average weight and fall rates, if you feel the drouge is collapsing to far with longer<br />
than normal “trap door” you may Larkshead a PD Slink onto the bottom of the kill line to reduce the amount of<br />
collapse.<br />
Page 10:X Section 2: Equipment • Chapter 1 - Description 11301 - 00.00.0000
SIGMA TANDEM SYSTEM OWNER’S MANUAL<br />
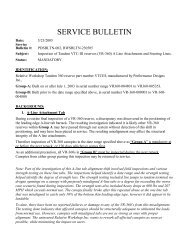
UNDERSTANDING THE MAIN RECOIL RIPCORD SYSTEM<br />
The Recoil Ripcord System for the Tandem Sigma drogue consists of:<br />
1. A single length of 1,000 lb. Spectra line with finger locked loops at each end, and near the center.<br />
2. A single length of 1/8” bungee cord, finger locked between the loops at each end of the Spectra line.<br />
3. Two, specially prepared, solid core ball handles.<br />
4. One stainless steel, eyeleted, ripcord pin.<br />
5. Two stainless steel ripcord housings.<br />
One ripcord handle is located at the bottom left corner of the main container, and the other on the right leg pad,<br />
allowing the tandem instructor to release the drogue with either hand. The right handle is positioned on the tandem<br />
Spectra<br />
Ripcord<br />
FIGURE 1<br />
RELEASE HANDLE SYSTEM<br />
(Cross section view of spandex for clarity)<br />
Bungee<br />
FIGURE 2<br />
RIPCORD DETAIL<br />
(Housings, et., removed for detail)<br />
instructor’s harness so as to simulate<br />
a Bottom of Container (BOC) position<br />
for the student. You don’t have to<br />
hook it up to the student harness<br />
before each jump. It is automatically<br />
in the right position.<br />
There are no “ripcord pockets” per say.<br />
Each ripcord handle “plugs into” the<br />
end of the housing, and is held in<br />
position by a combination of friction,<br />
and the pull of the bungee cord retract<br />
system.<br />
Pulling either handle about 5” pulls the single<br />
ripcord pin, opening the container and<br />
releasing the drogue. Notice that each ripcord<br />
is set up as a 2-1 pulley, so that a pull of 5<br />
pounds at the handle translates into a pull of<br />
10 lbs at the pin, resulting in easy pulls every<br />
time.<br />
Once the drogue is released, as evidenced by<br />
the “trap door effect,” you can simply let go<br />
of the handle. It will automatically return to<br />
its position on the end of the ripcord housing.<br />
Although the housings are double clamped<br />
into position under the drogue pouch for<br />
maximum security and long life, excessive<br />
pulling on the ripcord handles after drogue<br />
release might eventually damage these<br />
housing connections. You don’t have to baby<br />
the system, but pull only as far as necessary<br />
to release the drogue, and then let go of the<br />
handle.<br />
11301 - 00.00.0000 Section 2: Equipment • Chapter 1 - Description<br />
Page 11:X
SIGMA TANDEM SYSTEM OWNER’S MANUAL<br />
The advantages of this system are obvious. The spherical shape of the ripcord handles, and their<br />
method of attachment, makes snagging highly unlikely. If dislodged, they automatically return to<br />
position, so no more searching for “floating” ripcords. And the unique “Safety Pin,” connected to<br />
the drogue bridle, makes it virtually impossible for a snagged ripcord handle to cause an accidental<br />
container opening. And let’s not forget, you no longer have to waste time and effort stowing the<br />
handles after opening, or searching for them at packing time.<br />
Because this system is new (The first production rigs went into service Summer 2000), we don’t yet know how long the<br />
recoil ripcord system will last under actual field conditions. Although bench tests show that the ripcord system can<br />
last for over 1,000 jumps, you should inspect the whole system often for signs of wear.<br />
Look for wear at the junction of the Spectra ripcords and the handles, and around the pin area. The Spectra is 1,000<br />
lbs. strong, and the force required to pull the pin is less than 10 lbs. That’s over a 100 to 1 safety margin, so a small<br />
amount of fraying should not be cause for alarm. Besides, the ripcord system is designed to be redundant. If one side<br />
were to break or jam for any reason, the other side is still fully functional.<br />
Also notice if the recoil system is doing its job properly. With the rig packed, each ripcord should snap back into place<br />
when pulled a few inches and released. But please realize, if you pull and release each ripcord handle several times<br />
before each jump, you will shorten the life of the system by a factor of three. Inspect, but don’t play with the system<br />
incessantly if you want maximum life from your ripcords.<br />
UNDERSTANDING THE SIGMA SKYHOOK RSL COLLINS’ LANYARD<br />
The Collins’ lanyard was designed to prevent a main-reserve entanglement, by releasing the left (non-RSL side) main<br />
riser, in the event that the right (RSL side) main riser breaks or prematurely releases by itself, for any reason. On the<br />
Sigma, it is integrated into the RSL with no external lanyard. This is accomplished by threading the left riser 3-ring<br />
release cable through a loop in the reserve static line (RSL). As the right riser leaves, the RSL automatically pulls the<br />
left cutaway cable as it pulls the reserve pin, yielding an almost simultanious breakaway and clean reserve deployment.<br />
A standard RSL does one thing. It pulls the reserve ripcord pin automatically after a breakaway. The Skyhook RSL does<br />
this, and then goes two steps further.<br />
A. It automatically releases the Left (non-RSL) riser, if the right (RSL) riser releases prematurely for any reason (Collins.<br />
Lanyard). (You wouldn.t want your reserve container opened with one riser still attached, would you?)<br />
B. It then uses your departing main canopy as a super .pilot chute. to get your reserve to line stretch faster<br />
than ever before. Breakaway, to canopy-out-of-bag times are between ½ and ¾ of a second, depending on the<br />
size of your reserve canopy. This is up to three times faster than a pilot chute can do it alone.<br />
If you have a main total malfunction, or your AAD fires, the Skyhook Lanyard automatically releases, and<br />
therefore does nothing to hinder normal reserve deployment.<br />
Page 12:X Section 2: Equipment • Chapter 1 - Description 11301 - 00.00.0000