EPM Live WorkEngine
EPM Live WorkEngine
EPM Live WorkEngine

Create successful ePaper yourself
Turn your PDF publications into a flip-book with our unique Google optimized e-Paper software.
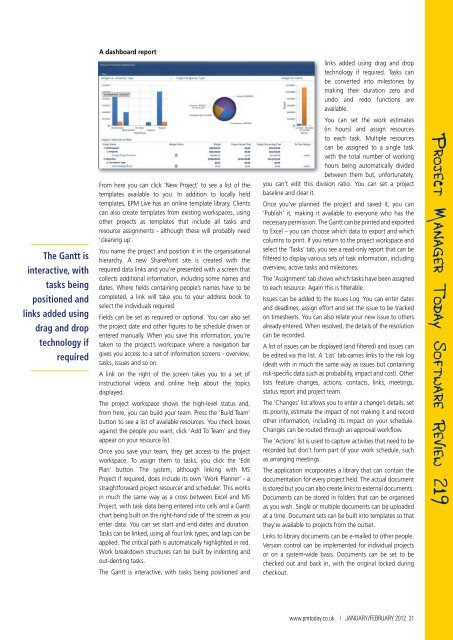
A dashboard report<br />
links added using drag and drop<br />
technology if required. Tasks can<br />
be converted into milestones by<br />
making their duration zero and<br />
undo and redo functions are<br />
available.<br />
The Gantt is<br />
interactive, with<br />
tasks being<br />
positioned and<br />
links added using<br />
drag and drop<br />
technology if<br />
required<br />
From here you can click ‘New Project’ to see a list of the<br />
templates available to you. In addition to locally held<br />
templates, <strong>EPM</strong> <strong>Live</strong> has an online template library. Clients<br />
can also create templates from existing workspaces, using<br />
other projects as templates that include all tasks and<br />
resource assignments - although these will probably need<br />
‘cleaning up’.<br />
You name the project and position it in the organisational<br />
hierarchy. A new SharePoint site is created with the<br />
required data links and you’re presented with a screen that<br />
collects additional information, including some names and<br />
dates. Where fields containing people’s names have to be<br />
completed, a link will take you to your address book to<br />
select the individuals required.<br />
Fields can be set as required or optional. You can also set<br />
the project date and other figures to be schedule driven or<br />
entered manually. When you save this information, you’re<br />
taken to the project’s workspace where a navigation bar<br />
gives you access to a set of information screens - overview,<br />
tasks, issues and so on.<br />
A link on the right of the screen takes you to a set of<br />
instructional videos and online help about the topics<br />
displayed.<br />
The project workspace shows the high-level status and,<br />
from here, you can build your team. Press the ‘Build Team’<br />
button to see a list of available resources. You check boxes<br />
against the people you want, click ‘Add To Team’ and they<br />
appear on your resource list.<br />
Once you save your team, they get access to the project<br />
workspace. To assign them to tasks, you click the ‘Edit<br />
Plan’ button. The system, although linking with MS<br />
Project if required, does include its own ‘Work Planner’ - a<br />
straightforward project resourcer and scheduler. This works<br />
in much the same way as a cross between Excel and MS<br />
Project, with task data being entered into cells and a Gantt<br />
chart being built on the right-hand side of the screen as you<br />
enter data. You can set start and end dates and duration.<br />
Tasks can be linked, using all four link types, and lags can be<br />
applied. The critical path is automatically highlighted in red.<br />
Work breakdown structures can be built by indenting and<br />
out-denting tasks.<br />
The Gantt is interactive, with tasks being positioned and<br />
You can set the work estimates<br />
(in hours) and assign resources<br />
to each task. Multiple resources<br />
can be assigned to a single task<br />
with the total number of working<br />
hours being automatically divided<br />
between them but, unfortunately,<br />
you can’t edit this division ratio. You can set a project<br />
baseline and clear it.<br />
Once you’ve planned the project and saved it, you can<br />
‘Publish’ it, making it available to everyone who has the<br />
necessary permission. The Gantt can be printed and exported<br />
to Excel – you can choose which data to export and which<br />
columns to print. If you return to the project workspace and<br />
select the ‘Tasks’ tab, you see a read-only report that can be<br />
filtered to display various sets of task information, including<br />
overview, active tasks and milestones.<br />
The ‘Assignment’ tab shows which tasks have been assigned<br />
to each resource. Again this is filterable.<br />
Issues can be added to the Issues Log. You can enter dates<br />
and deadlines, assign effort and set the issue to be tracked<br />
on timesheets. You can also relate your new issue to others<br />
already entered. When resolved, the details of the resolution<br />
can be recorded.<br />
A list of issues can be displayed (and filtered) and issues can<br />
be edited via this list. A ‘List’ tab carries links to the risk log<br />
(dealt with in much the same way as issues but containing<br />
risk-specific data such as probability, impact and cost). Other<br />
lists feature changes, actions, contacts, links, meetings,<br />
status report and project team.<br />
The ‘Changes’ list allows you to enter a change’s details, set<br />
its priority, estimate the impact of not making it and record<br />
other information, including its impact on your schedule.<br />
Changes can be routed through an approval workflow.<br />
The ‘Actions’ list is used to capture activities that need to be<br />
recorded but don’t form part of your work schedule, such<br />
as arranging meetings.<br />
The application incorporates a library that can contain the<br />
documentation for every project held. The actual document<br />
is stored but you can also create links to external documents.<br />
Documents can be stored in folders that can be organised<br />
as you wish. Single or multiple documents can be uploaded<br />
at a time. Document sets can be built into templates so that<br />
they’re available to projects from the outset.<br />
Links to library documents can be e-mailed to other people.<br />
Version control can be implemented for individual projects<br />
or on a system-wide basis. Documents can be set to be<br />
checked out and back in, with the original locked during<br />
checkout.<br />
Project Manager Today Software Review 219<br />
www.pmtoday.co.uk | JANUARY/FEBRUARY 2012 31