Create successful ePaper yourself
Turn your PDF publications into a flip-book with our unique Google optimized e-Paper software.
<strong>Warhammer</strong> <strong>Skirmish</strong> <strong>Scenarios</strong><br />
The jungle continent of Lustria is the most hostile environment outside<br />
the Realms of Chaos. This verdant landmass is covered with a<br />
primordial jungle so thick that its canopy seems to replace the sky<br />
itself. But this ancient jungle hides more than just mosquitoes and<br />
deadly sink holes. The Lizardmen guard this land for their masters, and<br />
their masters have riches beyond belief! You can investigate the<br />
dangerous, jungle lands of the Lizardmen by playing the following<br />
<strong>Warhammer</strong> <strong>Skirmish</strong> scenarios. Who knows? They may even spark<br />
off a few ideas of your own. At the very least, these scenarios will add a<br />
level of excitement and flavor to your games of <strong>Warhammer</strong>.<br />
Lizardmen army.<br />
These scenarios (Run Them Down and The Heist) are one-off games<br />
that we hope will encourage you to play as you paint and build a mighty
The <strong>Scenarios</strong><br />
Use this page as an index to get from scenario to scenario. All you have to do is click on<br />
the link or the images along the left hand side of this page. New Lizardmen scenarios<br />
will be listed here as they become available.<br />
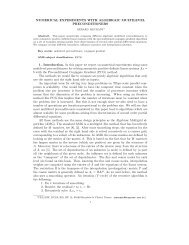
Run Them Down<br />
In this fast-paced scenario, a mighty Carnosaur crashes through<br />
the jungle undergrowth to tear into a group of fleeing trespassers.<br />
Will the invaders escape from the lands of Lustria in one piece, or<br />
will they end up as a tasty snack?<br />
The Heist<br />
A warrior has been tasked with a special mission: hide a<br />
magical item in the Mage Priest's throne room while the<br />
rest of his company distracts the Lizardmen guards. If he<br />
is found out, it could mean the end for his band of thieves!
Models Needed<br />
Pursuer's Forces - Lizardmen:<br />
• Saurus Oldblood riding a Carnosaur<br />
• 10 Skink <strong>Skirmish</strong>ers<br />
Fleeing Troops Forces - Empire:<br />
• 200 points of troops<br />
• No Special Characters, Heroes, war<br />
machines, or chariots<br />
• No mounted troops or flyers<br />
• 1 Champion may be included<br />
Run Them Down<br />
Ignoring the branches and vines that<br />
whipped at his heavily scaled and pitted<br />
face, ancient Scar-Leader Kroq-Gar rode<br />
through the trees on the back of the mighty<br />
Grymloq. The vicious Carnosaur, whom he<br />
had ridden into battle for nearly six<br />
centuries, snapped its massive jaws at the<br />
fleeing pterosaurs. Without breaking stride,<br />
the colossal predator caught one of the<br />
winged creatures, gulping it down whole.<br />
Raising his heavy head, Kroq-Gar let out a<br />
throaty roar. Grymloq bellowed in<br />
response, the deafening sound echoing<br />
through the heavy, moisture-filled air, warning the now silent jungle that its king was<br />
hunting. Kroq-Gar hefted his long-bladed spear high into the air, rejoicing in the thrill of<br />
the chase, eagerly anticipating the slaughter he would unleash upon the despised<br />
interlopers who had dared encroach upon his domain.<br />
Excerpt taken from War Against Chaos,<br />
pg. 20-21, <strong>Warhammer</strong> Armies: Lizardmen.
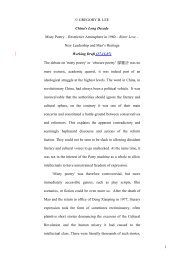
Run Them Down<br />
Battlefield<br />
This scenario requires a 24" x 48"<br />
area. Use a large amount of jungle<br />
terrain - the more jungle plants and<br />
trees you have on the table, the<br />
better it will be when the Carnosaur<br />
comes charging through it to chomp<br />
the fleeing scaleless-ones. The<br />
following pieces of scenery are ideal:<br />
tropical trees and undergrowth,<br />
statues, pillars and small crumbling<br />
and overgrown walls, and swampy,<br />
treacherous ground.<br />
Click image for larger map.<br />
Objectives<br />
The Pursuing forces must slay (and consume) as many of the fleeing troops as possible -<br />
the enemy must pay with their lives for their transgressions! The Pursuers win if they<br />
meet the victory conditions listed below.<br />
The Fleeing side must try to escape off the table edge with minimal casualties.<br />
As the sun is rapidly setting, the Pursuing force has 8 turns to wipe out as many of the<br />
Fleeing force as possible. After 8 turns any Fleeing models not engaged in combat but<br />
still on the board are considered to have made it off the battlefield, slinking away under<br />
the cover of darkness.<br />
Victory Conditions<br />
The Fleeing side wins this scenario if they get 50% of the original number of troops off of<br />
the northern table edge.<br />
The Pursuing side wins if they kill or consume 50% of the starting number of enemy<br />
troops. For each Skink that is mistakenly eaten (see Special Rules below), the Pursuing<br />
player must subtract 5% from his current total. All other results will end in a draw.<br />
Deployment<br />
The Fleeing side sets up all their models first. The entire force must be set up inside a 6"<br />
square at the center of the table.<br />
The Pursuing side sets up all their models last. The Carnosaur begins the game off the<br />
table but may move onto the table at its full movement allowance if the player chooses. It<br />
may appear anywhere along the southern table edge. The Skinks may be set up<br />
anywhere along the southern table edge, and at most 6" inches into the table.
Who Goes First?<br />
The Pursuing side get the first turn.<br />
Special Rules<br />
This scenario uses the special rules detailed below:<br />
Appetite for Destruction<br />
At the best of times a Carnosaur is an uncontrollable,<br />
aggressive beast. That means the monster's Blood-frenzy<br />
rules are in full effect. However, so hungry is this reptilian<br />
beast that it can't distinguish friend from foe once it enters<br />
this mind set. Instead of only charging the nearest enemy<br />
model, the enraged Carnosaur will attack any nearest<br />
model after its first kill, friend or foe. Yes, that's right.<br />
Skinks are on the menu too!<br />
Swath of Ruin<br />
At the beginning of its Close Combat phase, the Carnosaur may apply its attacks on any<br />
model within 4" of its base.<br />
Thick Jungle<br />
Due to the thickness of the jungle, fleeing troops may only move their regular movement,<br />
not double as for skirmishers. The Skinks and Carnosaur are not restricted due to<br />
familiarity with the terrain and sheer size, respectively.<br />
Wrong Way<br />
Roll a D6 for each Fleeing model at the beginning of their Movement phase. On a roll of<br />
a 1, a Fleeing model moves in a random direction.
Models Needed<br />
Defending Force - Lizardmen<br />
• 5 Saurus Temple Guard with shields<br />
• 8 Skink <strong>Skirmish</strong>ers with blowpipes<br />
Attacking Force<br />
• 200 points of troops<br />
• No Special Characters, Heroes, War<br />
Machines, or Chariots<br />
• No mounted troops or flyers<br />
• 1 Champion may be included<br />
The Heist<br />
spawning-kin swiftly approached their enemies.<br />
A distant, echoing roar reached Teoqual's<br />
ears, and he paused in readiness. He<br />
flicked his blue tongue, tasting the air.<br />
After a moment's silence, he let out a shrill<br />
chirruping call and cocked his head to the<br />
side, listening. A low, rumbling growl,<br />
rolling out across the water from further up<br />
the bank, answered him. Recognizing the<br />
resonating attack command of Scar-<br />
Veteran Bok-Ax, he slipped silently<br />
through the water towards the the Warriors<br />
of Chaos. Barely a ripple disturbed the<br />
water's surface as he and his Skink<br />
As he rose from the water in the shallows, Tenoqual pulled a long dart from his<br />
Salamander-skin armband, its tip smeared with a dark green resin, and pushed it into<br />
the mouth of his blowpipe.<br />
Excerpt taken from "War Against Chaos,"<br />
pp. 20-21, <strong>Warhammer</strong> Armies: Lizardmen
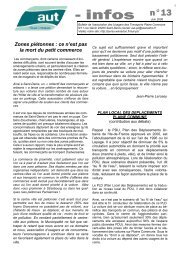
Battlefield<br />
This scenario requires a 24" x 48"<br />
area. Divide the table into two equal<br />
halves. The west half should contain<br />
large amounts of jungle vegetation,<br />
pools, columns, and small ruined<br />
temple structures. An intact stepped<br />
pyramid temple should be set up on<br />
the east half of the table (see map).<br />
The Heist<br />
Objectives<br />
The Attackers are attempting to gain<br />
Click image for larger map.<br />
access to the pyramid to steal as much Lizardmen gold as possible before the enemy<br />
knows what hit them. However, unbeknownst to most of the raiding force, one among<br />
them has been tasked with a special mission: It was observed that the Slann Mage<br />
Priest that resides over this pyramid has awoken from his meditative dream-trace and<br />
left the structure. This occurrence is extremely rare and the opportunity it presents must<br />
be seized. One of the raiders must hide an enchanted Lodestone in the pyramid's throne<br />
room. When the Mage Priest returns, its magic will be slowly drained from its corpulent<br />
form by this devious item.<br />
The Defenders are trying to destroy all the trespassers.<br />
Victory Conditions<br />
The Attackers have completed 50% of the mission if all the<br />
Temple Guard have been slain and the Lodestone has<br />
been left behind.<br />
Here's the twist - the theft of the gold is merely a<br />
distraction; a clever ruse to draw attention away from the<br />
real reason for storming the pyramid. But the gold must<br />
still be taken to ensure that the subterfuge has succeeded.<br />
Four Attacking models must make it back to their<br />
deployment zone (see map) and off the table with 4 gold<br />
tokens (see Special Rules below) to ensure a total victory.<br />
The Defenders win if they rout or destroy all of the attacking models.<br />
Deployment<br />
The Defending side sets up all their models first. The Temple Guard must be set up in<br />
and on top of the pyramid. The Skinks can be set up anywhere on the tabletop with<br />
"hidden" markers.
The Attacking side sets up all their models last. They must be set up within their<br />
deployment zone. (Up to 6" onto the table - see the map above.)<br />
Who Goes First?<br />
The Attackers get the first turn.<br />
Special Rules<br />
This scenario uses the special rules detailed below:<br />
Jungle Fighters<br />
The Skinks start the game with "hidden" counter (pennies will do) placed next to the<br />
miniatures. These models count as Hiding (see pg. 243, <strong>Warhammer</strong> Rule book) with<br />
the following changes. If a Skink moves or fires its blowpipe within 3" of an enemy<br />
model, it loses the "hidden" counter and can be attacked in the following turn. Any<br />
exposed Skink automatically regains its "hidden" status at the beginning of its next turn<br />
as long as it is not in combat.<br />
Hiding the Lodestone<br />
The Lodestone, an enchanted magic-draining device, must<br />
be hidden somewhere inside the Lizardman pyramid. One<br />
Attacking model is chosen in secret and recorded on a<br />
spare piece of paper. This must be done before the<br />
deployment of any Attacking troops. The model may not<br />
pass the Lodestone to another model. He was the only<br />
one thought capable enough to be entrusted to carry out<br />
this dangerous task.<br />
The only way to make sure that the mission will succeed is<br />
to slay any enemy that might take notice. That means the<br />
Attacker must put all of the Temple Guard models to the<br />
sword.<br />
If the Attacking model is killed while holding the<br />
Lodestone, the scenario ends and the Lizardmen win.<br />
Grabbing the Loot<br />
Inside the pyramid is a great pile of gold and precious stones. There is too much gold for<br />
a team of pack mules, let alone a single strong warrior to carry. But a few individuals can<br />
grab what they can, stuffing the treasure into pockets, sacks or even swallowing a gem<br />
or two.<br />
Each player takes a turn placing a Loot counter inside the pyramid. There are eight Loot<br />
counters in total. Once the game begins, only one Loot counter may be carried by a<br />
model. If a model gets a knocked down result in close combat he drops the counter. If<br />
another model moves over the dropped counter, that model may stop to pick it up.<br />
However, the model must end its movement over the Loot counter. The rest of its<br />
movement for that turn is lost.<br />
If the Lodestone is placed, but all the Attackers are killed, the Lizardmen win the<br />
scenario. If the Lodestone is not placed, but the Attackers make it off the table with the<br />
gold the game is a draw.