HG-0029 MIDMARK IQ Mark Digital Spirometer - afhcan
HG-0029 MIDMARK IQ Mark Digital Spirometer - afhcan
HG-0029 MIDMARK IQ Mark Digital Spirometer - afhcan

You also want an ePaper? Increase the reach of your titles
YUMPU automatically turns print PDFs into web optimized ePapers that Google loves.
AFHCAN<br />
www.<strong>afhcan</strong>.org<br />
Handy<br />
Guide<br />
<strong>MIDMARK</strong> <strong>IQ</strong> <strong>Mark</strong><br />
<strong>Digital</strong> <strong>Spirometer</strong><br />
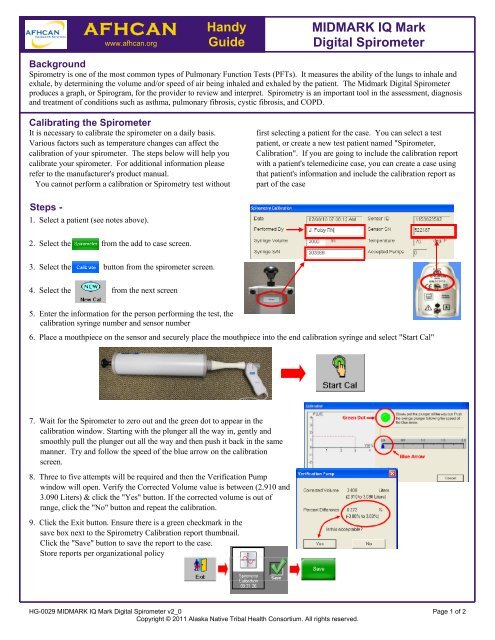
Background<br />
Spirometry is one of the most common types of Pulmonary Function Tests (PFTs). It measures the ability of the lungs to inhale and<br />
exhale, by determining the volume and/or speed of air being inhaled and exhaled by the patient. The Midmark <strong>Digital</strong> <strong>Spirometer</strong><br />
produces a graph, or Spirogram, for the provider to review and interpret. Spirometry is an important tool in the assessment, diagnosis<br />
and treatment of conditions such as asthma, pulmonary fibrosis, cystic fibrosis, and COPD.<br />
Calibrating the <strong>Spirometer</strong><br />
It is necessary to calibrate the spirometer on a daily basis.<br />
Various factors such as temperature changes can affect the<br />
calibration of your spirometer. The steps below will help you<br />
calibrate your spirometer. For additional information please<br />
refer to the manufacturer's product manual.<br />
You cannot perform a calibration or Spirometry test without<br />
first selecting a patient for the case. You can select a test<br />
patient, or create a new test patient named "<strong>Spirometer</strong>,<br />
Calibration". If you are going to include the calibration report<br />
with a patient's telemedicine case, you can create a case using<br />
that patient's information and include the calibration report as<br />
part of the case<br />
Steps -<br />
1. Select a patient (see notes above).<br />
2. Select the from the add to case screen.<br />
3. Select the button from the spirometer screen.<br />
4. Select the from the next screen<br />
5. Enter the information for the person performing the test, the<br />
calibration syringe number and sensor number<br />
6. Place a mouthpiece on the sensor and securely place the mouthpiece into the end calibration syringe and select "Start Cal"<br />
7. Wait for the <strong>Spirometer</strong> to zero out and the green dot to appear in the<br />
calibration window. Starting with the plunger all the way in, gently and<br />
smoothly pull the plunger out all the way and then push it back in the same<br />
manner. Try and follow the speed of the blue arrow on the calibration<br />
screen.<br />
8. Three to five attempts will be required and then the Verification Pump<br />
window will open. Verify the Corrected Volume value is between (2.910 and<br />
3.090 Liters) & click the "Yes" button. If the corrected volume is out of<br />
range, click the "No" button and repeat the calibration.<br />
9. Click the Exit button. Ensure there is a green checkmark in the<br />
save box next to the Spirometry Calibration report thumbnail.<br />
Click the "Save" button to save the report to the case.<br />
Store reports per organizational policy<br />
<strong>HG</strong>-<strong>0029</strong> <strong>MIDMARK</strong> <strong>IQ</strong> <strong>Mark</strong> <strong>Digital</strong> <strong>Spirometer</strong> v2_0 Page 1 of 2<br />
Copyright © 2011 Alaska Native Tribal Health Consortium. All rights reserved.
Patient Testing<br />
Follow your local protocols for all medical testing procedures. The procedures below are only general guidelines based on the use of<br />
the <strong>MIDMARK</strong> <strong>IQ</strong> <strong>Mark</strong> <strong>Digital</strong> <strong>Spirometer</strong>.<br />
Steps -<br />
1. Select a patient and then click the green <strong>Spirometer</strong> button.<br />
2. Select the green Start New Report button.<br />
3. Enter detailed patient information on the Patient Information screen; yellow asterisks are required information. Check smoker if<br />
the patient was ever a smoker, and add how many cig/day and # of years smoked. If patient has quit, check quit box and enter # of<br />
years ago that they quit. Click the green Continue Report button.<br />
4. Apply the plastic mouthpiece to the <strong>Spirometer</strong> handle.<br />
Note that the patient blows air in the direction of the arrow.<br />
5. Demonstrate to the patient how to perform the test.<br />
6. Click the Start New Test button to perform Spirometry testing.<br />
Have patient sit or stand, apply the nose clip, and blow out as long and hard as<br />
they can. The patient must either inhale at the end of the test or you must click the<br />
stop button on the incentive screen.<br />
7. Perform testing per organizational policy. After each test the Spirometry<br />
Confirmation screen appears. Click "Yes" to accept test attempt, unless an error<br />
has occurred. Click the "Yes" button to continue patient test attempts or click the<br />
"No" button when all attempts are complete.<br />
8. Click the Save Review button & then the green "Save" button<br />
to save the report to the case.<br />
9. If you want to do Post Bronchodilator testing, don’t save the report to the<br />
case yet. Click the Spirometry report thumbnail. Once in the report, click the<br />
Medication dropdown and select a medication, click the Perform Post BD button,<br />
and click "Yes" to amend the report.<br />
10. Perform Spirometry testing per organizational policy. Click the Exit button and the green "Save" button to<br />
save the report to the case.<br />
<strong>HG</strong>-<strong>0029</strong> <strong>MIDMARK</strong> <strong>IQ</strong> <strong>Mark</strong> <strong>Digital</strong> <strong>Spirometer</strong> v2_0 Page 2 of 2