Using the Minolta MS6000 Microform Scanner - Oncourse
Using the Minolta MS6000 Microform Scanner - Oncourse
Using the Minolta MS6000 Microform Scanner - Oncourse
Create successful ePaper yourself
Turn your PDF publications into a flip-book with our unique Google optimized e-Paper software.
<strong>Using</strong> <strong>the</strong> <strong>Minolta</strong> <strong>MS6000</strong> <strong>Microform</strong><br />
<strong>Scanner</strong><br />
Before Scanning,<br />
Log into <strong>the</strong> computer with your Network ID and Password. If you are not<br />
IUPUI/IU Student, Staff, and Faculty, you may purchase a Guest Computer<br />
Account at <strong>the</strong> 2 nd Floor Circulation Desk.<br />
As you are logging in, turn on <strong>the</strong> scanner. The power button is along <strong>the</strong><br />
right side of <strong>the</strong> scanner.<br />
Load <strong>the</strong> microfilm or microfiche.<br />
When done scanning,<br />
Log off of <strong>the</strong> computer, but do not turn it off<br />
Turn off <strong>Microform</strong> <strong>Scanner</strong><br />
Remove <strong>the</strong> Microfilm or Microfiche and return it to <strong>the</strong> table to be<br />
reshelved<br />
TO START SCANNING<br />
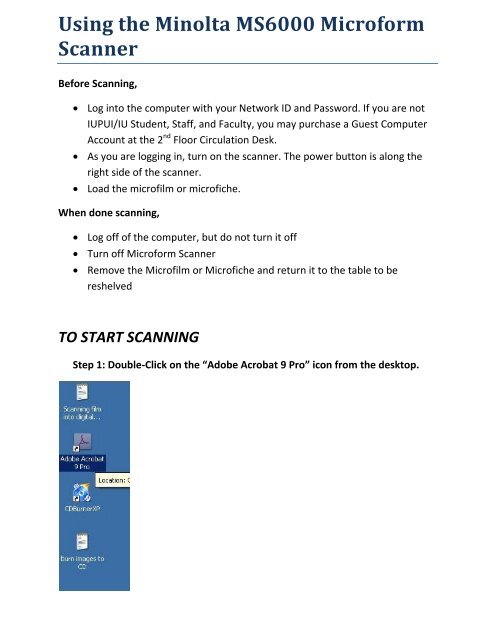
Step 1: Double‐Click on <strong>the</strong> “Adobe Acrobat 9 Pro” icon from <strong>the</strong> desktop.
Step 2: Once Acrobat is loaded, Choose Create, PDF from <strong>Scanner</strong>, and Custom<br />
Scan<br />
When <strong>the</strong> next menu appears, just choose Scan<br />
Step 3: Once you’ve selected <strong>the</strong> Scan button, <strong>the</strong> menu below will appear.<br />
From here, please <strong>the</strong> following options below:
OPTIONAL STEP:<br />
If you’ve done a scan and after you view it in Acrobat, you only wish to print or<br />
save a “clipping” of <strong>the</strong> scanned image, please follow <strong>the</strong> instructions below:<br />
1. On <strong>the</strong> top toolbar, you’ll see <strong>the</strong> crop button (red line is pointing to it<br />
below). Once you’ve selected this, high light <strong>the</strong> area that you wish to crop<br />
and press enter. On <strong>the</strong> next screen, click OK
2. In <strong>the</strong> next window, you’ll see it has removed everything from <strong>the</strong> scanned<br />
image except what I highlighted. From this point, I’ve chosen to print but<br />
you do have <strong>the</strong> option to save this. The next step will show you how to
Step 4: The final step is saving your scanned film image. When you click on <strong>the</strong><br />
floppy disk in <strong>the</strong> toolbar, <strong>the</strong> Save As prompt appears. When choosing <strong>the</strong> Save<br />
as type, this is where you can choose which type of format you want to save as.<br />
The most idea format is <strong>the</strong> default .PDF.<br />
If you have any questions about using <strong>the</strong> scanner station, please ask for<br />
assistance as <strong>the</strong> Reference Desk. If you need to purchase a Flash Drive, CD‐R, A<br />
Guest Computer Account, or purchase a Print Copier Card, please go to <strong>the</strong> 2 nd<br />
Floor Circulation Desk.


