TMS E36 Aluminum/Delrin Differential Mount - Turner Motorsport
TMS E36 Aluminum/Delrin Differential Mount - Turner Motorsport
TMS E36 Aluminum/Delrin Differential Mount - Turner Motorsport

You also want an ePaper? Increase the reach of your titles
YUMPU automatically turns print PDFs into web optimized ePapers that Google loves.
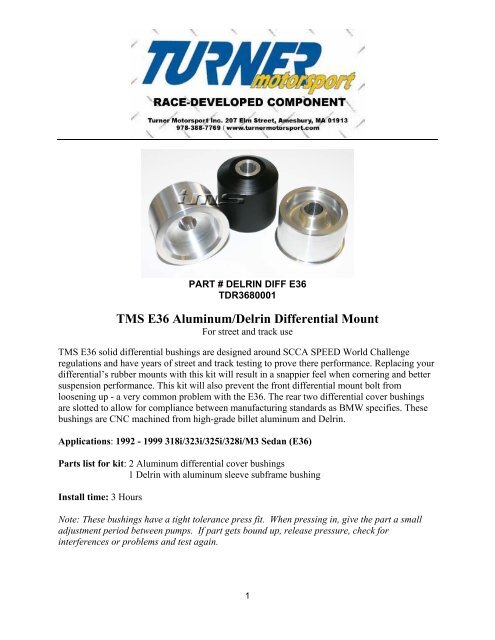
PART # DELRIN DIFF <strong>E36</strong><br />
TDR3680001<br />
<strong>TMS</strong> <strong>E36</strong> <strong>Aluminum</strong>/<strong>Delrin</strong> <strong>Differential</strong> <strong>Mount</strong><br />
For street and track use<br />
<strong>TMS</strong> <strong>E36</strong> solid differential bushings are designed around SCCA SPEED World Challenge<br />
regulations and have years of street and track testing to prove there performance. Replacing your<br />
differential’s rubber mounts with this kit will result in a snappier feel when cornering and better<br />
suspension performance. This kit will also prevent the front differential mount bolt from<br />
loosening up - a very common problem with the <strong>E36</strong>. The rear two differential cover bushings<br />
are slotted to allow for compliance between manufacturing standards as BMW specifies. These<br />
bushings are CNC machined from high-grade billet aluminum and <strong>Delrin</strong>.<br />
Applications: 1992 - 1999 318i/323i/325i/328i/M3 Sedan (<strong>E36</strong>)<br />
Parts list for kit: 2 <strong>Aluminum</strong> differential cover bushings<br />
1 <strong>Delrin</strong> with aluminum sleeve subframe bushing<br />
Install time: 3 Hours<br />
Note: These bushings have a tight tolerance press fit. When pressing in, give the part a small<br />
adjustment period between pumps. If part gets bound up, release pressure, check for<br />
interferences or problems and test again.<br />
1
Directions:<br />
1. Properly lift and support the car to access the differential.<br />
2. Remove differential from car<br />
3. Remove differential cover and clean all sealing surfaces.<br />
4. Press out old bushings from cover.<br />
5. Install new diff cover bushings<br />
• Each bushing needs to be pressed in from the rear of the cover (the side of the<br />
bushing with a flange is closest to the spare tire well when on car)<br />
• The slotted bushings align so that the slots are (parallel to the ground and chassis)<br />
• Use a small amount of lube to ease fitment<br />
• Stop press when the flanges of the bushing are flush to the subframe. Do not<br />
attempt to press in any further.<br />
6. Install cover on differential<br />
• Install cover with a new gasket or RTV silicone.<br />
• If you have 8.8 grade bolts, torque differential cover bolts to 45N-m (33ft-lb)<br />
• If you have 10.9 grade bolts, torque differential cover bolts to 90N-m (66ft-lb)<br />
7. Remove subframe differential bushing<br />
8. Install <strong>Delrin</strong> bushing<br />
• Install taper side of bushing towered rear of car<br />
9. Install differential in car<br />
• Torque differential cover bolts to subframe 77N-m (57ft-lb)<br />
• Torque front differential bolt to 95N-m (70ft-lb)<br />
2