Service & Installation - Gas Equipment Company, Inc.
Service & Installation - Gas Equipment Company, Inc.
Service & Installation - Gas Equipment Company, Inc.

Create successful ePaper yourself
Turn your PDF publications into a flip-book with our unique Google optimized e-Paper software.
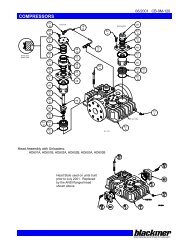
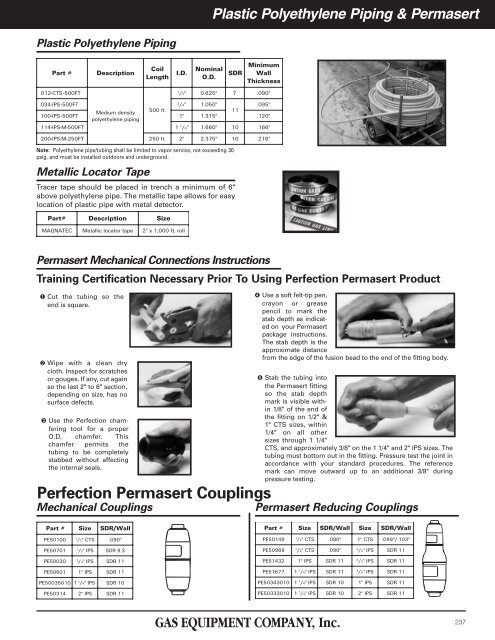
Plastic Polyethylene Piping & Permasert<br />
Plastic Polyethylene Piping<br />
Part<br />
#<br />
Description<br />
Coil<br />
Length<br />
I.D.<br />
Nominal<br />
O.D.<br />
SDR<br />
Minimum<br />
Wall<br />
Thickness<br />
012-CTS -500FT<br />
1<br />
/2" 0 .625"<br />
7 .090"<br />
034-IPS -500FT<br />
3<br />
/4" 1.050"<br />
.095"<br />
100-IPS -500FT<br />
Medium density<br />
500 ft.<br />
11<br />
1" 1.315"<br />
polyethylene piping<br />
.120"<br />
114-IPS-M-500FT 1 1<br />
/4" 1.660"<br />
10 .166"<br />
200-IPS-M-250FT 250 ft.<br />
2" 2.375"<br />
10 .216"<br />
Note: Polyethylene pipe/tubing shall be limited to vapor service, not exceeding 30<br />
psig, and must be installed outdoors and underground.<br />
Metallic Locator Tape<br />
Tracer tape should be placed in trench a minimum of 6"<br />
above polyethylene pipe. The metallic tape allows for easy<br />
location of plastic pipe with metal detector.<br />
Part#<br />
Description<br />
Size<br />
MAGNATEC<br />
Metallic<br />
locator tape<br />
2" x 1,000 ft. roll<br />
Permasert Mechanical Connections Instructions<br />
Training Certification Necessary Prior To Using Perfection Permasert Product<br />
➊ Cut the tubing so the<br />
end is square.<br />
➋ Wipe with a clean dry<br />
cloth. Inspect for scratches<br />
or gouges. If any, cut again<br />
so the last 2" to 6" section,<br />
depending on size, has no<br />
surface defects.<br />
➌ Use the Perfection chamfering<br />
tool for a proper<br />
O.D. chamfer. This<br />
chamfer permits the<br />
tubing to be completely<br />
stabbed without affecting<br />
the internal seals.<br />
➍ Use a soft felt-tip pen,<br />
crayon or grease<br />
pencil to mark the<br />
stab depth as indicated<br />
on your Permasert<br />
package instructions.<br />
The stab depth is the<br />
approximate distance<br />
from the edge of the fusion bead to the end of the fitting body.<br />
➎ Stab the tubing into<br />
the Permasert fitting<br />
so the stab depth<br />
mark is visible within<br />
1/8" of the end of<br />
the fitting on 1/2" &<br />
1" CTS sizes, within<br />
1/4" on all other<br />
sizes through 1 1/4"<br />
CTS, and approximately 3/8" on the 1 1/4" and 2" IPS sizes. The<br />
tubing must bottom out in the fitting. Pressure test the joint in<br />
accordance with your standard procedures. The reference<br />
mark can move outward up to an additional 3/8" during<br />
pressure testing.<br />
Perfection Permasert Couplings<br />
Mechanical Couplings<br />
Permasert Reducing Couplings<br />
Part<br />
#<br />
Size<br />
SDR/Wall<br />
PE50100 1<br />
/2" CTS<br />
.090"<br />
PE50701 1<br />
/2" IPS<br />
SDR 9. 3<br />
PE50030 3<br />
/4" IPS<br />
SDR 11<br />
PE50601 1"<br />
IPS<br />
SDR 11<br />
PE50035010 1 1<br />
/4" IPS<br />
SDR 10<br />
PE50314 2"<br />
IPS<br />
SDR 11<br />
Part<br />
#<br />
Size<br />
SDR/Wall<br />
Size<br />
SDR/Wall<br />
PE50149 1<br />
/2" CTS<br />
. 090"<br />
1 " CTS<br />
.099"/.103"<br />
PE50969 1<br />
/2" CTS<br />
. 090"<br />
3<br />
/4" IPS<br />
SDR 11<br />
PE51432 1"<br />
IPS<br />
SDR<br />
11 3<br />
/4" IPS<br />
SDR 11<br />
PE51677 1 1<br />
/4" IPS<br />
SDR 11<br />
3<br />
/4" IPS<br />
SDR 11<br />
PE50343010 1 1<br />
/4" IPS<br />
SDR 10<br />
1"<br />
IPS<br />
SDR 11<br />
PE50333010 1 1<br />
/4" IPS<br />
SDR 10<br />
2"<br />
IPS<br />
SDR 11<br />
237