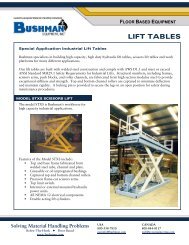
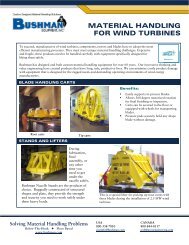
Gantry Crane Manual - Bushman Equipment, Inc.
Gantry Crane Manual - Bushman Equipment, Inc.
Gantry Crane Manual - Bushman Equipment, Inc.

Create successful ePaper yourself
Turn your PDF publications into a flip-book with our unique Google optimized e-Paper software.
Owner’s <strong>Manual</strong><br />
<strong>Gantry</strong> <strong>Crane</strong>s<br />
Fixed Height <strong>Gantry</strong> <strong>Crane</strong><br />
MODEL NUMBER: __________________<br />
SERIAL NUMBER: __________________<br />
CAPACITY IN TONS: ________________<br />
Telescoping <strong>Gantry</strong> <strong>Crane</strong><br />
<strong>Bushman</strong> AvonTec<br />
262-790-4200, 800338-7810, Fax 262-790-4200<br />
www.<strong>Bushman</strong>AvonTec.com<br />
Sale@<strong>Bushman</strong>AvonTec.com
SAFETY INFORMATION<br />
Read all the instructions in this Owner's <strong>Manual</strong> and any other manual, which<br />
accompanies this equipment before assembling or using this equipment.<br />
Read and obey all the warnings and other safety information attached to the gantry<br />
crane before assembling or using this equipment.<br />
Keep all warnings and safety labels attached to the equipment and legible. If the safety<br />
labels become damaged or unreadable, call the factory for free replacements.<br />
The equipment must only be operated on a level, clean, hard flat surface.<br />
The equipment must be operated in a location that will allow the operator to stay in a<br />
safe position, not under or near the load on the equipment.<br />
The equipment must be operated from a position that will not be hazardous to the<br />
operator or present hazardous conditions to the operator.<br />
LOAD CAPACITY<br />
Do not use your gantry and/or accessories to lift more than their rated capacity.<br />
Capacity ratings are based on new equipment. Age, dirt, improper maintenance, and<br />
daily wear will reduce the operating capacity of the gantry and/or accessories. Do not<br />
continue operation of any equipment damaged by overloading.<br />
Never attach a load greater than the capacity of the equipment. Never use two pieces<br />
of equipment to lift a load greater than the rated capacity of a single piece of equipment.<br />
A shifting load may place the weight of the entire load on either piece of equipment,<br />
causing one to fail.<br />
Apply the load evenly. Do not jerk or bounce a load or allow a load to swing. Avoid<br />
violent motions, shock loads, or any other loading for which the equipment is not rated.<br />
This type of loading requires equipment of greater capacity.<br />
Never exceed the rated load capacity of the smallest component being used in the<br />
system. Review the capacity of each component in the system and load the system to<br />
the smallest capacity only.<br />
Before operating, check each component of the equipment system for cracks, breaks,<br />
distortions, deformed parts, improper adjustment, loose parts, or other unsafe<br />
conditions. Discontinue use of the equipment if any unsafe condition is found.<br />
Never leave a suspended load unattended.<br />
This equipment is not made to lift people or to lift loads over people. Do not walk or<br />
work under a suspended load or allow anyone else to do so.<br />
Always center the hoist over the load before operating the equipment.<br />
When the gantry is used with an electric hoist or other electrical accessories, make sure<br />
the electrical ground wires are installed per the electrical code for safety. Ensure that
the wires are always connected when the equipment is in use. Consult the local<br />
electrical code for regulations concerning connecting and operating electrical equipment.<br />
For safe lifting, use a sling or other approved safe lifting device that is securely attached<br />
to the load.<br />
Be sure the load attachment is properly seated in the saddle of the hook. To avoid<br />
tipping the load, balance it properly before handling.<br />
PLEASE READ PRIOR TO ASSEMBLY<br />
The assembly instructions in this manual are provided as a guideline only. The<br />
manufacturer shall in no way be held liable for any accident or injury incurred during or<br />
because of the assembly of this piece of equipment.<br />
For information concerning product warranty, please see the statement at the end of<br />
this manual.<br />
WARNING LABELS<br />
This piece of equipment is shipped with the following warning labels attached. Please<br />
examine the shipment upon receipt. If any of these labels are missing, please contact<br />
the factory for replacement immediately.<br />
The manufacturer is in no way liable for any accident or injury incurred during the use of<br />
this equipment without the appropriate warning labels.<br />
FIXED HEIGHT GANTRY:<br />
1. CAUTION: Lock Wheels When In<br />
Use<br />
2. CAUTION: Do Not Move <strong>Gantry</strong><br />
While Loaded<br />
3. CAUTION: Do Not Exceed<br />
Capacity<br />
TELESCOPING GANTRY:<br />
1. CAUTION: Do Not Raise Load<br />
With Cable Come-A-<br />
Longs<br />
2. CAUTION: Do Not Move <strong>Gantry</strong><br />
While Loaded<br />
3. CAUTION: Lock Wheels When In<br />
Use<br />
4. CAUTION: Do Not Exceed<br />
Capacity
RESOURCES REQUIRED FOR ASSEMBLY<br />
• Three persons, a mechanic experienced in assembly and two people to help in<br />
the assembly process<br />
• Hoist, forklift, crane, or other device capable of safely lifting one ton to a height of<br />
12 ft.<br />
• Lifting sling<br />
• Tapered drift punch for hole alignment<br />
• 24-inch pry bar<br />
• Combination wrenches<br />
• Zero to 100-foot-pounds torque<br />
• Wrench and socket set<br />
• Safety equipment including hard hats, barricades, and whatever else is<br />
necessary to provide a safe working environment.<br />
ASSEMBLY INSTRUCTIONS<br />
Note: FOR TELESCOPING MODELS, REFER ALSO TO ADDITIONAL<br />
INSTRUCTIONS ON PAGE 4.<br />
1. Any person assembling the gantry crane must read the following instructions. The<br />
assembly of the gantry crane requires three people. Extreme caution must be taken<br />
during assembly to prevent accidents caused by falling of heavy parts.<br />
2. With the column (Item 3) lying flat, assemble the casters (Item 9) to the base tube<br />
(Item 1) using the smaller diameter bolts, lock washers, and nuts in the supplied<br />
hardware box. Insert the bolts from the inside of the tube out and then into the<br />
caster mounting plate. Add the lock washer (Item 15) and nut (Item 14). Without<br />
lubricant, the experienced mechanic should tighten these bolts to 55 to 60- footpounds<br />
torque each. If assembling a telescoping model, refer to that page.<br />
3. Lay the I-beam (Item 5) on the floor with holes facing toward top of column<br />
assemblies.<br />
4. Two people will raise one end of the column assembly base tube (Item 1) vertically<br />
until one end of the base is pointing up. One person should guide and steady the<br />
base and another person should guide and steady the top of the column as it is<br />
carefully positioned against the matching bolt holes in one end of the I-beam.<br />
5. Align the bolt holes in the mounting plates at the top of the column and on the I-<br />
beam. Insert the larger diameter supplied bolts into the holes, add a lock washer<br />
and nut, and finger tighten only. Without lubrication, tighten these four bolts to 55 to<br />
60- foot-pounds torque each. The base must be held steady while all bolts are<br />
tightened.<br />
6. Repeat steps four and five for the remaining leg.<br />
7. The gantry is now ready to be raised to its normal upright position. Carefully lift the<br />
gantry using a hoist, forklift, or other means with sufficient lifting height and capacity.<br />
Stand clear as the gantry is being raised.
ADDITIONAL NOTES FOR ASSEMBLY OF TELESCOPING GANTRY MODELS<br />
T-1.<br />
T-2.<br />
Prior to performing Step 3 above, insert both upper columns (Item 4) into the<br />
lower column assembly (Item 3) fully and pin them in place with the pin assembly<br />
(Item 6). Be sure the pin is locked with the cotter key (Item 2). The pins must be<br />
in place at all times except during height adjustment. Refer to drawing GCT-197-<br />
D attached.<br />
After raising the gantry into a vertical position (Step 7), attach the cable comea-longs<br />
provided to the chain link come-a-long anchors (item 12) on each leg,<br />
(attach cable end hook of come-a-longs to upper loop.) See the "Come-a-Long<br />
Operating Instructions" attached.<br />
Note: For ease of operation and reaching the come-a-long, attach the hook on<br />
the come-a-long body to the lower anchor and the cable end hook of the<br />
come-a-long to the upper anchor.<br />
T-3.<br />
Note: DO NOT USE CABLE COME-A-LONGS TO RAISE YOUR LOAD.<br />
Come-a-longs are used only to raise the beam (Item 5) to the desired height<br />
PRIOR to lifting any load.<br />
BE SURE TO REINSTALL THE LOCK PIN ASSEMBLY (Items 2 and 6) AFTER<br />
RAISING THE BEAM TO THE DESIRED HEIGHT.<br />
ACCESSORIES<br />
The gantry, by itself, is a movable supporting structure. To make the gantry crane<br />
functional as intended, more components are needed. These additional components<br />
are a trolley, hoist, and rigging equipment such as a nylon sling. The capacity of these<br />
additional components should be the same as the rated capacity of the gantry and<br />
should be used according to the manufacturer's instructions and recommendations.<br />
A qualified person should install the hoist and trolley according to the manufacturer's<br />
instructions. Do not modify the gantry members by drilling holes for the attachment of<br />
any component, or by welding to the gantry. This will weaken the gantry's lifting<br />
capacity.<br />
OPERATING INSTRUCTIONS<br />
The gantry crane is intended to provide a portable overhead beam for lifting a load<br />
when a fixed beam is not available. The load should be moved from one point to<br />
another by moving the trolley back and forth along the gantry I-beam, while the gantry<br />
crane is itself stationary. Use extreme caution when attempting to horizontally move a<br />
load by moving the entire gantry crane, this method is NOT RECOMMENDED. Comea-longs<br />
are used only to raise the beam (Item 5) to the desired height prior to lifting any<br />
load.
BE SURE TO REINSTALL THE LOCK PIN ASSEMBLY (Items 2 and 6) AFTER<br />
RAISING THE BEAM TO THE DESIRED HEIGHT.<br />
It is always necessary to center the I-beam, trolley, and hoist directly above the balance<br />
point of the load when operating the gantry crane. The only purpose of the hoist is to<br />
move the load straight up and down and to suspend the load. Do not operate the hoist<br />
to move in any direction other than straight up and down. Any hoist will produce a<br />
mechanical force great enough to tip over the gantry crane if not properly or carefully<br />
operated.<br />
When lowering the load into its desired position, it is important that the gantry I-beam,<br />
trolley, hoist, and load be positioned directly above the intended resting spot for the load.<br />
The load must be moved only directly down to its desired location. Never force the load<br />
off to the side or end of the gantry when it is being lowered. When moving the load<br />
along the length of the overhead beam with the trolley, make sure the caster wheels are<br />
locked and that all movements are made slowly and with care. Do not allow the load or<br />
trolley to make a forceful or violent contact with either end of the gantry or with other<br />
obstructions.<br />
When moving the load with the trolley, make sure the trolley track (bottom flange of the<br />
I-Beam) is free of any obstruction. Be sure the only force applied to move the trolley is<br />
in the direction of the length of the trolley track. DO NOT APPLY SIDE FORCE<br />
DURING THE MOVE.<br />
The load attachment should be suited to the material being lifted. It should securely<br />
retain the load in the desired position for the lifting operation. All load attachments must<br />
be inspected on a regular basis for possible deterioration. Load attachments must<br />
always be used in the fashion prescribed by their manufacturer and must be kept in<br />
excellent repair. Never attach a load to the hoist by using the hoist chain or rope as a<br />
substitute for a proper load attachment sling.