FACE® N-Linked Oligosaccharide Profiling Kit - ProZyme
FACE® N-Linked Oligosaccharide Profiling Kit - ProZyme
FACE® N-Linked Oligosaccharide Profiling Kit - ProZyme

Create successful ePaper yourself
Turn your PDF publications into a flip-book with our unique Google optimized e-Paper software.
FACE ® N-<strong>Linked</strong> <strong>Oligosaccharide</strong> <strong>Profiling</strong> <strong>Kit</strong><br />
GK90000
TOOLS FOR GLYCOBIOLOGY<br />
www.glyko.com<br />
Page 2
FACE N-<strong>Linked</strong> <strong>Oligosaccharide</strong> <strong>Profiling</strong> <strong>Kit</strong> (80 Reactions)<br />
NOTE: We want successful results for our customers, so please read this entire booklet before starting<br />
your experiment.<br />
Contents<br />
Page No<br />
<strong>Kit</strong> Contents 2<br />
Additional Reagents and Equipment Required 3<br />
Introduction 4<br />
Principle<br />
Description of FACE N-linked <strong>Profiling</strong> System<br />
Nature of FACE Oligo Standards and Controls<br />
Summary of Protocol<br />
Protocols<br />
Section 1: Enzymatic Release of <strong>Oligosaccharide</strong>s from Glycoproteins 9<br />
Section 2: Labeling of <strong>Oligosaccharide</strong>s from Glycoproteins 11<br />
Section 3: Preparation of Samples and Standards for Electrophoresis 12<br />
Section 4: FACE Electrophoresis 14<br />
I. Preparation of OLIGO Gel Running Buffer<br />
II. Set-up of FACE Electrophoresis Apparatus<br />
III. Loading and Running FACE N-<strong>Linked</strong> <strong>Profiling</strong> Gels<br />
Section 5: Processing of FACE N-<strong>Linked</strong> <strong>Profiling</strong> Gels 18<br />
I. Gel Imaging using UV Transilluminator (lightbox)<br />
II. Gel Imaging using FACE Imaging System<br />
III. Gel Handling<br />
IV. <strong>Oligosaccharide</strong> Preparation<br />
Troubleshooting Guide 21<br />
Figures 23<br />
Page 1
<strong>Kit</strong> Contents<br />
Catalog # Code Component Quantity Storage<br />
GK60000<br />
10 each<br />
Oligo <strong>Profiling</strong> Gels precast gels Room Temp<br />
WS0007 Oligo Gel Running Buffer 5 packs Room Temp on arrival<br />
GK50050<br />
4 packs<br />
GK50004<br />
2 packs<br />
4°C (when reconstituted)<br />
E1 2x Loading Buffer 1 tube Room Temp<br />
E2 Tracking Dye 1 tube Room Temp<br />
C1 N-Glycanase® 1 tube<br />
(100 mU)<br />
4°C<br />
C3 2x <strong>Profiling</strong> Enzyme Buffer 1 tube 4°C<br />
C11 2% SDS/1M β-mercaptoethanol 1 tube 4°C<br />
C12 15% NP-40 1 tube 4°C<br />
L1 Reducing Agent (NaBH 3 CN) 2 tubes Room Temp on arrival<br />
-70°C (when reconstituted)<br />
L2 Oligo Labeling Dye (ANTS) 2 tubes Room Temp on arrival<br />
-70°C (when reconstituted)<br />
L3 Oligo Labeling Diluent 2 tubes Room Temp<br />
L4 Labeling Solvent (DMSO) 2 tubes Room Temp<br />
GK50006 E3 Oligo Ladder Standard 1 tube -20°C<br />
E4 Oligo <strong>Profiling</strong> Control 1 tube -20°C<br />
E5 Oligo Quantitation Control 1 tube -20°C on arrival<br />
-70°C (when reconstituted)<br />
Page 2
Additional Reagents and Equipment Required<br />
• FACE Electrophoresis Gel Box (<strong>ProZyme</strong> Product Code GK40026)<br />
• A CAP Type I water supply (such as Milli-Q)<br />
• Assorted pipeting devices including a 0-10 µl capillary positive displacement pipette<br />
(e.g. Drummond Microdispenser, Fisher Cat# 21-176D)<br />
• Centrifugal vacuum evaporator<br />
• 45°C and 37°C oven or water bath<br />
• Cold ethanol (100 %, nondenatured, -20°C)<br />
• 1.5 ml microcentrifuge tubes<br />
• Microfuge<br />
• UV-protective eye wear or face shield<br />
• UV transilluminator or FACE Imager<br />
Page 3
INTRODUCTION<br />
Complex carbohydrates are important components of all living things. In addition to providing energy<br />
and structural supports for cells, increasing evidence has shown that the carbohydrate moieties of<br />
glycoconjugates are often important as recognition determinants in receptor-ligand or cell-cell<br />
interactions, in the modulation of immunogenicity and protein folding, and in the regulation of protein<br />
bioactivity. Changes in the biological activity of glycoproteins often result from alterations in protein<br />
glycosylation either through variable site occupancy or changes in the structure of the oligosaccharide<br />
occupying a particular site. Using the FACE Imaging System, individual oligosaccharides can be<br />
quantified to obtain molar ratios, amount of glycosylation and detect changes in the extent or nature of<br />
glycosylation.<br />
Principle<br />
The FACE or "Fluorophore-Assisted-Carbohydrate-Electrophoresis" System is based on the use of<br />
polyacrylamide gel electrophoresis to separate and quantify intact oligosaccharides released from<br />
glycoproteins. FACE analysis begins with the release of Asparagine-linked (N-linked) oligosaccharides<br />
from the glycoprotein using the enzyme N-Glycanase (Peptide N-glycosidase F). The released<br />
oligosaccharides are then labeled with a fluorophore at the reducing termini by reductive amination. The<br />
stoichiometry of labeling is such that only one molecule of fluorophore is attached to each molecule of<br />
oligosaccharide. When labeling 20 nmoles or less of total sugar using the reagents and labeling<br />
conditions described below, the fluorophore labeling efficiency is greater than 98%. Labeling more than<br />
20 nmoles of sugar in each reaction will result in reduced labeling efficiency. When labeling more than<br />
20 nmoles we recommend that you include the OLIGO Quantitation Control (E5) as an internal labeling<br />
control. The fluorescent labeled oligosaccharides are then separated and quantified on an OLIGO<br />
<strong>Profiling</strong> Gel using the FACE Imaging System. Figure 1 (page 23) shows the profile of N-linked<br />
oligosaccharides released from a number of glycoproteins.<br />
Page 4
Description of the FACE N-linked OLIGO <strong>Profiling</strong> System<br />
The FACE N-linked OLIGO <strong>Profiling</strong> <strong>Kit</strong> contains all reagents and buffers required to separate and<br />
quantify the N-linked oligosaccharides released from glycoproteins and glycopeptides. This kit contains<br />
all the components required to perform 80 enzymatic digests and 80 separate oligosaccharide labeling<br />
reactions. In addition, the kit contains electrophoresis size markers for determining the relative positions<br />
of oligosaccharide bands on the gel, and a control glycoprotein to verify the performance of the enzyme<br />
and reagents in the kit. The kit also contains 10 precast OLIGO <strong>Profiling</strong> Gels and 5 OLIGO Gel<br />
Running Buffer packs sufficient to prepare 7.5 liters of Electrophoresis Running Buffer.<br />
The FACE N-linked Oligo <strong>Profiling</strong> System involves four steps:<br />
Step I) Release of the N-linked oligosaccharides from the glycoprotein, performed enzymatically.<br />
Step II) Labeling of the mixture of released oligosaccharides with a fluorescent tag.<br />
Step III) Separation of the fluorophore labeled oligosaccharides by polyacrylamide gel electrophoresis.<br />
The resulting banding pattern represents the oligosaccharide profile of the glycoprotein. This pattern can<br />
be thought of as a glycosylation "fingerprint" with the bands representing the oligosaccharides released<br />
from the glycoprotein.<br />
Step IV) Imaging of the gel. Imaging can be performed either on a UV lightbox to obtain qualitative<br />
band conformation, or the gels can be imaged using the FACE Imaging System to determine the amount<br />
of oligosaccharide present in each band and the relative mobility of the bands. Once separated on the<br />
gel, individual oligosaccharide bands can be purified for further study.<br />
Page 5
Nature of FACE OLIGO Standards and Controls<br />
The OLIGO Ladder Standard (E3)<br />
The OLIGO Ladder Standard (E3) consists of a mixture of glucose polymers ranging from Glucose 1 to<br />
greater than Glucose 16 . An illustration of the OLIGO Ladder Standard as it should appear at the<br />
completion of electrophoresis is shown in Figure 4, Lane 1 (page 25). When the standard is prepared as<br />
directed below and the recommended amount is loaded onto the gel, the band representing Glucose 4<br />
contains 50 pmoles (25 pmoles for FACE imager users). The intensity of the Glucose 4 band in the<br />
standard mixture is less than the adjacent bands. This allows for easy identification of this band even if<br />
the lower bands in the standard have run off the gel. Quantitation of the oligosaccharide bands in the<br />
samples is achieved by comparing the intensity of the Glucose 4 band with the intensity of sample bands<br />
and it is therefore essential that the OLIGO Ladder Standard be present on each FACE OLIGO <strong>Profiling</strong><br />
Gel. If the FACE Imaging System is used, dilute the E3 standard so that the Glucose 4 band contains<br />
25 pmoles. Refer to the FACE Software Manual for a detailed description of band finding, quantitation<br />
procedure, assigning a DP value, etc.<br />
OLIGO <strong>Profiling</strong> Control (E4)<br />
The OLIGO <strong>Profiling</strong> Control (E4) is trypsin inhibitor, used as a control for enzyme digestion and<br />
fluorophore labeling. The oligosaccharide pattern for trypsin inhibitor is shown in Figure 4, Lane 2<br />
(page 25). This control is included in the kit because:<br />
If you use this control when you use the kit for the first time it will help you become familiar<br />
with the kit procedures. If the profile you obtain looks like the pattern in Lane 2 of Figure 4 then<br />
you can be assured that the kit is working properly.<br />
If you have an unknown sample that may, or may not, contain N-linked oligosaccharides it is<br />
often useful to include a tube of this control along with your tubes containing samples.<br />
Following electrophoresis, if your samples do not show carbohydrate bands but you can see the<br />
normal pattern of oligosaccharides released from the control, this will assure you that the<br />
reagents are good and that the release and labeling procedures were performed properly.<br />
Page 6
OLIGO Quantitation Control (E5)<br />
The OLIGO Quantitation Control (E5) consists of 6 nmoles of unlabeled maltotetraose (Glucose 4 ).<br />
Once this control is reconstituted, 10 µl of E5 will contain 200 pmoles of maltotetraose.<br />
E5 may be used as an internal labeling control, provided that you verify that your sample does not<br />
contain an oligosaccharide that will co-migrate with maltotetraose (e.g. Man 3 GlcNAc 2 migrates very<br />
close to Glucose 4 ). As shown in Figure 3 (page 24), the labeling efficiency of your sample is greater<br />
than 95% when labeling less than 20 nmoles. With some unknown samples you may not know how<br />
much sugar you are labeling before you set up the digest. E5 is provided so that a "spike" of 200 pmoles<br />
(10 µl) may be added to the enzyme digest prior to the ethanol extraction step so that you can monitor<br />
labeling efficiency. The maltotetraose band from the "spike" will be clearly visible on the gel (it will comigrate<br />
with the Glucose 4 band in the OLIGO Ladder Standard (E3) as long as you load greater than<br />
1/40 th of the labeling reaction in the lane. After correcting for dilution of the labeling reactions you will<br />
be able to determine the labeling efficiency of your sample by comparing the quantity of the internal<br />
Glucose 4 band against the same band in a lane containing (E5) labeled in a separate tube, or the Glucose 4<br />
band in the lane containing the OLIGO Ladder Standard (E3). If you find that the quantity of your<br />
spiked internal Glucose 4 band (corrected for dilution) is only 190 pmoles (100% labeling efficiency<br />
would give you 200 pmoles), the labeling efficiency of the sample is about 95%.<br />
Page 7
Summary of <strong>Profiling</strong> Protocol<br />
Purified Glycoprotein<br />
N-Glycanase<br />
Digestion 2 hours to overnight<br />
Free <strong>Oligosaccharide</strong>s<br />
Label with<br />
fluorophore 3 hours to overnight<br />
Labeled <strong>Oligosaccharide</strong>s<br />
Load onto<br />
FACE Gel 30 minutes<br />
Electrophoresis 1 - 1 ½ hours<br />
FACE Imaging and Data Analysis<br />
Page 8
Protocols<br />
SECTION 1<br />
ENZYMATIC RELEASE OF OLIGOSACCHARIDES FROM GLYCOPROTEINS<br />
NOTE:<br />
FACE Electrophoresis Buffer should be prepared up to one day in advance of the<br />
electrophoresis run and stored at 4°C. See page 14 for instructions.<br />
1 Isolate the glycoprotein according to your usual procedures.<br />
NOTE: The purified glycoprotein should be prepared in a phosphate buffer containing a minimum<br />
amount of salt. Tris, acetate and citrate buffers will inhibit the labeling reaction.<br />
2 If the volume of the glycoprotein solution required is greater than 100 µl, dry the glycoprotein in a<br />
1.5 ml microcentrifuge tube. Generally 50-200 µg of glycoprotein is required for analysis.<br />
NOTE: The actual amount of glycoprotein required will depend on the size of the protein and the extent<br />
of glycosylation. In general, at least 1 nmole of glycoprotein should be digested for analytical work, a<br />
greater amount will be required for the preparation of purified oligosaccharides (see Page 19,<br />
"N−<strong>Linked</strong> <strong>Oligosaccharide</strong> Preparation from FACE <strong>Profiling</strong> Gels").<br />
3 Add an equal volume of 2x <strong>Profiling</strong> Enzyme Buffer (C3) to the glycoprotein in solution or dissolve<br />
the dried glycoprotein in 45 µl of 1x OLIGO <strong>Profiling</strong> Enzyme Buffer made from the 2x (C3) stock<br />
by adding an equal volume of water.<br />
4 Remove a 45 µl aliquot of the OLIGO <strong>Profiling</strong> Control (E4) and place in a 1.5-ml microfuge tube.<br />
Store the remaining glycoprotein at 4°C for future labeling controls.<br />
5 Optional: SDS is often required to completely denature the glycoprotein prior to enzymatic<br />
digestion. To denature add 2.5 µl of SDS/β-mercaptoethanol (C11), boil for 5 minutes and then add<br />
2.5 µl of NP-40 (C12) to both the samples and Oligo <strong>Profiling</strong> Control (E4) tube.<br />
NOTE: Some proteins will precipitate when boiled, e.g. immunoglobulins. This procedure should be<br />
used if your protein precipitates:<br />
a. Add SDS/β-ME at the recommended concentration. Incubate 5 minutes at room temperature.<br />
b. Add NP-40 according to directions.<br />
c. Add N-Glycanase and incubate overnight.<br />
Page 9
6 Add 2 µl of N-Glycanase (C1) to the glycoprotein sample and Oligo <strong>Profiling</strong> Control (E4). Mix<br />
with finger flicks and centrifuge for 5 seconds. Store any remaining enzyme at 4ºC.<br />
7 Incubate for 2 hours or overnight at 37°C.<br />
8 Prepare the OLIGO Quantitation Control (E5):<br />
a. Add 300 µl of distilled water to the tube labeled E5, which contains 6 nmoles of maltotetraose.<br />
b. Resuspend the lyophilized carbohydrate by vortexing.<br />
c. The concentration of the maltotetraose is now 200 pmoles/10 µl.<br />
9 Add 10 µl (200 pmoles) of reconstituted E5 to the glycoprotein digest as an internal labeling control,<br />
or label 10 µl in a separate tube to check your quantitation according to the guidelines on page 4.<br />
Store the unused reconstituted E5 at -20°C.<br />
10 Precipitate the protein by adding 3 volumes of cold ethanol. Keep samples on ice for 10 minutes.<br />
Spin samples in microcentrifuge for 5 minutes to pellet the protein.<br />
11 Remove the supernatant and transfer to a clean 1.5 ml microcentrifuge tube.<br />
DO NOT DISCARD THE SUPERNATANT; the released carbohydrates are present in the<br />
supernatant.<br />
12 If a large amount of protein was digested (>250 µg), 5-10% of the released oligosaccharides may<br />
remain in the pellet. The recovery of these oligosaccharides can be accomplished by drying the<br />
pellet completely in a centrifugal vacuum evaporator or lyophilizer. Add 50 µl water to resuspend,<br />
then 150 µl of cold ethanol and precipitate on ice. Centrifuge and combine the supernatants.<br />
13 Dry supernatants in a centrifugal vacuum evaporator or lyophilize to a translucent pellet.<br />
At this point samples may be stored at -20°C, or proceed with the fluorophore labeling procedure<br />
described in Section 2.<br />
Page 10
SECTION 2<br />
LABELING OF OLIGOSACCHARIDES FROM GLYCOPROTEINS<br />
NOTE: Sample Handling and Storage<br />
• Always avoid exposing labeled samples and dyes to light or excessive heat.<br />
• Labeled samples are stable for 3 months when stored at -70°C.<br />
• Unused solutions of the Labeling Dye and Labeling Reducing Agent may be stored for as long as<br />
2 weeks at -70°C. Thaw immediately before use.<br />
I. Preparation of fluorophore labeling reagents<br />
1 Add 125 µl of the Oligo Labeling Diluent (L3) to one vial of Oligo Labeling Dye (L2). Mix well by<br />
vortexing until dye is totally dissolved (warm at 37°C if necessary). Centrifuge for 1 second in a<br />
microcentrifuge. Reconstituted Labeling Dye solution may be stored for up to 2 weeks in the dark at<br />
-70°C.<br />
2 Add 125 µl of Labeling Solvent (L4) to one vial of Reducing Agent (L1). Mix well by vortexing<br />
until crystals are completely dissolved, warm briefly if necessary. Reconstituted Reducing Agent<br />
may be stored for 2 weeks at -70ºC.<br />
II. Labeling reactions<br />
Perform the following steps for the glycans released from your sample protein and the Oligo <strong>Profiling</strong><br />
Control (E4) (from Section 1 step 13). In addition, if you are using E5 as an external standard, take 10<br />
µl from the E5 tube, dry down in centrifugal vacuum evaporator or lyophilizer and follow these labeling<br />
instructions.<br />
1 Add 5 µl of reconstituted Oligo Labeling Dye (L2) to each dried oligosaccharide pellet. Mix well<br />
until the oligosaccharide pellet is dissolved.<br />
2 Add 5 µl of reconstituted Reducing Agent (L1). Mix well by vortexing. Centrifuge for 5 seconds in<br />
a microfuge.<br />
3 Incubate samples at 45ºC for 3 hours or overnight at 37°C.<br />
Page 11
SECTION 3<br />
PREPARATION OF SAMPLE AND STANDARDS FOR ELECTROPHORESIS<br />
I. Sample Preparation<br />
1a Add 10 µl water to your sample(s) and E4, then add 20 µl of 2x Loading Buffer. Load 4 µl or 1/10 th<br />
of the total sample volume directly onto the gel. Bring the E5 external control to a total volume of<br />
16 µl, with the addition of 6 µl of 2x Loading Buffer (added to 10 µl labeling reaction). Load 4 µl or<br />
50 pmoles onto the gel.<br />
Alternatively,<br />
1b Dry the samples, E4 and E5 in a centrifugal vacuum evaporator for approximately 15 minutes or<br />
until the sample reaches a viscous gel stage.<br />
2b Resuspend the fluorophore-labeled oligosaccharide from your sample only, in 10-20 µl water.<br />
NOTE: The actual volume of water used to resuspend the sample will depend on the amount of<br />
oligosaccharide present in the sample. Start with 10 µl, this will enable the sample to be diluted further<br />
if necessary.<br />
3b Remove 2 µl of the sample and add 2 µl of 2x Loading Buffer (E1).<br />
4b Resuspend E4 in 20 µl water and 20 µl of 2x Loading Buffer. Resuspend E5 in 8 µl water and 8 µl<br />
of 2x Loading Buffer.<br />
5b Load 4 µl of the sample, E4 and E5 directly onto the gel.<br />
II. Preparation of OLIGO Ladder Standard (E3):<br />
For non-imager users:<br />
1a Resuspend the OLIGO Ladder Standard (E3) in 50 µl of distilled water.<br />
2a Add 50 µl of 2x Loading Buffer (E1). After reconstitution the OLIGO Ladder Standard should be<br />
stored at -70°C.<br />
Page 12
3a Load 4 µl directly onto the gel; the maltotetraose band in the ladder should contain 50 pmoles.<br />
For Imager users:<br />
1b Resuspend the OLIGO Ladder Standard (E3) in 100 µl of distilled water.<br />
2b Add 100 µl of 2x Loading Buffer (E1). After reconstitution, the OLIGO Ladder Standard should be<br />
stored at -70°C.<br />
2c Load 4 µl directly onto the gel; the maltotetraose band in the ladder should contain 25 pmoles.<br />
Page 13
SECTION 4<br />
FACE ELECTROPHORESIS<br />
I. Preparation of 1.5 liter of FACE Oligo Gel Running Buffer<br />
(1.5 liter of buffer is sufficient for one electrophoresis run of one or two gels.)<br />
NOTE:<br />
FACE electrophoresis buffer should be prepared up to one day in advance of the<br />
electrophoresis run and stored at 4°C.<br />
1 Remove one of the Oligo <strong>Profiling</strong> Gel Running Buffer packs from the kit.<br />
2 Cut open one end of the packet and carefully pour the contents into a 2-liter graduated cylinder and<br />
add 1000 ml of distilled water.<br />
3 Rinse buffer packet with 100 ml of water and add to the redissolved buffer.<br />
4 Bring up to a final volume of 1.5 liter with water.<br />
5 Mix well. The buffer must be chilled to 4-6°C before use.<br />
II. Set-up of FACE Electrophoresis Apparatus<br />
FACE Electrophoresis of N-linked gels is best performed at a temperature range of 5-8°C. We<br />
recommend the use of a recirculating chiller, however satisfactory results can be obtained by chilling the<br />
buffer prior to the electrophoresis run.<br />
CAUTION:<br />
To prevent damage to the gel box, connect both quick disconnect fittings to gel box<br />
before turning on the recirculator!<br />
1 Place the FACE electrophoresis tank containing a stir bar on a mechanical stirrer. If using a<br />
recirculating chiller, connect it to the gel box cooling chamber with tubing and quick-connect<br />
fittings. Turn on the circulator and stirrer; set the coolant temperature to 5ºC. Bleed all air out of<br />
system by tilting the gel box in the direction of the outlet.<br />
Page 14
2 Pour pre-cooled OLIGO Gel Running Buffer into the electrophoresis tank up to the level marked on<br />
the outside of the box. The temperature of the buffer can be monitored during the run using a<br />
thermometer inserted through the hole in the lid. The temperature will probably increase a few<br />
degrees during electrophoresis but should not exceed 10°C<br />
III. Loading and Running FACE OLIGO <strong>Profiling</strong> Gels<br />
1 Determine the number of gels required for the samples prepared. Each Oligo <strong>Profiling</strong> Gel contains<br />
8 lanes. One outside lane should be used for the Oligo Ladder Standard (E3) leaving the other 7<br />
lanes for samples. Optional: Load 2 µl of the E2 tracking dye to an outside lane to monitor<br />
electrophoresis. This leaves 6 lanes for samples. The FACE electrophoresis box will accept one or<br />
two gels.<br />
2 Cut open 1 or 2 packages containing FACE Oligo <strong>Profiling</strong> Gels. Gently remove the comb(s) from<br />
the gel(s). To avoid distorting the wells, gently wiggle each comb to free the teeth from the gel, then<br />
lift up slowly until the comb is released.<br />
3 It is essential that the wells of the gel are thoroughly rinsed with Oligo Gel Running Buffer from the<br />
upper buffer reservoir prior to sample loading. This is best accomplished by using a syringe with a<br />
blunt needle (a Pasteur pipette is not recommended because of the possibility of breakage in the<br />
wells).<br />
4 Place the gel cassette(s), one on each side of the center core unit of the gel box with the short glass<br />
plate against the gasket. Be sure the cassette is centered and that the cassette is resting on the "feet"<br />
at the bottom of the apparatus. If running only one gel, place the buffer dam on the other side.<br />
5 Place one wedge down each side of the cassette. Then push wedges down to obtain a seal between<br />
the inner short plate and the gasket. Repeat this procedure on the other side. Both sides should now<br />
be sealed against the gaskets.<br />
6 Fill the upper buffer reservoir formed between the cassettes with approximately 100 ml of chilled<br />
Oligo Gel Running Buffer and check for leaks. Final buffer level should be just below the electrode<br />
supports. If a leak occurs, first check that the apparatus was assembled properly, then try pushing<br />
down the wedge with slightly greater pressure. If the leak persists check the "Troubleshooting"<br />
section of this manual.<br />
Page 15
7 With the core unit containing the gels placed securely on the bench, load samples into the wells by<br />
underlaying the upper buffer. Use flat sequencing pipette tips (e.g. Sigma T-1656) to load by<br />
delivering the sample to the bottom of each well. Optimal resolution will be achieved by using 4 µl<br />
of sample per lane.<br />
NOTE: For the most reliable quantitation of oligosaccharide bands the use of a positive displacement<br />
pipette is recommended.<br />
8 Place the core unit containing the loaded gels into the electrophoresis tank and place the lid on<br />
electrophoresis tank.<br />
9 First connect the power cords to the electrophoresis tank then connect the power supply. Connect<br />
the positive (red) lead to the electrode marked with a red dot on the electrophoresis box. Connect the<br />
negative (black) lead to the electrode marked with a black dot.<br />
10 A thermometer may be placed into the lower buffer chamber through the hole in the lid to monitor<br />
the temperature.<br />
NOTE: The initial temperature of the lower buffer should be between 5°C and 8°C.<br />
11 Turn on the power supply and select the proper current. FACE OLIGO <strong>Profiling</strong> Gels should be run<br />
at a constant current of 20 mA per gel (40 mA for 2 gels). Limits on the power supply should be set<br />
for 1000 volts and 60 watts. These run conditions will result in voltages of 100-400 V at the<br />
beginning of the run and may approach 800 V at the end of the run. If the initial voltage is<br />
significantly different, check to be sure that the leads are connected properly and that the buffers are<br />
at the recommended levels.<br />
12 Monitor electrophoresis by following the migration of the fast moving Orange Dye (E1). Generally,<br />
electrophoresis is complete when the orange dye just exits the bottom of the gel in approximately<br />
1 hour and 5 minutes. If the tracking dye (E2) is used, 4 colors should separate during the course of<br />
the electrophoresis run.<br />
13 Most N-linked oligosaccharides fall in the Glucose 4 – Glucose 12 range in the OLIGO Ladder<br />
Standard (E3) (see Figure 4, page 25) so the time of electrophoresis should be adjusted to optimize<br />
the separation of this region of the gel.<br />
Page 16
14 When the electrophoresis is complete, turn off the power supply. Disconnect the power cords from<br />
the power supply and the electrophoresis tank. Turn off the recirculating chiller if used.<br />
NOTE: If using the FACE Imager, begin warm-up now.<br />
Page 17
SECTION 5<br />
PROCESSING OF FACE OLIGO PROFILING GELS<br />
Following Step 14, above, carefully remove the gels from the electrophoresis tank.<br />
I. Gel Imaging using the UV Transilluminator (lightbox)<br />
CAUTION:<br />
UV-protective eyewear or face shield should be worn. Avoid prolonged exposure to UV<br />
light.<br />
1 Allow UV lightbox to "warm-up" for at least 2 minutes in order to get maximum intensity output.<br />
The lightbox must be long-wave UV (UVP Model TL-33 or equivalent) and have a peak output at<br />
approximately 360 nm; this is not the type of box typically used for ethidium-stained DNA gels.<br />
2 Optional: To increase sensitivity you may wish to peel the tape from the gel cassette, and<br />
disassemble the cassette by carefully prying open the two glass plates, removing the gel completely<br />
from the cassette and placing it directly on the UV lightbox.<br />
Images of gels can be recorded using a Polaroid camera. The proper choice of light source, filters and<br />
film must be made. A filter must be fitted to the camera lens, which completely covers the glass of the<br />
lens, stray UV contacting the lens will cause it to fluoresce and subsequently lower the sensitivity of the<br />
film. A Kodak Wratten Number 8 filter is suggested and can be purchased from Kodak and Kodak<br />
distributors. A suitable filter will have no inherent fluorescence, peak transmission at approximately<br />
500 nm, and bandwidth of 80 nm FWHM.<br />
A medium speed, medium resolution, Polaroid film is recommended. Use Polaroid 53 film for cameras<br />
that use single 4"x 5" sheet film; use Polaroid 553 film for cameras that use 8 sheet film cartridges.<br />
Photographing Gels:<br />
1 Photograph the gel using the lowest practical F setting on the lens, with the gel filling as much of<br />
the frame as possible. In our experience, exposures at F5.6 using Polaroid 53 film have ranged from<br />
5 to 40 seconds using the equipment specified above. KEEP UV EXPOSURE OF THE GEL TO A<br />
MINIMUM TO PREVENT BLEACHING.<br />
Page 18
2 Develop film according to manufacturer's instructions.<br />
II.<br />
Gel Imaging Using the FACE Imaging System<br />
1 Turn on the FACE Imager and allow a warm-up period of at least 10 minutes before acquiring an<br />
image. Allow the computer to initialize the Imager.<br />
2 Clean the glass plates completely with lint-free tissue. A little distilled water should be used to<br />
clean any obvious residue on the plates before imaging. The gel cassettes should be relatively dry<br />
and free of dust before imaging.<br />
3 Open the door to the Imager and place the cassette containing the gel into the cassette holder (see<br />
the "FACE Software Manual" for imaging instructions).<br />
III. Gel Handling<br />
After imaging, gels may be processed in a number of ways depending on the needs of the investigator.<br />
• If the gel is no longer needed it should be properly discarded.<br />
• As long as the gel cassette is intact, it can be placed back in the electrophoresis apparatus and the<br />
run continued in order to improve the resolution of the oligosaccharide bands.<br />
• Following imaging of the oligosaccharide gels, the glass plates can be separated and the gels<br />
dried on a flat bed gel drier between sheets of Teflon membrane at 80°C for 1 hour. After the gel<br />
is dry, carefully peel the Teflon sheets away from the gel. Gels dried in this manner may be<br />
stored indefinitely and re-imaged at any time.<br />
NOTE: Drying fixes the bands so that they do not continue to diffuse through the gel.<br />
IV. N-<strong>Linked</strong> <strong>Oligosaccharide</strong> Preparation from FACE <strong>Profiling</strong> Gels<br />
FACE <strong>Profiling</strong> Gels may be used for the preparation of oligosaccharides (e.g. for subsequent enzymatic<br />
sequencing) by loading aliquots of the same sample in all lanes. The following procedure is<br />
recommended for maximum recovery of oligosaccharides. Due to loss of signal that may occur during<br />
this procedure, accurate quantitation may not be possible on purified oligosaccharides.<br />
Page 19
1 Following electrophoresis, bands on the gel can be visualized by placing the gel on a long wave UV<br />
lightbox.<br />
CAUTION:<br />
UV protective eyewear or face shield should be worn. Avoid prolonged exposure to UV<br />
light.<br />
2 Remove the tape and carefully separate the cassette with a broad spatula. Using a scalpel or razor<br />
blade, carefully excise the band(s) of interest. This should be done as quickly as possible to<br />
minimize photobleaching.<br />
3 Place the gel slices in microcentrifuge tubes.<br />
4 Soak the gel slices in a minimum volume of 100% ethanol for ½ hour.<br />
5 Pipet off the ethanol and suspend the gel slices in a minimum volume of water, enough to cover the<br />
gel slices.<br />
6 Vortex the gel slices gently, place at 4°C overnight or all day (12-16 hours).<br />
7 Remove the supernatant and place in a microcentrifuge tube.<br />
8 If maximum recovery is required wash the gel slices, again, in a minimum volume of water. Place<br />
the gel slices at 4°C for 1 to 4 additional hours.<br />
9 Remove the supernatant and pool with the first supernatant.<br />
10 If any particulate material is visible, filter the supernatant pool through a 0.65µ filter.<br />
11 Dry the samples (supernatants).<br />
Page 20
TROUBLESHOOTING GUIDE<br />
Sample not moving or moving slowly on gel.<br />
Leads may be reversed. Check leads to power supply and gel box. Check upper buffer level is above the<br />
top of the short glass plate. Check the lower buffer level. If the level of the buffer is above the orange<br />
gasket, remove 20-50 mls of buffer until the level is below the gasket.<br />
Erratic voltage, voltage and/or current leak. (At the beginning of the run voltage is greater than<br />
400V or readings are unstable.)<br />
Make sure that the electrical leads are not arcing due to condensation on the lid of the tank. Dry the area<br />
around the electrical posts on the inner box. Check that the leads to the power supply are connected<br />
securely. Verify that the power supply is operating properly.<br />
Band distortion in gel<br />
From time to time band distortions may occur when running O-linked gels, for various reasons,<br />
including:<br />
• Sample may be overloaded, use a maximum of 1/5 th of the volume of the labeling reaction for<br />
each lane.<br />
• Wells may have been torn when comb was removed. Remove comb slowly using a gentle back<br />
and forth rocking motion and lift vertically.<br />
• “Smile effect” on the gel may be the result of a gel not being cooled uniformly. Check that the<br />
cooling system is on and working properly, and is free of air bubbles in the electrophoresis box.<br />
Make sure that a stirring bar has been placed in the electrophoresis box and that the lower buffer<br />
is being mixed. Check that power supply is set for proper current level - see Section 4-III-11 for<br />
proper settings.<br />
• “Fuzzy bands” may be due to too high current used. Check Section 4-III-11 for proper settings.<br />
Page 21
Upper buffer chamber leaks when cassettes are in place.<br />
Check that the plates are clean, not cracked or chipped, and that they are centered on the inner core<br />
assembly. Once the wedge has been brought into position against the glass, gently push down to engage<br />
the sealing gasket. Check that the gaskets are not cracked and that they are seated properly in place (do<br />
not grease gaskets). Pushing down with slightly greater pressure can stop most minor leaks.<br />
If you are using a FACE Imaging System and would like us to take a look at your gel for troubleshooting<br />
purposes, please e-mail a copy of the .raw or .IM2 file to us at glyko@prozyme.com<br />
Trademarks<br />
FACE is a registered trademark of <strong>ProZyme</strong>, Inc., San Leandro, CA, USA<br />
The following designations are trademarks owned by other companies:<br />
Eppendorf is a trademark of Eppendorf Geratebau + Hinz, GmbH<br />
Kodak is a trademark of the Eastman Kodak Company<br />
Milli-Q is a trademark of the Millipore Corporation<br />
N-Glycanase is a registered trademark of Genzyme Corporation, Boston, MA, USA. Recombinant<br />
PNGase F is covered by US Patent No 5,238,821 and its foreign equivalents. The product is<br />
manufactured under exclusive license by <strong>ProZyme</strong>, Inc<br />
Nonidet is a trademark of Shell International Petroleum Company<br />
Polaroid is a trademark of the Polaroid Corporation<br />
Teflon is a trademark of E.I. DuPont de Nemours and Company<br />
Tris is a trademark of Rohm and Haas<br />
Page 22
Separation of N-<strong>Linked</strong> <strong>Oligosaccharide</strong>s Released from Various Glycoproteins<br />
Figure 1.<br />
Lane 1 FACE Oligo Ladder Standard<br />
Lane 2 Fetuin N-linked oligosaccharides<br />
Lane 3 HIV gp120 N-linked oligosaccharides<br />
Lane 4 Human α 1 -acid glycoprotein<br />
Lane 5 Bovine ribonuclease B<br />
Lane 6 Human chorionic gonadotrophin<br />
Lane 7 Human α 1 -trypsin<br />
Lane 8 Bovine deoxyribonuclease<br />
Page 23
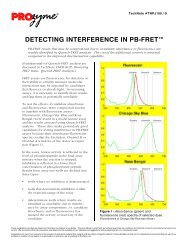
Fluorophore Labeling<br />
Figure 2.<br />
Fluorophore labeling by reductive amination<br />
Figure 3. Fluorophore labeling efficiency of a di-sialylated biantennary oligosaccharide.<br />
Page 24
1 2<br />
<br />
Figure 4.<br />
Lane 1 E3 – FACE Oligo Ladder Standard<br />
Lane 2 E4 – Oligo <strong>Profiling</strong> Control<br />
NOTE: The band marked in Lane 1 is Glucose 4 , maltotetraose, which is provided individually as an<br />
internal standard (E5).<br />
Page 25
<strong>ProZyme</strong>, Inc.<br />
3832 Bay Center Place, Hayward, CA 94545-3619 USA<br />
Tel: 1(510) 638-6900 Toll-free: 1(800) 457-9444<br />
Fax: 1(510) 638-6919<br />
E.mail: glyko@prozyme.com<br />
www.prozyme.com/glyko<br />
AD