
You also want an ePaper? Increase the reach of your titles
YUMPU automatically turns print PDFs into web optimized ePapers that Google loves.
AUTUMN 2007<br />
THE BEACON<br />
PAGE 10<br />
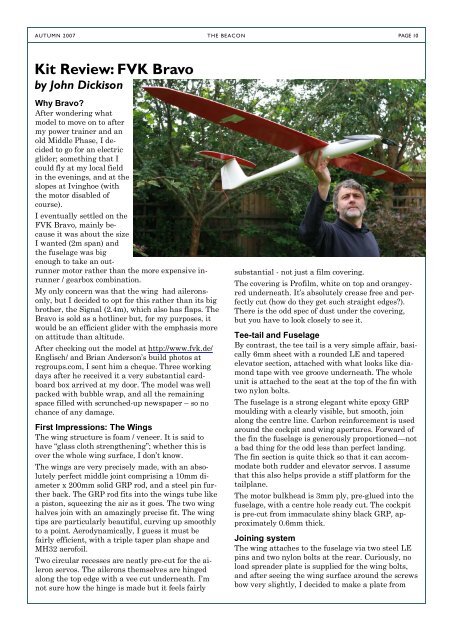
<strong>Kit</strong> <strong>Review</strong>: <strong>FVK</strong> <strong>Bravo</strong><br />
by John Dickison<br />
Why <strong>Bravo</strong>?<br />
After wondering what<br />
model to move on to after<br />
my power trainer and an<br />
old Middle Phase, I decided<br />
to go for an electric<br />
glider; something that I<br />
could fly at my local field<br />
in the evenings, and at the<br />
slopes at Ivinghoe (with<br />
the motor disabled of<br />
course).<br />
I eventually settled on the<br />
<strong>FVK</strong> <strong>Bravo</strong>, mainly because<br />
it was about the size<br />
I wanted (2m span) and<br />
the fuselage was big<br />
enough to take an outrunner<br />
motor rather than the more expensive inrunner<br />
/ gearbox combination.<br />
My only concern was that the wing had aileronsonly,<br />
but I decided to opt for this rather than its big<br />
brother, the Signal (2.4m), which also has flaps. The<br />
<strong>Bravo</strong> is sold as a hotliner but, for my purposes, it<br />
would be an efficient glider with the emphasis more<br />
on attitude than altitude.<br />
After checking out the model at http://www.fvk.de/<br />
Englisch/ and Brian Anderson’s build photos at<br />
rcgroups.com, I sent him a cheque. Three working<br />
days after he received it a very substantial cardboard<br />
box arrived at my door. The model was well<br />
packed with bubble wrap, and all the remaining<br />
space filled with scrunched-up newspaper – so no<br />
chance of any damage.<br />
First Impressions: The Wings<br />
The wing structure is foam / veneer. It is said to<br />
have “glass cloth strengthening”; whether this is<br />
over the whole wing surface, I don’t know.<br />
The wings are very precisely made, with an absolutely<br />
perfect middle joint comprising a 10mm diameter<br />
x 200mm solid GRP rod, and a steel pin further<br />
back. The GRP rod fits into the wings tube like<br />
a piston, squeezing the air as it goes. The two wing<br />
halves join with an amazingly precise fit. The wing<br />
tips are particularly beautiful, curving up smoothly<br />
to a point. Aerodynamically, I guess it must be<br />
fairly efficient, with a triple taper plan shape and<br />
MH32 aerofoil.<br />
Two circular recesses are neatly pre-cut for the aileron<br />
servos. The ailerons themselves are hinged<br />
along the top edge with a vee cut underneath. I’m<br />
not sure how the hinge is made but it feels fairly<br />
substantial - not just a film covering.<br />
The covering is Profilm, white on top and orangeyred<br />
underneath. It’s absolutely crease free and perfectly<br />
cut (how do they get such straight edges?).<br />
There is the odd spec of dust under the covering,<br />
but you have to look closely to see it.<br />
Tee-tail and Fuselage<br />
By contrast, the tee tail is a very simple affair, basically<br />
6mm sheet with a rounded LE and tapered<br />
elevator section, attached with what looks like diamond<br />
tape with vee groove underneath. The whole<br />
unit is attached to the seat at the top of the fin with<br />
two nylon bolts.<br />
The fuselage is a strong elegant white epoxy GRP<br />
moulding with a clearly visible, but smooth, join<br />
along the centre line. Carbon reinforcement is used<br />
around the cockpit and wing apertures. Forward of<br />
the fin the fuselage is generously proportioned—not<br />
a bad thing for the odd less than perfect landing.<br />
The fin section is quite thick so that it can accommodate<br />
both rudder and elevator servos. I assume<br />
that this also helps provide a stiff platform for the<br />
tailplane.<br />
The motor bulkhead is 3mm ply, pre-glued into the<br />
fuselage, with a centre hole ready cut. The cockpit<br />
is pre-cut from immaculate shiny black GRP, approximately<br />
0.6mm thick.<br />
Joining system<br />
The wing attaches to the fuselage via two steel LE<br />
pins and two nylon bolts at the rear. Curiously, no<br />
load spreader plate is supplied for the wing bolts,<br />
and after seeing the wing surface around the screws<br />
bow very slightly, I decided to make a plate from
AUTUMN 2007<br />
THE BEACON<br />
PAGE 11<br />
some glass PCB. In the fuselage the wing bolts tap<br />
in to what looks like 3mm ply under the GRP.<br />
Again, I played safe and glued some metal nuts to<br />
the ply.<br />
A bag of bits included: nylon bolts, control rods,<br />
plastic clevises, control horns, and wire for that<br />
clever way of holding the canopy on.<br />
Instructions are packed into two sides of A4 with<br />
diagrams and text for: build, setup, and power system.<br />
They also cover the non-electric version of this<br />
model. Being new to this game, I had to email<br />
Brian a “few” times with questions, and he was<br />
most helpful.<br />
Power System<br />
I opted for the only out-runner recommended, the<br />
AXI 2826/10. The instructions show that with a<br />
14x9.5 prop and 3S2P LiPo this draws 46A. I actually<br />
used a 3700 mAh 3S1P LiPo and a 14x9 prop<br />
(because that was in stock). The AXI website shows<br />
this arrangement to be about 72% efficient, which I<br />
guess is the price for not using an in-runner with<br />
gearbox. I used a Jeti 40 controller as recommended<br />
on the AXI site.<br />
I struggled a bit with spinners and all the gubbins<br />
for the folding prop blades, but eventually settled on<br />
an open nose spinner for good cooling (hopefully).<br />
The one I chose is an all-in-one item and, unlike<br />
others I tried, it didn’t require a large hole in the<br />
ply bulkhead. The instructions say to use a 41mm<br />
spinner, but I could only find 42mm and 40mm and<br />
I plumped for the latter.<br />
Prop and spinner assembly<br />
Getting down to assembly<br />
I think I probably hold the unofficial world duration<br />
record for a <strong>Bravo</strong> assembly but, in my defence, this<br />
business of gluing servos in is all a bit scary to the<br />
uninitiated!<br />
I started at the back, hinging the rudder with the<br />
pinned tab hinges supplied. The wood at the back of<br />
the fin was surprisingly hard. Then followed multiple<br />
test installations of a pair of HS81 MG servos.<br />
This was fairly awkward because they had to keep<br />
going in and out through the hole in the side of the<br />
fin.<br />
I packed the lower/rudder servo with balsa, so that<br />
the servo arm poked out as far as possible. The elevator<br />
servo was packed the other way to allow its<br />
arm to sit within the fin, just clearing the inside of<br />
the skin. The arm was cut down from a huge one I<br />
had that normally takes a brass clamp ring. Anyway<br />
it did the job, although I had to relieve the<br />
metal clevis slightly.<br />
Hitec HS 81 MG’s are a tight fit<br />
The elevator pushrod is a simple threaded steel rod<br />
and requires an exit hole at the top of the fin. Similarly,<br />
I had to enlarge the rudder horn slot. I went<br />
to the trouble of making the more robust elevator<br />
horn shown in the instructions - it wraps round the<br />
TE to the top surface. I took the precaution of using<br />
soft locking compound on all threads before gluing<br />
the servos in place. This was bit of a puzzle, the procedure<br />
being: both servos in<br />
through the hole, screw in the<br />
elevator pushrod, glue and<br />
pack the rudder servo, slide<br />
the elevator servo out of the<br />
way, apply the glue for it, slide<br />
it back and pack with balsa –<br />
or something like that. Fortunately,<br />
it all went well and, after<br />
the epoxy had gone beyond<br />
the point of no return, both servos<br />
operated correctly.<br />
Elevator linkage<br />
Motor Installation<br />
The AXI motor is a fairly easy fit in the nose, but<br />
the leads exit the motor at 90 deg and were hard up<br />
against the side of the fuselage. I seriously considered<br />
cutting the fuselage to allow the leads to poke<br />
out but in the end, I just about found enough space<br />
for them, by doubling the thickness of the ply bulkhead<br />
and recessing part of the new wood next to the<br />
leads. Also, to allow slightly sharper bend radius, I<br />
ever so carefully cut back some of the stiff plastic<br />
around the leads where they exit the motor - all a<br />
Modified bulkhead
AUTUMN 2007<br />
THE BEACON<br />
PAGE 12<br />
<strong>Bravo</strong> (cont)<br />
After a chat with Mike Shellim on the benefits of<br />
the Multiplex Cockpit SX, I changed from my Futaba<br />
EX6 to the SX. The SX was a revelation in so<br />
many ways, but the main benefits in this case were<br />
reduction of aileron differential with aileron-spoiler<br />
and proper servo travel limits. I set the control surface<br />
travels to the “aerobatic” settings given in the<br />
instructions, rather than “thermal”.<br />
Motor fitted to bulkhead<br />
bit near the limit but I got away with it.<br />
I cut cooling holes in the bulkhead to match up with<br />
the motor openings and, after giving the ply a coat<br />
of sanding sealer, the motor was mounted using the<br />
standard four screws with locking compound. The<br />
motor leads were taped to the fuselage wall to stop<br />
them touching the moving part of the motor body.<br />
Radio Installation<br />
I used HS 125 MG servos for the ailerons. These got<br />
the full treatment; mounts cut off, roughed up with<br />
silicon carbide paper, degreased, and then glued in<br />
with 5 minute epoxy. I found that the circular cutouts<br />
in the wing needed enlarging. After doing the<br />
rather fiddly ply lining, the servos were blocked in<br />
and glued.<br />
Hitec HS125 MG servos glued in place. Looks neat!<br />
I glued the supplied aileron horns onto the surfaces,<br />
after cutting away the film, rather than using the<br />
optional height adjustable ones mentioned in the<br />
instructions.<br />
For the Rx battery I used an 800mAh Sanyo AAA<br />
NiMH pack. The Rx battery was mounted close to<br />
the CG, with a Futaba R147F receiver just behind<br />
it. The Flight Power 3700 25C LiPo was probably<br />
not the best shape for this model, but I managed to<br />
adjust its position to get the CG about right. It was<br />
secured using foam and Velcro. I added a couple of<br />
tubes to help get the cooling air past the receiver<br />
and battery foam – well that’s the theory.<br />
The aerial went out through a hole I made in the<br />
top of the fuselage and then up to the top of the fin<br />
in the standard draggy power model fashion. All<br />
connectors were standard Futaba type.<br />
Various components ready for final assembly<br />
Woo hoo—first flight!<br />
After a motor test run and with the CG set at the<br />
most forward recommended point (70mm from the<br />
LE), I headed for my local field. It was a beautiful<br />
sunny morning, with a light breeze along the length<br />
of the field. I was pretty nervous about throwing my<br />
precious glider into the air; at 1.6 kg it was no<br />
feather weight and would require a hefty launch.<br />
Also, I made a last minute change from mode 6 to<br />
mode 2, i.e. swapping throttle/spoilers, so that the<br />
slightly tricky right-hand slider was confined to<br />
spoilers.<br />
The moment of truth arrived, I set the motor to<br />
about half throttle and ran forward and hurled the<br />
<strong>Bravo</strong> into the unknown. To my relief, it flew perfectly<br />
straight in a shallow climb and, after what<br />
seemed like an age of being unable to take my eye<br />
off the model, I found the right hand stick and took<br />
control.<br />
Favourable Impressions? You Bet!<br />
My first impression was that of precise, stable handling.<br />
The glide performance was so good that I could<br />
glide in on a test approach at about 30ft from the<br />
far end of the field and still be at a good height by<br />
the time it passed me. Overhead passes on low<br />
power revealed the slightly eerie presence of this<br />
model, with its large bird-like wings rock steady<br />
and the motor humming menacingly.<br />
Gliding down it became apparent that this model<br />
could exhibit Klingon style cloaking, and for a few<br />
terrifying seconds I found myself staring at what<br />
appeared to be empty sky!<br />
A few slow circuits showed that the skinny MH32<br />
aerofoil would take considerable abuse in tight low
AUTUMN 2007<br />
THE BEACON<br />
PAGE 13<br />
speed turns without a hint of tip stall. Being relatively<br />
new to almost zero dihedral, I sensed that<br />
lack of concentration would be punished severely<br />
with this model.<br />
Landing<br />
Finally it came to the first landing; over the fence at<br />
the far end of the field, aileron spoilers full up about<br />
100ft away at about 20ft high, and it came in without<br />
any fuss whatsoever. All my concerns about<br />
landing without crow braking were gone.<br />
Further launches followed. Getting more adventurous<br />
in the climb, I used full throttle and was<br />
amazed. This model can scream up vertically faster<br />
than anything I have ever seen. It’s as if someone<br />
had switched the sign on gravity! Once or twice it<br />
did a little jump in these manic climbs – possibly<br />
ESC noise?<br />
Loops were fast and smooth but, given my limited<br />
piloting skills, I didn’t go any further than that.<br />
Landings can be flared if required, giving rise to a<br />
gentle but curious nose up attitude in ground effect.<br />
After 20 minutes on each battery I found that they<br />
only needed a half charge. On this basis, 30 minute<br />
flights without thermals should easily be possible.<br />
Cooling did not appear to be a problem, but I think I<br />
will have to keep an eye on it when I start using<br />
high power for longer.<br />
In Summary<br />
The <strong>Bravo</strong> is exactly what I expected and more. It’s<br />
a high quality, well designed and versatile electric<br />
glider that is well supported by the UK distributor.<br />
Launching and landing cause no real drama. You<br />
can thermal it, or glide in at low level swooping<br />
around with the occasional squirt of amps, but push<br />
the throttle forward and it all gets seriously fast,<br />
the main limitation being pilot ability to keep up<br />
with it. I see no reason why a less powerful motor<br />
would not suffice for “normal” flying.<br />
I’ve yet to explore aerobatics properly, and I guess<br />
the aerofoil would not be great in prolonged inverted<br />
flight, but that’s not really what this model<br />
is all about. I’m certainly looking forward to the<br />
next flying session.<br />
John Dickison<br />
<strong>Kit</strong> Specification<br />
Span<br />
Length<br />
Weight:<br />
Wing Profile<br />
Controls<br />
2 m<br />
1.09 m<br />
0.85 kg<br />
MH32<br />
Cost £163<br />
Manufacturer<br />
UK Distributor<br />
Rudder, Elevator, Ailerons (2 servos),<br />
Motor Speed<br />
<strong>FVK</strong><br />
Brian Anderson