Download the Fastrack Super Duty Owner's Manual 48/54/60
Download the Fastrack Super Duty Owner's Manual 48/54/60
Download the Fastrack Super Duty Owner's Manual 48/54/60

Create successful ePaper yourself
Turn your PDF publications into a flip-book with our unique Google optimized e-Paper software.
unseated when <strong>the</strong> steering control levers are not in <strong>the</strong> park<br />
brake position (park brake switches are disengaged) or <strong>the</strong> deck<br />
clutch switch is engaged <strong>the</strong> engine will stop.<br />
The following steps are <strong>the</strong> correct procedures for starting <strong>the</strong><br />
engine. If difficulty is encountered, contact <strong>the</strong> Hustler ® Dealer<br />
in your area.<br />
1. Before starting mower each day, perform daily preoperation<br />
checking. (See Safety Start Interlock System<br />
section.)<br />
2. Make sure <strong>the</strong> steering control levers are in <strong>the</strong> park<br />
brake position and <strong>the</strong> deck clutch switch is disengaged.<br />
Only start <strong>the</strong> engine from <strong>the</strong> operator’s position.<br />
3. Use choke when engine is cold, or if warm engine fails to<br />
start within 5 seconds of cranking. Avoid flooding by<br />
operating engine without choking as soon as possible.<br />
4. Set throttle at approximately 1/2 open position.<br />
5. Insert key in ignition switch and rotate full clockwise to<br />
engage starting motor. Release key when engine starts.<br />
IMPORTANT: The engine starter should not be operated<br />
for periods longer than 30 seconds at a time. An interval<br />
of at least two minutes should be allowed between such<br />
cranking periods to protect <strong>the</strong> starter from overheating<br />
and burning-out.<br />
6. Perform a test to make sure <strong>the</strong> safety start interlock<br />
system is operating properly. Refer to Safety start<br />
interlock system section.<br />
7. As soon as <strong>the</strong> engine begins to run, check to make<br />
certain <strong>the</strong> oil warning light is off. If not, stop <strong>the</strong> engine<br />
immediately and check for <strong>the</strong> cause.<br />
8. Allow <strong>the</strong> engine to idle a few minutes before advancing<br />
<strong>the</strong> throttle and/or engaging <strong>the</strong> deck clutch.<br />
Stopping The Engine<br />
Use <strong>the</strong> following procedure to shut off <strong>the</strong> engine after<br />
operating <strong>the</strong> equipment.<br />
1. Place <strong>the</strong> steering control levers in <strong>the</strong> park brake<br />
position.<br />
2. Throttle <strong>the</strong> engine back to low idle, <strong>the</strong>n disengage <strong>the</strong><br />
deck clutch. Refer to Mower deck operation section for<br />
more details.<br />
3. Let <strong>the</strong> engine run at low idle for a couple of minutes.<br />
4. Rotate <strong>the</strong> ignition key counter-clockwise to <strong>the</strong> “OFF”<br />
position. Remove <strong>the</strong> key from switch before leaving <strong>the</strong><br />
mower.<br />
Moving Mower With Stalled Engine<br />
If it becomes necessary to move <strong>the</strong> mower when <strong>the</strong> engine<br />
is inoperative, <strong>the</strong> transaxles are equipped with bypass valves.<br />
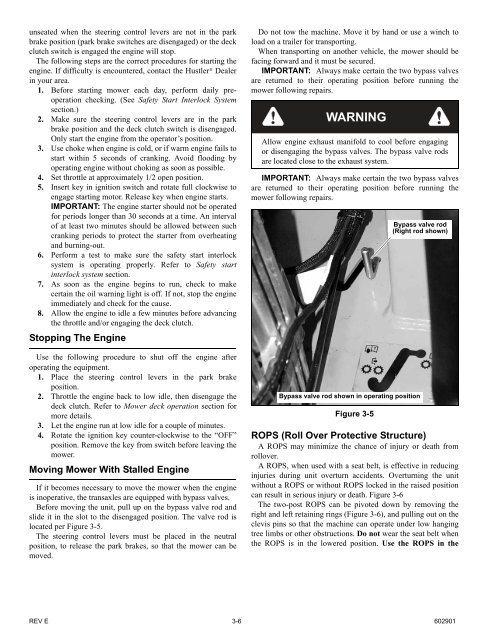
Before moving <strong>the</strong> unit, pull up on <strong>the</strong> bypass valve rod and<br />
slide it in <strong>the</strong> slot to <strong>the</strong> disengaged position. The valve rod is<br />
located per Figure 3-5.<br />
The steering control levers must be placed in <strong>the</strong> neutral<br />
position, to release <strong>the</strong> park brakes, so that <strong>the</strong> mower can be<br />
moved.<br />
Do not tow <strong>the</strong> machine. Move it by hand or use a winch to<br />
load on a trailer for transporting.<br />
When transporting on ano<strong>the</strong>r vehicle, <strong>the</strong> mower should be<br />
facing forward and it must be secured.<br />
IMPORTANT: Always make certain <strong>the</strong> two bypass valves<br />
are returned to <strong>the</strong>ir operating position before running <strong>the</strong><br />
mower following repairs.<br />
WARNING<br />
Allow engine exhaust manifold to cool before engaging<br />
or disengaging <strong>the</strong> bypass valves. The bypass valve rods<br />
are located close to <strong>the</strong> exhaust system.<br />
IMPORTANT: Always make certain <strong>the</strong> two bypass valves<br />
are returned to <strong>the</strong>ir operating position before running <strong>the</strong><br />
mower following repairs.<br />
Figure 3-5<br />
Bypass valve rod<br />
(Right rod shown)<br />
Bypass valve rod shown in operating position<br />
ROPS (Roll Over Protective Structure)<br />
A ROPS may minimize <strong>the</strong> chance of injury or death from<br />
rollover.<br />
A ROPS, when used with a seat belt, is effective in reducing<br />
injuries during unit overturn accidents. Overturning <strong>the</strong> unit<br />
without a ROPS or without ROPS locked in <strong>the</strong> raised position<br />
can result in serious injury or death. Figure 3-6<br />
The two-post ROPS can be pivoted down by removing <strong>the</strong><br />
right and left retaining rings (Figure 3-6), and pulling out on <strong>the</strong><br />
clevis pins so that <strong>the</strong> machine can operate under low hanging<br />
tree limbs or o<strong>the</strong>r obstructions. Do not wear <strong>the</strong> seat belt when<br />
<strong>the</strong> ROPS is in <strong>the</strong> lowered position. Use <strong>the</strong> ROPS in <strong>the</strong><br />
REV E 3-6 <strong>60</strong>2901