ML0721 - HWH Corporation
ML0721 - HWH Corporation
ML0721 - HWH Corporation

Create successful ePaper yourself
Turn your PDF publications into a flip-book with our unique Google optimized e-Paper software.
UNDERSTAND OPERATOR’S MANUAL BEFORE USING.<br />
BLOCK FRAME AND TIRES SECURELY BEFORE<br />
REMOVING TIRES OR CRAWLING UNDER VEHICLE.<br />
OPERATING PROCEDURES<br />
SITE SELECTION<br />
Park with the front of the vehicle facing downhill if possible.<br />
Care must be taken not to raise the rear of the vehicle too high or<br />
the vehicle may roll forward or backward off the jacks. If parking<br />
on soft ground or asphalt paving, wood blocks or pads should<br />
be placed under the jacks.<br />
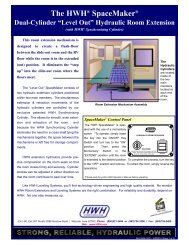
ROOM EXTENSION PROCEDURES<br />
IMPORTANT: If the vehicle is equipped with a room extension<br />
read this section carefully.<br />
If the vehicle is equipped with kick-down jacks, the wheels MUST<br />
be blocked securely. Do NOT operate any room extension<br />
until the leveling and stabilizing procedure is complete. Do<br />
NOT retract the leveling system until all room extensions are<br />
retracted. NEVER operate the leveling system when any<br />
room extensions are extended.<br />
Refer to the vehicle owners manual for proper operation of<br />
room extensions.<br />
IMPORTANT: Do not use a room extension support when the<br />
vehicle is supported by the leveling system.<br />
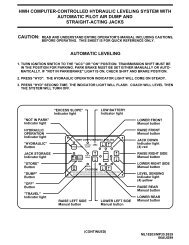
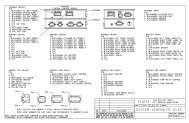
LEVELING PROCEDURE<br />
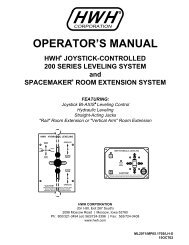
JACK<br />
CONTROL<br />
LEVER<br />
OPERATE POSITION<br />
<strong>HWH</strong> HYDRAULIC LEVELING<br />
LEFT<br />
EXTEND<br />
FRONT<br />
EXTEND<br />
REAR<br />
EXTEND<br />
"CAUTION"<br />
OPERATE<br />
2. Turn ignition switch to "ON" or "ACCESSORY".<br />
RIGHT<br />
EXTEND<br />
1. Place gear selector in the parking position, apply park brake<br />
and block tires securely.<br />
NOTE: If the hand/auto park brake is not set, the "NOT IN<br />
PARK/BRAKE" light will come on while the "ON" button is<br />
pushed. The panel will not turn on if the park brake is not<br />
set.<br />
4. Move the FRONT and REAR STORE LEVERS to the OPERATE<br />
POSITION. Nothing should happen at this time.<br />
OPERATE<br />
STORE<br />
FRONT<br />
STORE<br />
REAR<br />
FRONT<br />
STORE<br />
LEVER<br />
REAR<br />
STORE<br />
LEVER<br />
3. Push the "ON" button on the light plate. The POWER ON<br />
light will be lit.<br />
swings vertical. Check that all jacks have swung to the vertical<br />
position. Place pads under jacks if necessary at this time.<br />
6. A lit yellow LEVEL light indicates that the end, side or corner<br />
of the vehicle is low. Only one yellow LEVEL light should be<br />
lit at a time. If a corner of the vehicle is low a side LEVEL light<br />
will be on by itself.<br />
Move the JACK CONTROL LEVER to the extend position to<br />
extend jack pairs corresponding to a lit yellow light. Extend<br />
jack pairs accordingly until all yellow lights are out. It may take<br />
several movements from side to front, or side to rear to raise<br />
a low corner. If the ground is too uneven, the jacks may not<br />
have enough stroke to level the vehicle. The vehicle may<br />
have to be moved. Remember, if the rear of the vehicle is<br />
lifted too high, the vehicle may roll forward or backward off<br />
the jacks.<br />
7. After the vehicle is level, the jacks not used for leveling may<br />
be extended until they touch the ground. This provides additional<br />
stability against wind and activity in the vehicle. Do this<br />
by pushing the jack control lever to the rear and/or front as needed<br />
to extend any remaining jacks. Do not use the right or left<br />
extend positions.<br />
8. Push the "OFF" button on the light panel.<br />
9. Turn the ignition switch off.<br />
5. Swing the jacks to the vertical position by pushing the center<br />
jack control lever to FRONT EXTEND then REAR EXTEND. The<br />
respective red WARNING light will be lit as soon as the jack<br />
MP35<br />
19NOV07