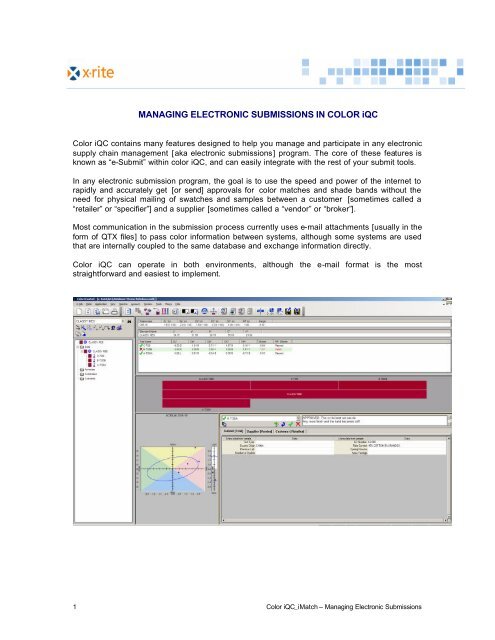
MANAGING ELECTRONIC SUBMISSIONS IN COLOR iQC
MANAGING ELECTRONIC SUBMISSIONS IN COLOR iQC
MANAGING ELECTRONIC SUBMISSIONS IN COLOR iQC

Create successful ePaper yourself
Turn your PDF publications into a flip-book with our unique Google optimized e-Paper software.
<strong>MANAG<strong>IN</strong>G</strong> <strong>ELECTRONIC</strong> <strong>SUBMISSIONS</strong> <strong>IN</strong> <strong>COLOR</strong> <strong>iQC</strong><br />
Color <strong>iQC</strong> contains many features designed to help you manage and participate in any electronic<br />
supply chain management [aka electronic submissions] program. The core of these features is<br />
known as “e-Submit” within color <strong>iQC</strong>, and can easily integrate with the rest of your submit tools.<br />
In any electronic submission program, the goal is to use the speed and power of the internet to<br />
rapidly and accurately get [or send] approvals for color matches and shade bands without the<br />
need for physical mailing of swatches and samples between a customer [sometimes called a<br />
“retailer” or “specifier”] and a supplier [sometimes called a “vendor” or “broker”].<br />
Most communication in the submission process currently uses e-mail attachments [usually in the<br />
form of QTX files] to pass color information between systems, although some systems are used<br />
that are internally coupled to the same database and exchange information directly.<br />
Color <strong>iQC</strong> can operate in both environments, although the e-mail format is the most<br />
straightforward and easiest to implement.<br />
1 Color <strong>iQC</strong>_iMatch – Managing Electronic Submissions
Setting up e-Submit:<br />
In order to begin with e-Submit, you must first enable e-Submit and Tagging support. This is done<br />
from the main menu “Settings” [when no jobs are open]:<br />
In addition, you will have to set up the system parameters [apply to ALL jobs] that are to be used<br />
when you are working with e-Submits. The menu item “Setup eSubmit and Tagging” allows you to<br />
set these system parameters.<br />
2 Color <strong>iQC</strong>_iMatch – Managing Electronic Submissions
The first two settings are the Format Files that you want to use to define your tag labels and<br />
choices. Any Label Format or Standard Label Format files you specify here are system defaults<br />
that may be overridden by individual job or template file settings. The other settings apply to ALL<br />
jobs, and controls how labels/tags are handled during the import or export of submit files. The<br />
location of the submit files allows you to specify where on your network the software can expect<br />
to find [or can create] submit files for interchange with external software. For those suppliers who<br />
must include their accreditation number as part of the submission process, place your specific<br />
number as indicated.<br />
The Format Files that you use may come from one or more Customers, or downloaded from a<br />
web-site, or they can be created from examples included with color <strong>iQC</strong>. The format files define<br />
what label/tag pairs you want each trial [and standard] to get when they are measured, what type<br />
of data field it is [edit box, dropdown list, multi-select], what the transfer label is, which tag group it<br />
is in [Submit, Supplier, Customer], and what the possible choices for it are [if any are defined]. In<br />
addition, the position of the label/tag pair in the list is important in terms of database storage –<br />
each item is linked to a specific database column in the TAGS table, so do not change the order<br />
of the tags once determined.<br />
You may have a maximum of 30 labels in each format file. The size of the label cannot exceed 20<br />
characters, and the size of the data you enter for each label cannot exceed 120 characters.<br />
3 Color <strong>iQC</strong>_iMatch – Managing Electronic Submissions
Using Format Files:<br />
Each time you open a job, the job reads in the definitions of the format files for standards and for<br />
trials. If the format file is specified in the job settings [including settings file or template], then it is<br />
used – otherwise the system specified default format files will be used. Each time a measurement<br />
is created, it acquires the labels from the current format file [either standard or trial – whichever is<br />
appropriate]. From that point on, regardless of what format file is used, that measurement already<br />
contains the labels it was given “at birth”. This makes it possible to work with and display trials<br />
from a variety of sources within the same job. Changing labels in a measurement after creation<br />
can be done from within the Submit View.<br />
To define a format file to be used for a particular job or settings file, first open the job – then from<br />
the tools menu [or from right click within the Submit view], select “Setup Tagging Format”. This<br />
brings up the same settings dialog shown earlier, but in this case either of the two format file<br />
names you enter here will ONLY apply to this job. If the format file fields are left blank, it indicates<br />
this job will use the default system format files you specified earlier. Note that the other settings in<br />
the dialog still apply to the system and are NOT specific to this job.<br />
In the e-mail submission process, the action of submitting from a supplier to a customer uses the<br />
email address associated with the CUSTOMER_EMAIL tag in the Standard. When a customer<br />
reply’s to a Submit, they are using the SUPPLIER_EMAIL field in the submit [trial] being sent. If<br />
no email addresses are found, then the user will be prompted for an email address before<br />
sending.<br />
Submit View:<br />
The submit view is available as a view from within the QC frame in a job. It is designed to let you<br />
work with Standards and Trials while viewing and modifying their tag data, and perform actions<br />
related to submitting and approving samples.<br />
The user can select any standard or trial shown in views and modify the tag data within that<br />
measurement. To modify data, move to the field to be modified and hit the key to make<br />
that field active - if a change is made press again [or move to another field] to complete<br />
that change. The three [Submit, Supplier, Customer] are only shown if your current<br />
Format file contains labels for more than 1 tag group. Selecting each will display the<br />
appropriate labels/data for each group based on the current format file definition. [Note: Group<br />
tabs only apply to Trial data, Standards always show complete data regardless of which tab is<br />
selected.]<br />
4 Color <strong>iQC</strong>_iMatch – Managing Electronic Submissions
The buttons in the control panel allow the user to select the current measurement, copy data,<br />
change the status of the selected measurement, and enter comments. Comments are multi-line<br />
comments [you can enter between each comment to separate them into multiple lines].<br />
You should always append any comments AFTER the status indicator, or re-click on the<br />
appropriate status button after entering comments.<br />
- copy tag data from current measurement to all other trials shown in view.<br />
- change status of current measurement to Submitted.<br />
- change status of current measurement to Not Done. This prevents it from being<br />
included in the email submit file and will remove it from views before submitting.<br />
- change status of current measurement to Approved.<br />
- change status of current measurement to Rejected.<br />
- change status of current measurement to Commented.<br />
The dropdown control at the top left of the control panel is used to select the current<br />
measurement as well as to review the status of all the current items:<br />
Sending e-Submits:<br />
The main toolbar in Color <strong>iQC</strong> contains a button for “e-Submit Selected items”. If this button is<br />
pressed while the Submit View has focus, then it will create a QTX file containing the standard<br />
and the shown in views items that have a status of Submitted, Approved, or Rejected, and save it<br />
to the designated QTX location.<br />
If the user has a MAPI compliant email system [ex: Outlook, Outlook express, Lotus with MAPI<br />
option], and has selected “e-mail as an attachment” in their e-Submit settings, the software will<br />
automatically create an email message, determine whether the desired action is to send to<br />
customer or send to supplier, place the appropriate email address in the “send-to” box of the mail<br />
message, place appropriate information in the subject line, include information in the message<br />
body related to the items being sent, and attach the proper QTX file to the mail message as an<br />
attachment. The determination of the action to be taken is based on what status button was last<br />
clicked in the Submit View - if the user clicks on “Approved”, “Rejected”, or “Commented”, the<br />
action is to send the response to the Supplier using the email address for Supplier in the first<br />
Submit. If the user last clicked on “Submitted”, then the action is to send the Submission to the<br />
Customer using the Customer email address specified in the Standard.<br />
If MAPI compliant software is not being used, or the user needs to manually direct the<br />
submission for other reasons, then the QTX file is created and placed in the outgoing Mailbox<br />
folder.<br />
5 Color <strong>iQC</strong>_iMatch – Managing Electronic Submissions
If the user needs to specifically select items to be submitted from the tree view, then the QC Tree<br />
View will have focus, and the behavior of the “send e-Submit button” in the main toolbar will be<br />
slightly different, instead sending the items selected in the tree view regardless of their submit<br />
status.<br />
Receiving e-Submits:<br />
Importing submits from QTX files can be accomplished a number of ways, depending on how<br />
they are received.<br />
If they are normally received from an external source and placed into a network folder, then the<br />
“Import e-Submit File” button in the main toolbar, coupled with the e-Submit setting for “QTX File<br />
location” will allow you to browse and import any files located in this folder into a new job.<br />
If they are received as attachments in your email program, you may open the attached QTX files<br />
directly from the email by double clicking on the attachment. If double clicking on the attachment<br />
does not open as a job within color <strong>iQC</strong>, you need to set the Windows Explorer option to<br />
associate the QTX file with Color <strong>iQC</strong>.<br />
When Color <strong>iQC</strong> imports a QTX file [regardless of how it is opened], it looks for a template named<br />
“QTX.jt5”, located in the current macros and settings path [specified in the current desktop]. If this<br />
file exists, it is automatically used to define the appearance and behavior [views, format files,<br />
tolerances, settings, etc.] and create a new job in which to import the data into. If this QTX.jt5 file<br />
does not exist, the user is prompted to enter the name of an “import template” file to use for<br />
creating a job and importing data. This allows users to create multiple template files to use when<br />
dealing with various customers or suppliers – giving them the opportunity to specify which<br />
settings to use for the incoming data on a case by case basis.<br />
When the data is imported from a QTX file, the software attempts to match the Tag Labels in the<br />
QTX file with the expected “Transfer Labels” specified in the current Format file. Any tags not<br />
matching are either discarded or added as additional unspecified data depending on your current<br />
e-Submit setting for “Use ONLY these labels exclusively, ignore others during import”.<br />
When importing data from QTX files, Color <strong>iQC</strong> also checks the imported standard with its current<br />
database to see if a standard already exists with that same name and same colorimetric values<br />
[within 0.20DEcmc]…. If found then it is recalled into the job in place of the imported standard.<br />
This assures that imported data will be properly associated with the actual Standard that exists in<br />
your current database even across multiple submits. If a standard is found in your database, you<br />
will be notified of this replacement after the import process is completed.<br />
Organizing the Submit Process:<br />
The e-Submit process can involve a large amount of data consisting of Standards and associated<br />
trials for a variety of colors, products, seasons, customers, and suppliers. While e-Submit is<br />
primarily a job based function, it is obviously important to maintain this data in a database<br />
capable of organizing and analyzing the state of the submit process. Color <strong>iQC</strong> contains two<br />
features designed to assist you with this process.<br />
The function “Recall from Database by Tags” [available from the menu] allows the user to<br />
recall trials and standards from the database using up to 4 tag filters, Date Range, and submit<br />
status. The 4 tags can be selected from any of the currently defined tag labels, are persistent<br />
from last usage, and can be changed at anytime. The qualifier allows the user to specify the value<br />
as either “contains”, “begins with”, “equals”, or “not contains”.<br />
6 Color <strong>iQC</strong>_iMatch – Managing Electronic Submissions
The date range allows the user to specify data added to the database within the last day, 2 days,<br />
week, month, or year. Submit status can filter submits that are submitted, accepted, rejected,<br />
commented, or still open [not done].<br />
The potential matches are then displayed in a tree view, organized by the specified tags.<br />
The user can then select the specific data to be retrieved from the database into the job to be<br />
worked on. The user can click on a single item folder to recall everything within that branch,<br />
including trials and associated standards, into the job to be worked on.<br />
A print report button allows the tree view to be printed on the printer, giving the user a way of<br />
creating a database contents report organized by any 4 tags that they choose.<br />
7 Color <strong>iQC</strong>_iMatch – Managing Electronic Submissions
In the above example, the data is organized by Season “contains 2007”, Brand=”any value”, and<br />
Color Name=”any value”. Clicking on “Classy Red”, then would result in the Classy Red<br />
standard and the three submits being recalled into the job.<br />
The function “Store to DB and Clear Job” [available from the menu] will automatically<br />
return all the data from the job into the database [updating existing measurements and adding<br />
any new measurements], then delete the standards and trials from the job [any existing<br />
substrates, colorants, and Collections will remain in the job]. This allows the user to quickly<br />
update any changes back to the database after the submission process and return the job to an<br />
empty status in preparation for the next action. This method of operation is a more “database<br />
oriented” approach than the “job based” operations normally used in color <strong>iQC</strong>. With this<br />
approach, users can have a single job always open that becomes a temporary workspace<br />
container and use only the database as their primary storage media.<br />
8 Color <strong>iQC</strong>_iMatch – Managing Electronic Submissions
Appendix<br />
e-Submit Terms and Definitions:<br />
Customer<br />
Supplier<br />
Submit<br />
Submit View<br />
Tagging<br />
Tag Format File<br />
QTX File<br />
Transfer Label<br />
Typically a retailer or other party that submits are sent to for approval.<br />
Typically the user who is sending the trials to the customer for approval.<br />
The trial [or trials] being sent for approval, or being returned with<br />
comments, accompanied by the relevant standard.<br />
A user selectable view within the job frame that allows the user to view,<br />
change, and process submits from within color <strong>iQC</strong>.<br />
User defined label/data pairs that can be used to append additional<br />
information to a sample or standard. Examples include Season, Brand,<br />
Style, email addresses, country-of-origin, etc. Each measurement can<br />
contain up to 30 tag pairs. This data can be used as search criteria within<br />
database recalls.<br />
The definitions for labels and their possible choices are contained in<br />
format files [.fmt extension]. Jobs and templates can be connected to<br />
different format files [one for standards, one for trials], so working with<br />
multiple customers/suppliers is easy. In Color <strong>iQC</strong>, the FMT files are<br />
stored in the user’s local system settings folder [by default this is<br />
C:\Color_iControl\System\]<br />
Common ASCII based file structure used to pass color information<br />
between color systems. The file contains spectral data, names,<br />
measurement details, and additional label/tag pairs of data for standards<br />
and trials.<br />
Label identifier in the Tag Format file [usually uppercase] that is used<br />
within the QTX file to identify a tag label for external communication with<br />
other systems. Internally <strong>iQC</strong> uses the “display label” for each tag, but<br />
when exporting/importing through QTX files these display labels are<br />
replaced with the appropriate “Transfer Label”.<br />
9 Color <strong>iQC</strong>_iMatch – Managing Electronic Submissions