Napoleon At Waterloo - Learning SPI's Great Battles of the American ...
Napoleon At Waterloo - Learning SPI's Great Battles of the American ...
Napoleon At Waterloo - Learning SPI's Great Battles of the American ...

Create successful ePaper yourself
Turn your PDF publications into a flip-book with our unique Google optimized e-Paper software.
25<br />
Walhain with III Corps and IV Corps was just a<br />
little behind. Settling down for lunch, <strong>the</strong><br />
Marshal's mess was disturbed at 1130 by <strong>the</strong><br />
sound <strong>of</strong> artillery fire coming from <strong>the</strong><br />
direction <strong>of</strong> Mont-St.-Jean, about a dozen<br />
miles to <strong>the</strong> northwest. The commander <strong>of</strong> IV<br />
Corps and several o<strong>the</strong>r senior <strong>of</strong>ficers<br />
demanded that Grouchy immediately move to<br />
support <strong>Napoleon</strong>, who was obviously engaged<br />
in a major battle. Grouchy refused, pointing<br />
out that his orders required him to pursue <strong>the</strong><br />
Prussians. Had he moved at this point he<br />
would probably have arrived on <strong>Napoleon</strong>'s<br />
right flank about 1900 hours, just in time to<br />
fallon <strong>the</strong> Prussian IV Corps as it engaged<br />
<strong>Napoleon</strong>'s troops near Placenolt and also in<br />
time to support <strong>the</strong> attack <strong>of</strong> <strong>the</strong> Old Guard.<br />
Undoubtedly, Grouchy could have influenced<br />
<strong>the</strong> course <strong>of</strong> <strong>the</strong> battle, but it is not<br />
necessarily <strong>the</strong> case that his arrival would have<br />
turned <strong>Waterloo</strong> into a French victory. The<br />
luncheon went on, only to be interrupted<br />
again at 1230 when <strong>the</strong> messenger from II<br />
Cavalry Corps finally arrived, having taken two<br />
hours to cover about six miles. He told<br />
Grouchy that <strong>the</strong> Prussians were preparing to<br />
fallon <strong>Napoleon</strong>'s flank.<br />
Grouchy immediately, and belatedly, moved<br />
into action. I Cavalry Corps was ordered to<br />
take <strong>the</strong> village <strong>of</strong> Limale followed by IV<br />
Corps, while III Corps marched for Wav're<br />
screened by II Caval ry Corps.<br />
Holding <strong>the</strong> Iine <strong>of</strong> <strong>the</strong> Dyle River, between<br />
Limale and Wavre, was Prussian III Corps (c.<br />
17,000). Fighting began at 1630, when II<br />
Cavalry Corps arrived in front on Wavre,<br />
closely followed by III Corps. The French<br />
cleared <strong>the</strong> nearslde <strong>of</strong> <strong>the</strong> river handily but<br />
got into a difficult position doing so. From <strong>the</strong><br />
heights <strong>of</strong> <strong>the</strong> left bank Prussian batteries sh ot<br />
up <strong>the</strong> French badly. Although <strong>the</strong> Prussian<br />
defense was improvised it was highly effective.<br />
Ironically if <strong>the</strong> French had delayed a bit<br />
longer <strong>the</strong> Prussians would have been out <strong>of</strong><br />
<strong>the</strong> position entirely, marching for <strong>Waterloo</strong>.<br />
Indeed, one brigade had already marched <strong>of</strong>f,<br />
but had been replaced by a wayward brigade<br />
<strong>of</strong> I Corps which took up position in Limale.<br />
Meanwhile, Blucher, by this time closer to<br />
<strong>Waterloo</strong> than to <strong>the</strong> action at Wavre, had a<br />
difficult time convincing his <strong>of</strong>ficers to<br />
continue to march to support Wellington.<br />
Fortunately for <strong>the</strong> Allies, he was successful.<br />
Unlike Grouchy, Blucher recognized what his<br />
primary mission was and did not permit<br />
secondary considerations to influence his<br />
judgement. Defeating <strong>Napoleon</strong> was far more<br />
important than <strong>the</strong> fate <strong>of</strong> one corps at Wavre.<br />
hi le Blucher was making this decision, <strong>the</strong><br />
situation along <strong>the</strong> Dyle grew heated and<br />
bloody. In a short time I and II Cavalry Corps<br />
and III Corps were hotly engaged and IV Corps<br />
vas moving up rapidly, though because <strong>of</strong> a<br />
confusion in orders it was turning up at Wavre<br />
ra<strong>the</strong>r than Limale. <strong>At</strong> 1700 Grouchy finally<br />
received orders from <strong>Napoleon</strong> to assist <strong>the</strong><br />
main body at <strong>Waterloo</strong>. Ordering III Corps and<br />
II Caval ry Corps to keep up <strong>the</strong> pressu re at<br />
Vavre, Grouchy assembled IV Corps and<br />
marched for Limale, but not before wasting<br />
more time by making one final attempt to take<br />
Vavre.<br />
t Limale I Cavalry Corps, supported by a<br />
cavalry division from IV Corps, had just<br />
9JCeeded in siezing <strong>the</strong> village at <strong>the</strong> charge<br />
'<strong>the</strong>n Grouchy arrived with <strong>the</strong> balance <strong>of</strong> IV<br />
Corps. The Prussians made a serious effort to<br />
ratake <strong>the</strong> place but were repu lsed by IV Corps<br />
<strong>Napoleon</strong><br />
at <strong>Waterloo</strong>:<br />
Some Variant Scenarios<br />
or Marshal Grouchy to <strong>the</strong> Rescue?<br />
If Grouchy had performed more competently<br />
at <strong>Waterloo</strong> he might have gone<br />
down as one <strong>of</strong> history's greatest "clutch<br />
players." This module enables players to<br />
modify <strong>SPI's</strong> <strong>Napoleon</strong> at <strong>Waterloo</strong> to<br />
include a burst <strong>of</strong> genius on Grouchy's part.<br />
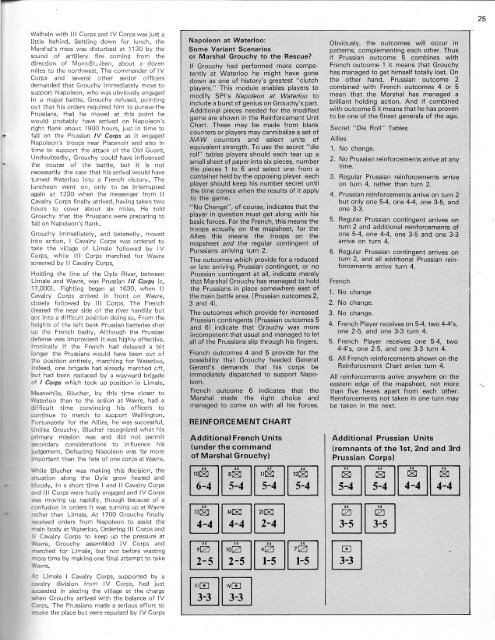
Additional pieces needed for <strong>the</strong> modified<br />
game are shown in <strong>the</strong> Reinforcement Unit<br />
Chart. These may be made from blank<br />
counters or 'players may cannibalize a set <strong>of</strong><br />
NA W counters and select units <strong>of</strong><br />
equivalent strength. To use <strong>the</strong> secret "die<br />
roll" tables players should each tear up a<br />
small sheet <strong>of</strong> paper into six pieces, number<br />
<strong>the</strong> pieces 1 to 6 and select one from a<br />
container held by <strong>the</strong> opposing player. each<br />
player should keep his number secret until<br />
<strong>the</strong> time comes when <strong>the</strong> results <strong>of</strong> it apply<br />
to <strong>the</strong> game.<br />
"No Change", <strong>of</strong> course, indicates that <strong>the</strong><br />
player in question must get along with his<br />
basic forces. For <strong>the</strong> French, this means <strong>the</strong><br />
troops actually on <strong>the</strong> mapsheet, for <strong>the</strong><br />
Allies this means <strong>the</strong> troops pn <strong>the</strong><br />
mapsheet and <strong>the</strong> regular contingent <strong>of</strong><br />
Purssians arriving turn 2.<br />
The outcomes which provide for a reduced<br />
or late arriving Prussian contingent, or no<br />
Prussian contingent at all, indicate merely<br />
that Marshal Grouchy has managed to hold<br />
<strong>the</strong> Prussians in place somewhere east <strong>of</strong><br />
<strong>the</strong> main battle area. [Prussian outcomes 2,<br />
3 and 4].<br />
The outcomes which provide for increased<br />
Prussian contingents [Prussian outcomes 5<br />
and 6] indicate that Grouchy was more<br />
incompetent that usual and managed to let<br />
all <strong>of</strong> <strong>the</strong> Prussians slip through his fingers.<br />
French outcomes 4 and 5 provide for <strong>the</strong><br />
possibility that Grouchy heeded General<br />
Gerard's demands that his corps be<br />
immediately dispatched to support <strong>Napoleon</strong>.<br />
French outcome 6 indicates that <strong>the</strong><br />
Marshal made <strong>the</strong> right choice and<br />
managed to come on with all his forces.<br />
REINFOP4CEMENT<br />
CHART<br />
Additional French Units<br />
(under <strong>the</strong> command<br />
<strong>of</strong> Marshal Grouchy)<br />
~.<br />
10[8;J<br />
[;J'<br />
B[8;J 11[8;J 12[8;J<br />
6-4 5-4 ffiJ' 5-4 ~' 5-4<br />
~.~~<br />
~~~<br />
~~r:cn~<br />
~~~~<br />
~~<br />
l2:U~<br />
Obviously, <strong>the</strong> outcomes will occur in<br />
patterns, complementing each o<strong>the</strong>r. Thus<br />
if Prussian outcome 5 combines with<br />
French outcome 1 it means that Grouchy<br />
has managed to get himself totally lost. On<br />
<strong>the</strong> o<strong>the</strong>r hand, Prussian outcome 2<br />
combined with French outcomes 4 or 5<br />
mean that <strong>the</strong> Marshal has managed a<br />
brilliant holding action. And if combined<br />
with outcome 6 it means that he has proven<br />
to be one <strong>of</strong> <strong>the</strong> finest generals <strong>of</strong> <strong>the</strong> age.<br />
'4.<br />
Secret "Die Roll" Tables<br />
Allies<br />
1. No change.<br />
2. No Prussian reinforcements arrive at any<br />
time.<br />
3. Regular Prussian reinforcements arrive<br />
on turn 4, ra<strong>the</strong>r than turn 2.<br />
4. Prussian reinforcements arrive on turn 2<br />
but only one 5-4, one 4-4, one 3-5, and<br />
one 3-3.<br />
5. Regular Prussian contingent arrives on<br />
turn 2 and additional reinforcements <strong>of</strong><br />
one 5-4, one 4-4, one 3-5 and one 3-3<br />
arrive on turn 4.<br />
6. Regular Prussian contingent arrives on<br />
turn 2, and all additional Prussian reinforcements<br />
arrive turn 4.<br />
French<br />
1. No change<br />
2. No change.<br />
3. No change.<br />
French Player receives on 5-4, two 4-4's,<br />
one 2-5, and one 3-3 turn 4.<br />
5. French Player receives one 5-4, two<br />
4-4's, one 2-5, and one 3-3 turn 4.<br />
6. All French reinforcements shown on <strong>the</strong><br />
Reinforcement Chart arrive 'turn 4.<br />
All reinforcements arrive anywhere on <strong>the</strong><br />
eastern edge <strong>of</strong> <strong>the</strong> mapsheet, not more<br />
than five hexes apart from each 'o<strong>the</strong>r,<br />
Reinforcements not taken in one turn may<br />
be taken in <strong>the</strong> next.<br />
Additional<br />
Prussian Units<br />
(remnants <strong>of</strong> <strong>the</strong> 1st, 2nd and 3rd<br />
Prussian Corps)<br />
mm~m<br />
~~~~<br />
I~II~51<br />
~<br />
~