DOCTRINE FOR DESERT FOX - RussGifford.net
DOCTRINE FOR DESERT FOX - RussGifford.net
DOCTRINE FOR DESERT FOX - RussGifford.net

You also want an ePaper? Increase the reach of your titles
YUMPU automatically turns print PDFs into web optimized ePapers that Google loves.
4<br />
OPERATIONAL ANALYSIS<br />
<strong>DOCTRINE</strong> <strong>FOR</strong> <strong>DESERT</strong> <strong>FOX</strong><br />
Maxims and Measures for Successful Operations<br />
by J Matisse Enzer<br />
Desert Fox covers one of those perennial game<br />
subjects that are virtual ly cliches in the minds of<br />
most gamers. The romantic image of tanks and armored<br />
cars making cavalry -like charges through<br />
the desert dust; everyone in jaunty hats and desert<br />
tans; the chivalric behavior of the British and the<br />
Germans. Of course. it was only a very little bit like<br />
that at all. Mostly it was a terrible time in a hostile<br />
environment. Perhaps the most appealing thing<br />
about the subject from a game designer's point of<br />
view is th at the whole thing is so self-contained<br />
and manageable even at a campaign level. Hence,<br />
Desert Fox.<br />
- Redmond<br />
The Desert Fox is an operational-level<br />
simulation of the campaign in Libya and<br />
Egypt from March 1941 through the end of<br />
1942. The term "operational" is very accurate<br />
in this case as a well-played game<br />
usually takes the form of a series of distinct<br />
"operations," with the more thorough and<br />
precise player being the winner. JUSt as<br />
thoroughness and precision are requisites for<br />
success in The Desert Fox, lack of these same<br />
qualities is an assurance of defeat.<br />
A Game-Turn in The Desert "Fox<br />
represents one month of real time. Counters<br />
range in size from battalions to divisions, the<br />
most common units being brigades and<br />
regiments. Zones of Control are active and<br />
semi-rigid for most units, though battalionsize,<br />
artillery, and non-combat units lack<br />
ZOC's. Unit characteristics include combat<br />
strength, movement allowance, morale<br />
rating, armor rating, and stacking point<br />
value.<br />
A Player-Turn consists of Reinforcement,<br />
Air Allocation, Initial Movement,<br />
First Enemy Reaction, First Combat,<br />
Motorized Movement, Second Enemy Reaction,<br />
Second Combat, and Refit Phases.<br />
Each player has two opportunities to move<br />
(once with mechanized units only) and to<br />
react to enemy movement. Supply logisitics<br />
are tr.eated semi-abstractly; supply may be<br />
drawn through either supply dumps or<br />
through mobile supply units (MSU's), which<br />
represent convoys of trucks.<br />
The players have two main resources<br />
which they must learn to manipulate with<br />
care: combat units and supply lines. Victory<br />
or defeat will often be determined by the<br />
degree to which a player succeeds in integrating<br />
his supply units into supply grids.<br />
Techniques of integration can be broken<br />
down into the following five maxims:<br />
1. Plan everything to the last detail, then<br />
plan again.<br />
2. Do not attack unless confident of a<br />
smashing victory.<br />
3. The best defense is ... a good defense.<br />
4. Massage your supply grid.<br />
5. Territory is more important<br />
than casualties.<br />
Planning<br />
Planning is of the utmost importance in<br />
The Desert Fox from the Commonwealth<br />
player's placement of his units before the<br />
first turn, right up to the last moves of the<br />
game. The player who calculates movement<br />
points, traces supply lines, considers probabilities,<br />
and so on, will defeat a more tactically<br />
skillful but less methodical opponent<br />
every time.<br />
The key to the game is learning to plan<br />
"operations" - discreet detailed plans of action<br />
for 2 to 4 Game-Turns with definite<br />
goals, territorial and otherwise.<br />
The following sequence should be considered<br />
in planning an operation: (1) Determine<br />
long range goals; (2) Evaluate the<br />
resou rces available, and decide what percentage<br />
of these can be expended on the operation<br />
without detrimental effects; (3) Determine<br />
the opposition's goals and resources;<br />
(4) Use this information to set up a selfcontained<br />
project that brings you closer to<br />
your long-range goals.<br />
For example, a reasonable operation for<br />
the Axis player to plan for Game-Turns I<br />
through 3 is t.he capture and control of the<br />
coastal road from EI Agheila through<br />
Tobruk, allowing that city's capture, bypass,<br />
or encirclement. Planning this operation involves<br />
breaking it down into moves for each<br />
of the three Game-Turns. Counting movement<br />
points will show that the lead units<br />
must travel at full speed across the desert or<br />
along the coastal road. Fast.er units using the<br />
coastal road will be able to deal with Commomvealth<br />
units between Benghazi and<br />
Gazala. Since units tied up with the Commonwealth<br />
forces in L0705 and L0704 past<br />
Game-Turn 1 will not be available for an<br />
assault on Tobruk by Game-Turn 3, the first<br />
step of the operation is the elimination of<br />
these units by the end of the first Combat<br />
Phase of Game-Turn 2.<br />
The next point at which resistance can<br />
be predicted to be encountered is along the<br />
road near Benghazi. Contingency plans must<br />
be developed, if the coastal road is blocked.<br />
The only way to cut off the Jebel Achdar<br />
may be to send units across the deserr<br />
towards Mechili.<br />
Making s"re that all units are in supply<br />
on their way to an assault will take up a good<br />
part of the planning of the operation. Supply<br />
units move more slowly than most combat<br />
units, but, at least in the particular operation<br />
in question, one can plan on capturing Commonwealth<br />
dumps with fast reconnaissance<br />
units. Care must be taken, however; Commonwealth<br />
troops have been known to sally<br />
forth from the Tobruk area and cut Axis supply<br />
lines as early as Game-Turn 2.<br />
It is very important to plan the allocation<br />
of supply assets (dumps and MSU's) as<br />
far in advance as possible, especially during<br />
offensive operations where poor planning<br />
can cost the chance of advancing. Before<br />
moving units, know where they ,viII draw<br />
supply from at the beginning of the next<br />
friendly Movement Phase.<br />
Little elements have to be taken into account,<br />
too. Make sure pure armor units will<br />
be matched with infantry or mech units so<br />
that combined arms effects ~I on '[ sap your<br />
strength. Also, always check for annoying<br />
possibilities that an opponent can take advantage<br />
of. (For example, can any of t.he<br />
other guy's recce units make a suicide dash<br />
on your primary supply line? Very embarrassing.)<br />
Above all, make sure you have sufficient<br />
supply for an attack before announcing<br />
it.<br />
A Smashing Victory<br />
An attack should only be conducted as<br />
part of a well coordinated operation, with<br />
some ultimate territorial or positional goal in<br />
mind. Given these criteria, no more than a<br />
few attacks per turn will usually be necessary.<br />
Once you have decided that an attack is<br />
necessary, pile everything you can into it.<br />
The CRT is structured in such a way that to<br />
do more than disrupt the enemy you have to<br />
attack with a lot of artillery, or wit h heavy<br />
odds in your favor.<br />
For example, an assault on Tobruk in<br />
the first fev, .. turns is generally a worthwhile<br />
objective. Most playings of The Desert Fox<br />
will find Tobruk garrisoned with 6 to 8 Combat<br />
Strength Points and 1 or 2 artillery units<br />
by the time the Axis has a supplied unit at the<br />
gates, however. This means that even with 30<br />
to 40 Combat Strength Points and 2 or 3 artillery<br />
units, the Axis will have-only a 50070<br />
chance of taking the bloody place. [f the attack<br />
fails and the Commonwealth player is<br />
competent, the Axis player might well lose<br />
his offensive capacity for the early part of the<br />
game. An assault should not be staged unless<br />
one is confident of success, and the consequences<br />
of fai lure would be acceptable.
The Best Defense<br />
Continuous defensive lines don't work<br />
in the desert; if a line has one weak point, it<br />
might as well not be there at all. Instead,<br />
large quam.ities of troops should be concentrated<br />
in a series of positions occupying alternate<br />
hexes along a limited front. Each such<br />
position should contain a dump, if possible,<br />
in case worse comes to worst and it is surrounded.<br />
While keeping these defensive positions<br />
betl','een your supply lines and the bad<br />
guys, keep some fast recce units close by (but<br />
not in the thick of things) to exploit openings<br />
resulting from a poorly executed enemy attack<br />
. Enhancing a defensive position with<br />
fortifications is nice, but expensive in terms<br />
of supply expended. Desert combat is so<br />
fluid that by the time a fortification is built,<br />
chances are it won't be needed anymore<br />
anyway. This is not to say that fortifications<br />
should never be used; their use and positioning<br />
does have to be planned out well in advance<br />
of the moment they will be needed,<br />
however.<br />
Even better than defensive positions are<br />
ret rograde operations (i.e., retreating).<br />
Retreats should be used when the friendly<br />
units in question occupy poor defensive [errain;<br />
it is not worth fighting over t.errilOry<br />
you can capture later. Of course, if your opponent's<br />
attack seems weak or poorly coordinated,<br />
it may very well be worthwhile [0 let<br />
him bash his head on your brick wall.<br />
Retreating can also be used as a ploy to get<br />
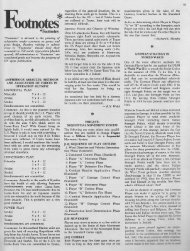
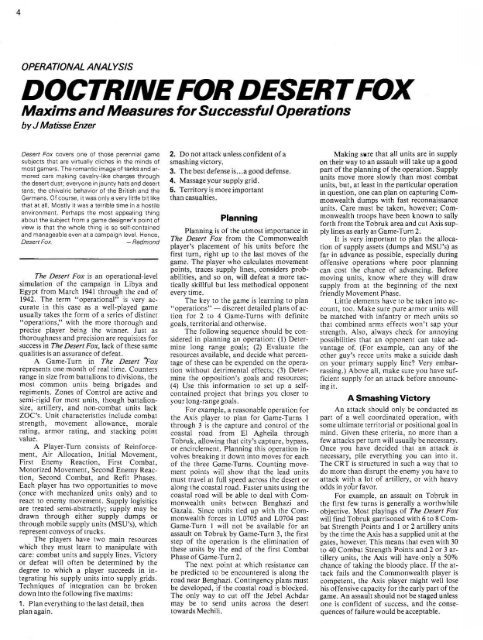
A feature of The Desert Fox which provides the defend<br />
ing player with unique versatility is reaction<br />
movement. Using Ihi. rule. the defending player can<br />
rein force hexes under anack, and adjust defensive poyour<br />
opponent to overextend himself. Most<br />
players just can't resist filling up empty<br />
spaces with their units, even if it means leaving<br />
a tenuous supply line or a vulnerable<br />
vanguard,<br />
For the Commonwealth player, the problem<br />
of defense lessens as the game progresses.<br />
The constant replacement of units<br />
and supplies available to the Commonwealth<br />
player makes losses less painful. Indeed, at<br />
times the Commonwealth player will enjoy<br />
such a numerical superiority over the Axis<br />
thal he will be able to set up a string of positions<br />
stretching 200 kilometers or more. This<br />
is not to say that such lines are in any way<br />
more efficient than a small series of defensive<br />
hard points, but they are conceivable if [he<br />
Commonwealth player is setting up for a<br />
flanking operation, or if he enjoys a<br />
favorable territorial situation.<br />
Assuming that Tobruk does not fall early<br />
in the game, the Axis will probably have to<br />
garrison the road bypassing the fortress for<br />
much of the game to keep lines of supply<br />
open. The Italian infantry divisions are ideal<br />
for this task; they are too ponderous to be used<br />
effectively in offensive operations (and<br />
are gluttonous consumers of combat supply),<br />
but are sufficiently large to cover any but the<br />
most determined sortie. Italian infantry can<br />
also be used to cOver other rear areas, or to<br />
cover the notorious southern flank in situations<br />
where combat ability is not vital, but a<br />
rigid zone of control is.<br />
Supply Grids<br />
A good supply grid cannot be created<br />
unless the player setting it up has a pretty<br />
good idea of where his units will be a turn or<br />
so ahead of their being there. If this information<br />
is uncertain or unascertainable, it will be<br />
necessary to keep some supply units in MSU<br />
form, but in general MSU's should be used as<br />
little as possible. Since an MSU is not an end<br />
supply source, keeping supply units in MSU<br />
form in effect is a waste oC supply capacity.<br />
Usually about a third of a player's supply<br />
units will be MSU's, but this should be increased<br />
to about a half or more in highly<br />
fluid situations.<br />
Supply lines must be protected at all<br />
times from enemy action. Only rarely will the<br />
loss of a supply chain not seriously affect a<br />
player's situation, and both players will<br />
always find it well worthwhile to sacrifice a<br />
recce unit to cut a supply line . The Axis<br />
player will have the quickest advances, and<br />
thus the longest supply lines for most of the<br />
game, and so his task to defend them will be<br />
the hardest. El Agheiia should be used as· a<br />
supply terminus only for units wit hin 20 or 30<br />
movement points. Dumps will have to be used<br />
to supply units occupying positions further<br />
forward .<br />
The perfect supply grid does not exist,<br />
but if the technique of operational planning<br />
is mastered, it will be a lot easier to create<br />
supply grids tuned to support a variety of<br />
operations.<br />
5<br />
Figure 1: Reaction Movement<br />
sitions afler the anacking player has commiled his<br />
forces. Effecti\'ely, Ihis rule ac of<br />
reserve.; a player can hold his mobile (armOr) forces<br />
hack umil banlc is joined and crilical areas are de·<br />
termined.<br />
Figure t shows an example of effeclive ulilizacion or<br />
defensive rea cl ion movement. The Cornmonwcalth<br />
player has deployed a defensive lin e jusl strong<br />
enough 10 prevent overruns. and has kept 7Sptn<br />
Mech, 417(2) Arrnd. and 7!i(2) Arm" in reserve, in<br />
pos it io ns from whic h Ihey can reael 10 aid any pan of<br />
Ihe tine which is Ihrealened .
6<br />
The exact placement of MSU's and<br />
dumps does, of course, depend on the<br />
specific situation. However, some concepts<br />
are worth keeping in mind: (I) The closer a<br />
dump is to the units supplied by iI, Ihe better;<br />
(2) Supply lincs thaI run north-south are belter<br />
than ones that run east-west (this is<br />
because a north-south line has a smaller<br />
southern flank than an east-.... ·eSI line, and is<br />
thus easier to protect from a nanking<br />
maneuver); (3) Always, always check that<br />
your supply grid is Out of range of all enemy<br />
units, regardless of whether or not such<br />
enemy units would die after cutting your supply<br />
lines; (4) If you find you must have a<br />
vulnerable spot somewhere, keep dumps<br />
stacked with your forward positions, so that<br />
they will still be in supply if cut off.<br />
Territory<br />
It is an inhumane but correct observation<br />
that territory is worth more than<br />
casualties in The Desert Fox. The vic!.Orv<br />
conditions speak only of territory, not<br />
bodies. The only exception to this is a Commonwealth<br />
failure to withdraw unils on<br />
schedule, which is viorth a small town for<br />
each unit not withdrawn. Units are only<br />
valuable in The Desert Fox as vehicles for<br />
capturing and holding tcrritory. This is not to<br />
say thaI they should be thrown away<br />
recklessly, but only that one should not be<br />
overly concerned with losing them if a valid<br />
objective can be accomplished by their<br />
sacrifice.<br />
Optional Rules<br />
The following three Sections are additional<br />
rules for The Desert Fox. They may be<br />
used individually, or together. The first Section<br />
was designed by Eric Sven Ristad, Ihc<br />
second by J Matisse Enzer, and t he third by<br />
Richard Berg. ' -<br />
[16.0] Operation Herkules<br />
COMMENTARY:<br />
The effects of logi,[ics was of paramount importance<br />
in the North African campaign, and [he<br />
island of Malta was crucial to the war of supply.<br />
The island dom inated [he Axis supply and communica[ions<br />
line.l, ot'lentimes to deadly effeci.<br />
A plan was proposed for the invasion of Malta as<br />
early as April, 1941. Although the plan was accepted<br />
as feasible and considered at several poillls<br />
during the war. it was never implemented. The<br />
plan for thc in vasion was code-named Operation<br />
Herkules. and was scheduled for mid-1942. Airborne<br />
and amphibiollS forces consi>ling of Ihe<br />
Italian "marine.I," the folgorc Glider Infantry<br />
Division, and the German Ramcke Heavy Airborne<br />
Infantry Division were to assault the island,<br />
supported by elements of the Italian Navy. Amphibious<br />
landing. craft were prepared in Ita)y, and<br />
in March of 1942 Kesselri'ng's Sicilian Luftwaffe<br />
intensified its bombing raids on Malta. deslroying.<br />
planes on the ground, and prevellling sllpply ,hip,s<br />
from reaching the island. In April alone. nearly<br />
7.000 tons of bombs were dropped.<br />
Chllrchill realized [hat Malta was in deep trouble.<br />
and ordered a major offensive in North Africa 10<br />
seize lhe airfields in western Cyrenaica and enable<br />
the Deser[ Air Force [0 come within ran~e of<br />
Malta and provide lhe island with air suppon.<br />
Reluctant and ill-prepared, Auchinleck, Ihe<br />
British commander in the desert, promised a June<br />
offensive. At the same time, Rommel decided to<br />
throw the British out of eastern Cyrenaica. The<br />
Gazala campaign ensued.<br />
After Gazala, when the British army seemed to<br />
have been completely demolished and lhe way to<br />
the Nile dclla open, Rommel decided 10 use the<br />
forces slotted for Herkules (the Sicilian Luftwaffe<br />
in particular) in his drive o n Egypt. The Malta invasion<br />
was .>
7<br />
[17.16] Whenever a detachment is formed from a<br />
unit, the owning player immediately rolls a die: on<br />
a 101' 2, the unit is immediately depleted; on a 3, 4,<br />
5, Or 6, the unit suffers no disability.<br />
[17.2] PROPERTIES OF DETACHMENTS<br />
In order 10 usc detachments, it will be necessary 10<br />
make the following counters:<br />
Axis<br />
Detach<br />
14<br />
x2'<br />
CW<br />
Detach<br />
14<br />
x2<br />
[17.21] Deta