Streets of Stalingrad
Streets of Stalingrad
Streets of Stalingrad

Create successful ePaper yourself
Turn your PDF publications into a flip-book with our unique Google optimized e-Paper software.
OPERA TIONAL ANAL YSIS<br />
Ie<br />
-ngra<br />
The Struggle for the City<br />
by Jerrold Thomas<br />
r<br />
I remember when we made the decision to publish<br />
John Hill's 8acr/e for S(a/ingrad. Much <strong>of</strong> the <strong>of</strong>fice<br />
chat centered around the salability 01 John's<br />
name las an author/ designer}. To test this, we<br />
featured his name prominently on the package. As<br />
a control, another game (Kursk, by Eric Goldberg)<br />
was handled in the same way Ito see if "unknown"<br />
Eric had as much pulling power as "star" Johnl.<br />
Both games sold well. Actually, the unsung hero<br />
<strong>of</strong> Sta/ingrad (the game) is John Butterfiel d, who<br />
did a masterful job <strong>of</strong> development. .. and design,<br />
to bring the game to fruition. - Redmond<br />
SPI's latest "<strong>Stalingrad</strong>" game was<br />
bound to provoke comment when it was released,<br />
It is by John Hill, the most respected<br />
independent designer around; its historical<br />
research was augmented by David Parham,<br />
the acknowledged researcher on the subject;<br />
and its release was nearly simultaneous with<br />
that <strong>of</strong> <strong>Streets</strong> oj <strong>Stalingrad</strong>, the long<br />
awaited "Kesselslacht" project's result.<br />
This article does not compare the two<br />
games, as they are hopelessly different. Suffice<br />
to say that the similarities are restricted<br />
to the area involved, the simplicity and basic<br />
bloodiness <strong>of</strong> the CRT's, and the huge losses<br />
mandated 10 fall primarily on the "landsers"<br />
<strong>of</strong> both armies.<br />
I do want to give a few points <strong>of</strong> play<br />
and basic strategic consideration, however. I<br />
have found that the system is different<br />
enough that games can easily be grossly affected<br />
by one player's misunderstanding <strong>of</strong><br />
what exactly is happening and what will happen<br />
next.<br />
It is <strong>of</strong>ten hard for players 10 appreciate<br />
the differences in the armies. Good tactics<br />
for one are usually bad tactics for the other;<br />
the differences are so pervasive that players<br />
are apt to forget and respond in kind when<br />
the opponent does something -<br />
a mistake!<br />
it is usually<br />
SITUATION AND SET-UP<br />
Differences begin right with the set-up.<br />
The German player can be "fast and loose"<br />
with his set-up, while the Russian has to place<br />
every unit with care. To discuss the Russian<br />
set-up, we will look at each deployment zone<br />
in turn,<br />
Southern Zone. Here the Russian<br />
forces have some good terrain and some<br />
good units; unfortunately, there is not<br />
enough <strong>of</strong> either 10 stop the Germans from<br />
isolating the whole southern zone, or taking<br />
all the VP hexes there. The Germans simply<br />
have lOO much equipment in the area; and<br />
because they are under time pressure (knowing<br />
that they must lose the 29 Motorized<br />
Division on Turn 3), a major effort is usually<br />
mounted here.
Strategies here wiH differ, but a viable<br />
one is to defend as heavily as possible in the<br />
fortified zones, including the river bank and<br />
the great gully. Place those Guards 2-8's out<br />
in the open, where their Zones <strong>of</strong> Control<br />
will do some good; someone will have to die<br />
out there in any case. You want to defend the<br />
front with the required minimums. You<br />
should never, on the southern sector, put a<br />
unit anywhere but in a fort or heavy structure<br />
unless it is mandatory.<br />
Central Zone. This is where the game<br />
can be won or lost . The great bulk <strong>of</strong> the Russian<br />
unrestricted deployment units are in this<br />
sector, as are all <strong>of</strong> the landing hexes.<br />
There are two main strategies which the<br />
Russians can take. The first involves a maximum<br />
effort to defend Mamayev Kurgan. It<br />
is not possible to keep the German player<br />
from taking the hill on Turn 1. (This is a maxim<br />
<strong>of</strong> the Russian deployment; the German<br />
player can always take anyone hex. The key<br />
is to cause losses and tie up German units to<br />
the greatest extent possible.) The strategy<br />
aims to make this a costly assault, which will<br />
soak up much <strong>of</strong> the German air and most <strong>of</strong><br />
the German central ground forces. Normally<br />
this involves three 4-strength units, or three<br />
3-strength units, on the hill itself, and small<br />
units in all the hexes around it. The woods<br />
are occupied with units (<strong>of</strong> whatever type)<br />
that have Zones <strong>of</strong> Control. The woods units<br />
and those around the hill will draw air or<br />
ground units to clear them for the final<br />
assault; three good units in a fortified hex<br />
will require a large assault force, and well<br />
deployed artillery will cause heavy losses.<br />
The drawback to this approach is that<br />
once the hill does fall, the Russians are <strong>of</strong>ten<br />
hard pressed to defend the city behind it.<br />
<strong>Stalingrad</strong> is cut in two (or three) by the Germans<br />
on Turn 1 or 2. This is a serious<br />
development which can allow the Germans<br />
to pick <strong>of</strong> VP hexes at their leisure.<br />
The other approach to the Mamayev<br />
Kurgan situation is to defend only the hill<br />
itself. Usually three 3-8's are on the hill, but<br />
the units are not placed around it, but rather<br />
in the heavy structure and fortified hexes<br />
behind it. The special structure hexes present<br />
a dilemma, especially in the set-up. Usually,<br />
you might put militia here, figuring that it<br />
would not be a good enough target to draw<br />
German air. You will hope to reinforce during<br />
a Reaction Phase, and then hope for the<br />
oil tanks to go up.<br />
It will always be touch and go in the central<br />
ferry area, but an aggressive defense in<br />
the south may buy you time and, more importantly,<br />
may occupy the German forces<br />
there until Turn 3.<br />
The Russian player must give thought to<br />
channeling the German attacks. The key<br />
thing is to keep at least two <strong>of</strong> the ferry hexes<br />
linked. This will give you strategic flexibility;<br />
you can give one up temporarily without immediate<br />
isolation. If you have only one ferry<br />
hex in an enclave, you are forced to overdefend<br />
it, possibly resulting in the loss <strong>of</strong> other<br />
VP hexes which might have been held .<br />
The heart <strong>of</strong> the Russian position is the<br />
northern factory area, which covers the<br />
northern ferry, provides armor replacements,<br />
and includes VP's which the German<br />
player must have to win. This area is favored<br />
by a dearth <strong>of</strong> German units on Turn 1.<br />
However, the Russian units defending the<br />
north zone are all vulnerable to German airpower,<br />
so an aggressive defense based on the<br />
heavy structures south <strong>of</strong> Rynok is necessary<br />
to prevent exploitation on Turn I, and the<br />
area should be greatly reinforced by the end<br />
<strong>of</strong> Turn 2. The early level <strong>of</strong> fighting here will<br />
be determined by the German approach for<br />
Turn 2; that is, where the German player<br />
commits the bulk <strong>of</strong> his Turn 2 replacements<br />
and new units.<br />
One <strong>of</strong> the most important considerations<br />
for the Russian player is the placement<br />
<strong>of</strong> the vital artillery units. Despite their high<br />
DF strengths, I do not recommend placing<br />
them in VP hexes. This allows the German<br />
player to get double duty from his dive<br />
bombers: clearing VP hexes and killing artillery<br />
at the same time. Non-VP fortified<br />
hexes are good placements, particularly<br />
Volga River Bank hexes. The fortification<br />
provides protection from level bombers, and<br />
dive bombers will not be clearing hexes that<br />
will have to be reoccupied.<br />
Don't stack artillery! It makes too<br />
tempting a target for any attack, and increased<br />
coordination is an illusion. This is due to<br />
the peculiarities <strong>of</strong> the CRT. An attack which<br />
has a good chance to eliminate one unit wi ll<br />
also have a significant chance to eliminate<br />
two. My own recommendation is to place<br />
them in adjacent hexes, making sure that all<br />
<strong>of</strong> these are fortified or heavy structure<br />
hexes. Often a diamond pattern is a good<br />
one, as the loss <strong>of</strong> anyone artillery unit will<br />
not destroy the unity <strong>of</strong> the group for fire<br />
purposes.<br />
It is not a good idea to stack overmuch<br />
in the initial set-up. There is so much German<br />
airpower on Turn 1 that even fortified hexes<br />
are possible targets, and heavy structures are<br />
completely vulnerable. Usually I would stack<br />
only in fortified zones; here at least the cost<br />
will be high. The same CRT peculiarity noted<br />
previously is what makes stacking unwise. A<br />
common German approach will be to blow<br />
(literally) a path through the Russian lines;<br />
you want to make that path include more<br />
hexes and fewer units, reducing the efficiency<br />
<strong>of</strong> the bombardment.<br />
A further factor mitigating against<br />
stacking in non-crucial hexes is the reaction<br />
sequence. On Turn I, the Russians need their<br />
reinforcements more than ever, due primarily<br />
to their poor enforced set-up, the heavy<br />
airpower losses they will suffer, and the<br />
freshness <strong>of</strong> the German forces. Therefore,<br />
the Russian wants to provoke as many attacks<br />
as possible, which requires units in as<br />
many hexes as possible. Once the lines are<br />
somewhat stabilized, stacking becomes more<br />
attractive.<br />
Northern Zone. This zone is the worst<br />
situation on the map. There is no way to prevent<br />
the isolation <strong>of</strong> the Orlovka salient if the<br />
German player chooses to press there;<br />
therefore, put garbage units out there, but<br />
units with ZOC's. That will at least add to the<br />
German movement difficulties as he wipes<br />
the units out. Again, don't stack; that lets the<br />
German use units efficiently, and it will not<br />
help your kill ratio. Disperse so that each attack<br />
will use up German units which might<br />
better be street figh ting.<br />
Even the units in the Rynok-Spartanovka<br />
area are in bad shape. The Russian<br />
player should get as many <strong>of</strong> these units back<br />
into the heavy structures in the central zone<br />
as possible; light structures simply do not<br />
provide enough defensive help. Remember<br />
that units can only be moved across the gully<br />
by Reaction Phase movement; don't wait<br />
thinking you can do it with Russian Strategic<br />
Withdrawal - you'll be sorry! If artillery<br />
here has survived the initial bombing, the<br />
Russian might consider moving it back even<br />
if that means giving up its use on Turn 1; the<br />
option may be gone by Turn 2.<br />
THE GERMANS<br />
The Germans do not need to be concerned<br />
with specific zones; they need to plan<br />
ahead and deploy accordingly. Before the<br />
first bomb falls, the Germans should have<br />
mapped out a basic first turn strategy. The<br />
Germans cannot attack everything, but they<br />
can make several major thrusts; and they do<br />
not have too many worries about counterattacks<br />
on this turn, as the Russians will be<br />
busy repairing their lines as a first step.<br />
The key to any German strategy will be<br />
the central units: 295 and 71 Infantry Divisions,<br />
and possibly 24 Panzer. The direction<br />
which these units take will make the difference.<br />
If the 295 Division moves north, then<br />
this will relieve 60 Mot <strong>of</strong> responsibilities for<br />
Orlovka, allowing it to combine with 16<br />
Panzer in a strong attack on the northern<br />
factories. If 295 stays south, it provides for a<br />
strong thrust into the city center, aimed at<br />
Mamaeyev Kurgan and the Central Ferry<br />
hex. Should 24 Panzer be shifted north <strong>of</strong> the<br />
gully, then the central drive becomes the<br />
main event, and it has options to turn north<br />
or south once the Volga is reached.<br />
In the south, 29 Mot should be able to<br />
compromise most <strong>of</strong> the area, either by<br />
assaulting the VP hexes or by isolating the<br />
whole group from the southern ferry. You<br />
must take care to plan for clearing all <strong>of</strong> the<br />
VP hexes here by Turn 2; once the 29 Mot is<br />
withdrawn, the <strong>of</strong>fensive here will come to a<br />
screeching halt.<br />
Aside from the planning, the set-up is<br />
not crucial for the Germans. They want to be<br />
as far forward as possible, especially the artillery.<br />
Artillery should be sited so it can<br />
bombard or advance to support. Preferentially,<br />
it will be in other than clear terrain;<br />
while the Russian air presence is minimal, it is<br />
foolish to throw the guns away carelessly.<br />
Guarding the key artillery - the 170 guns,<br />
the 210 howitzers, and the 100 guns - is a<br />
job that can be assigned to the one flak<br />
available Turn 1.<br />
The plan will dictate such things as<br />
which side <strong>of</strong> the gully to place the 24 Panzer<br />
on, or where in the areas to deploy the 295<br />
and 71 Infantry, etc. The one thing to<br />
5
6<br />
remember is to keep some stacks together<br />
where overruns are available. The German<br />
. SPA is most excellent for this, as it has a<br />
strength <strong>of</strong> 8 to contribute, and it can overrun<br />
and then deploy for support.<br />
OPERATIONS<br />
General Statements on Unit<br />
Movement and .Employment<br />
German Operations. The general<br />
course <strong>of</strong> German operations will vary greatly<br />
from turn to turn. On Turn 1, the German<br />
player can be much more "fast and loose"<br />
with his movements. The opportunity for<br />
Russian <strong>of</strong>fensive activity is small, due to the<br />
German strength and the Russian player's<br />
pressing need to move units into less exposed<br />
defensive positions. This turn will usually<br />
end with most Russian units moved, so<br />
things like "lines" are not crucial for the Germans.<br />
The later turns can be a different<br />
story. The German player must seek to force<br />
the commitment <strong>of</strong> the Russian arriving reinforcements.<br />
If he does not do so, the Russian<br />
player can accumulate them and bring them<br />
all on at a time when the German artillery is<br />
exhausted; the Germans will be hard pressed<br />
to hold if this occurs.<br />
Usually, Turn 3 is key in this regard: the<br />
removal <strong>of</strong> 17 units heavily impacts on the<br />
German attack; the Russian has many quality<br />
reinforcements; the German player must<br />
be careful to hoard his artillery, especially the<br />
longer-ranged guns, and to keep them in<br />
secure places. With plenty <strong>of</strong> guns, a Russian<br />
attack can turn into a very expensive proposition<br />
for them.<br />
The German player is <strong>of</strong>ten faced with<br />
conflicting objectives. He may have two<br />
hexes he has partially cleared for assaulting,<br />
yet he must do one at a time and risk a reaction,<br />
etc. Here is where one turn advance<br />
planning is crucial - the bulk <strong>of</strong> the "block<br />
clearing" tactics mentioned later in this article<br />
need planning, and the reader is referred<br />
there for ways in which this kind <strong>of</strong> situation<br />
can be resolved.<br />
One thing which the German player<br />
should do, wherever he may plan to assaUlt,<br />
is to occupy areas he has cleared. One small<br />
unit can save a very large attack later. This is<br />
especially true since these situations tend to<br />
occur most at the beginning <strong>of</strong> the turn,<br />
when most <strong>of</strong> the German artillery is<br />
available; thus, even a small unit is relatively<br />
secure from attack.<br />
Another move to make whenever possible<br />
is to cut Russian supply. The loss <strong>of</strong> ability<br />
to conduct instant counterattacks is<br />
almost as valuable to the Germans as is the<br />
halving <strong>of</strong> firepower, since it allows planning<br />
without making allowances for losses in transit.<br />
Care must be exercised, however, to<br />
make sure that the units stay isolated - if<br />
this cannot be guaranteed, make every effort<br />
to wipe out as many as possible while they are<br />
halved, to save German units in the long run.<br />
One <strong>of</strong> the more ticklish points is the<br />
coordination <strong>of</strong> assaults with artillery positioning.<br />
The artillery must be in position<br />
first, and sometimes the assaulting units have<br />
penetrated deep into Russian positions. Care<br />
must be taken to clear the appropriate artillery<br />
sites before the artillery has to be<br />
there; if this is done skillfully, it can<br />
sometimes be a form <strong>of</strong> indirect approach,<br />
suggesting that the German player is developing<br />
an assault in a direction different from<br />
the one in which he intends to make his main<br />
effort.<br />
Sometimes the German player must deal<br />
with opportunity: he has planned an assault<br />
on "A"; units are in position; the assault is<br />
likely to succeed; and then his air and artillery<br />
.bombardment, through some unexpectedly<br />
good rolls, creates a golden opportunity<br />
in another area. The turn <strong>of</strong> the game<br />
is a main determinant in situations like this .<br />
In the earlier turns, the German player can<br />
afford to take an opportunity which promises<br />
excellent geographic gains, though it<br />
may not immediately yield VP hexes. In the<br />
later turns, he must ruthlessly stick to his<br />
plan (unless it is a plan born <strong>of</strong> desperation,<br />
in which case anything else may very well be<br />
preferable.<br />
The same holds true regarding inflicting<br />
losses - these are more important earlier on.<br />
From Turn 5 or so, units become virtually<br />
meaningless; their only value is in the terrain<br />
they occupy, and the only reason to kill them<br />
is to occupy their hexes. If you do not plan to<br />
occupy a unit's hex, you should think long<br />
and hard about spending the effort to kill it.<br />
The Orlovka salient presents an interesting<br />
situation to the German player. One<br />
<strong>of</strong> the most pr<strong>of</strong>itable ways to attack this sector<br />
is to use overruns. However, as with any<br />
overrrun attack, this should not be done<br />
hastily. The salient should be first cut <strong>of</strong>f<br />
from supply, and then the overruns should be<br />
conducted later, when initiating a Russian<br />
Reaction Phase will not upset carefully laid<br />
plans. The unique immobilizing effect <strong>of</strong><br />
lack <strong>of</strong> supply on Russian units makes this<br />
quite a practiCal means <strong>of</strong> proceeding. If the<br />
motorized units are not available, large<br />
stacks <strong>of</strong> infantry Can attack relying on<br />
breakthrough points; here the absence <strong>of</strong> instant<br />
counterattacks by Russian units will<br />
allow the German player to move his stack<br />
adjacent to two or more Russian-occupied<br />
hexes, reducing his need to achieve more than<br />
one breakthrough point. In any case, a point<br />
will come when the number <strong>of</strong> trapped units<br />
becomes too small to justify the number <strong>of</strong><br />
German units needed to destroy them. The<br />
stragglers may than either be ignored, or left<br />
for the artillery and air to finish <strong>of</strong>f.<br />
One <strong>of</strong> the things which the German<br />
player must avoid is winning hexes twice.<br />
Once the Germans occupy a hex, they should<br />
aim to keep it. If they have the artillery handy,<br />
one unit is enough; but if their artillery<br />
will be depleted, then several may be<br />
necessary. The Germans should examine<br />
their last few assaults to see if: (1) they will be<br />
strong enough to hold what they will take; (2)<br />
their attacks will weaken their own hold on<br />
other key hexes, by drawing <strong>of</strong>f ground units<br />
and/or artillery. As noted earlier, these questions<br />
are also involved with the Russian<br />
overall position: how much movement must<br />
the Russian player make to correct existing<br />
deficiencies, and how much will he have<br />
available for counterattacking the German<br />
positions. There will come a time on mOst<br />
turns wnen further attacks will cost more<br />
than they gain.<br />
German operations should always be<br />
pursued with the intent <strong>of</strong> cutting up the Russian<br />
positions. Taking the ferry hexes is<br />
usually not so important as cutting areas <strong>of</strong>f<br />
from Russian reinforcement. This will, if<br />
achieved, permit tremendous gains in<br />
economy <strong>of</strong> force. If the Russian player can<br />
strengthen a position, then the German<br />
player must keep enough units nearby to deal<br />
with a maximum response; if the position is<br />
cut <strong>of</strong>f, the German player can tailor his<br />
forces to the minimum neces·sary - this<br />
becomes increasingly important when the attack<br />
moves deep into the city. There the German<br />
units move slowly indeed, and a whole<br />
turn can be wasted shifting units which represent<br />
useless overkill.<br />
There are few other general maxims.<br />
One is never to move a unit just to move it;<br />
having it available for instant counterattacks<br />
can be very important. Another bit <strong>of</strong> advice<br />
is always get your artillery under cover; this<br />
becomes more and more important as the<br />
Trans-Volga Artillery grows in strength. One<br />
final note is to always plan an attack on a<br />
heavy fortified structure so that you have a<br />
minimum <strong>of</strong> 516 chance to occupy it. The<br />
loss ratio on twice-assaulted hexes is<br />
something not even to be thought about.<br />
RUSSIAN OPERATIONS<br />
The Russian player must generally react,<br />
rather than act, until he has achieved some<br />
positional stability. Russian units, by and<br />
large, will cause more German losses defensively<br />
than anything they can hope to do attacking.<br />
The low stacking, weak strengths,<br />
and artillery limitations <strong>of</strong> the Russians<br />
severely cramp their plans for attacks.<br />
The Russians must prioritize their 'continuity<br />
<strong>of</strong> lines. Lines should be several hexes<br />
deep. except in critical hexes (VP's and other<br />
fortified zones). Engineer units are a luxury<br />
at first, but some effort should be made to<br />
save a few, their presence can pay big<br />
dividends later; the best method for this is to<br />
place them in the VP hexes, since these had<br />
better be the last to go.<br />
As noted with the German player, the<br />
nature <strong>of</strong> Russian operations is determined,<br />
in large part, by the stage which the Game<br />
Turn has reached. If it is early, and the bulk<br />
<strong>of</strong> the German artillery is uncommitted,<br />
moves should be restricted to defensive ·adjustments,<br />
and reinforcements shollld be<br />
entered only if absolutely necessary. As the<br />
turn progresses, and the German force is<br />
spent, the Russsian can allow himself some<br />
small thoughts <strong>of</strong> attack. Attack by the Russians<br />
should be for very valuable positions<br />
only - if the Germans will not be compelled<br />
to retake the position, don't try to take it<br />
from them. Usually this means only VP<br />
hexes, though sometimes an attack to restore<br />
communications between pockets is worth<br />
consideration.<br />
It is certainly possible that at least one<br />
turn may find the Russians with only one
Reaction Phase. In this instance, attacks may<br />
be' more feasible if due only to the large<br />
number <strong>of</strong> units with available movement.<br />
However, even here the first priority must be<br />
strengthening <strong>of</strong> defenses. If you plan to try<br />
to link-up, or to attack a ferry hex, remember<br />
to use the Volga River hexes to the maximum<br />
(more on this in the tactics section). Also, if<br />
you do link-up pockets, but know that you<br />
won't be able to keep them linked, stuff as<br />
many units as possible into the fortified<br />
zones - there they will retain their movement<br />
ability, devastating defensive fire, and<br />
great nuisance value by forcing the defense<br />
<strong>of</strong> otherwise secure VP hexes.<br />
Finally, the Russian player must be patient;<br />
it will be entirely possible for the Russian<br />
never to attack in the game, and yet to<br />
win. A successful Russian defense will result<br />
in either the Germans never taking the<br />
necessary hexes, or in their taking them but<br />
being too weak to hold them against even<br />
modest Russian attacks. Either way, a win is<br />
a win.<br />
Tactical Modules<br />
The nuts and bolts <strong>of</strong> BFS<br />
BASIC AlTACK TACTICS<br />
The basic tactics <strong>of</strong> attacking are<br />
presented from the German viewpoint. The<br />
Germans will do about 90"70 <strong>of</strong> the attacking<br />
in the typical game <strong>of</strong> Battle Jor Stafingrad;<br />
also they are the ones with the units and coordination<br />
to apply preplanned tactics to attacks.<br />
The Russian player will usually find<br />
himself forced to adopt whatever <strong>of</strong> the<br />
following tactics he can manage, given his<br />
poor unit strength and coordination.<br />
The main attacks discussed will be those<br />
that count: attacks on heavy or fortified<br />
structures. The basic patterns will be more or<br />
less identical for other combat, but the Germans<br />
can be much freer when the Russian<br />
defensive fire is not be.ing doubled or tripled.<br />
Two basic types <strong>of</strong> attack will be looked at:<br />
maximum effort attacks (max attacks),<br />
which seek several breakthrough points and<br />
intend to use the same units to clear a number<br />
<strong>of</strong> hexes; and minimum level attacks (min<br />
attacks), which are aimed solely at gaining<br />
one hex using the least possible number <strong>of</strong><br />
units.<br />
Maximum attacks are almost mandatory<br />
on Turn 1; most <strong>of</strong> the "block clearing"<br />
approaches given later require a turn <strong>of</strong><br />
set-up, and this is just not available. The<br />
following points are designed as a mental<br />
checklist, to recall when you plan or execute<br />
a max attack.<br />
1. Maximum Stacking, 4 units per hex<br />
wherever possible. The German player must<br />
plan for this; remember that the stacking<br />
limits apply at all times in heavy structures,<br />
and your first units might block the later arrivals<br />
if you are careless.<br />
2. Maximum Factors. That usually translates<br />
as armor, but not more than one per<br />
hex, otherwise the non-armor is relatively<br />
easy to peel <strong>of</strong>f, destroying the effectiveness<br />
<strong>of</strong> the tanks. Use may also be made <strong>of</strong> direclfire<br />
artilery. The drawback is that the guns<br />
cannot follow up; they are usable only for the<br />
initial attack, and therefore should be used<br />
only: where space is limited, or where their<br />
combat roles place them in a hex that you<br />
want them to occupy anyway.<br />
3. Surviving Engineers. The only method<br />
to guarantee this is to have more engineeroccupied<br />
hexes than the Russian player has<br />
defending units. Where this is not possible,<br />
the use <strong>of</strong> multiple engineers on several hexes<br />
may preserve one for the battle.<br />
4. Breakthrough Points. The use <strong>of</strong> many<br />
units in one attack necessitates that the atlack<br />
will generate more than one<br />
breakthrough point. The following chart<br />
shows what attack strengths will have to survive<br />
defensive fire in order to generate breakthrough<br />
points; simply compare the expected<br />
values with the number <strong>of</strong> defending units,<br />
estimate your losses to defensive fire and add<br />
them in, and you will have a basis to estimate<br />
how much you will need . The chart also<br />
dramatically shows the necessity <strong>of</strong> having<br />
engineer units involved in attacks on heavy<br />
fortified structures.<br />
ATTACK<br />
STRENGTH<br />
18 "<br />
22<br />
. 26<br />
30<br />
36<br />
42<br />
4.5<br />
5.0 "<br />
5.5<br />
3.5 3.0<br />
4.0 ,3, $<br />
4.5 4.0<br />
5. Losses. As has been mentioned in other<br />
sections. The CRT is set up so that stacking<br />
raises the effectiveness <strong>of</strong> enemy fire, since,<br />
whatever the level <strong>of</strong> loss the firer aims at, if<br />
he has a good chance for X losses, there will<br />
also be a significant chance for X + 1 losses.<br />
Also, a max attack cannot be concealed. The<br />
units are right out there to look at, so it will<br />
usually draw a maximum response. The Russians<br />
need not repulse it; they need only, by<br />
their fire, reduce the number <strong>of</strong> breakthrough<br />
points earned, and/or select losses<br />
so that more breakthrough points will be<br />
needed to launch another attack.<br />
6. No Second Chance. Should your max<br />
attack fail, you will not be likely to get<br />
another chance; t.he adjacent hexes will be<br />
choked with flipped-over units which will get<br />
in the way <strong>of</strong> further attacks this turn.<br />
What is a minimum attack? This is an<br />
attack designed to just barely clear a hex; it<br />
usually features (1) many hexes involved, but<br />
few units in each; and (2) each hex set up to<br />
have units <strong>of</strong> nearly equal strength and value.<br />
The minimum attack assumes that the units<br />
involved will do nothing else this turn, win or<br />
lose - it is designed to minimize commitment<br />
<strong>of</strong> force in an area and to minimize<br />
losses.<br />
Following is an example from a real<br />
game. Two Russian 8-6-6 artillery and a<br />
militia unit occupies a fort hex. Their DF has<br />
an expected value <strong>of</strong> loss <strong>of</strong> 7.5 units, with<br />
two 24-point attacks and one 3-pointer. this<br />
was minimum attacked from all six adjacent<br />
hexes. Each hex contained one 5- 4-12 battalion<br />
and either a 1-12 engineer or a 2-1 - 12<br />
anti-tank units. This configuration was<br />
guaranteed to clear (if not occupy) the hex,<br />
and the expected loss was only 4.5 units. (In<br />
the actual case, only 4 units were lost.) The<br />
minimum attack saved three whole units by<br />
not providing a target for the high defensive<br />
fire expected.<br />
Another use for minimum attacks is<br />
when 'you can use the small stacks, in place,<br />
for something. The most common use is to<br />
cut a sector <strong>of</strong>f from supply. With no ZOC's<br />
in the city, you will have to put units out <strong>of</strong><br />
these stacks, by routing the cordon adjacent<br />
to an enemy posi tion to be attacked.<br />
Using Tanks. The Germans can use<br />
tanks for up factoring, as they are the most<br />
efficient units, aside from direct-firing artillery,<br />
for packing attack strength into a<br />
given space. Both sides can use tanks for protection;<br />
this is especially important for the<br />
German player as he attacks the ferry hexes,<br />
the river bank hexes, or the special structures.<br />
As the Trans-Volga artillery grows in power,<br />
armor units are almost the only ones that<br />
will be able to survive. One other use for armor<br />
units is on Turn I, assaulting Mamayev<br />
Kurgan. Turn 1 is <strong>of</strong>ten when the Russian<br />
player has the most artillery available; and<br />
Mamayev Kurgan is usually a place which<br />
he will defe.nd; therefore the tanks can be<br />
useful in weakening the Russian indirect fire.<br />
Tanks, for the Germans, do have the<br />
disadvantage <strong>of</strong> brittleness. They come back<br />
only 1/3 <strong>of</strong> the time, and there are few to<br />
begin with. I have my own questions about<br />
the historicity <strong>of</strong> this, but the fact remains<br />
that the tank units must be hoarded for use<br />
later. This generally means no more than one<br />
per hex, and usually not without several<br />
other units; tanks enjoy no protection in<br />
direct combat.<br />
Clearing Blocks. It is possible to greatly<br />
improve the German pOSition ins<strong>of</strong>ar as<br />
clearing fortified hexes is concern~d, and the<br />
suggestions that follow are directed to that<br />
end, though <strong>of</strong> course there is nothing to prevent<br />
their use with heavy structures as well.<br />
The common strain that runs through all o.f<br />
them is planning. Units must be in positions<br />
at the start <strong>of</strong> the turn, and this can mean<br />
some bizarre approaches to lead up to where<br />
you want to be next turn; hopefully these will<br />
be approaches that seem to have another purpose.<br />
Direct Fi ring Artillery is perhaps the<br />
German player's best weapon against Russian<br />
fortified hexes. The use <strong>of</strong> this weapon<br />
during the operations stages has already been<br />
mentioned, but an even more effective use is<br />
for direct-fire (adjacent) bombardment. The<br />
Germans have very few mortar units, so most<br />
<strong>of</strong> their artillery can move adjacent to a hex<br />
and bombard it at full strength even if it is a<br />
fortified hex. Even two smaller batteries<br />
(8- 10- 12'5 for example) can guarantee a loss<br />
to a fortified hex, and have a 50% chance <strong>of</strong><br />
killing two units. Normally this is all you<br />
want to attempt, as you gain little from killing<br />
a third unit since a "survivor" is created.<br />
7
8<br />
Reducing the number <strong>of</strong> defending units<br />
is very important for the German player; it<br />
both reduces the number <strong>of</strong> engineer units<br />
needed to assure one surviving, and a glance<br />
at the chart under "max attacks" will show<br />
how fewer defending units dramatically<br />
reduce the amount <strong>of</strong> attack strength needed<br />
to clear a hex. The reduction in units also<br />
limits the Russian player's options; he cannot<br />
so readily combine to annihilate a specific<br />
hex and therefore the German player may be<br />
fre~r with his use <strong>of</strong> more valuable units,<br />
such as tanks or direct-firing artillery.<br />
Other adjacent units can also be quite<br />
valuable. When you clearly do not have the<br />
steam to directly attack a fortified hex, but<br />
can attack others nearby, you c~n plan to<br />
leave a stack or more <strong>of</strong> units next to the fort.<br />
This will assume great importance should<br />
you clear the hex, or reduce the units in it,<br />
through some kind <strong>of</strong> bombardment. The<br />
adjacent units are available to launch instant<br />
counterattacks should the Russian player attempt<br />
to reinforce the fort. The Russ!an<br />
player is forced to choose between leavmg<br />
the fort half empty or paying many units to<br />
put someone in it.<br />
Other adjacent units will also be created<br />
when you move your artillery adjacent to set<br />
up the next ttirn's bombardment. Just shoving<br />
an artillery piece next to a fort is a good<br />
way to lose it in an instant counterattack; the<br />
artillery piece should be accompanied by at<br />
least two other units, to threaten a reply to an<br />
instant counterattack, and to absorb any<br />
losses. Such approaches are also suggested<br />
for earlier in the turn, when, should the Russian<br />
player attempt a counterattack, you are<br />
in a position to follow up any successes you<br />
might have from your own participation.<br />
German self-propelled artillery can be<br />
especially useful for block clearing. These are<br />
the only artillery units able to participate in<br />
instant counterattacks, so that they can serve<br />
a dual function: in place <strong>of</strong> bombardment,<br />
but also usable for instant counterattacks if<br />
need arises. A particularly effective trick is to<br />
move the SPA unit adjacent to the fort and<br />
then deploy it there. The unit is perfectly<br />
capable <strong>of</strong> supplying some indirect fire support,<br />
but until it does, the Russian pla~er<br />
must be careful about moving valuable umts<br />
into or out <strong>of</strong> the fort hex, or into any other<br />
adjacent hexes.<br />
"They'll likely Gather at the River."<br />
It is easy for the Russian player to undervalue<br />
the Volga River Bank hexes. These are some<br />
<strong>of</strong> the best hexes to defend on the map. They<br />
have the following significant advantages:<br />
,. The Russians still triple their DF, and the<br />
Germans are still quartered for bombardment<br />
- the Russians are hard to dig out.<br />
2. These hexes are the only place where stacking<br />
is equal; the reduction to 2 units hurts the<br />
Germans more than the Russians.<br />
3. Attacking such hexes draws the German<br />
player into the guns <strong>of</strong> the Trans-Volga Artillery<br />
and Volga Flotilla, and they are clear<br />
terrain for Germans when bombarded.<br />
4. The River Bank hexes can be attacked<br />
from fewer sites; as few as three hexes are adjacent,<br />
and at least two <strong>of</strong> these will also be<br />
VRB hexes, meaning fewer attackers and<br />
more TV A targets.<br />
5. The River Bank hexes are always in supply,<br />
so units retain movement, and militia units<br />
can survive indefinitely.<br />
When an area is cut <strong>of</strong>f, the VRB hexes<br />
become even more crucial. If there are any<br />
places that the German player is likely to ignore,<br />
or that he will want to ignore, they will<br />
be non-ferry VRB hexes. Therefore these<br />
hexes make perfect locations for the remnants<br />
<strong>of</strong> the area force. Units should be moved<br />
or strategically withdrawn iOlO such hexes,<br />
one per hex. The presence <strong>of</strong> such a force can<br />
tie down significant numbers <strong>of</strong> German<br />
units, to garrison VP hexes, that might othe.rwise<br />
be better used up front. Also, In<br />
desperate cases, the force can attack the VP<br />
hex.<br />
As previously noted, the VRB hexes also<br />
make good artillery sites, mainly just because<br />
they are non-VP fortS. They are not recommended<br />
for the mortars, however, as their<br />
short range is <strong>of</strong>ten all but useless from the<br />
riverbank.<br />
AIRPOWER<br />
Making the Most out <strong>of</strong> Fun<br />
Few things in Bat/lefor <strong>Stalingrad</strong> bring<br />
as much satisfaction as the Airpower Phase,<br />
particularly for the German player. You can<br />
bomb away with no danger <strong>of</strong> loss, and "no<br />
result" is the worst possible outcome. This<br />
makes planning especially important ~ an<br />
orgy <strong>of</strong> purposeless bombing, while it will<br />
certainly have results, may also put you fatally<br />
behind in the game.<br />
Dive Bombers. To save them, or not to<br />
save them? Dive bombers' immunity to terrain<br />
effects makes them tempting to reserve<br />
for ground support, but my usual policy is to<br />
use them as tank and artillery killers as long<br />
as any worthwhile targets remain. For example,<br />
on Turn 1, my normal approach wo~ld<br />
be to make 13 two-point attacks; anythmg<br />
more wastes effort, since you can only kill<br />
one unit per attack anyway.<br />
Normally, targets are Russian artillery;<br />
first the 6- 14-6's; then either the 6-8-6's or<br />
8- 6-12's, depending on which ones are most<br />
immediately useful to the defense. Mortars<br />
are the last priority, as they can be more successfully<br />
ground-attacked than the others.<br />
Also not prioritized are artillery units which<br />
are not in fort hexes. On Turn I, any such artillery<br />
can be smashed by level bombers or<br />
German artillery if need arises. A consistent<br />
campaign by the dive bombers against the<br />
Russian artillery can virtually eliminate them<br />
by the end <strong>of</strong> the game. This will reap<br />
dividends in economy <strong>of</strong> force, as the Germans<br />
will be able to better know their losses<br />
to D F in ad vance.<br />
Level Bombers. Here is where planning<br />
is most crucial. Level Bombers, at least<br />
in the initial turns, will be used to blow open<br />
holes for the initial German Operation<br />
Phases. The holes must coincide with the<br />
plan! It is altogether too easy to pick the best<br />
units to kill, and deviate from the best path<br />
that is to be cleared.<br />
There are times when the dive bombers<br />
must be called in, but normally level bombers<br />
work alone. Their use on Turn I is highly<br />
variable; the main lines <strong>of</strong> action are either to<br />
blow several holes, one in each sector, or \0<br />
concentrate most <strong>of</strong> the punch in one area,<br />
aiming to virtually clear it from the air. Often<br />
the latter method is attempted in the Spartanovka/<br />
Rynok area, due to the absence <strong>of</strong><br />
heavy buildings. Inadequate defense behind<br />
this area can allow the Germans to seize the<br />
tractor factory by a coup, and to compromise<br />
the northern ferry early in the game - a<br />
serious development.<br />
The Russian player gets the short end <strong>of</strong><br />
the airpower game. He uses his air points<br />
most <strong>of</strong>ten to pick <strong>of</strong>f German artillery<br />
which is not covered by flak, or any other<br />
targets <strong>of</strong> opportunity. Sometimes pockets<br />
can be reconnected through air attack. They<br />
will be isolated afterwardS, but this will give<br />
at least one chance for an instant counterattack<br />
if properly done. The Russian dive<br />
bombers are <strong>of</strong>ten most useful as ground<br />
support. They can add the crucial factors to<br />
an otherwise weak Russian attack - an allimportant<br />
consideration late in the game if<br />
the Germans have just enough to win.<br />
The German flak, however, is<br />
everywhere by the end <strong>of</strong> the game. There<br />
will be up to 10 flak units with ranges <strong>of</strong> up to<br />
three hexes, so the Russian player should be<br />
willing to take on one battery, or he may find<br />
no targets. The Russian player has three absolute<br />
priority units to hit. These are the<br />
three long-range batteries: the lOOmm guns<br />
(2 batteries), and the 170mm guns (I battery).<br />
While the 210 howitzers are valuable, the<br />
range <strong>of</strong> the other guns lets them deploy in a<br />
central position and dominate the whole<br />
map. If they can be killed, the German pla~er<br />
will have to use a number <strong>of</strong> other battenes<br />
to provide the same coverage one <strong>of</strong> the long<br />
ranged ones could.<br />
Soviet Militia. These units are quitt<br />
unique, with special liabilities and abili~ies<br />
which players must allow for. The most Important<br />
ability <strong>of</strong> militia units is their replacement.<br />
This is the only way new units can be<br />
placed into an isolated sector, (unless the sector<br />
inlcludes the tractor factory, etc.) and<br />
even a very few units can really be built up by<br />
enough militia.<br />
Initially the loss rate for militia will be<br />
high, and the replacements should be taken<br />
to the maximum. Later, as the weaker positions<br />
are eliminated from the Russian<br />
defense, the loss rate will drop, and the Russian<br />
player should give some thought to<br />
keeping back a few militia, so that there will<br />
be enough available to replace when need be,<br />
should a section be cu t <strong>of</strong>f.<br />
Militia do require leadership, however.<br />
A non-militia unit ~ust accompany all<br />
militia. Otherwise they lose their ability to<br />
move or to exist without supply (this last is<br />
especially important).<br />
LOSSES/UNITS<br />
In many respects, "a unit is a unit" in<br />
Battle for <strong>Stalingrad</strong>. The CRT makes no<br />
distinction, and both sides have many posi-
Iy, the Russian will suffer the loss <strong>of</strong> most <strong>of</strong><br />
the Orlovka force out <strong>of</strong> supply, with virtually<br />
no German losses - a loss, conservatively,<br />
<strong>of</strong> 20 net units. The upshot <strong>of</strong> this is that the<br />
Russian must extract more than I-I losses<br />
whenever they defend in a fort or heavy<br />
struCture hex. They should aim for 1.5-1<br />
losses, bu t can win wit h 1.25-1. Anything less<br />
will eventually lead 10 the Russian running<br />
out <strong>of</strong> units; since they are defending, they<br />
\I·ill reach that point at which a shortage <strong>of</strong><br />
units allows the attacker to bypass defenders,<br />
which can vi rtually eliminate them in BFS<br />
wi th its unique supply penalities that apply to<br />
the Russians.<br />
Soviet Defense: Using Stacks. Initially,<br />
stacking is a luxury which the Russian<br />
player can rarely afford, This has been<br />
discllssed earlier, but the basic reason, to<br />
restate, is that Slacking increases losses.<br />
However a time must arrive when the Russian<br />
player begins stacking in non-VP hexes;<br />
this must be done ~."ith care.<br />
While stacking begins as a means to hold<br />
a line firmly, a second aspect is the creation<br />
<strong>of</strong> efficient counterattack forces. For this<br />
purpose, stacks <strong>of</strong> three good units (3's)<br />
without slow artillery in them are best. Such<br />
Slacks are the best places for your engineers,<br />
and a stack 2-12's or 3- 12'5 somewhere can<br />
be a game saver. T he Russians are always<br />
shon <strong>of</strong> artillery support, so i hey must put<br />
their strength up front. To [his end, it is<br />
sometimes good to place a fast artillery (8 or<br />
12 MP's) into a stack to use for direct fire.<br />
The unit will be lost, but artillery units can<br />
always be killed anyway if t he German player<br />
is willing to make the effort.<br />
9<br />
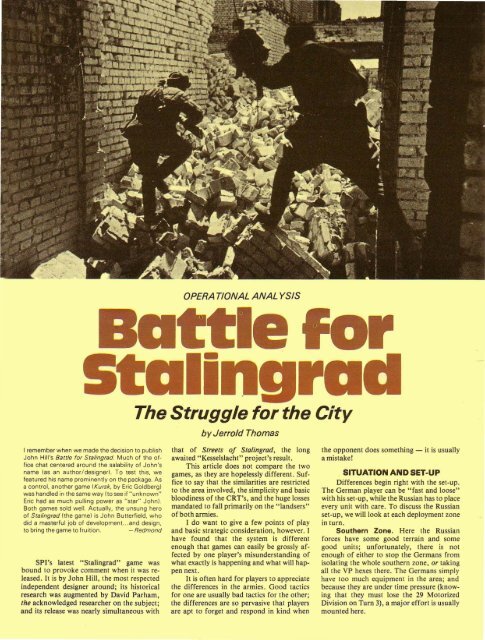
A section <strong>of</strong> the Battle for <strong>Stalingrad</strong> map.<br />
tions where a 1 or a 6 is equally useful.<br />
Therefore, a look at the basic quantities <strong>of</strong><br />
units can be worthwhile.<br />
The Russian player has 282 units, initial<br />
plus reinforcements, and in addition receives<br />
militia and armor replacements. Giving<br />
estimates <strong>of</strong> 30 tank unit replacements a nd 38<br />
militia replacements gives a total Russian expectation<br />
<strong>of</strong> 350 units. The German player<br />
has 188 units, ini tial plus reinforcements<br />
minus lhe 17 units <strong>of</strong> the 29 the Motorized<br />
Divisio n. To thi s he can add an expected<br />
value <strong>of</strong> approxiamtely 80 replacements -<br />
depending, <strong>of</strong> course, on his losses. This gives<br />
a tOlal <strong>of</strong> 268 German units for the game.<br />
This raw ratio <strong>of</strong> 350 to 268 is<br />
misleading. The effective ratio is very close lO<br />
I- \. For example, the German player has<br />
available approximately 272 level bomber<br />
and 85 Stuka points; these together will account<br />
for over 60 Russian units. Additional-<br />
The best place to begin assembling such<br />
stacks is adjacent to VP hexes; in this way<br />
counterattacks can be generated wi lhout the<br />
necessity for excess movement.<br />
Instant Counterattacks. The Russian<br />
player will do the bulk <strong>of</strong> the instant<br />
counlerattacking; he also may I.ose the most<br />
by doing so. T he first point to consider is the<br />
location <strong>of</strong> the units. Whenever the Russian<br />
player launches an ICA, he gives up his terrain.<br />
Therefore, the best place to ICA from is<br />
minimal terrain, such as woods or light St ruCtures;<br />
the worst from forts.<br />
The second aspect is the chance and effecls<br />
<strong>of</strong> a response. How many units are in<br />
the stack being attacked? These two questions<br />
establish the value <strong>of</strong> the attack. Then<br />
the Russian player must look at his immunity<br />
from response. This is dependent on the involvement<br />
<strong>of</strong> the German units, and the<br />
value <strong>of</strong> the ICA'ing unilS. If Ihe German<br />
player is in the middle <strong>of</strong> setting up a large altack,<br />
he may nOI respond to prevent a possible<br />
Russian Reaction Phase. Also, if t he unit s<br />
are unique, he may not be able to respond<br />
because he will lose them for the attack.<br />
This is the main benefit <strong>of</strong> ICA's: the<br />
disruption <strong>of</strong> German plans. The unit killing<br />
aspect is always secondary. The Russians will<br />
get more fire power on defense, and wi ll have<br />
terrain effects in their favor, so they will kill<br />
fewer units per Russian lost through ICA's.<br />
Though the Germans will do less<br />
ICA'ing than the Russians, they have one<br />
unique advantage. Since the Russians are immune<br />
to Sl acking considerations while they<br />
move, the Germans can get some en lire ly free<br />
attacks. By ICA'ing Russians as they move<br />
over already stacked Russians, the possibility<br />
<strong>of</strong> response will cost the Russians a ll the<br />
responding units due to overstacking. The<br />
Russians will rarely get to try this because it<br />
only applies [ 0 German units in relatively<br />
open terrain.<br />
SUMMARY<br />
The game has a unique development;<br />
both sides can radically affect the outcome<br />
by one or two coups, and yet steady patient<br />
play yields great advantages. Two a rmies are<br />
wholly dissimilar, ye t they are relatively<br />
balanced, The game moves well, tes lS planning<br />
and patience, yet has constant tension.<br />
All in all, I like it! ••