Leica Cyclone – Creating a Mesh and Modeling Surface Topography
Leica Cyclone – Creating a Mesh and Modeling Surface Topography
Leica Cyclone – Creating a Mesh and Modeling Surface Topography

Create successful ePaper yourself
Turn your PDF publications into a flip-book with our unique Google optimized e-Paper software.
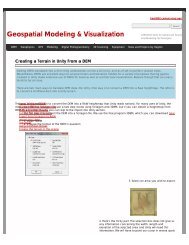
Figure 3 <strong>–</strong> Top view of plaza; Polylines have been created to outline where the sidewalk <strong>and</strong> grass meet; orange h<strong>and</strong>les help highlight the<br />
polylines<br />
More Tips:<br />
C. Use multiple views to confirm line is properly located at all angles <strong>and</strong> h<strong>and</strong>le constraints (Edit Object -> H<strong>and</strong>les<br />
constrain to -> Various options <strong>–</strong> NOTE: once placed in top view, constraining h<strong>and</strong>les to z-direction helps placement<br />
in 3D)<br />
D. Try different methods to see what works for you.With all, use multiple views to confirm the line is properly located<br />
at all angles<br />
Figure 4 <strong>–</strong> (Left) Although from Top View, the breakline looks correct, inspection from a different angle reveals that it is not correct (Right) H<strong>and</strong>les<br />
<strong>and</strong> constraints (Edit Object -> H<strong>and</strong>les -> Constrain Motion) are used to pull the polyline into the correct position <strong>–</strong> every section of every breakline<br />
should be inspected from multiple views<br />
6. Create h<strong>and</strong>les at places where polylines intersect (Select line -> ALT + Select point on line for new h<strong>and</strong>le to help snap<br />
lines together).<br />
7. Delete all points beyond boundary of mesh -> Select polyline representing boudary of mesh -> Right click -> Fence -> From<br />
Selection -> Fence -> Delete outside<br />
8. Delete points within other breaklines to remove any remaining points that should not be considered in the creation of the<br />
mesh -> Copy final breaklines to original or temporary working space in case altered/needed in future<br />
8. Unify points reducing spacing to 1 foot to start <strong>and</strong> adjust settings for desired results.