A223 Action on Hearing Loss Smoke Alarm
A223 Action on Hearing Loss Smoke Alarm
A223 Action on Hearing Loss Smoke Alarm

You also want an ePaper? Increase the reach of your titles
YUMPU automatically turns print PDFs into web optimized ePapers that Google loves.
2<br />
BS5446-3:2005<br />
<strong>Smoke</strong> Detector Model SD3.0/001<br />
Revisi<strong>on</strong> No 1 17/08/05<br />
Owners Manual
1 General Informati<strong>on</strong><br />
2 Features<br />
3 Unpacking Guide<br />
CONTENTS<br />
4 Quick Start Guide & Installati<strong>on</strong><br />
4.1 Locate <strong>Smoke</strong> Detector<br />
4.2 Locate Base Unit<br />
4.3<br />
4.4<br />
Locate Juncti<strong>on</strong> Box<br />
C<strong>on</strong>nect The System<br />
4.5 Power The System<br />
4.6 Test The System<br />
4.7 Operati<strong>on</strong> During Mains Power Failure<br />
4.8 Turning The System Off<br />
5 Advanced Installati<strong>on</strong><br />
5.1 Extending The <strong>Smoke</strong> Detector Cable<br />
5.2 Shortening The <strong>Smoke</strong> Detector Cable<br />
5.3 C<strong>on</strong>necting More Than One Detector<br />
5.4 C<strong>on</strong>necting to Additi<strong>on</strong>al Equipment<br />
2<br />
3<br />
4<br />
5<br />
7<br />
8<br />
10<br />
11<br />
12<br />
13<br />
15<br />
15<br />
16<br />
16<br />
17<br />
18<br />
21<br />
6 Maintenance<br />
6.1 Testing & Inspecti<strong>on</strong><br />
6.2 Cleaning<br />
6.3 Replacing The Battery<br />
7 Troubleshooting<br />
8 Technical help<br />
9 Specificati<strong>on</strong><br />
10 Guarantee<br />
22<br />
22<br />
22<br />
23<br />
24<br />
26<br />
27<br />
28<br />
11 Accessories<br />
1<br />
29
1. General Informati<strong>on</strong><br />
OWNERS MANUAL FOR SMOKE ALARM MODEL: SD3.0/001<br />
IMPORTANT:<br />
PLEASE READ THIS MANUAL THOROUGHLY BEFORE<br />
INSTALLING/OPERATING YOUR SMOKE ALARM AND KEEP<br />
IT IN A SAFE PLACE.<br />
WHEN INSTALLING THIS SMOKE ALARM FOR USE BY<br />
OTHERS, PLEASE LEAVE THIS MANUAL OR A COPY OF IT<br />
WITH THE END USER.<br />
PLEASE NOTE THAT THIS PRODUCT HAS BEEN DESIGNED<br />
FOR HOME DOMESTIC USE AND IS NOT NECESSARILY<br />
SUITABLE IN OTHER LOCATIONS, INCLUDING LEISURE<br />
ACCOMODATION VEHICLES (LAVS).<br />
This owner's manual covers:<br />
●<br />
<br />
●<br />
●<br />
●<br />
●<br />
●<br />
●<br />
●<br />
<br />
Features<br />
Unpacking Guide<br />
Quick Start Guide & Installati<strong>on</strong><br />
Advanced Installati<strong>on</strong><br />
Maintenance<br />
Troubleshooting<br />
Technical Help<br />
Specificati<strong>on</strong><br />
Guarantee<br />
Accessories<br />
Due to a policy of c<strong>on</strong>tinuous product development we reserve the<br />
right to make changes to this manual without prior notice<br />
2
2. Features<br />
●<br />
Mains powered with battery backup.<br />
● Internal rechargeable backup battery providing up to 100<br />
hours of standby time.<br />
●<br />
Internal automatic battery charger with advanced power<br />
management to prol<strong>on</strong>g battery life.<br />
●<br />
Mains power OK and failure indicati<strong>on</strong>.<br />
●<br />
Low battery and battery fail indicati<strong>on</strong>.<br />
●<br />
<strong>Alarm</strong> indicati<strong>on</strong> and powerful xen<strong>on</strong> strobe light.<br />
●<br />
C<strong>on</strong>tinuous automatic fail safe m<strong>on</strong>itoring of external pad and<br />
detector circuits.<br />
●<br />
Indicati<strong>on</strong> of detector circuit faults.<br />
●<br />
Indicati<strong>on</strong> of pad circuit faults.<br />
●<br />
Test butt<strong>on</strong> for automatic test routine.<br />
●<br />
Can accept up to 10 interc<strong>on</strong>nected smoke detectors.<br />
●<br />
Auxiliary output for c<strong>on</strong>necti<strong>on</strong> to other equipment.<br />
3
3. Unpacking Guide<br />
Your packaging should include the following items…<br />
●<br />
SMOKE DETECTOR<br />
1<br />
● BASE UNIT 2 WITH JUNCTION BOX<br />
3<br />
●<br />
VIBRATING PAD<br />
4<br />
●<br />
POWER ADAPTER<br />
5<br />
SYSTEM COMPONENTS:<br />
1<br />
2<br />
3<br />
4<br />
5<br />
Please check that all of the above items are present and that they<br />
have not been damaged in transit. If any item is missing or damaged<br />
please c<strong>on</strong>tact “TECHNICAL HELP”, see page 26 for details.<br />
4
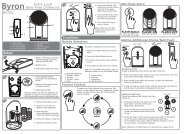
4. Quick Start Guide & Installati<strong>on</strong><br />
This product has been designed so that any<strong>on</strong>e with competent DIY<br />
skills should be able to install this. Otherwise a qualified electrician<br />
will be able to install it for you.<br />
The system is intended for bedroom use although the detector is<br />
intended for a suitable locati<strong>on</strong>, i.e. hall or landing.<br />
TYPICAL INSTALLATION (BASE UNIT ON TABLE TOP):<br />
1<br />
Overhead view of room with smoke<br />
detector fixed in centre of ceiling.<br />
1<br />
2<br />
2<br />
Base unit sitting <strong>on</strong> table with the<br />
base unit juncti<strong>on</strong> box underneath table.<br />
3<br />
3<br />
5
4. Quick Start Guide & Installati<strong>on</strong> (c<strong>on</strong>tinued)<br />
10m<br />
<strong>Smoke</strong> detector cable, plugged into the base unit<br />
juncti<strong>on</strong> box with a 10m cable.<br />
3<br />
IMPORTANT: UNDER MATTRESS VIBRATING PADS ARE<br />
INTENDED FOR THE PURPOSE OF WAKING SLEEPING<br />
PERSONS WHILE VISUAL ALERTING SIGNALS ARE OF<br />
MOST POTENTIAL VALUE DURING TIMES WHEN THE<br />
OCCUPANTS ARE AWAKE.<br />
4<br />
Vibrating pad under the mattress, plugged into<br />
the base unit juncti<strong>on</strong> box with a 2m cable.<br />
2m<br />
3<br />
4<br />
3<br />
5<br />
1m<br />
Mains power adapter plugged into a mains socket and<br />
plugged into the base unit juncti<strong>on</strong> box with a 1m cable.<br />
3<br />
5<br />
3<br />
6
4.1 Locate <strong>Smoke</strong> Detector<br />
a. Find a suitable locati<strong>on</strong> for the SMOKE DETECTOR 1 and<br />
install according to the manufacturers instructi<strong>on</strong>s. This is<br />
very important because locati<strong>on</strong> is a major factor in how well<br />
a smoke detector works.<br />
IMPORTANT:<br />
Your system is supplied with a single DICON SAFETY<br />
PRODUCTS LTD MODEL: Micro 300 IONIZATION SMOKE<br />
DETECTOR.<br />
Up to 9 additi<strong>on</strong>al SMOKE DETECTORS may be c<strong>on</strong>nected to<br />
the system refer to “ADVANCED INSTALLATION” <strong>on</strong> page 18 for<br />
details.<br />
NOTE:<br />
The Micro 300 IONIZATION SMOKE DETECTOR is powered<br />
from the BASE UNIT 2 , no batteries are required.<br />
b. The SMOKE DETECTOR 1 is supplied with a standard<br />
10m cable and plug for c<strong>on</strong>necti<strong>on</strong> to the JUNCTION<br />
BOX 3 . This cable should be routed to the JUNCTION<br />
BOX 3 and fixed as necessary.<br />
The standard 10m cable supplied may be extended, or<br />
shortened, if required. Refer to “ADVANCED INSTALLATION”<br />
<strong>on</strong> page 16 or 17 for details.<br />
7
4.2 Locate Base Unit<br />
a. Find a suitable locati<strong>on</strong> for the BASE UNIT 2 . This may be<br />
either placed <strong>on</strong> a bedside table A or wall mounted B<br />
using the keyhole slots in the base of the unit.<br />
In either case the BASE UNIT 2 must be located so that the<br />
JUNCTION BOX 3 is no more than 1m from the nearest mains<br />
power outlet.<br />
A Table Top<br />
1. Place the BASE UNIT 2 <strong>on</strong> a flat surface i.e. table top.<br />
2. Route the JUNCTION BOX 3 cable from the rear of the<br />
BASE UNIT 2 as shown below…<br />
BASE UNIT ON TABLE TOP:<br />
C<strong>on</strong>tinued On Page 9<br />
8
4.2 Locate Base Unit (c<strong>on</strong>tinued)<br />
B Wall Mounted<br />
1. Mark two holes using the dimensi<strong>on</strong>s show below and drill<br />
two 4mm holes…<br />
125mm<br />
2. Insert plastic wall plugs and screws (not supplied).<br />
3. Hang the BASE UNIT 2 <strong>on</strong>to the screws using the keyhole<br />
slots in the base.<br />
4. Route the JUNCTION BOX 3 cable in the slot provided <strong>on</strong><br />
the back of the unit so that it exits at the lower edge of the<br />
BASE UNIT 2 .<br />
BASE UNIT WALL MOUNTED:<br />
9
4.3 Locate Juncti<strong>on</strong> Box<br />
1. Find a suitable locati<strong>on</strong> for the JUNCTION BOX 3. This<br />
should be placed behind the bedside table or bed and may<br />
be fixed to the wall or skirting board using the keyhole slots<br />
provided as follows…<br />
2. Mark two holes using the dimensi<strong>on</strong>s show below and drill<br />
two 4mm holes…<br />
63mm<br />
3. Insert plastic wall plugs and screws (not supplied).<br />
4. Hang the JUNCTION BOX 3 <strong>on</strong>to the screws using the<br />
keyhole slots in the base.<br />
JUNCTION BOX MOUNTED ON SKIRTING BOARD:<br />
10
4.4 C<strong>on</strong>nect the System<br />
C<strong>on</strong>nect the SMOKE DETECTOR 1 , VIBRATING PAD 4 &<br />
POWER ADAPTER 5 by plugging into the JUNCTION BOX<br />
as follows…<br />
3<br />
3<br />
4<br />
5<br />
1<br />
11
4.5 Power the System<br />
With the system fully c<strong>on</strong>nected…<br />
1. Plug the POWER ADAPTER 5 into the mains outlet and<br />
switch <strong>on</strong>.<br />
2. The green “POWER” indicator will light c<strong>on</strong>stantly indicating<br />
that the main power supply is <strong>on</strong> and the system is<br />
operating normally.<br />
SYSTEM POWERED AND HEALTHY:<br />
Green power<br />
LED illuminated<br />
Note:<br />
● The SMOKE DETECTOR 1 may emit a short t<strong>on</strong>e as the<br />
power is turned <strong>on</strong>.<br />
●<br />
If the internal backup battery is low, the amber “BATTERY”<br />
indicator will flash to indicate the low battery c<strong>on</strong>diti<strong>on</strong>. This<br />
will stop flashing as the battery charges.<br />
If either the “PAD” or “DETECTOR” indicators flash this indicates a<br />
problem with their c<strong>on</strong>necti<strong>on</strong>. Refer to “TROUBLESHOOTING” <strong>on</strong><br />
page 24 for further assistance.<br />
12
4.6 Test the System<br />
With the system powered and working…<br />
1. Press the “TEST” butt<strong>on</strong> <strong>on</strong> the BASE UNIT 2 , hold it<br />
in briefly and then release.<br />
This will start the automatic test routine.<br />
BASE UNIT TEST BUTTON:<br />
Base unit<br />
test butt<strong>on</strong><br />
2. The red “ALARM” indicator will then flash 3 times and the<br />
strobe light will flash. AS THE STROBE LIGHT IS VERY<br />
BRIGHT, IT IS ADVISABLE TO LOOK AWAY DURING<br />
THIS PART OF THE TEST. The red “ALARM” indicator will<br />
then turn off.<br />
3. The amber “PAD” indicator will flash 3 times and at the same<br />
time as the indicator is <strong>on</strong>, the VIBRATING PAD 4 will<br />
operate. The amber “PAD” indicator will then turn off.<br />
4. The amber “DETECTOR” indicator will flash 3 times and then<br />
turn off.<br />
C<strong>on</strong>tinued On Page 14<br />
13
4.6 Test the System (c<strong>on</strong>tinued)<br />
5. The automatic test is now finished and all indicators will<br />
remain off except the green “POWER” indicator which will<br />
turn <strong>on</strong> again indicating that the system is working.<br />
6. Press and hold in the test butt<strong>on</strong> <strong>on</strong> the SMOKE DETECTOR<br />
1 until the alarm sounds c<strong>on</strong>tinuously. (Note: The test butt<strong>on</strong><br />
may have to be held in for up to 20 sec<strong>on</strong>ds and the alarm<br />
may c<strong>on</strong>tinue for up to 10 sec<strong>on</strong>ds after the test butt<strong>on</strong> is<br />
released). The red “ALARM” indicator <strong>on</strong> the BASE UNIT 2<br />
will begin to flash, together with the strobe light.<br />
The VIBRATING PAD 4 will also operate.<br />
7. Release the test butt<strong>on</strong> <strong>on</strong> the SMOKE DETECTOR 1 ; the<br />
alarm t<strong>on</strong>e will stop, the flashing red “ALARM” indicator <strong>on</strong><br />
the BASE UNIT 2 and the strobe light will turn off. The<br />
VIBRATING PAD 4 will stop operating.<br />
8. The system is now fully tested and operating correctly.<br />
Note:<br />
●<br />
The Auxiliary Output is not tested by pressing the test<br />
butt<strong>on</strong> <strong>on</strong> Base Unit. This is tested by the activati<strong>on</strong> of the<br />
SMOKE DETECTOR 1 detailed in points 6 & 7 above.<br />
●<br />
We str<strong>on</strong>gly recommend that you test the system <strong>on</strong>ce a<br />
week to make sure that it is working correctly.<br />
● For more informati<strong>on</strong> refer to “MAINTENANCE” <strong>on</strong> page 22.<br />
14
4.7 Operati<strong>on</strong> During A Mains Power Failure<br />
a. When the mains power supply fails, the system will c<strong>on</strong>tinue<br />
to operate for up to 100 hours in standby mode (from a fully<br />
charged, healthy battery).<br />
b. This mains failure / running from battery c<strong>on</strong>diti<strong>on</strong> is indicated by<br />
the amber “BATTERY” indicator flashing. Note: When the mains<br />
power fails, the amber “BATTERY” indicator may take up to 30<br />
sec<strong>on</strong>ds to begin flashing.<br />
4.8 Turning the System Off<br />
The system should remain switched <strong>on</strong> all of the time, however there may<br />
be occasi<strong>on</strong>s when it is necessary to switch the system off:<br />
a. During prol<strong>on</strong>ged periods when the property is not occupied<br />
i.e. holidays.<br />
b. When transporting or storing the system if it is used in a<br />
portable or temporary applicati<strong>on</strong> i.e. hotel room, caravan etc.<br />
IMPORTANT: If the mains power is switched off, the system will c<strong>on</strong>tinue<br />
to operate for up to 100 hours in standby mode or until the battery is fully<br />
discharged.<br />
If the battery is allowed to discharge fully and the unit is then stored and<br />
not used, the battery may become irreversibly damaged.<br />
The system should be turned off as follows:<br />
a. Switch off mains power and unplug power adapter.<br />
b. Wait for the amber “BATTERY” indicator to begin flashing.<br />
c. Press and hold the “POWER OFF” butt<strong>on</strong> until the amber<br />
“BATTERY” indicator stops flashing. This may take up to<br />
5 sec<strong>on</strong>ds.<br />
d. The system is now turned off and the battery disc<strong>on</strong>nected.<br />
15
5. Advanced Installati<strong>on</strong><br />
It is recommended that a suitably qualified electrician should<br />
carry out any advanced installati<strong>on</strong><br />
5.1 EXTENDING THE SMOKE DETECTOR CABLE<br />
IMPORTANT: This must always be carried out with the SMOKE<br />
DETECTOR 1 cable unplugged from the JUNCTION<br />
BOX 3 !<br />
In some cases it may be necessary to locate the SMOKE<br />
DETECTOR 1 more than 10m from the BASE UNIT 2 .<br />
In this case the 10m cable supplied can be extended using<br />
<strong>on</strong>e of a range of standard SMOKE DETECTOR 1<br />
extensi<strong>on</strong> cables - for more informati<strong>on</strong> refer to<br />
“ACCESSORIES” <strong>on</strong> page 29.<br />
Alternatively the 10m cable supplied can be extended using<br />
standard twin core (stranded or solid c<strong>on</strong>ductor) cable.<br />
We recommend stranded c<strong>on</strong>ductor 7/0.20 cable (7strands<br />
of 0.2mm). For more informati<strong>on</strong> refer to “ACCESSORIES”<br />
<strong>on</strong> page 29.<br />
1. Open the cover of the SMOKE DETECTOR 1 and locate<br />
the screw terminal that the cable is attached to.<br />
2. Remove the cable from the screw terminal by unscrewing the<br />
terminal screws.<br />
3. Join the ends of the standard 10m cable (supplied) to the<br />
cable extensi<strong>on</strong> using a terminal block.<br />
4. C<strong>on</strong>nect the extensi<strong>on</strong> cable ends to the screw terminal,<br />
making sure that the c<strong>on</strong>necti<strong>on</strong>s are tightened correctly.<br />
5. Make sure that you c<strong>on</strong>nect the wires correctly, c<strong>on</strong>necting<br />
like to like (i.e positive to positive, negative to negative).<br />
Note: The negative wire is easily identified, it has a black strip.<br />
16
5.2 SHORTENING THE SMOKE DETECTOR CABLE<br />
IMPORTANT: This must always be carried out with the SMOKE<br />
DETECTOR 1 cable unplugged from the JUNCTION<br />
BOX 3 !<br />
In some cases it may be necessary to locate the SMOKE<br />
DETECTOR 1 much closer than 10m from the<br />
BASE UNIT 2 .<br />
In this case the 10m cable supplied can be shortened,<br />
if you wish.<br />
1. Open the cover of the SMOKE DETECTOR 1 and locate<br />
the screw terminal that the cable is attached to.<br />
2. Remove the cable from the screw terminal by unscrewing the<br />
terminal screws.<br />
3. Using wire cutters, shorten the standard 10m cable to the<br />
required length.<br />
4. Strip and rec<strong>on</strong>nect the cable ends to the screw terminal,<br />
making sure that the c<strong>on</strong>necti<strong>on</strong>s are tightened correctly.<br />
5. Make sure that you rec<strong>on</strong>nect the wires correctly, c<strong>on</strong>necting<br />
like to like (i.e positive to positive, negative to negative).<br />
Note: The negative wire is easily identified, it has a black strip.<br />
17
5.3 CONNECTING MORE THAN ONE DETECTOR<br />
IMPORTANT: This must always be carried out with the SMOKE<br />
DETECTOR 1 cable unplugged from the JUNCTION<br />
BOX 3 !<br />
Up to 10 SMOKE DETECTORS can be c<strong>on</strong>nected to<br />
the system.<br />
Additi<strong>on</strong>al SMOKE DETECTORS are c<strong>on</strong>nected in a “daisy<br />
chain” to the first detector and to each other, see the<br />
diagram below:<br />
CONNECTING ADDITIONAL SMOKE DETECTORS:<br />
power to detector head<br />
A<br />
power to detector head<br />
R56<br />
R56<br />
D22<br />
IMPORTANT!<br />
when c<strong>on</strong>necting more than<br />
<strong>on</strong>e detector head, this resistor<br />
(R56) must be removed from<br />
each detector head EXCEPT<br />
the last <strong>on</strong>e in the line.<br />
D22<br />
IMPORTANT!<br />
when c<strong>on</strong>necting more than<br />
<strong>on</strong>e detector head, this resistor<br />
(R56) must be removed from<br />
each detector head EXCEPT<br />
the last <strong>on</strong>e in the line.<br />
C<br />
B<br />
c<strong>on</strong>nect red sleeved<br />
wire to<br />
CONN6<br />
c<strong>on</strong>nect red sleeved<br />
wire to<br />
CONN6<br />
plain wire to<br />
plain wire to<br />
D<br />
A<br />
B<br />
C<br />
D<br />
End of line detector screw terminal circuit board.<br />
10m cable with plug (standard supply)<br />
Plug into ‘Detector’ socket <strong>on</strong> juncti<strong>on</strong> box<br />
Interc<strong>on</strong>nect cable (opti<strong>on</strong>al)<br />
C<strong>on</strong>tinued On Page 19<br />
18
5.3 CONNECTING MORE THAN ONE DETECTOR (c<strong>on</strong>tinued)<br />
Use manufacturers recommended SMOKE DETECTORS<br />
<strong>on</strong>ly. For more informati<strong>on</strong> refer to “ACCESSORIES” <strong>on</strong><br />
page 29.<br />
To interc<strong>on</strong>nect SMOKE DETECTORS use standard twin<br />
core cable (stranded or solid c<strong>on</strong>ductor). We recommend<br />
stranded c<strong>on</strong>ductor 7/0.20 cable (7strands of 0.2mm). For<br />
more informati<strong>on</strong> refer to “ACCESSORIES” <strong>on</strong> page 29.<br />
Make sure that you c<strong>on</strong>nect the wires correctly, c<strong>on</strong>necting<br />
like to like (i.e positive to positive, negative to negative).<br />
Note: The negative wire is easily identified, it has a black strip.<br />
C<strong>on</strong>tinued On Page 20<br />
19
5.3 CONNECTING MORE THAN ONE DETECTOR (c<strong>on</strong>tinued)<br />
1. Open the cover of the first SMOKE DETECTOR (supplied as<br />
standard) and locate the screw terminal that the standard 10m<br />
cable is attached to.<br />
2. Remove the cable from the screw terminal by unscrewing the<br />
terminal screws.<br />
3. Cut the required length of “interc<strong>on</strong>nect” cable to c<strong>on</strong>nect the<br />
first SMOKE DETECTOR to the sec<strong>on</strong>d SMOKE DETECTOR<br />
and strip the ends.<br />
4. C<strong>on</strong>nect both the standard 10m cable (that plugs into the<br />
JUNCTION BOX 3 ) and the “interc<strong>on</strong>nect cable” to the<br />
screw terminal in the first SMOKE DETECTOR, making sure<br />
that the c<strong>on</strong>necti<strong>on</strong>s are tightened correctly.<br />
5. Open the cover of the sec<strong>on</strong>d SMOKE DETECTOR (opti<strong>on</strong>al)<br />
and locate the screw terminal.<br />
6. C<strong>on</strong>nect the other end of the “interc<strong>on</strong>nect cable” to the<br />
screw terminal in the sec<strong>on</strong>d SMOKE DETECTOR, making<br />
sure that the c<strong>on</strong>necti<strong>on</strong>s are tightened correctly.<br />
7. Using wire cutters remove the resistor, R56, from the screw<br />
terminal circuit board in the first SMOKE DETECTOR <strong>on</strong>ly.<br />
8. When installing more than <strong>on</strong>e additi<strong>on</strong>al SMOKE<br />
DETECTOR repeat steps 1-6 above, c<strong>on</strong>necting the third to<br />
the sec<strong>on</strong>d, the fourth to the third etc.<br />
IMPORTANT: When installing more than <strong>on</strong>e additi<strong>on</strong>al<br />
SMOKE DETECTOR each SMOKE DETECTOR screw<br />
terminal circuit board should have resistor R56 removed as in<br />
step 7 above, apart from the last SMOKE DETECTOR<br />
in the line.<br />
20
5.4 CONNECTING ADDITIONAL EQUIPMENT<br />
The JUNCTION BOX 3 has an auxiliary output socket marked<br />
“OUT” which is activated when the unit is in alarm mode.<br />
This output can be used to trigger additi<strong>on</strong>al equipment - see<br />
page 29.<br />
21
6. Maintenance<br />
6.1 TESTING & INSPECTION<br />
WEEKLY<br />
●<br />
Test the system according to “TEST THE SYSTEM” <strong>on</strong><br />
page 13.<br />
MONTHLY<br />
●<br />
●<br />
Check all cables m<strong>on</strong>thly for signs of physical damage.<br />
Check plug & socket c<strong>on</strong>necti<strong>on</strong>s at JUNCTION BOX 3<br />
EVERY FOUR YEARS<br />
●<br />
Replace the internal battery. See 6.3, “REPLACING THE<br />
BATTERY”, <strong>on</strong> page 23.<br />
EVERY 10 YEARS<br />
● Replace the VIBRATING PAD 4 and SMOKE DETECTOR 1<br />
6.2 CLEANING<br />
We recommend that the system is turned off during cleaning, see<br />
“TURNING THE SYSTEM OFF” <strong>on</strong> page 15 for details.<br />
Clean with a damp cloth and mild detergent if required.<br />
DO NOT USE SOLVENT.<br />
22
6.3 REPLACING THE BATTERY<br />
IMPORTANT: The system must always have a battery c<strong>on</strong>nected.<br />
Always test the RNID <strong>Smoke</strong> <strong>Alarm</strong> for correct operati<strong>on</strong> using the<br />
test procedure (see “TEST THE SYSTEM”), whenever the batteries<br />
are replaced.<br />
REPLACING THE BATTERY:<br />
1. Turn the system off, see “TURNING THE SYSTEM OFF” <strong>on</strong><br />
page 15 for details.<br />
2. Remove the battery cover <strong>on</strong> the bottom of the BASE<br />
UNIT 2.<br />
3. Unplug the battery from its c<strong>on</strong>nectors.<br />
4. Remove the battery and replace. Use <strong>on</strong>ly manufacturers<br />
recommended replacement battery.<br />
5. Dispose of the old battery according to the instructi<strong>on</strong>s <strong>on</strong><br />
the battery.<br />
6. Plug new battery into the c<strong>on</strong>nectors, make sure that it is<br />
c<strong>on</strong>nected the right way round.<br />
7. Refit the battery cover.<br />
8. Turn the system <strong>on</strong>; see “POWER THE SYSTEM” <strong>on</strong> page 12<br />
for details.<br />
23
7. Troubleshooting<br />
In the event of a problem, please use the troubleshooting guide<br />
below for assistance.<br />
If you cannot fix the problem and require further assistance, please<br />
c<strong>on</strong>tact “TECHNICAL HELP”, see page 26 for details.<br />
TROUBLESHOOTING GUIDE<br />
What is happening? Possible cause(s) What you should do<br />
The green “POWER”<br />
indicator <strong>on</strong> the BASE<br />
UNIT is permanently off.<br />
The system is not<br />
switched <strong>on</strong>.<br />
Check that the mains<br />
adapter is plugged in<br />
and switched <strong>on</strong>.<br />
The amber “BATTERY”<br />
indicator <strong>on</strong> the BASE<br />
UNIT is flashing.<br />
There is no mains<br />
power to the system and<br />
it is operating <strong>on</strong> internal<br />
battery backup.<br />
or<br />
The battery is faulty, or<br />
unplugged.<br />
Check that the mains<br />
adapter is plugged in<br />
and switched <strong>on</strong>.<br />
See “REPLACING THE<br />
BATTERY” <strong>on</strong> page 23.<br />
The amber “PAD”<br />
indicator <strong>on</strong> the BASE<br />
UNIT is flashing.<br />
The pad is unplugged or<br />
there is a wiring fault.<br />
Check that the pad<br />
cable is securely<br />
plugged into the juncti<strong>on</strong><br />
box. Check that the pad<br />
cable is not damaged.<br />
24
7. Troubleshooting (c<strong>on</strong>tinued)<br />
The amber<br />
“DETECTOR” indicator<br />
<strong>on</strong> the BASE UNIT<br />
is flashing.<br />
The system will not turn<br />
off when I press the<br />
“POWER OFF” butt<strong>on</strong><br />
<strong>on</strong> the BASE UNIT and<br />
the green “POWER”<br />
indicator stays <strong>on</strong>.<br />
Nothing happens when I<br />
press the “TEST” butt<strong>on</strong><br />
<strong>on</strong> the BASE UNIT.<br />
IMPORTANT!<br />
The “TEST” butt<strong>on</strong> is<br />
inhibited during an<br />
alarm c<strong>on</strong>diti<strong>on</strong>.<br />
The detector is<br />
unplugged or there is a<br />
wiring fault.<br />
The mains power supply<br />
to the system is still <strong>on</strong>.<br />
A fault c<strong>on</strong>diti<strong>on</strong> has<br />
already been<br />
automatically detected<br />
by the system.<br />
25<br />
Check that the detector<br />
cable is securely<br />
plugged into the juncti<strong>on</strong><br />
box. Check that the<br />
detector cable is not<br />
damaged.<br />
If you have<br />
disc<strong>on</strong>nected the<br />
detector cable from the<br />
detector head (for<br />
example to<br />
lengthen/shorten the<br />
cable or install<br />
additi<strong>on</strong>al detectors)<br />
check that you have<br />
rec<strong>on</strong>nected it correctly.<br />
You can <strong>on</strong>ly turn the<br />
system off after the<br />
mains power has been<br />
turned off.<br />
If you wish to turn the<br />
system off please refer<br />
to “TURNING THE<br />
SYSTEM OFF” <strong>on</strong><br />
page 15.<br />
Correct the fault<br />
c<strong>on</strong>diti<strong>on</strong>. When all<br />
faults are cleared there<br />
should be no flashing<br />
indicators.<br />
Press the “TEST” butt<strong>on</strong><br />
<strong>on</strong> the BASE UNIT, the<br />
automatic test routine<br />
should commence, see<br />
“TEST THE SYSTEM”<br />
<strong>on</strong> page 13 for<br />
details
9. Specificati<strong>on</strong><br />
●<br />
POWER CONSUMPTION: 1.2W (standby),<br />
8.7W (activated) *<br />
●<br />
SUPPLY: 230VAC ± 10%, 50/60Hz<br />
●<br />
BATTERY RATING: 12V, 0.8Ah.<br />
●<br />
BATTERY TYPE: NP0.8-12 or equivalent.<br />
●<br />
BATTERY BACKUP TIME: 100 hours minimum (standby),<br />
followed by 15 minutes (activated)*<br />
* with standard pad c<strong>on</strong>nected to “PAD” socket and no<br />
additi<strong>on</strong>al output device or load c<strong>on</strong>nected to the<br />
“OUT” socket.<br />
* with fully charged battery in good c<strong>on</strong>diti<strong>on</strong>.<br />
27
11. Accessories<br />
The following accessories are available for<br />
SMOKE ALARM MODEL: SD3.0/001<br />
● I<strong>on</strong>izati<strong>on</strong> <strong>Smoke</strong> Detector PART No. SD3.0/001/ID<br />
● Optical <strong>Smoke</strong> Detector PART No. SD3.0/002/OD<br />
● Heat Detector PART No. SD3.0/003/HD<br />
For more informati<strong>on</strong> <strong>on</strong> these and ways in which to use your RNID<br />
<strong>Smoke</strong> <strong>Alarm</strong> please c<strong>on</strong>tact:<br />
RNID Sound Advantage<br />
1 Hadd<strong>on</strong>brook Business Centre<br />
Ort<strong>on</strong> Southgate<br />
Peterborough<br />
PE2 6YX<br />
Tel: 0870 789 8855 (Voice)<br />
Tel: 01733 238 020 (Text)<br />
Web: www.rnid.org.uk<br />
Best time to teleph<strong>on</strong>e: 8.30am - 5.00pm, M<strong>on</strong>day - Friday.<br />
29