AUS_ Celebrity DX om 4-11-06.p65 - Pride Mobility Products
AUS_ Celebrity DX om 4-11-06.p65 - Pride Mobility Products
AUS_ Celebrity DX om 4-11-06.p65 - Pride Mobility Products

Create successful ePaper yourself
Turn your PDF publications into a flip-book with our unique Google optimized e-Paper software.
V. BATTERIES AND CHARGING<br />
• Always fully charge your scooter’s batteries prior to daily use.<br />
• Maintain 2-2.4 bar (30-35 psi) in each tire.<br />
• Plan your route ahead to avoid as many hills, cracked, broken or soft surfaces as possible.<br />
• Limit your baggage weight to essential items.<br />
• Try to maintain an even speed while your scooter is in motion.<br />
• Avoid stop-and-go driving.<br />
What type and size of battery should I use?<br />
We rec<strong>om</strong>mend deep-cycle batteries that are sealed and maintenance free. Both AGM and Gel-Cell are deepcycle<br />
batteries that are similar in performance. Do not use wet-cell batteries, which have removable caps.<br />
WARNING! Corrosive chemicals are contained in batteries. Use only AGM or Gel-Cell<br />
batteries to reduce the risk of leakage or explosive conditions.<br />
NOTE: Sealed batteries are not serviceable. Do not remove the caps.<br />
How do I change a battery in my scooter?<br />
WARNING! Prevent injury and/or equipment damage! Do not mix or match new and old<br />
batteries. If you encounter a situation where one battery needs to be replaced, then replace<br />
both batteries. Refer to specifications table in this manual and the manual supplied with<br />
the battery charger for rec<strong>om</strong>mended type and capacities.<br />
WARNING! Battery posts, terminals, and related accessories contain lead and lead<br />
c<strong>om</strong>pounds. Wash hands after handling.<br />
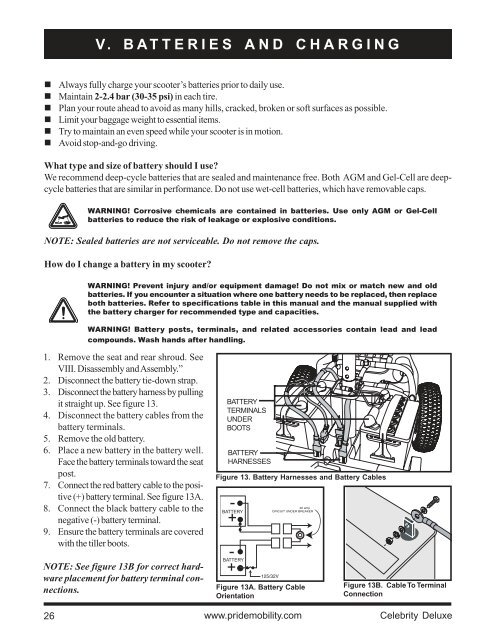
1. Remove the seat and rear shroud. See<br />
VIII. Disassembly and Assembly.”<br />
2. Disconnect the battery tie-down strap.<br />
3. Disconnect the battery harness by pulling<br />
it straight up. See figure 13.<br />
4. Disconnect the battery cables fr<strong>om</strong> the<br />
battery terminals.<br />
5. Remove the old battery.<br />
6. Place a new battery in the battery well.<br />
Face the battery terminals toward the seat<br />
post.<br />
7. Connect the red battery cable to the positive<br />
(+) battery terminal. See figure 13A.<br />
8. Connect the black battery cable to the<br />
negative (-) battery terminal.<br />
9. Ensure the battery terminals are covered<br />
with the tiller boots.<br />
NOTE: See figure 13B for correct hardware<br />
placement for battery terminal connections.<br />
BATTERY<br />
TERMINALS<br />
UNDER<br />
BOOTS<br />
BATTERY<br />
HARNESSES<br />
Figure 13. Battery Harnesses and Battery Cables<br />
-<br />
+<br />
BATTERY<br />
-<br />
+<br />
BATTERY<br />
Figure 13A. Battery Cable<br />
Orientation<br />
Figure 13B. Cable To Terminal<br />
Connection<br />
26 www.pridemobility.c<strong>om</strong> <strong>Celebrity</strong> Deluxe