AUS_ Celebrity DX om 4-11-06.p65 - Pride Mobility Products
AUS_ Celebrity DX om 4-11-06.p65 - Pride Mobility Products
AUS_ Celebrity DX om 4-11-06.p65 - Pride Mobility Products

Create successful ePaper yourself
Turn your PDF publications into a flip-book with our unique Google optimized e-Paper software.
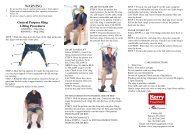
VIII. DISASSEMBLY AND ASSEMBLY<br />
6. Unplug both battery harnesses. Pull each harness<br />
straight up. See figure 20.<br />
7. Unfasten the battery tie-down strap and remove the<br />
batteries fr<strong>om</strong> the battery wells.<br />
8. Squeeze the tiller adjustment lever and lower the tiller<br />
to it’s lowest point.<br />
REAR LIGHTING<br />
HARNESS<br />
WARNING! Failure to unplug both<br />
battery harnesses, the front-to-rear<br />
harness, and rear lighting harness<br />
prior to separating the front and rear<br />
sections could result in permanent<br />
damage to the scooter.<br />
Frame Separation<br />
1. Lift up on the frame release lever. See figure 21.<br />
2. Lift the front section up until the frame hooks of the front<br />
section separate fr<strong>om</strong> the rear section. See figure 21.<br />
NOTE: Stabilise the rear section with your free hand<br />
by holding onto the upper frame tube. See figure 22.<br />
3. Slowly separate the two sections. See figure 22.<br />
ASSEMBLY<br />
1. Position the front and rear sections of your scooter as<br />
shown in figure 22.<br />
2. Use the frame release lever to lift the front section as<br />
you align the frame hooks of the front section with the<br />
lower frame tube of the rear section. See figure 22.<br />
3. Once the frame hooks are over the lower frame tube,<br />
lower the front section c<strong>om</strong>pletely. This will engage<br />
the frame lock. See figure 21.<br />
4. Raise the tiller.<br />
5. Reinstall both batteries and secure with tie-down straps—<br />
making sure the strap is positioned over the frame release<br />
lever to ensure proper securement.<br />
6. Connect the front-to-rear harness, rear lighting harness,<br />
and both battery harnesses. See figure 20.<br />
7. Reinstall the rear shroud.<br />
8. Reinstall the seat and rotate it until it locks into place.<br />
9. Unlock the front wheel by turning the tiller lock knob<br />
90° anticlockwise. See figure 19A.<br />
WARNING! After assembly, make<br />
absolutely certain the tiller lock knob<br />
is in the unlocked position before<br />
riding your scooter.<br />
BATTERY HARNESSES FRONT-TO REAR HARNESS<br />
Figure 20. Harness Connections<br />
FRAME RELEASE LEVER<br />
FRAME LOCK<br />
FRAME HOOK<br />
Figure 21. Frame Release<br />
LOWER FRAME TUBE<br />
UPPER FRAME TUBE<br />
FRAME HOOK<br />
Figure 22. Frame Separation<br />
34 www.pridemobility.c<strong>om</strong> <strong>Celebrity</strong> Deluxe