Scissor Lift Technical Handbook.pdf - Omni Metalcraft Corp.
Scissor Lift Technical Handbook.pdf - Omni Metalcraft Corp.
Scissor Lift Technical Handbook.pdf - Omni Metalcraft Corp.
- No tags were found...

Create successful ePaper yourself
Turn your PDF publications into a flip-book with our unique Google optimized e-Paper software.
SCISSOR LIFT TECH HANDBOOKGENERAL SAFETY STATEMENTSIMPORTANTREQUIRED READING!¡IMPORTANTE!¡LECTURA OBLIGATORIA!To ensure this quality product is safely and correctly utilized, all instructions within this manual must be read andunderstood prior to equipment start-up. Be aware of all safety labels on machinery. If you do not understandany of the safety instructions or feel there may be safety labels missing, contact your supervisor or productsupplier immediately!Para garantizar que este producto de calidad se utilice correctamente y con seguridad, es necesario leer ycomprender las instrucciones incluidas en este manual, antes de comenzar a utilizar el equipo. Esté atento atodas las etiquetas de seguridad que se encuentran en las máquinas. Si no entiende alguna de las instruccionesde seguridad o considera que faltan algunas etiquetas de seguridad, ¡comuníquese inmediatamente con susupervisor o proveedor del producto!COMPLIANCE WITH SAFETY STANDARDSCompliance with safety standards, including federal, state and local codes or regulations is the responsibility of the equipmentpurchaser(s). Placement of guards, safety labels and other safety equipment is dependent upon the area and use to which thesystem is applied. A safety study should be made of the equipment application by the purchaser(s). It is the purchaser’sresponsibility to provide any additional guards, safety labels or other safety equipment deemed necessary based on thissafety study.The information contained in this safety manual is correct at the time of printing. Due to the continuing development ofproduct lines, changes in specifications are inevitable. The company reserves the right to implement such changes withoutprior notice.If you suspect fire hazards, safety hazards, dangers towards health or any other job safety concerns,consult your federal, state or local codes.Certain safety information in this document was reprinted from ASME B20.1-2000 by permission of TheAmerican Society of Mechanical Engineers. All rights reserved.Inspect equipment for safety labels. Make sure personnel are aware of and follow safety instructions.Maintain an orderly environment in the vicinity of the equipment at all times. Clean up spilled materialsor lubricants immediately.All personnel shall be instructed regarding the necessity for continuous care and attention to safetyduring the operation of the equipment. They must be trained to identify and immediately report allunsafe conditions or practices relating to the equipment and its operation.Know your company’s machine specific Lockout / Tagout procedure. Do Not perform maintenance untilelectrical disconnect has been turned off!Replace all safety devices, guards and guarding prior to equipment start-up.References used for safety instructions in this manual are from: Conveyor Equipment Manufacturers Association (CEMA) and TheAmerican Society of Mechanical Engineers (ASME)3
SCISSOR LIFT TECH HANDBOOKSAFETY INFORMATION: GENERAL SAFETY LABELS (Continued)#111750 ( 1 3/4” x 1 1/4” )Generally placed on smaller guards toalert personnel of potential danger ifguard is removed and power is notlocked out.#111749 ( 3” x 1 1/4” )Placed on shipping brace which stabilizesequipment during shipping. Brace must beremoved before operating! May cause severeinjury if not removed.#110491 (10” x 7” )Placed on equipment where conveyors maystart without warning.5
SCISSOR LIFT TECH HANDBOOKSAFETY INFORMATION: SCISSOR LIFT SAFETY LABELS#113611 - A-4 (6 7/8 x 1 1/4) or B-4 (17 x 2)Placed on the side edges of the lift table platform to warn personnel to read operating instruction before usinglift table and to warn of possible bodily injury hazards.#113609 - A-1 (6 7/8 x 1 1/4) or B-1 (8 x 2)Placed on the top surface of the lift table platform to warn personnel against riding on scissor lifts that are notdesigned for such use.#113608 - A-3 (6 7/8 x 1 1/4) or B-3 (8 x 2)Placed on the base frame adjacent to each maintenance device to warn service personnel to engage maintenancedevice before working on, and particularly under, lift table.#113610 - A-5 (6 7/8 x 1 1/4) or B-4 (8-2), A-6 (2 x 1 1/12)Placed on or near the control station where up/down controls arelocated to warn personnel to stand clear while lift table is inoperation. Location can vary depending on type of control stationused.6
SCISSOR LIFT TECH HANDBOOKSAFETY INFORMATION: INSTALLATION SAFETY1) LOADING / UNLOADINGHave trained personnel load or unload equipment. The equipment must be properly handled whentransferring from the unloading area to final site location to prevent damage.2) GUARDS / GUARDINGInterfacing of Equipment. When two or more pieces of equipment are interfaced, special attention shall begiven to the interfaced area to ensure the presence of adequate guardingand safety devices.Guarding Exceptions. Wherever conditions prevail that would requireguarding under this standard but such guarding would render theequipment unusable, seek guidance from your safety professional.3) ANCHORINGDO NOT operate equipment unless it is properly anchored. Serious injury or death may result.4) SAFETY WARNINGInstall all safety devices, guards and guarding prior to equipment start-up.7
SCISSOR LIFT TECH HANDBOOKSAFETY INFORMATION: ELECTRICAL SAFETY1) ELECTRICAL CODEAll electrical installations and wiring shall conform to federal, state and local codes.When equipment operation is not required for a maintenance procedure,electrical power must be turned off and locked / tagged out following yourcompany’s machine specific procedure.2) CONTROL STATIONControl stations should be so arranged and located that the operation of the affected equipment is visible fromthem. Control stations shall be clearly marked or labeled to indicate the function controlled.Equipment that would cause injury when started shall not be started until personnel in the area are alerted by asignal or by a designated person that the equipment is about to start.Where system function would be seriously hindered or adversely affected by the required time delay, or wherethe intent of the warning may be misinterpreted (i.e., a work area with many different equipment and allieddevices), a clear, concise and legible warning sign needs to be provided. The warning sign shall indicate thatequipment and allied equipment may be started at any time, that danger exists and that personnel must keepclear. These warning signs shall be provided along the equipment at areas not guarded by position or location.Remotely and automatically controlled equipment, and equipment where operator stations are not manned or arebeyond voice or visual contact from drive areas, loading areas, transfer points and other potentially hazardouslocations on the equipment path not guarded by location, position or guards shall be furnished with emergencystop buttons, pull cords, limit switches or similar emergency stop devices.All such emergency stop devices shall be easily identifiable in the immediate vicinity of such locations unlessguarded by location, position or guards. Where the design, function and operation of such equipment clearly isnot hazardous to personnel, an emergency stop device is not required.The emergency stop device shall act directly on the control of the equipment concerned and shall not depend onthe stopping of any other equipment. The emergency stop devices shall be installed so that they cannot beoverridden from other locations.Inactive and unused actuators, controllers and wiring should be removed from control stations and panel board,together with obsolete diagrams, indicators, control labels and other material that might confuse the operator.3) SAFETY DEVICESAll safety devices, including wiring of electrical safety devices, shall be arranged to operate such that a powerfailure or failure of the device itself will not result in a hazardous condition.4) EMERGENCY STOPS AND RESTARTSEquipment controls shall be so arranged that, in case of emergency stop, manual reset or start at the locationwhere the emergency stop was initiated shall be required for the equipment and associated equipment to resumeoperation.Before restarting the equipment that has been stopped because of an emergency, an inspection of the equipmentshall be made and the cause of the stoppage determined. The starting device and electrical power must be turnedoff and locked / tagged out according to your company’s machine specific procedure before any attempt is madeto remove the cause of the stoppage, unless operation is necessary to determine the cause or to safely removethe stoppage.5) SAFETY WARNINGReplace all safety devices, guards and guarding prior to equipment start-up.8
SCISSOR LIFT TECH HANDBOOKSAFETY INFORMATION: OPERATIONAL SAFETYOnly trained, qualified personnel shall be permitted to operate the equipment. Training shall include instructionin operation under normal conditions and emergency situations.Where safety is dependent upon stopping / starting devices, they shall be kept free of obstructions to permitaccess.The area around loading and unloading points shall be kept clear of obstructions that could endanger personnel.Do not ride the load-carrying element of a conveyor/equipmentunder any circumstances, unless the equipment is designed andequipped with safety and control devices intended to carrypersonnel. For no reason shall a person ride any element of avertical conveyor. Warning labels reading “DO NOT RIDECONVEYOR” shall be affixed by the owner of the equipment.Personnel working on or near a conveyor/equipment shall be instructed as to the location and operation ofpertinent stopping devices.Equipment shall be used to transport only a load that it is designed to handle safely.Under no circumstances shall the safety characteristics of the equipment be altered.Routine inspections and preventative and corrective maintenance programs shall be conducted to ensurethat all safety features and guards are retained and function properly. Inspect equipment for safety labels. Makesure personnel are aware of and follow safety label instructions.Alert all personnel to the potential hazard of entanglement inconveyors/equipment caused by items such as long hair, looseclothing and jewelry.SAFETY WARNINGReplace all safety devices, guards and guarding prior to equipment start-up.9
SCISSOR LIFT TECH HANDBOOKSAFETY INFORMATION: MAINTENANCE / SERVICE SAFETYELECTRICAL POWER MUST BE TURNED OFF AND LOCKED / TAGGED OU T followingyour company’s machine specific procedures when servicing equipment to prevent accidentalrestarting by other persons or interconnecting equipment (when used).1) MAINTENANCE (REPAIR)Maintenance and service shall be performed by trained, qualified personnel only.Where lack of maintenance and service would cause a hazardous condition, the user shall establish amaintenance program to ensure that conveyor components are maintained in a condition that does notconstitute a hazard to personnel.No maintenance or service shall be performed when a conveyor is in operation. See “Lubrication” and“Adjustment or Maintenance During Operation” for exceptions.When a conveyor is stopped for maintenance or service, the starting devices, prime mover, poweredaccessories or electrical must be locked / tagged out in accordance with a formalized procedure designed toprotect all persons or groups involved with the conveyor against an unexpected restart. Personnel should bealerted to the hazard of stored energy, which may exist after the power source is locked out. All safetydevices and guards shall be replaced before starting equipment for normal operation.2) ADJUSTMENT OR MAINTENANCE DURING OPERATIONWhen adjustments or maintenance must be done while equipment is in operation, only trained, qualifiedpersonnel who are aware of the hazards of the conveyor in motion shall be allowed to make adjustments,perform maintenance or service.Conveyors shall NOT be maintained or serviced while in operation unless proper maintenance or servicerequires the conveyor to be in motion. If conveyor operation is required, personnel shall be made aware ofthe hazards and how the task may be safely accomplished.3) LUBRICATIONConveyors shall NOT be lubricated while in operation unless it is impractical to shut them down forlubrication. Only trained and qualified personnel who are aware of the hazards of the conveyor in motionshall be allowed to lubricate a conveyor that is operating.Where the drip of lubricants or process liquids on the floor constitutes a hazard, drip pans or other means ofeliminating the hazard must be provided by purchaser(s).4) MAINTENANCE OF GUARDS AND SAFETY DEVICESGuards and safety devices shall be maintained in a serviceable and operational condition. Warning signs arethe responsibility of the owner of the conveyor and must be maintained in a legible / operational condition.10
SCISSOR LIFT TECH HANDBOOKSAFETY INFORMATION: MAINTENANCE / SERVICE SAFETY (Continued)5) INSPECTIONSRoutine inspections with preventative and /or corrective maintenance programs shall be conducted to ensurethat all safety features and devices are maintained and function properly.All personnel shall inspect for hazardous conditions at all times. Remove sharp edges or protruding objects.Repair or replace worn or damaged parts immediately.6) CLEANINGWhere light cleaning and/or casing cleaning are required, they shall be performed by trained personnel. Theconveyor electrical power must be turned off and locked / tagged out following your company’s machinespecific procedures. Special attention may be required at feed and discharge points.7) SAFETY WARNINGReplace all safety devices, guards and guarding prior to equipment start-up.11
SCISSOR LIFT TECH HANDBOOKSAFETY INFORMATION: RESPONSIBILITIES OF OWNERS AND USERSINSPECTION AND MAINTENANCEThe lift shall be inspected and maintained in proper working order in accordance with this manual and safeoperating practices.REMOVAL FROM SERVICEAny lift not in safe operating condition shall be removed from service until it is repaired to the originalmanufacturer’s standards.REPAIRS, MODIFICATIONS OR ALTERATIONSAll repairs shall be made by authorized personnel in conformance with the manufacturer’s instructions.OPERATORSOnly trained and authorized personnel shall be permitted to operate the lift.BEFORE OPERATIONBefore using the lift, the operator shall have:1) Read and understood the manufacturer’s operating instructions and safety rules and been trained byqualified personnel.2) Inspected the lift for proper operation and condition. Any suspect item shall be carefully examined and adetermination made by a qualified person as to whether it constitutes a safety hazard. All unsafe items shallbe corrected before further use of the lift.DURING OPERATIONThe lift shall be used only in accordance with its intended purpose and within the manufacturer’s limitations andsafety rules:1) Do not overload the lift. Please note that the lift has a capacity tag attached to it. Do not remove the tag.Exceeding the capacities shown on the tag may cause damage to the lift or injury to personnel.2) Ensure that all safety devices are operational and in place.3) Personnel near operating lifts must maintain a safe distance to avoid being pinched or trapped by theequipment or struck by objects that may fall from the lift platform.MODIFICATIONS OR ALTERATIONSConsult the manufacturer before modifying or altering the equipment in any way. (failure to do so may void thewarranty)12
SCISSOR LIFT TECH HANDBOOKSAFETY INFORMATION: WARNINGSWARNING!!!NO RIDERS!!!WARNING!!!To avoid personal injury, never go under the lift platform until the load is removed and the scissor mechanism issecurely blocked in the UP position.WARNING!!!To avoid personal injury, stand clear of scissor leg mechanism while lift is in motion.WARNING!!!Where it is desired to raise the base of the lift to achieve a greater collapsed height, the footprint of the baseframe must be fully supported. Failure to do so will damage the lift. This lift is designed to be a floor mount.WARNING!!!DO NOT install lifts in pits unless equipped with bevel toe guards or other approved toe protection. A shear pointcan exist causing serious toe injury or severance.SAFETY MAINTENANCE BAR PROCEDUREWARNING!!!ALWAYS use the safety bars for service or maintenance. NEVER go under or reach under the lift unless bothsafety bars are securely in place and the power to the unit has been disconnected. NEVER use safety bars with aload on the platform.CAUTIONOperating the lift with safety bars improperly stored may result in damage to the equipment.1) Remove the safety bars from their storage position.2) Raise the lift to full travel, and place the safety bar. Make sure the safety bar is in place.3) Once BOTH safety bars are in place, slowly lower the lift until the safety bars rest against the end of the baseframe. Visually inspect both safety bars to ensure they are secure.4) To disengage the safety bars, raise the lift, move the safety bars and make sure lift operates correctly. Storethe safety bars in their original position.SAFETY WARNINGREPLACE ALL SAFETY DEVICES, GUARDS AND GUARDING PRIOR TO EQUIPMENT START-UP.13
SCISSOR LIFT TECH HANDBOOKRECEIVING AND INSPECTION: RETURNS, DAMAGES AND SHORTAGESUNCRATING CHECKLIST1) Compare the bill of lading with what you have received (including accessories).2) Examine the equipment for damage.3) Immediately report shortages or damages to the vendor and carrier.4) Obtain a signed damage report from the carrier and send a copy to the vendor.Do not attempt to modify or repair damaged equipment prior to filing this report.Note:Do not return equipment to the factory without a written return authorization. Returns without writtenauthorization will not be accepted.Note: Custom products may be crated differently.MOTOR DRIVEN ROLLER CONVEYOR STRAIGHT AND CURVE TECH HANDBOOKRECEIVING AND INSPECTION: REMOVAL OF CRATINGAFTER COMPLETING THE “UNCRATING CHECKLIST”1) Remove crating and packaging.2) Look for boxes, accessories, bags or components such as fasteners, manuals, guard rails etc. that may bebanded or fastened to the crating material.Note: Make sure all fasteners, guards and essential components are not discarded.14
SCISSOR LIFT TECH HANDBOOKGENERAL INSTALLATION: INSTALLATION INSTRUCTIONSANCHORED AND PIT MOUNTED HYDRAULIC SCISSOR LIFT TABLESNote:Permanent installation of hydraulic scissor lift tables may be subject to local codes, regulations, permits orinspections.1) <strong>Scissor</strong> lifts are shipped on either skids or pallets. With slings placed around the base frame or lift bottom,remove the lift from the skid. Be careful not to damage any of the frame structure.2) Position and align the lift so that 1/2” to 1” clearance is maintained around the platform. Level the scissor liftand place solid shims under the base frame as detailed in the drawing below. Grout as required. If shimmingand grout will not be used, the floor must be level “to within 1/8 in. over 5 ft. of length and width.”3) Where anchor clips have been provided, the bolt fit is close to restrict shifting. Careful location of the anchorbolts is required with special consideration being given to the frame and platform.4) Jog the motor with the control in very short jogs, to check if the lift will raise. On 3-phase systems, 2 of 3power leads may need to be switched so the pump will turn the proper direction.Caution: Continued operation of a reversed direction hydraulic pump for approximately 30 seconds can burnup a pump, so use short jogs.5) Raise the lift halfway several times, fully lower, holding the down control an extra 10 seconds each timewhen the lift is fully lowered to bleed air from the cylinders. Then with the lift fully up, insert the safetymaintenance bars, remove the breather cap and add hydraulic oil. Replace the breather cap.6) Clean up any debris or spilled fluid, as this may later be misinterpreted as mechanical trouble or a cylinderleak. Remove the maintenance bars and lower the unit.7) Instruct user(s) in the proper operation of the lift, safety precautions, and equipment capacity. Supplymaintenance personnel with this service manual.TABLETOPHYDRAULICCYLINDERBREATHERCAPMOTORPUMPMAINTENANCEBARBASEFRAMEGROUTSHIM15
SCISSOR LIFT TECH HANDBOOKGENERAL INSTALLATION: INSTALLATION INSTRUCTIONSINSTALLATION OF ANCHOR BOLTS1) Position lift according to instructions on page 15. Drill holes in concrete the same diameter as anchor bolts,using anchor clip holes as guides. Drill holes sufficiently deep.2) With nut and washer on anchor bolts, drive anchor bolts into holes so that a minimum of six to seven threadsare below the top of the anchor clips.3) Tighten the nuts while making sure enough force is used to spread anchor bolt wedges. Use three or fourturns past finger-tightening as a guide.4) After the scissor lift has been aligned, leveled and shimmed, and all anchor bolts installed, pour 1” of groutunder the entire base frame. Tighten nuts or anchor bolts after the grout has set and cured. Run hydraulichose and/or electrical cord through the conduit in the pit wall. Replace the platform.16
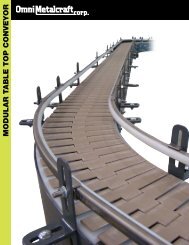
BPLATFORM(REF)PIT DEPTH(LIFT LOWERED HEIGHT PLUS1/2” FOR SHIMS OR GROUT)1 3/4” DEEP X 3 1/2” WIDE RECESS FORCABLES OR HOSESAAPLATFORM LENGTHPIT LENGTH = PLATFORM LENGTH + 1 1/2”CURB ANGLES(BY OTHERS)LOWEREDHEIGHTCURB ANGLES(BY OTHERS)SECTION B-BSCALE 1:12BEVEL TOP PLATFORMBCLEARANCE 3/4”MINIMUMCLEARANCE 3/4”MINIMUMPIT WIDTH =PLATFORM WIDTH + 1 1/2”PLATFORM WIDTHPOWER SUPPLY CASE(BY OTHERS)SECTION A-ASCALE 1:12SUMP AND/OR DRAIN(IF REQUIRED BY OTHERS)NOTES:1) All pit work “by others”, includes conduit, piping, curb angles, etc.2) Run 3” diameter PVC with long radius sweep elbows to providepipe case for hose or cables, run from pit to power unit or controllocation.SCISSOR LIFT TECH HANDBOOKGENERAL INSTALLATION: PIT LAYOUT DRAWING17
SCISSOR LIFT TECH HANDBOOKGENERAL INSTALLATION: SEQUENCE OF OPERATION1) Hydraulic <strong>Scissor</strong> <strong>Lift</strong>s are designed primarily for in-plant applications and are furnished with constantpressure push-button controls. Actuating the "UP" button causes the solenoid on the magnetic starter to pullin, closing its line contacts and allowing the line voltage to be applied to the motor.2) Assuming the motor rotation is correct, the motor will drive a gear pump, which in turn draws oil from thereservoir through the pump and forces it at a constant volume under pressure required by the load. The oilflows through the valves and piping into the hydraulic cylinder. The hydraulic cylinder must displace theincoming volume of oil by increasing the size of the chamber. This is accomplished by forcing the pistoninside the cylinder away from the fully collapsed position. The piston is attached to a rod which is attached tostructural members of the lift's leg assembly. As the piston and rod move out, the legs open.3) When the desired height or upward travel of the platform is attained, the “UP” button is deactivated byremoving the operator's finger from the push-button. The motor stops the pump from pumping oil. Thecheck valve in the pump assembly closes, preventing reverse flow of the oil. This maintains the desired raisedposition.4) When the operator desires to lower the lift, the person depresses the “DOWN” button on the push-buttoncontrol which closes the circuit and energizes the down valve solenoid. The solenoid pulls in and activatesthe Down valve which allows the valve to open. Opening the Down valve allows the oil in the cylinder to flowthrough the Down valve at a controlled rate and return to the reservoir.5) The downward travel of the lift may be stopped at any desired point by removing the operator's finger fromthe “DOWN” button.CAUTION: DO NOT continue to press the “UP” button if the lift is not raising or you have reached the fully raisedposition as this may result in permanent damage to the motor or pump.18
SCISSOR LIFT TECH HANDBOOKGENERAL INSTALLATION: OPERATING INSTRUCTIONSCUSTOM HYDRAULIC SCISSOR LIFTHydraulic scissor lifts have an excellent safety record overall, but as with all moving equipment, they can bedangerous. Operators must use common sense and take responsibility for the safety of everyone near the lift.They must use the safety devices provided and be careful not to surprise anyone in the area with the movementof the lift.PREOPERATIONAL CHECKS1) Check all electrical wiring and connections to be sure that they are completed properly and are operational.2) Check for obstructions or debris that may interfere with the safe operation of the lift.3) Be sure that all personnel in the area are a safe distance away from the lift and aware that you are about tooperate it.4) If there are any optional safety devices such as bellows or electric toe guards, check them for properoperation.TEST OPERATE THE EQUIPMENT1) Station yourself so that you will always see the equipment when it is in operation.Never operate the equipment in the blind!2) Raise the equipment and note that the control is a constant pressure, deadman type. When you release theup or down switch the unit should stop moving immediately and maintain its elevation. If it does not, contactqualified maintenance personnel.3) Cycle the equipment several times to be sure that it is operating smoothly with no jerking or suddenmovement. On initial start up there may be some air in the lines or the cylinders may be dry due to storageso it may take several cycles to smooth out the operation. If the operation is not smooth after several cycles,contact qualified maintenance personnel. Any evidence of binding or scraping in the operation should causeyou to immediately stop using the lift.4) Check all safety devices for proper operation.5) If you elect to test load the equipment, be sure that you do not exceed the capacities shown on the tag.Overloading may cause structural stresses that may not show up for some time, but will diminish the life andcapacity of the unit.DAILY OPERATION1) All personnel should be required to read and understand the entire operating instructions section of thismanual prior to operating the lift.2) Operators must know the capacity of the unit and be aware of any loads that may exceed the capacity.3) Operators must be alert to all personnel in the vicinity of the lift and avoid any surprises to these personnelin regard to movement or the position of the lift at any time. Never operate the unit if you cannot see it andthe personnel around it.4) On the first use of the lift each day, each operator should check to see that the lift is operating properly andsmoothly. All safety devices must be in place and operating properly.5) If the unit has a traveling electrical cord, the operator must ensure that it is kept away from the lift as itraises and lowers.6) Loads should be centered before raising or lowering the lift as this will help ensure even wear on all movingparts.19
SCISSOR LIFT TECH HANDBOOKMAINTENANCE: MAINTENANCE INSTRUCTIONS1) Always remember that this is a piece of machinery with large moving parts that can seriously hurt you.2) Read and understand this manual in its entirety before attempting service work.WARNING3) Always use the safety bars or safety chocks if you are going to work on the unit in the elevated position ormust reach under the platform.4) When using the safety supports, adhere to the following rules:A) Be sure there is no load on the platform.B) Be sure the safety support is properly engaged.C) Hold the down pedal an extra 10 seconds when lowering onto the safety support to be sure that all theweight of the lift is on the support.D) Disconnect and lock / tag out the electricity to the unit to prevent accidental movement of the lift byother personnel.E) Spend as little time as possible under the lift.5) Use only replacement parts recommended by the manufacturer.6) Do not let the equipment stay in disrepair: fix little problems while they are little problems or some of themmay get very severe very quickly.7) Inspect the equipment on a regular schedule, preferably monthly.8) Never work on the hydraulics or electrical systems unless the unit is fully lowered or properly sitting on asafety support.9) Never apply a load to the equipment unless the base is continuously supported.WARNING10) Never expect to hold a leg assembly by simply lifting one end of a platform:A) The roller end of most lifts is not gibbed or captured in any way, so lifting on the roller end simply tiltsthe platform.B) Even if you raise the clevis end of the platform, if the base frame is not firmly lagged to the ground orheld down by some other means, the legs will come up with the platform in a spongy and unpredictablemanner and could cause personal injury.C) The only safe way to hold a lift’s legs open other than the factory designed safety support, is to blockbetween the clevis end of the platform and the base frame.The routine maintenance of this equipment is minor and consists of periodic checks.SAFETY WARNINGREPLACE ALL SAFETY DEVICES, GUARDS AND GUARDING PRIOR TO EQUIPMENT START-UP.20
SCISSOR LIFT TECH HANDBOOKMAINTENANCE: MAINTENANCE SCHEDULESWARNINGTo avoid personal injury, never go under the lift platform until the load is removed and the scissor mechanismis securely blocked in the "UP" position with maintenance bars to prevent accidental lowering of the lift.Before maintenance or servicing, ELECTRICAL POWER MUST BE TURNED OFF AND LOCKED / TAGGED OUTfollowing your company’s machine specific procedure.Be sure that all pressure is relieved from the hydraulic system before disassembling any components. SeeGeneral Hydraulic Information.WEEKLY MAINTENANCEInspect bushings for wear. Replace if necessary.(See Bushing Maintenance and Lubrication Instructions below.)Grease all regreaseable pivot pins. Use No. 2 lithium based grease or equivalent. (if supplied)MONTHLY MAINTENANCEInspect oil level in reservoir. Fill if necessary.Inspect hydraulic hose(s) for pinch points and signs of wear. Correct pinch points and replace hose(s) whennecessary.Inspect all wires for looseness or wear.Inspect all hydraulic fittings for leaks. Tighten as required.Clean all debris from the vicinity of floor mounted units in order to avoid interference with the liftmechanism or rollers.Operate the unit and check for any abnormal noise or vibrations.Check all safety devices on the unit such as the condition of the pleated bellows or smooth operation of theelectric toe guards.SEMI-ANNUAL MAINTENANCEInspect oil for darkening or gritty feel. Change if necessary.Inspect oil for presence of water (oil will turn milky in color).Change oil if necessary.BUSHING MAINTENANCE AND LUBRICATION INSTRUCTIONSThe service life of a bushing is generally not predictable, since their failure will develop only as gradual wear, notas catastrophic failure, such as with a bearing. The need for inspection is largely proportional to the actual dutycycle, environment, and application. It is recommended that the bushings be inspected for wear at least once aweek during the first few months of operation. It is likely that such frequent attention will prove unnecessary, butwill result in the establishment of a realistic maintenance schedule based on experience. Replace bushings asnecessary. Failure to do so will damage the scissor arms. It is also recommended that the bushings be inspectedfollowing a lengthy period of shutdown.SAFETY WARNINGREPLACE ALL SAFETY DEVICES, GUARDS AND GUARDING PRIOR TO EQUIPMENT START-UP.21
SCISSOR LIFT TECH HANDBOOKMAINTENANCE: GENERAL HYDRAULIC INFORMATION1) All hydraulic cylinders will require the replacement of packing and seals after a period of time, depending onusage and environmental conditions. It is normal maintenance just like changing oil in an automotive engine.However, maintenance personnel should recognize the difference between leakage and weepage:Weepage is the normal accumulation of fluid that passes the seals in the course of operations. As thehydraulic fluid properly performs its lubrication function on cylinder walls and piston rods. It may beoccasionally observed squirting from cylinder breathers, but should stop squirting after several cycles offull stroke when the small accumulation is cleared.Leakage is the fluid which leaks past worn or cut packing and seals. It too may be observed squirting, butdoes not stop after several cycles and the lift will probably not hold position under load.Always be careful when working around cylinders, not to nick the extended rod or dent the cylindercasing, as this may cause damage to cylinder seals or packing.If you elect to repaint or retouch part of the lift, cover exposed rods with plastic or soluble grease whichcan be removed after painting to ensure that no paint sticks to the rods and damages packing or seals.2) General precautions:Be sure that all pressure is relieved from the hydraulic system before disassembling any components.Continue to hold the down control for several seconds after fully lowering the unit on its safety supportor the ground, before opening a line or component.Always be careful to avoid contamination entering the system. Be careful with the ends of the hoseswhich may fall into dirt or other foreign materials. If you suspect contamination, flush the system andcomponents.3) Hydraulic fittings sealants and torques:The lift may be equipped with NPT fittings (tapered), (JIC) 37 Degrees (flared) fittings, and SAE fittings(with “O” ring seals).Be careful when tightening NPT fittings not to over tighten and crack them. Swivel fittings are especiallyvulnerable and should be snugged up enough to stop leaking.If leakage persists after tightening the fittings fairly hard, inspect fittings for burrs on the mating edges.Always use a sealant or Teflon tape with NPT fittings. If using Teflon tape, be sure the tape is started 11/2 threads back from the leading edge and only use 2 wraps to be sure that tape does not break off andcontaminate the system. Never reuse old sealant or Teflon tape. Once a connection has been opened,remove old and apply fresh sealant or tape.22
SCISSOR LIFT TECH HANDBOOKMAINTENANCE: OIL VISCOSITY RECOMMENDATIONSHYDRAULIC FLUIDAll types of petroleum-based hydraulic fluids are more or less suitable for use. The exact choice of fluid isdetermined by its wear and temperature viscosity characteristics, taking into consideration oxidation andcorrosion protection, material compatibility and air/water separation characteristics.CHEMICAL AND PHYSICAL PROPERTIESA.P.I. Gravity (@ 60° F) 28 to 31.5Viscosity (sus @ 100° F) 194 to 236Viscosity IndexFlash (o.c.)Fire (o.c.)THESE PRODUCTS ARE PREFERRED DUE TO THE ANTI-WEAR ADDITIVES THEY CONTAINFILL COMPONENTS WITH FLUIDReservoir filled with specified oil level mark.90 min.385 deg. min.425 deg. min.Cities Service Oil Company Pacemaker XD 20Gulf Oil <strong>Corp</strong>orationHarmony 48 AWMobil Oil <strong>Corp</strong>oration D.T.E. 25Shell Oil Company Tellus 929Sinclair Refining Company Duro AW 21Standard Oil Company OhioSun Oil CompanyTexaco Incorporated*Valvoline QualityWolfsheadInduston FF-48Sunvis 821 WR OilRando Oil HD-Z32Hydraulic Oil ISO-46Hydraulic Oil-4623
SCISSOR LIFT TECH HANDBOOKMAINTENANCE: REPORT ON MISCELLANEOUS MAINTENANCE PERFORMANCEREPORT ON MISCELLANEOUS MAINTENANCE PERFORMANCEDate___________Maintenance Performed:____________________________________________________________________________________________________________________________________________________________________________________________________________________________________________________________________________________Date___________Maintenance Performed:____________________________________________________________________________________________________________________________________________________________________________________________________________________________________________________________________________________Date___________Maintenance Performed:____________________________________________________________________________________________________________________________________________________________________________________________________________________________________________________________________________________Date___________Maintenance Performed:____________________________________________________________________________________________________________________________________________________________________________________________________________________________________________________________________________________Date___________Maintenance Performed:____________________________________________________________________________________________________________________________________________________________________________________________________________________________________________________________________________________Date___________Maintenance Performed:____________________________________________________________________________________________________________________________________________________________________________________________________________________________________________________________________________________Date___________Maintenance Performed:____________________________________________________________________________________________________________________________________________________________________________________________________________________________________________________________________________________24
SCISSOR LIFT TECH HANDBOOKTROUBLESHOOTING AND REPLACEMENT PARTS: TROUBLESHOOTINGWARNINGOnly qualified service personnel should undertake service work on hydraulic lifts. Service personnel shouldbe able to read and understand wiring and hydraulic diagrams, know how to safely trouble shoot liveelectrical circuits and be familiar with this manual and all safety devices on this lift.No work should be performed beneath a raised lift platform unless safety bars are installed.LIFT DOES NOT RAISE (POWER UNIT IS RUNNING OR HUMMING)Rotation of 3-phase motor may be reversed. Reverse any two electrical leads.Motor may be single-phasing (humming). Check wiring.Voltage at motor terminals may be too low to run pump at existing load. Check by measuring voltage atmotor terminals, or as near as possible while pump is running under load. Reading source voltage or pumpidlingvoltage is meaningless. Inadequate or incorrect wiring can starve the motor when the source voltage isample. Correct as necessary.Check for line or hose leak. Correct as necessary.Check for oil shortage in reservoir. Add oil if necessary.Load may exceed rating. Remove excessive load.Suction screen may be clogged, starving pump. Screen is attached to suction line in tank. Remove and clean.Drain and replace oil.Breather cap on reservoir may be clogged. Remove and clean.“Down” valve may be energized by faulty wiring or stuck open. Remove solenoid and check.Pump may be seized if motor is humming or blowing fuses or overloads.MOTOR LABORS OR HEATS EXCESSIVELYVoltage may be low. Check at motor terminals while pump is running loaded, not at line source or whilepump is idling, inadequate wiring can starve motor, even when source voltage is ample.Wiring may be incorrect. On 3-phase units using twist-lock plug, make sure that one leg of motor line is notconnected to ground prong.Pump may be binding from oil starvation, which develops high internal heat. Pump can be irreparablydamaged by oil starvation and may have to be replaced.LIFT OPERATES “JERKY” OR “SPONGY”Lower lift entirely and hold “Down” button an additional 10-30 seconds to bleed air from cylinder.Check for oil starvation in pump.LIFT LOWERS TOO SLOWLY WITH LOADDown valve may require cleaning.Check for pinched tubing or hose.Oil extremely heavy for existing temperature.LIFT WILL NOT LOWER (ELECTRICAL)Solenoid coil may be incorrectly wired, not rated for the voltage, or the line voltage may be excessively low.Check voltage near coil. (120-volt) or (24V)LIFT RAISES, THEN LOWERS BACK SLOWLYDown solenoid valve may not be seating. Remove solenoid coil and check again. If lift does not hold withsolenoid coil removed, down valve cartridge should be removed and cleaned or replaced as necessary.Oil, line, hose or fitting may be leaking. Check and repair if necessary.“Check valve” in pump assembly may not be seating. This is indicated by the pump and motor turningbackward on their own. Most of the time this condition is audible. Replace pump assembly.SAFETY WARNINGREPLACE ALL SAFETY DEVICES, GUARDS AND GUARDING PRIOR TO EQUIPMENT START-UP.25
SCISSOR LIFT TECH HANDBOOKELECTRICAL SCHEMATIC: STANDARD SINGLE-PHASE WIRING SCHEMATIC26
SCISSOR LIFT TECH HANDBOOKELECTRICAL SCHEMATIC: STANDARD THREE-PHASE WIRING SCHEMATIC27
SCISSOR LIFT TECH HANDBOOKHYDRAULIC SCHEMATIC: SHOP-AID SERIES SCISSOR LIFTS ONLYPUMP ASSEMBLY CONTAINS CHECK,RELIEF, AND DOWN SOLENOID VALVESLIFT CYLINDER(S)(QUANTITY VARIES)CHECK VALVEFLOW CONTROLMP.F.RELIEF VALVEDOWN VALVESUCTIONFILTERRESERVOIR28
SCISSOR LIFT TECH HANDBOOKHYDRAULIC SCHEMATIC: POWER-UP/POWER-DOWN SCHEMATICPOWER UP / DOWN HYDRAULIC SCHEMATICCONTROLLED FLOWC1C2V1V2ABPTP.F.SUCTIONFILTER29
SCISSOR LIFT TECH HANDBOOKPARTS LISTS: SCISSOR LIFT31
SCISSOR LIFT TECH HANDBOOKPARTS LISTS: SCISSOR LIFTDETAIL DESCRIPTION DETAIL DESCRIPTION1 BASE WELDMENT 15 BUSHING2 PLATFORM 16 ARM PIVOT PIN3 INNER ARM WELDMENT 17 CENTER PIVOT PIN4 OUTER ARM WELDMENT 18 COTTER PIN5 MAINTENANCE BAR 19 CLEVIS PIN: CAP END6 CAM FOLLOWER 20 CLEVIS PIN: ROD END7 INTERNAL POWER UNIT ASSEMBLY 21 SOCKET HEAD CAP SCREW8 BREATHER VENT 22 CARRIAGE BOLT9 FLOW CONTROL 23 NYLOCK NUT10 HYDRAULIC HOSE 24 HEX NUT11 HYDRAULIC FITTING: NIPPLE 25 LOCK WASHER12 HYDRAULIC FITTING: ADAPTER 26 THRUST WASHER13 HYDRAULIC FITTING: ELBOW 27 FLAT WASHER14 HYDRAULIC CYLINDER32
SCISSOR LIFT TECH HANDBOOKNOTESNotes:____________________________________________________________________________________________________________________________________________________________________________________________________________________________________________________________________________________________________________________________________________________________________________________________________________________________________________________________________________________________________________________________________________________________________________________________________________________________________________________________________________________________________________________________________________________________________________________________________________________________________________________________________________________________________________________________________________________________________________________________________________________________________________________________________________________________________________________________________________________________________________________________________________________________________________________________________________________________________________________________________________________________________________________________________________________________________________________________________________________________________________________________________________________________________________________________________________________________________________________________________________________________________________________________________________________________________________________________________________________________________________________________________________________________________________33
SCISSOR LIFT TECH HANDBOOKABBREVIATED WARRANTY<strong>Omni</strong> <strong>Metalcraft</strong> <strong>Corp</strong>. warrants that the Equipment will be free of defects in workmanship and material (ifproperly installed, operated and maintained) for a period of one year or 2080 hours of use, whichever is sooner,from date of shipment to Customer, subject to the limitations hereunder set forth. If within the one yearwarranty period, <strong>Omni</strong> receives from the Customer written notice of any alleged defects in the Equipment and ifthe Equipment is not found to be in conformity with this warranty (the Customer having provided <strong>Omni</strong> areasonable opportunity to perform any appropriate tests thereon) <strong>Omni</strong> will, at its option, either repair theEquipment or supply a replacement therefore.*The above stated information is in reference to a section of <strong>Omni</strong> <strong>Metalcraft</strong>’s full Terms and Conditions of sale. This information does notconstitute an agreement, but simply reference information. To obtain a full copy of <strong>Omni</strong> <strong>Metalcraft</strong>’s Terms and Conditions of sale, pleasecontact your sales representative.34