Tiling a Bathroom Floor - Fine Homebuilding
Tiling a Bathroom Floor - Fine Homebuilding
Tiling a Bathroom Floor - Fine Homebuilding

You also want an ePaper? Increase the reach of your titles
YUMPU automatically turns print PDFs into web optimized ePapers that Google loves.
square. Diagonal layouts also have the effect<br />
of making a narrow room appear wider.<br />
Most every room has obvious focal points<br />
where full tiles should go. I establish two<br />
control lines, 90° to each other, and orient<br />
them so that they correspond with the<br />
room's focal points. For example, in the small<br />
bathroom I'm tiling here, the two critical<br />
points are in front of the vanity and in front<br />
of the bathtub; I plan on using full tiles (or<br />
complete half-tiles) in these areas (drawing<br />
p. 86). Cut tiles will go where they are less<br />
obvious. In general, I try to avoid cutting<br />
tiles to less than half their original size—<br />
they just look unsightly.<br />
After you've determined the basic layout<br />
and the control lines, you can snap grid lines<br />
that will guide you as you set the tile. Plastic<br />
spacers will keep your grout lines a consistent<br />
width. But don't count on them entirely<br />
to keep the layout straight because tiles vary<br />
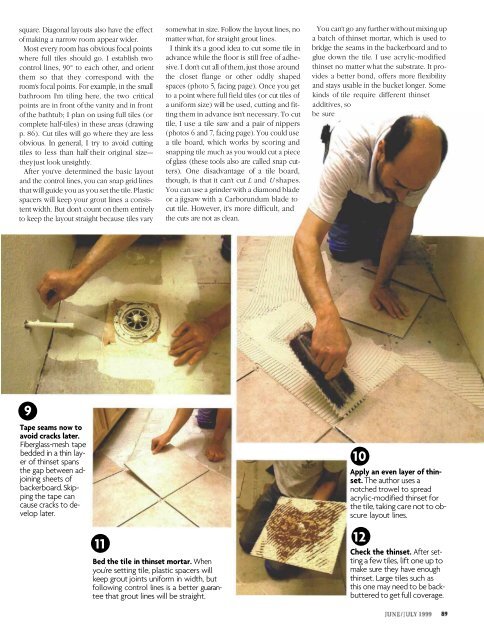
9<br />
Tape seams now to<br />
avoid cracks later.<br />
Fiberglass-mesh tape<br />
bedded in a thin layer<br />
of thinset spans<br />
the gap between adjoining<br />
sheets of<br />
backerboard. Skipping<br />
the tape can<br />
cause cracks to develop<br />
later.<br />
11<br />
Bed the tile in thinset mortar. When<br />
you're setting tile, plastic spacers will<br />
keep grout joints uniform in width, but<br />
following control lines is a better guarantee<br />
that grout lines will be straight.<br />
somewhat in size. Follow the layout lines, no<br />
matter what, for straight grout lines.<br />
I think it's a good idea to cut some tile in<br />
advance while the floor is still free of adhesive.<br />
I don't cut all of them, just those around<br />
the closet flange or other oddly shaped<br />
spaces (photo 5, facing page). Once you get<br />
to a point where full field tiles (or cut tiles of<br />
a uniform size) will be used, cutting and fitting<br />
them in advance isn't necessary. To cut<br />
tile, I use a tile saw and a pair of nippers<br />
(photos 6 and 7, facing page). You could use<br />
a tile board, which works by scoring and<br />
snapping tile much as you would cut a piece<br />
of glass (these tools also are called snap cutters).<br />
One disadvantage of a tile board,<br />
though, is that it can't cut L and U shapes.<br />
You can use a grinder with a diamond blade<br />
or a jigsaw with a Carborundum blade to<br />
cut tile. However, it's more difficult, and<br />
the cuts are not as clean.<br />
You can't go any further without mixing up<br />
a batch of thinset mortar, which is used to<br />
bridge the seams in the backerboard and to<br />
glue down the tile. I use acrylic-modified<br />
thinset no matter what the substrate. It provides<br />
a better bond, offers more flexibility<br />
and stays usable in the bucket longer. Some<br />
kinds of tile require different thinset<br />
additives, so<br />
be sure<br />
10<br />
Apply an even layer of thinset.<br />
The author uses a<br />
notched trowel to spread<br />
acrylic-modified thinset for<br />
the tile, taking care not to obscure<br />
layout lines.<br />
12<br />
Check the thinset. After setting<br />
a few tiles, lift one up to<br />
make sure they have enough<br />
thinset. Large tiles such as<br />
this one may need to be backbuttered<br />
to get full coverage.