Tiling a Bathroom Floor - Fine Homebuilding
Tiling a Bathroom Floor - Fine Homebuilding
Tiling a Bathroom Floor - Fine Homebuilding

Create successful ePaper yourself
Turn your PDF publications into a flip-book with our unique Google optimized e-Paper software.
or admix when mixing the grout, which<br />
causes discoloration and a weaker mix. Another<br />
is using too much water when cleaning<br />
excess grout off the tile, which also can cause<br />
it to discolor. A third common error is using<br />
a high-speed mixer for the grout, which<br />
traps air in it and makes it weak.<br />
Add only enough water to the grout powder<br />
to make it workable. Follow the manufacturer's<br />
recommended ratio of water to<br />
grout. Ideally, the grout should be a little<br />
difficult to spread into the joints. If<br />
you're not going to mix the grout by<br />
hand, use a mixing paddle, the same<br />
type you would use for mixing thinset,<br />
and a slow-speed drill. After<br />
mixing, allow the grout to slake for<br />
15 minutes and then remix it. At<br />
this point, you may add liquid or<br />
powder to adjust the consistency.<br />
As you work, remixing the grout<br />
occasionally will help to keep it workable,<br />
but do not add more liquid.<br />
Use a rubber grout trowel to spread the<br />
grout diagonally, holding the trowel at a<br />
45° angle (photo 14, facing page). Grout<br />
King makes the best grout trowel I know<br />
(Diamond Tough Tools; 888-595-5995;<br />
cost: about $13), It's worth buying one<br />
even if you use it only once.<br />
With all the joints<br />
filled and excess<br />
grout re-<br />
moved with the trowel, let the grout sit until<br />
it begins to firm and you see a dry film on<br />
the tile. Then it's time to began cleaning the<br />
tile. You'll need at least two good hydro<br />
sponges (sold at tile-supply stores) and a<br />
large bucket of clean, cool water. After wetting<br />
and wringing out the sponge, wipe the<br />
surface to get even grout joints. Then, with a<br />
rinsed sponge, use one side of the sponge for<br />
one wipe in a diagonal direction (photo 15,<br />
below). After using both sides of the sponge,<br />
wring it out (photo 16, below). Change the<br />
water frequently to avoid spreading dirty water<br />
on the tile. You may have to make several<br />
passes until all the residue is gone.<br />
After the floor dries, you will see a film on<br />
the tile surface. This film can be polished off,<br />
but wait a bit until the grout is firmly set.<br />
Dennis Hourany owns Elite Tile in Walnut Creek,<br />
California. Photos by Scott Gibson.<br />
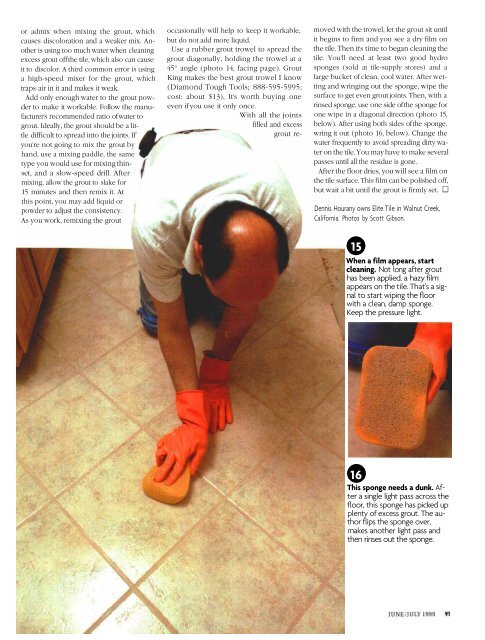
15<br />
When a film appears, start<br />
cleaning. Not long after grout<br />
has been applied, a hazy film<br />
appears on the tile. That's a signal<br />
to start wiping the floor<br />
with a clean, damp sponge.<br />
Keep the pressure light.<br />
16<br />
This sponge needs a dunk. After<br />
a single light pass across the<br />
floor, this sponge has picked up<br />
plenty of excess grout. The author<br />
flips the sponge over,<br />
makes another light pass and<br />
then rinses out the sponge.