Viola M2M Gateway - Viola Systems
Viola M2M Gateway - Viola Systems
Viola M2M Gateway - Viola Systems
Create successful ePaper yourself
Turn your PDF publications into a flip-book with our unique Google optimized e-Paper software.
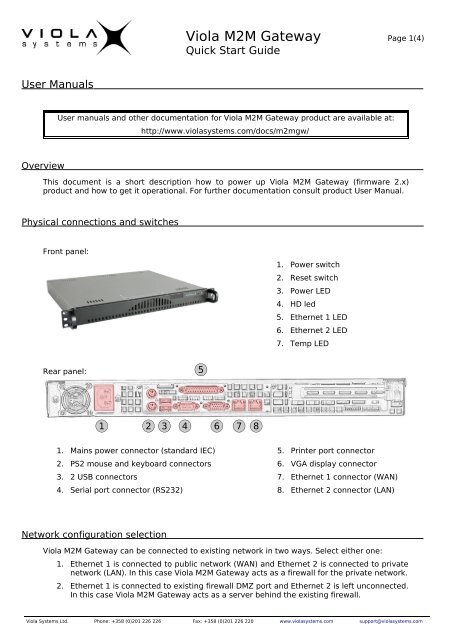
<strong>Viola</strong> <strong>M2M</strong> <strong>Gateway</strong> Page 2(4)Quick Start GuideSetting IP Address Using Web Browser1. Connect the cross-over Ethernet cable between <strong>Viola</strong> <strong>M2M</strong> <strong>Gateway</strong> (Ethernet 1connector) and your configuration computer.2. Configure your computer to use the same IP address space than <strong>Viola</strong> <strong>M2M</strong> <strong>Gateway</strong>(laptop IP for example 10.10.10.11 with netmask 255.0.0.0). Check with ping command.3. Connect to the <strong>Viola</strong> <strong>M2M</strong> <strong>Gateway</strong> using your web browser. The default IP address of<strong>Viola</strong> <strong>M2M</strong> <strong>Gateway</strong> is 10.10.10.10 (netmask 255.0.0.0). Note that you have to connectto a HTTPS port 10000 (see picture below).4. Your browser might mention about certificates, you can safely ignore them at this point.5. When you get to the login screen enter username and password and press Login button.Note: Default username is root and default password is m2m. It is recommended thatthe default password is changed before the product is connected to a public network.6. Now you should be logged in a see a configuration menu.7. Select Network Configuration icon on the first page.8. From the next screen select Network Interfaces icon.9. Below the text “Interfaces Activated at Boot Time” select eth0.10. Enter your preferred configuration to the configuration fields.11. Press Save and Apply button when you are ready to activate your new settings.Note that your existing web browser connection hangs up after you apply the settings,so open a new connection to the new IP address (check your Ethernet cabling)12. Now you should be able to connect to the <strong>Viola</strong> <strong>M2M</strong> <strong>Gateway</strong> with your new IP address.Changing system passwordThe system default password should always be changed to a more secure one.1. From the top icon row on the blue background, select System icon.2. From the System page select Change Passwords icon.3. From the user list select user root.4. Enter new system password and press Change to commit the new password.Configuring firewallDefault firewall rules allow only Arctic traffic. Here are the instructions how to adjust them:1. From the top icon row on the blue background, select Networking icon.2. From the Networking page select Linux Firewall icon.3. Existing firewall rules can be modified by clicking the Action text (colored Drop/Accept).4. Adding new rules can be done by clicking the blue arrows on the left side of the rules.5. Modified rules can be applied or old rules can be reseted using the buttons at the end ofthe page.<strong>Viola</strong> <strong>Systems</strong> Ltd. Phone: +358 (0)201 226 226 Fax: +358 (0)201 226 220 www.violasystems.com support@violasystems.com
<strong>Viola</strong> <strong>M2M</strong> <strong>Gateway</strong> Page 4(4)Quick Start GuideCreating L2TP-VPN tunnelRequirements (see product User Manuals for further information):• <strong>Viola</strong> <strong>M2M</strong> <strong>Gateway</strong> and <strong>Viola</strong> Arctic with preconfigured IP addresses.• <strong>Viola</strong> Arctic configured to use <strong>Viola</strong> <strong>M2M</strong> <strong>Gateway</strong> as L2TP-VPN server.Creating a new connection:1. Login to the <strong>Viola</strong> <strong>M2M</strong> <strong>Gateway</strong> graphical user interface.2. From the first page select L2TP-VPN configuration icon.3. From the L2TP-VPN configuration screen select Add peer button.4. Fill in the settings for the tunnel. For simple point-to-point tunnel only peer name and IPpair are needed. Peer name is the hostname of the <strong>Viola</strong> Arctic that forms the other endof the tunnel. IP pair is an IP pair that does not conflict with any other address used.5. Routing mode selects if the network on the other side of the tunnel is routed thoroughthe tunnel. Remote network IP and network mask define the remote network routedthorough the tunnel.6. Username and password must be the same than on the <strong>Viola</strong> Arctic.7. When you are done, press Confirm button to save the settings. The tunnel should nowbe added to the tunnel list.8. Enable the tunnel by clicking Enable text.9. The connection can be tested by selecting the checkbox next to the peer name andpressing the Start check button.Note that <strong>Viola</strong> Arctic may take some time before it forms the connection.Using backup functionThe Backup module saves user made settings of the <strong>Viola</strong> <strong>M2M</strong> <strong>Gateway</strong>. It backupsconfiguration files and keys of VPN tunnels and firewall settings.Creating backup:From the first page select <strong>Viola</strong> <strong>M2M</strong> Backup icon and press create backup button to create abackup file.Restoring backup:Press open button to select the backup you want to restore and press restore backup buttonto restore the backup.Restoring backup on a different <strong>Viola</strong> <strong>M2M</strong> <strong>Gateway</strong>:To restore a backup on a different machine, the backup file has to be copied into the/opt/viola/m2mBackups/ directory on the second machine. Besides that the MD5 file has alsoto be copied onto the new machine. This file has to copied into the /opt/viola/MD5/ directory.After restoring the backup as described above, the IP address has to be changed to the IPaddress of the machine the backup was created on. Afterwards the secondary unit canreplace the primary unit seamlessly without any further configuration.Final wordsIn order to get better understanding about the <strong>Viola</strong> <strong>M2M</strong> <strong>Gateway</strong> product, it is recommendedto read the User Manual, as it will help you during the installation process. Building morecomplex networking schemes requires more knowledge about networking, especially routing.<strong>Viola</strong> <strong>Systems</strong> Ltd. Phone: +358 (0)201 226 226 Fax: +358 (0)201 226 220 www.violasystems.com support@violasystems.com


