the kent brake noise elimination system - Kent-Automotive.com
the kent brake noise elimination system - Kent-Automotive.com
the kent brake noise elimination system - Kent-Automotive.com

You also want an ePaper? Increase the reach of your titles
YUMPU automatically turns print PDFs into web optimized ePapers that Google loves.
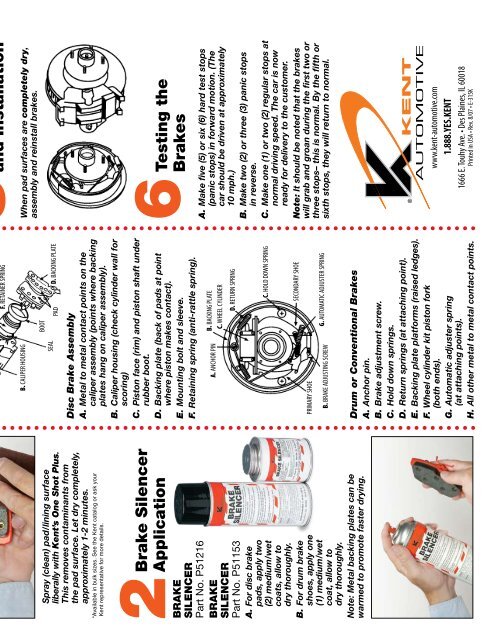
Spray (clean) pad/lining surfaceliberally with <strong>Kent</strong>’s One Shot Plus.This removes contaminants from<strong>the</strong> pad surface. Let dry <strong>com</strong>pletely,approximately 1-2 minutes.*Available in bulk sizes. See <strong>the</strong> <strong>Kent</strong> catalog or ask your<strong>Kent</strong> representative for more details.2Brake SilencerApplicationBRAKESILENCERPart No. P51216BRAKESILENCERPart No. P51153A. For disc <strong>brake</strong>pads, apply two(2) medium/wetcoats, allow todry thoroughly.B. For drum <strong>brake</strong>shoes, apply one(1) medium/wetcoat, allow todry thoroughly.Note: Metal backing plates can bewarmed to promote faster drying.F. RETAINER SPRINGB. CALIPER HOUSINGSEALBOOTPAD D. BACKING PLATEDisc Brake AssemblyA. Metal to metal contact points on <strong>the</strong>caliper assembly (points where backingplates hang on caliper assembly).B. Caliper housing (check cylinder wall forscoring)C. Piston face (rim) and piston shaft underrubber boot.D. Backing plate (back of pads at pointwhere piston makes contact).E. Mounting bolt and sleeve.F. Retaining spring (anti-rattle spring).A. ANCHOR PINB. BACKING PLATEC. WHEEL CYLINDERD. RETURN SPRINGC. HOLD DOWN SPRINGSECONDARY SHOEPRIMARY SHOEB. BRAKE ADJUSTING SCREWG. AUTOMATIC ADJUSTER SPRINGDrum or Conventional BrakesA. Anchor pin.B. Brake adjustment screw.C. Hold down springs.D. Return springs (at attaching point).E. Backing plate platforms (raised ledges).F. Wheel cylinder kit piston fork(both ends).G. Automatic adjuster spring(at attaching points).H. All o<strong>the</strong>r metal to metal contact points.5and InstallationWhen pad surfaces are <strong>com</strong>pletely dry,assembly and reinstall <strong>brake</strong>s.6Testing <strong>the</strong>BrakesA. Make five (5) or six (6) hard test stops(panic stops) in forward motion. (Thecar should be driven at approximately10 mph.)B. Make two (2) or three (3) panic stopsin reverse.C. Make one (1) or two (2) regular stops atnormal driving speed. The car is nowready for delivery to <strong>the</strong> customer.Note: It should be noted that <strong>the</strong> <strong>brake</strong>swill grab and groan during <strong>the</strong> first two orthree stops– this is normal. By <strong>the</strong> fifth orsixth stops, <strong>the</strong>y will return to normal.www.<strong>kent</strong>-automotive.<strong>com</strong>1.888.YES.KENT1666 E. Touhy Ave. • Des Plaines, IL 60018Printed in USA • Rev. 8/07 • E-315K