Hardware Maintenance Manual - Lenovo
Hardware Maintenance Manual - Lenovo
Hardware Maintenance Manual - Lenovo

Create successful ePaper yourself
Turn your PDF publications into a flip-book with our unique Google optimized e-Paper software.
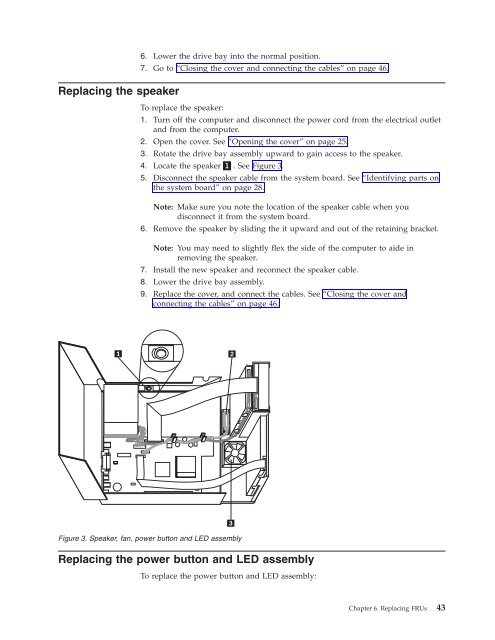
Replacing the speaker<br />
6. Lower the drive bay into the normal position.<br />
7. Go to “Closing the cover and connecting the cables” on page 46.<br />
To replace the speaker:<br />
1. Turn off the computer and disconnect the power cord from the electrical outlet<br />
and from the computer.<br />
2. Open the cover. See “Opening the cover” on page 25.<br />
3. Rotate the drive bay assembly upward to gain access to the speaker.<br />
4. Locate the speaker▌1▐. See Figure 3.<br />
5. Disconnect the speaker cable from the system board. See “Identifying parts on<br />
the system board” on page 28.<br />
Note: Make sure you note the location of the speaker cable when you<br />
disconnect it from the system board.<br />
6. Remove the speaker by sliding the it upward and out of the retaining bracket.<br />
Note: You may need to slightly flex the side of the computer to aide in<br />
removing the speaker.<br />
7. Install the new speaker and reconnect the speaker cable.<br />
8. Lower the drive bay assembly.<br />
9. Replace the cover, and connect the cables. See “Closing the cover and<br />
connecting the cables” on page 46.<br />
Figure 3. Speaker, fan, power button and LED assembly<br />
Replacing the power button and LED assembly<br />
To replace the power button and LED assembly:<br />
Chapter 6. Replacing FRUs 43