XLS1000 - DST-AU Home
XLS1000 - DST-AU Home
XLS1000 - DST-AU Home
- No tags were found...

Create successful ePaper yourself
Turn your PDF publications into a flip-book with our unique Google optimized e-Paper software.
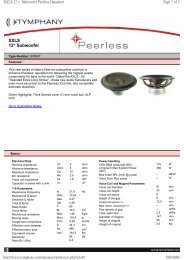
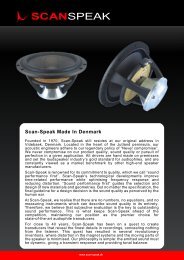
<strong>XLS1000</strong> DUAL 12" SUBWOOFERSuper low, super loud and super clean bass. This ultra-high performance,audio phyle sub-woofer gives out copious amounts of very tight, very fastand very acurate bass. Designed for both distortion-free music and earthshaking home theater special effects, the <strong>XLS1000</strong> can faithfully reproduceany bass signal from the highly demanding DVD and Super-Audio CD sources.The <strong>XLS1000</strong> will fill larger sized rooms with beautifully accurate bass ofclarity and definition only achievable in an exceptionally well designedunit. The new dual 12" XLS radiator design will effortlessly reproduce themost demanding bass without distortion or "boomyness" up to incrediblesound levels. Passive radiator technology has been used in our design toeliminate port air velocity noise, increase efficiency and achieveincredibly low bass in a relatively compact unit of only 60L. A truly top-ofthe-line,high performance sub-woofer that will match to any high-endspeaker and theater system.Available with Built-In AmplifierOr without - For an external Amp.12" Peerless XLS 300Wrms Active Driver12" Peerless XLS Passive RadiatorNo Port Velocity Noises at high volumesUse our 200W amp or connect your ownAttractive "Piano" Black Polished FinishGenuine Aussie wood feature panelSeven "Aussie Hard Wood" BracingInterlocking cabinate jointsSuper low frequency responseSuper high output levelsSuper low distortionExtreem performance andMaximum efficiency designdanish sound technologyAustralianMade BoxesWith DanishSpeakers<strong>AU</strong>STRALIANDISTRIBUTORCOMPONENTS AustAsiaenquiries@wescomponents.com Phone (02)9797-9866 Fax1 (02)9716-6015 Fax2 (02)9799-7051NOV.2002
XLSeXtra Long StrokePeerless Sub WoofersPeerless <strong>XLS1000</strong>12" SUB-WOOFERInstruction SheetDesigned By Russell StoreyCONTENTS OF <strong>XLS1000</strong> KIT:CAB1000-xx Cabinet (xx=Colour Code)With Black Speaker GrillWith Wood Feature PanelWoofer 12" 830500 Peerless XLS SubPassive 12" 830548 Peerless XLS SubScrews x20 STS8B (8mmx25mm)Gasket Tape Approx' 2 metreGrill ClipsSGC12CONTENTS OF XLS1002 KIT:Components as above but with AMP.CAB1002-xx Cabinet (xx=Colour Code)S200W200Wrms Sub-AmpOPTIONAL:Spiked FeetSPIKE35 x4Staple internal waddingInsert S200W AmplifierInsert Passive RadiatorAttach Cables andInsert Main DriverAttach Spiked FeetGlue Feature PanelTest and setupWES Components 138 Liverpool Rd Ashfield 2131 PH (02)9797-9866 FAX (02)9716-6015Designed by Russell Storey - Stones Sound Studio Po Box 94 Tyalgum 2484 - www.wescomponents.com/sss/
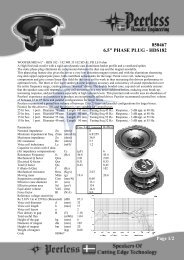
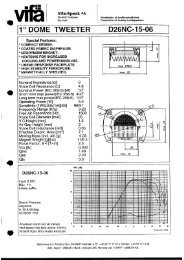
XLSeXtra Long StrokePeerless Sub WoofersPeerless <strong>XLS1000</strong>Contents <strong>XLS1000</strong> & XLS1002 Kit:CAB1000-xx Cabinet (xx=Colour Code)With Black Speaker GrillWith Wood Feature PanelWoofer 12" 830500 Peerless XLS SubPassive 12" 830548 Peerless XLS SubS200W 200Wrms Sub-Amp (XLS1002)Screws x20 STS8B (8mmx25mm)Gasket TapeApprox' 2 metreOPTIONAL:Spiked FeetSPIKE35 x4ESSENTIAL FOR STABLE BASS PERFORMANCE.<strong>XLS1000</strong> - No Amplifier Hole. Blank.XLS1002 - Includes S200W Amp & Hole.Both units are identical other thanthe amplifier being supplied or not.Please follow instructions carefullyfor best results. Please take care asnot to scratch the Piano finish paint.Spiked feet are recommended.Instruction SheetCHECK THE CONTENTS!READ THE INSTRUCTIONS!Check that all contents of the kitare supplied and in good condition.Make sure you have a clean workarea. It is recommended you use adrop sheet so that your work doesnot scratch the cabinet.RIGHTXLS1002 is shown here with its S200W amplifier and hole in cabinet to suit.<strong>XLS1000</strong> is without a hole for the S200W amplifier. This boxrequires either a hole cut into it to suit your choice of inbuiltamplifier or requires speaker cable access via a small hole or ourJ706 recessed single speaker socket. We would suggest youlocate this on the bottom of the box for an attractive concealment.orLEFTLOOK HERE! READ ME! IMPORTANT!Once you have taken the box out of the packaging, you shouldmake a decision on the box orientation that you desire. This iswhether you want the Amplifier and/or wood feature panel to theLEFT or to the RIGHT of the front driver. Once this choice ismade you will know which side is the bottom and thus where toput the feet which require holes to be drilled to affix.5cm5mm Drill BitFor an improved, tight bass response it is highly recommended that you attach some heavy-duty spiked feet to the <strong>XLS1000</strong>.For our recommended SPIKE35, a 5mm hole is drilled on all 4 corners (in about 5 to 7cm from the edge). A nut and bolt is used to affixthe feet, so it is recommended that you do the feet first, for easy bolt access and for better box stability when installing the drivers, etc.WES Components 138 Liverpool Rd Ashfield 2131 PH (02)9797-9866 FAX (02)9716-6015Designed by Russell Storey - Stones Sound Studio - www.wescomponents.com/sss/
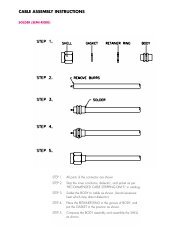
Place your speaker cabinet on a non-slip, non-scratch surface.Identify the orientation of the box as you desire (Left or Right).Insert the Amplifier.The ports are on the bottom side, so make sure you install theamp upright. Pilot holes are pre-drilled so simply screw in thesupplied screws, caution that you don't thread the screws byover tightening. If using an electronic screwdriver, adjust to amedium/high torque setting. Beware which way is UP!Insert the Wadding.The internals require some dampening.Ensure you cover the amplifiers plasticcover, but allowing the connectioncable thru. Split theremains into strips andplace BETWEEN thebracing battens on thetop, bottom, left and right panels. Don't allow any of the wadding totouch any part of the drivers. Use a staple gun or appropriate glue.Affix the wadding to the side of the cabinet, stapling down alledges and loose areas.Apply the gasket tape.For a good air-tight seal between the speaker and cabinet,it is required that you apply gasket tape around the wholecircumference of the flange on both of the woofers.Passive RadiatorInsert the Passive Radiator.This is the driver without any magnet. It is mounted on the rear ofthe cabinet. Identified as the hole without the feature panel or grillmounting plugs. Gradually tighten each screw, traversing acrossthe woofer. Carefully, ensure the wadding does not interfere withthe driver and that the gasket seals tight and proper and you don'tthread the screws or accidentally slip and puncture the cone!APPLYING GASKET TAPEAROUND THE DRIVERSIS VERY IMPORTANT !SOLDERING IS RECOMMENDEDInsert the Speaker.Cabling is supplied with the amp and will connect directly to the 12" driver.We highly recommend that you solder this connection for reliability. Makesure the cable is not going to rattle on the drivers cone. Now simply locatethe driver into the flush hole and apply the screws, again tighteningcarefully as not to strip them or slip and puncture the cone.Feature PanelYou may wish to leave this untill after the testing stage.Please affix the panel carefully with the appropriateGLUE (Not Supplied) and let dry as per glueinstructions. The front is identified by the grill sockets.WES Components 138 Liverpool Rd Ashfield 2131 PH (02)9797-9866 FAX (02)9716-6015Designed by Russell Storey - Stones Sound Studio - www.wescomponents.com/sss/
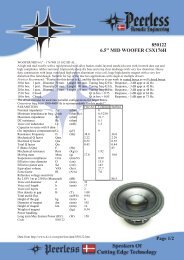
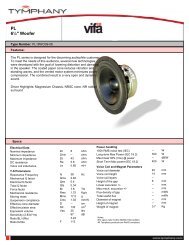
ECBA8765432REVISIONSREV. DESCRIPTIONDATE APPROVED1Stones Sound Studio<strong>AU</strong>DIOPHILE 12" XLS SUBWOOFER - <strong>XLS1000</strong> & XLS1002ECBA87654NEXT ASSY. USED ONAPPLICATIONAudiophile Satellite Monitors or <strong>Home</strong> TheatreITEMNO.1x Peerless 12" Cast Alloy Composite Fibre Cone Sub Driver 8305001x Peerless 12" Cast Alloy Composite Fibre Cone Passive Radiator 830548"Tweaked-Up" S200W Subwoofer Amplifier 200WrmsUNLESS OTHERWISE SPECIFIEDDIMENSIONS ARE IN MILLIMETRESTOLERANCES ARE +/- 5mmS200W WES Components200Wrms Built-In AmplifierFlange = 250x250mmHole = 220x220mmMATERIALHigh Density Particle Board(MDF) Laminated/PaintedFINISHPremium Piano Type Black Painted Finishwith Wood Veneer Feature PanelSpike Feet Locations Not ShownConstructors Discretion3PART NUMBERR1000KS (SSS#)CAD DRAWING,MANUALLY UPDATE TO SUITWOOD THICKNESS (32mm)APPROVALS DATEDRAWN10-09-2003From Box. Jim RyanCHECKEDVOLUMESupplied by theDesigner:Russell Storey2General Dimensions Diagram15-07-2002WES Components*** Note ***"~"= Approximate Only due to cabinet Thickness & may vary from diagramwith thickness of timber wall - <strong>XLS1000</strong> = 32mm MDF.Outside Dimension = Inside + Eg 32mm MDFFEATURE PANEL AND FRONT GRILL32mm think. All outer edges beveled.Beware of dimensions as determinedby cabinet wall thickness and tolerances32x42mm Hardwood BracingShown counter-sunk into walls(<strong>XLS1000</strong>) but not necessary.X2 each wall except AMP wallonly one to allow space for S200Walso depend on cloth grill thickness, etc.Feature Panel Width + Grill Width + Cloth.Genuine Australian Wood Feature PanelCabinet is universal in that the front/backcan be swapped for the amplifier hole tobe on the left or right.~395mm~32mm~40mm~40mm~32mmGrill Clips 10mm~200125mm280+5mm Deep310mm Bevel~260mm460mm~395mm"Back" 12" Passive Radiator325mmHole S200W220x220mm5mm Bevel250x250mm~420mm485mmSpiked feet should be attached,essential for stability, after final assembly.ALL INNER EDGES ARE BEVELEDTo reduce turbulence, less distortion.All beveled edges are optional but recommended.460mm 460mm~55~395mm"Front" 12" XLS Driver Grill Frame280+5mm Deep310mm BevelIdentical to belowBut FlippedPlus Grill Clips83050083054890mm55Line Up Grill Clips With Front Panel830500830548XLS1002 [With Amplifier Cut-Out]<strong>XLS1000</strong> [With NO Cut-Out]MATERIAL SPECS.32mm MDF<strong>AU</strong>DIOPHILE SUB WOOFERCAB1000 / 1002SIZE DWG. NO.A3SCALE XX:XX CAD FILE: HDS1000_INS.cdr SHEET 1of11QTY.REV....\Kit_Instruction_Manuals\Finals\<strong>XLS1000</strong>_INS.cdrDesigned by Russell Storey - Stones Sound Studio - www.wescomponents.com/sss/