DH100ACDCLP Air Duct Smoke Detector with Extended Air Speed ...
DH100ACDCLP Air Duct Smoke Detector with Extended Air Speed ...
DH100ACDCLP Air Duct Smoke Detector with Extended Air Speed ...
- No tags were found...

Create successful ePaper yourself
Turn your PDF publications into a flip-book with our unique Google optimized e-Paper software.
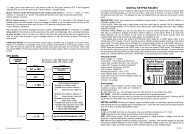
[3] Figure 1: Exploded View Of <strong>Duct</strong> <strong>Smoke</strong> <strong>Detector</strong> ComponentsFOAMGASKETSSAMPLING TUBEFILTERSCONDUIT HOLESDETECTORHOUSINGPLASTICSAMPLING TUBETERMINAL STRIPPOWER BOARDPLASTIC SAMPLING TUBESELF-TAPPING SCREWCOVER MOUNTINGSCREWSDETECTOR BOARDDETECTORCOVER[4] Contents Of The <strong>Duct</strong> <strong>Smoke</strong> <strong>Detector</strong> Kit1. Complete housing base and cover assembly2. Two #10 machine screws for mounting3. Two sampling tube filters4. One test magnet5. Drilling template6. Two foam gaskets7. Four #6-self tapping mounting screws for the metalsampling tube and optional exhaust tube extension8. Two jack nuts9. One inlet tube end plug10. One plastic sampling tube11. One #8 self-tapping screw for the plastic sampling tubeNOTE: For ducts over 1 1 ⁄2 feet, longer inlet sampling tubesmust be ordered to complete the installation. Theymust be the correct length for the width of the ductwhere they will be installed. See Table 1 on page 3to determine the inlet tube required for differentduct widths.[5] Installation Sequence[5.1] Verify <strong>Duct</strong> <strong>Air</strong> Flow Direction And VelocityModel <strong>DH100ACDCLP</strong> detectors are designed to be used inair handling systems having air velocities of 100 to 4000feet per minute. Be sure to check engineering specificationsto ensure that the air velocity in the duct falls <strong>with</strong>in theseparameters. If necessary, use a velocity meter (anemometer)to check the air velocity in the duct.[5.2] Drill The Mounting HolesRemove the paper backing from the mounting templatesupplied. Affix the template to the duct at the desiredmounting location. Make sure the template lies flat andsmooth on the duct. Center punch holes A and B. Drill theholes as indicated on the template. Insert the two jack nutreceptacles. Drive a #10 machine screw into jacket to flarethe retainer, then back out the screw to use for detectormounting.[5.2.1] Sampling Tube Installation for <strong>Duct</strong>s LessThan 1 1 ⁄2 Feet Wide (see Figure 2)1. Remove the front cover.2. Slide the plastic sampling tube into the housing bushing.3. Align the holes in the bushing <strong>with</strong> the holes in the samplingtube. Make sure there are 6 exposed holes on theplastic sampling tube. Secure <strong>with</strong> the #8 self-tappingscrew into the bottom of the permanent tube (shown inFig. 2).NOTE: For ducts greater than 1 1 ⁄2 feet in width, refer tosections [5.4.1] and [5.4.2].Figure 2. Plastic sampling tube connected to ductsmoke detector:[5.3] Secure The <strong>Detector</strong> Housing To The <strong>Duct</strong>Slide the foam gaskets over the tube bushings as shown inFigure 3. Use the two machine screws to screw the detectorhousing to the duct.CAUTION: Do not overtighten the screws.D200-14-00 2 I56-0084-00