RD-600 Sequencing (PDF) - Roland Corporation Australia
RD-600 Sequencing (PDF) - Roland Corporation Australia
RD-600 Sequencing (PDF) - Roland Corporation Australia
- No tags were found...

Create successful ePaper yourself
Turn your PDF publications into a flip-book with our unique Google optimized e-Paper software.
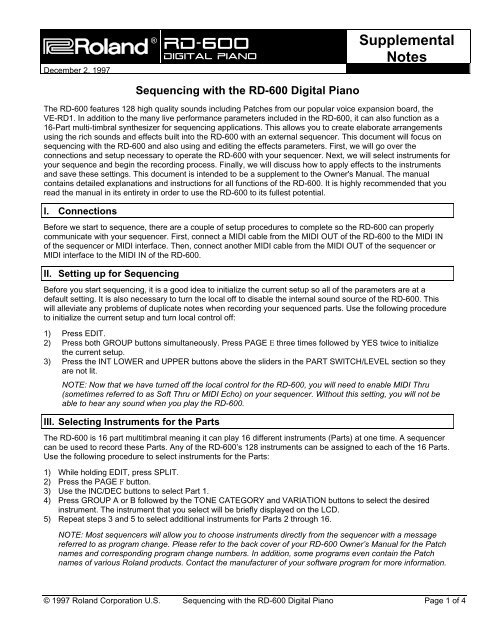
®®ÂØÒňΠ<strong>RD</strong>-<strong>600</strong>Digital PianoDecember 2, 1997SupplementalNotes<strong>Sequencing</strong> with the <strong>RD</strong>-<strong>600</strong> Digital PianoThe <strong>RD</strong>-<strong>600</strong> features 128 high quality sounds including Patches from our popular voice expansion board, theVE-<strong>RD</strong>1. In addition to the many live performance parameters included in the <strong>RD</strong>-<strong>600</strong>, it can also function as a16-Part multi-timbral synthesizer for sequencing applications. This allows you to create elaborate arrangementsusing the rich sounds and effects built into the <strong>RD</strong>-<strong>600</strong> with an external sequencer. This document will focus onsequencing with the <strong>RD</strong>-<strong>600</strong> and also using and editing the effects parameters. First, we will go over theconnections and setup necessary to operate the <strong>RD</strong>-<strong>600</strong> with your sequencer. Next, we will select instruments foryour sequence and begin the recording process. Finally, we will discuss how to apply effects to the instrumentsand save these settings. This document is intended to be a supplement to the Owner's Manual. The manualcontains detailed explanations and instructions for all functions of the <strong>RD</strong>-<strong>600</strong>. It is highly recommended that youread the manual in its entirety in order to use the <strong>RD</strong>-<strong>600</strong> to its fullest potential.I. ConnectionsBefore we start to sequence, there are a couple of setup procedures to complete so the <strong>RD</strong>-<strong>600</strong> can properlycommunicate with your sequencer. First, connect a MIDI cable from the MIDI OUT of the <strong>RD</strong>-<strong>600</strong> to the MIDI INof the sequencer or MIDI interface. Then, connect another MIDI cable from the MIDI OUT of the sequencer orMIDI interface to the MIDI IN of the <strong>RD</strong>-<strong>600</strong>.II. Setting up for <strong>Sequencing</strong>Before you start sequencing, it is a good idea to initialize the current setup so all of the parameters are at adefault setting. It is also necessary to turn the local off to disable the internal sound source of the <strong>RD</strong>-<strong>600</strong>. Thiswill alleviate any problems of duplicate notes when recording your sequenced parts. Use the following procedureto initialize the current setup and turn local control off:1) Press EDIT.2) Press both GROUP buttons simultaneously. Press PAGE E three times followed by YES twice to initializethe current setup.3) Press the INT LOWER and UPPER buttons above the sliders in the PART SWITCH/LEVEL section so theyare not lit.NOTE: Now that we have turned off the local control for the <strong>RD</strong>-<strong>600</strong>, you will need to enable MIDI Thru(sometimes referred to as Soft Thru or MIDI Echo) on your sequencer. Without this setting, you will not beable to hear any sound when you play the <strong>RD</strong>-<strong>600</strong>.III. Selecting Instruments for the PartsThe <strong>RD</strong>-<strong>600</strong> is 16 part multitimbral meaning it can play 16 different instruments (Parts) at one time. A sequencercan be used to record these Parts. Any of the <strong>RD</strong>-<strong>600</strong>’s 128 instruments can be assigned to each of the 16 Parts.Use the following procedure to select instruments for the Parts:1) While holding EDIT, press SPLIT.2) Press the PAGE F button.3) Use the INC/DEC buttons to select Part 1.4) Press GROUP A or B followed by the TONE CATEGORY and VARIATION buttons to select the desiredinstrument. The instrument that you select will be briefly displayed on the LCD.5) Repeat steps 3 and 5 to select additional instruments for Parts 2 through 16.NOTE: Most sequencers will allow you to choose instruments directly from the sequencer with a messagereferred to as program change. Please refer to the back cover of your <strong>RD</strong>-<strong>600</strong> Owner’s Manual for the Patchnames and corresponding program change numbers. In addition, some programs even contain the Patchnames of various <strong>Roland</strong> products. Contact the manufacturer of your software program for more information.© 1997 <strong>Roland</strong> <strong>Corporation</strong> U.S. <strong>Sequencing</strong> with the <strong>RD</strong>-<strong>600</strong> Digital Piano Page 1 of 4
®ÂØÒňÎ<strong>RD</strong>-<strong>600</strong> Supplemental NotesVII. Applying Reverb and ChorusAdding reverb to a part will create an ambiance to a sound. It can give you the feeling of playing in a concert hall.Chorus can broaden the sound, adding depth and luster to a Part. The following chart lists the parametersavailable for editing:REVERBCHORUSType Room1, Room2, Stage1, Stage2, Hall1, Hall2 Level The level of the chorus effect.Delay and Pan-DelayLevel The level of the reverb effect. Rate The speed of the chorus effect.Time Sets the length of time the reverb will continue. Depth Sets the depth that the chorus willmodulate.HF Damp Sets the frequency that the high range will be cut. PreDelay Adjusts the amount of time before thechorus effect begins to sound.DelayFeedbackAdjusts the amount of times the delay will repeat. Feedback Adjusts the amount of chorus sound thatis returned or fed back into the chorus.Output Determines how the chorus and reverbwill be connected before being sent to theoutput.Use the following procedure to change the Reverb settings:1) While holding EDIT, press the REVERB button repeatedly to step through the different parameter settingslisted above.2) Use the INC/DEC buttons to change the values for these settings.Use the following procedure to change the Chorus settings:1) While holding EDIT, press the CHORUS button repeatedly to step through the different parameter settingslisted above.2) Use the INC/DEC buttons to change the values for these settings.Now that you have defined the overall Reverb and Chorus settings for this setup, use the following procedure todefine the Reverb and Chorus amount for each Part in your sequence:1) While holding EDIT, press SPLIT.2) Press the PAGEF button.3) Use the INC/DEC buttons to select the desired Part.4) While holding EDIT, press REVERB or CHORUS to display the Reverb or Chorus Amount parameter.5) Use the INC/DEC buttons to set the effect amount for the currently selected Part.VIII. Saving the SetupAll of the changes thus far are only in temporary memory. This means that the changes will revert back to theiroriginal settings if the <strong>RD</strong>-<strong>600</strong> is turned off or if a new Setup is selected. We must write the settings to a Setup inorder to retain them for future use. Use the following procedure to save your settings to an Internal Setup:1) Press EDIT so it is lit.2) Press both GROUP buttons simultaneously.3) Use the INTERNAL TONE CATEGORY and INTERNAL TONE VARIATION buttons to select the desiredSetup destination.4) Press INC/YES.Use the following procedure to recall the saved Setup:1) Press both GROUP buttons simultaneously.2) Use the INTERNAL TONE CATEGORY and INTERNAL TONE VARIATION buttons to select a Setup.© 1997 <strong>Roland</strong> <strong>Corporation</strong> U.S. <strong>Sequencing</strong> with the <strong>RD</strong>-<strong>600</strong> Page 3 of 4
®ÂØÒňÎ<strong>RD</strong>-<strong>600</strong> Supplemental NotesIX. Customizing The KeyboardHere are some extra features available to help you in the operation of the <strong>RD</strong>-<strong>600</strong>:Use the following procedure to set the <strong>RD</strong>-<strong>600</strong> to power up with your current Setup:1) While holding EDIT, press SPLIT.2) Press the PAGE F button three times to select Powerup Mode.3) Press INC/YES to change DEFAULT to LAST.There is a Control Channel setting in the <strong>RD</strong>-<strong>600</strong> that will allow you to change Setups with a MIDI programchange message. Use the following procedure to set the Control Channel:1) From the Powerup Mode page, press the PAGE F button three times to select Control Ch.2) Use the INC and DEC buttons to select a MIDI channel that will not be used in your sequence (i.e. Channel16). If you set the Control Channel to a channel that you are using, you may inadvertently change your Setupinstead of the desired Patch.NOTE: Sending a program change from 1-64 to MIDI Channel 16 will now change entire Setups.3) To disable the Control Channel function press INC and DEC simultaneously.© 1997 <strong>Roland</strong> <strong>Corporation</strong> U.S. <strong>Sequencing</strong> with the <strong>RD</strong>-<strong>600</strong> Page 4 of 4