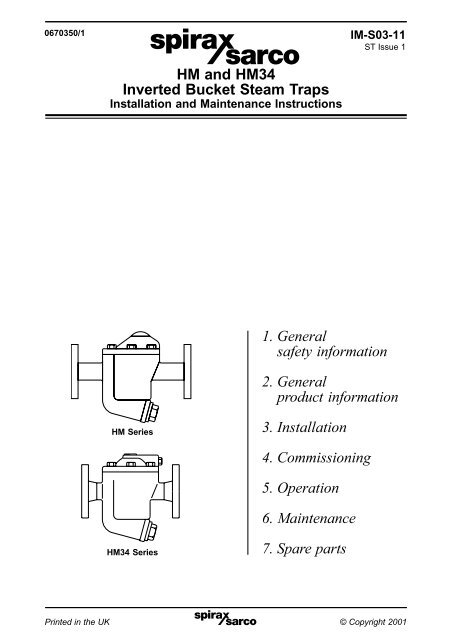
HM and HM34 Inverted Bucket Steam Traps - Spirax Sarco
HM and HM34 Inverted Bucket Steam Traps - Spirax Sarco
HM and HM34 Inverted Bucket Steam Traps - Spirax Sarco

You also want an ePaper? Increase the reach of your titles
YUMPU automatically turns print PDFs into web optimized ePapers that Google loves.
0670350/1<br />
<strong>HM</strong> <strong>and</strong> <strong>HM</strong>34<br />
<strong>Inverted</strong> <strong>Bucket</strong> <strong>Steam</strong> <strong>Traps</strong><br />
Installation <strong>and</strong> Maintenance Instructions<br />
<strong>HM</strong> Series<br />
<strong>HM</strong>34 Series<br />
IM-S03-11<br />
ST Issue 1<br />
1� General<br />
safety information<br />
2� General<br />
product information<br />
3� Installation<br />
4� Commissioning<br />
5� Operation<br />
6� Maintenance<br />
7� Spare parts<br />
Printed IM-S03-11 in the ST UK Issue 1 © Copyright 20011
2<br />
1� General safety information<br />
Safe operation of these units can only be guaranteed if they are properly installed,<br />
commissioned <strong>and</strong> maintained by a qualified person (see Section 11 of the attached<br />
Supplementary Safety Information) in compliance with the operating instructions. General<br />
installation <strong>and</strong> safety instructions for pipeline <strong>and</strong> plant construction, as well as the<br />
proper use of tools <strong>and</strong> safety equipment must also be complied with.<br />
Warning<br />
The body/cover gasket <strong>and</strong> strainer cap gasket contain a thin stainless steel support ring<br />
which may cause physical injury if not h<strong>and</strong>led <strong>and</strong> disposed of carefully.<br />
Isolation<br />
Consider whether closing isolating valves will put any other part of the system or personnel<br />
at risk. Dangers might include; isolation of vents <strong>and</strong> protective devices or alarms.<br />
Ensure isolation valves are turned off in a gradual way to avoid system shocks.<br />
Pressure<br />
Before attempting any maintenance consider what is or may have been in the pipeline.<br />
Ensure that any pressure is isolated <strong>and</strong> safely vented to atmospheric pressure before<br />
attempting to maintain the product, this is easily achieved by fitting <strong>Spirax</strong> <strong>Sarco</strong><br />
depressurisation valves type DV (see separate literature for details). Do not assume<br />
that the system is depressurised even when a pressure gauge indicates zero.<br />
Temperature<br />
Allow time for temperature to normalise after isolation to avoid the danger of burns <strong>and</strong><br />
consider whether protective clothing (including safety glasses) is required.<br />
Disposal<br />
These products are recyclable. No ecological hazard is anticipated with the disposal of<br />
these products providing due care is taken.<br />
IM-S03-11 ST Issue 1
2� General product information<br />
2.1 General description<br />
The <strong>Spirax</strong> <strong>Sarco</strong> <strong>HM</strong> Series inverted bucket steam trap is manufactured in cast iron <strong>and</strong> has an<br />
integral strainer as st<strong>and</strong>ard. It is designed to be installed in horizontal pipework <strong>and</strong> will operate<br />
on steam pressures up to 14 bar g (203 psi g).<br />
The <strong>Spirax</strong> <strong>Sarco</strong> <strong>HM</strong>34 series inverted bucket trap is similar to the <strong>HM</strong> Series but is manufactured<br />
in carbon steel <strong>and</strong> will operate on steam pressures up to 32 bar g (464 psi g).<br />
Note: For further information see the following Technical Information Sheets, TI-S03-02 for the<br />
<strong>HM</strong> Series <strong>and</strong> TI-P072-01 for the <strong>HM</strong>34 Series, which gives full details of:- Materials, sizes <strong>and</strong><br />
pipe connections, dimensions, weights, operating ranges <strong>and</strong> capacities.<br />
Fig. 1 <strong>HM</strong>00 (½") <strong>and</strong> <strong>HM</strong>10 (¾")<br />
Fig. 2 <strong>HM</strong>12 (1")<br />
Fig. 3 <strong>HM</strong>34 (½" <strong>and</strong> ¾")<br />
Fig. 4 <strong>HM</strong>34 (1")<br />
IM-S03-11 ST Issue 1 3
2.2 Sizes <strong>and</strong> pipe connections<br />
<strong>HM</strong> Series<br />
½" (<strong>HM</strong>00), ¾" (<strong>HM</strong>10) <strong>and</strong> 1" (<strong>HM</strong>12) screwed BSP or NPT.<br />
DN15 (<strong>HM</strong>003), DN20 (<strong>HM</strong>103) <strong>and</strong> DN25 (<strong>HM</strong>123) st<strong>and</strong>ard flange BS 4504 <strong>and</strong> DIN PN16.<br />
<strong>HM</strong>34 Series<br />
½", ¾" <strong>and</strong> 1" screwed BSP or NPT <strong>and</strong> socket weld ends BS 3799 Class 3000<br />
DN15, 20 <strong>and</strong> 25 st<strong>and</strong>ard flange BS 4504 PN40.<br />
Flanges also available ANSI 150 <strong>and</strong> ANSI 300.<br />
2.3 Materials<br />
Trap <strong>HM</strong> Series <strong>HM</strong>34 Series<br />
Cover Cast iron Cast steel<br />
Body<br />
4<br />
½" <strong>and</strong> ¾" Cast iron Forged steel<br />
1" Cast iron Cast steel<br />
Internals Stainless steel Stainless steel<br />
Note: For further information on materials see the following Technical Information Sheets:<br />
TI-S03-02 for the <strong>HM</strong> Series <strong>and</strong> TI-P072-01 for the <strong>HM</strong>34 Series.<br />
2.4 Limiting conditions<br />
<strong>HM</strong> <strong>HM</strong>34<br />
Maximum body designed conditions PN16 PN40<br />
PMA - Maximum allowable pressure 16 bar g (232 psi g) 40 bar g (580 psi g)<br />
TMA - Maximum allowable temperature 300°C (572°F) 300°C (572°F)<br />
PMO - Maximum operating pressure 16 bar g (232 psi g) 40 bar g (580 psi g)<br />
TMO - Maximum operating temperature 300°C (572°F) 300°C (572°F)<br />
Designed for a maximum cold<br />
hydraulic test pressure of:<br />
24 bar g (348 psi g) 60 bar g (870 psi g)<br />
IM-S03-11 ST Issue 1
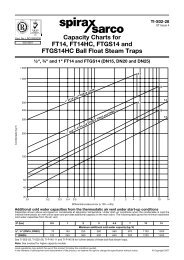
2.5 Operating range<br />
<strong>HM</strong> Series<br />
Temperature °C<br />
300<br />
200<br />
100<br />
<strong>HM</strong>34 Series<br />
300<br />
Temperature °C<br />
200<br />
0 0<br />
<strong>Steam</strong><br />
saturation<br />
curve<br />
DPMX - Maximum differential pressure<br />
Size<br />
2 4 6 8 10 12 14* 16<br />
Pressure bar g<br />
The product must not be used in this region.<br />
*PMO Maximum operating pressure recommended for saturated steam 14 bar g (203 bar g).<br />
DPMX - Maximum differential pressure<br />
Size<br />
Screwed<br />
Flanged<br />
Maximum differential pressure bar<br />
4 8.5 10 12.5 14<br />
½" <strong>HM</strong>00/8 <strong>HM</strong>00/7 <strong>HM</strong>00/6 — —<br />
¾" <strong>HM</strong>10/10 <strong>HM</strong>10/8 — <strong>HM</strong>10/7 —<br />
1" <strong>HM</strong>12/12 <strong>HM</strong>12/10 — — <strong>HM</strong>12/7<br />
DN15 <strong>HM</strong>003/8 <strong>HM</strong>003/7 <strong>HM</strong>003/6 — —<br />
DN20 <strong>HM</strong>103/10 <strong>HM</strong>103/8 — <strong>HM</strong>103/7 —<br />
DN25 <strong>HM</strong>123/12 <strong>HM</strong>123/10 — — <strong>HM</strong>123/7<br />
Note: The pressure limit of the flange type should be greater than the pressure limit of the internal<br />
mechanism selected.<br />
100<br />
<strong>Steam</strong><br />
saturation<br />
curve<br />
0<br />
0<br />
10 20 30 32* 40<br />
Pressure bar g<br />
*PMO<br />
The product must not be used in this region.<br />
Maximum operating pressure recommended for saturated steam 32 bar g (464 bar g).<br />
Maximum differential pressure bar<br />
4 8.5 12 20 32<br />
DN15 - ½" <strong>HM</strong>34/8 <strong>HM</strong>34/7 <strong>HM</strong>34/6 <strong>HM</strong>34/5 <strong>HM</strong>34/4<br />
DN20 - ¾" <strong>HM</strong>34/10 <strong>HM</strong>34/8 <strong>HM</strong>34/7 <strong>HM</strong>34/6 <strong>HM</strong>34/5<br />
DN25 - 1" <strong>HM</strong>34/12 <strong>HM</strong>34/10 <strong>HM</strong>34/8 <strong>HM</strong>34/6 <strong>HM</strong>34/5<br />
Note: The pressure limit of the flange type should be greater than the pressure limit of the internal<br />
mechanism selected.<br />
IM-S03-11 ST Issue 1 5
After installation or maintenance ensure that the system is fully functioning. Carry out tests on<br />
any alarms or protective devices.<br />
6<br />
3� Installation<br />
Note: Before actioning any installation observe the 'Safety information' in Section 1.<br />
Referring to the Installation <strong>and</strong> Maintenance Instructions, name-plate <strong>and</strong> Technical Information<br />
Sheet, check that the product is suitable for the intended installation.<br />
3.1 Check materials, pressure <strong>and</strong> temperature <strong>and</strong> their maximum values. If the maximum<br />
operating limit of the product is lower than that of the system in which it is being fitted,<br />
ensure that a safety device is included in the system to prevent overpressurisation.<br />
3.2 Determine the correct installation situation <strong>and</strong> the direction of fluid flow.<br />
3.3 Remove protective covers from all connections.<br />
3.4 The trap must be installed with the body upright so that the bucket is rising <strong>and</strong> falling<br />
vertically. When superheat conditions exist the trap body may need to be primed with<br />
water prior to steam being turned on to avoid steam blowing through the trap.<br />
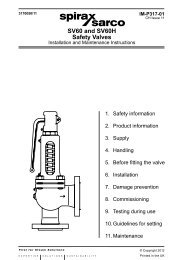
3.5 <strong>Inverted</strong> bucket steam traps do not permit rapid release of air. On process applications, in<br />
particular, this can lead to slow warm-up times <strong>and</strong> waterlogging of the steam space. A<br />
separate external air vent is therefore required in parallel to vent air efficiently. Any bypass<br />
should be positioned above the trap. If it is below, <strong>and</strong> is leaking or left open, the waterseal<br />
could be blown away leading to steam wastage (see Fig. 5). Where inverted bucket<br />
traps are fitted in exposed conditions the possibility of freezing damage can be reduced by<br />
thermal insulation.<br />
3.6 <strong>Traps</strong> must be installed in a horizontal pipeline with the strainer pocket at the bottom. The<br />
inlet of the trap should be below the drain point of the plant being drained, so that a<br />
waterseal can be maintained around the open end of the bucket. A small drop leg should<br />
precede the trap - typically 150 mm (6").<br />
3.7 Where the trap discharges into a closed condensate return system or where there is a lift at<br />
the trap, a check valve should be fitted downstream of the trap.<br />
3.8 If the trap has to be installed at a higher point than the drainage point then a small bore riser<br />
into a 'U' seal should be used. A check valve should be fitted before the trap to prevent the<br />
loss of the internal waterseal. See Fig. 6.<br />
Note: If the trap is to discharge to atmosphere ensure it is to a safe place, the discharging fluid may<br />
be at a temperature of 100 °C (212°F).<br />
4� Commissioning<br />
5� Operation<br />
Under most conditions the trap will discharge condensate with a blast type action. Under low<br />
load <strong>and</strong>/or low pressure applications the discharge may tend to 'dribble'. Condensate is<br />
discharged at steam temperature so due care must be given to the site of the discharge.<br />
IM-S03-11 ST Issue 1
Fig. 5<br />
Fig. 6<br />
'<strong>HM</strong>' trap<br />
Check<br />
valve<br />
Check<br />
valve<br />
Air vent<br />
'<strong>HM</strong>' trap<br />
Bypass<br />
IM-S03-11 ST Issue 1 7
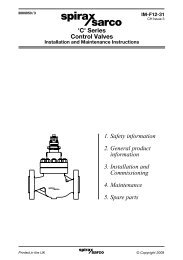
Table 1 Recommended tightening torques<br />
8<br />
or<br />
Item no. Nm (lbf ft)<br />
mm<br />
2<br />
8<br />
13<br />
6� Maintenance<br />
Note: Before actioning any maintenance program observe<br />
the 'Safety information' in Section 1.<br />
Warning<br />
The body/cover gasket <strong>and</strong> strainer cap gasket contain a thin stainless steel support<br />
ring which may cause physical injury if not h<strong>and</strong>led <strong>and</strong> disposed of carefully.<br />
6.1 Before undertaking any maintenance on the trap it must be isolated from both the supply line<br />
<strong>and</strong> return line <strong>and</strong> any pressure allowed to safely normalise to atmosphere. The trap should then<br />
be allowed to cool. When reassembling, ensure that all joint faces are clean.<br />
6.2 How to fit the valve <strong>and</strong> seat assembly:<br />
- Undo the cover bolts <strong>and</strong> nuts (2) <strong>and</strong> remove the cover from the body.<br />
- Unhook the bucket (4) from the valve lever (10).<br />
- Remove the valve guide plate by undoing the two screws (5).<br />
- Remove the seat (8) from the cover.<br />
- Ensure all joining faces are clean <strong>and</strong> then screw in the new seat to the recommended tightening<br />
torque. Use a small amount of joining paste on the threads.<br />
- Fit new valve guide plate with the two screws supplied <strong>and</strong> refit the new lever. Ensure that the<br />
valve <strong>and</strong> seat are aligned correctly before finally tightening the guide plate screws.<br />
- Hook the bucket to the lever <strong>and</strong> ensure gasket faces on the body cover are clean.<br />
- Using a new cover gasket (7) refit the cover to the body ensuring the small ferrule (11) is positioned<br />
correctly. Tighten cover bolts / nuts to the recommended tightening torque (see Table 1).<br />
6.3 How to clean / replace the strainer screen:<br />
- Undo the strainer cap (13) <strong>and</strong> remove the screen (12) <strong>and</strong> gasket (14).<br />
- Clean or replace the strainer screen (12).<br />
- Ensure threads are clean.<br />
- Refit new strainer cap gasket <strong>and</strong> locate the screen in the strainer cap.<br />
- Screw into the body <strong>and</strong> tighten to the recommended torque (see Table 1).<br />
<strong>HM</strong><br />
½" <strong>and</strong> ¾"<br />
1"<br />
M6 x 25<br />
M12 x 45<br />
15 - 16<br />
85 - 95<br />
(11 - 12)<br />
(61 - 68)<br />
½" <strong>and</strong> ¾"<br />
<strong>HM</strong>34<br />
1"<br />
M8 x 30<br />
M12 x 45<br />
25 - 28<br />
25 - 28<br />
(18 - 20)<br />
(18 - 20)<br />
<strong>HM</strong><br />
½" <strong>and</strong> ¾"<br />
1"<br />
13<br />
13<br />
50 - 55<br />
80 - 88<br />
(36 - 40)<br />
(57 - 63)<br />
½" <strong>and</strong> ¾"<br />
<strong>HM</strong>34<br />
1"<br />
13<br />
13<br />
50 - 55<br />
80 - 88<br />
(36 - 40)<br />
(57 - 63)<br />
<strong>HM</strong><br />
½" <strong>and</strong> ¾"<br />
1"<br />
22<br />
27<br />
M28<br />
M32<br />
90 - 100<br />
125 - 145<br />
(64 - 72)<br />
(89 - 104)<br />
½" <strong>and</strong> ¾"<br />
<strong>HM</strong>34<br />
1"<br />
22<br />
27<br />
M28<br />
M32<br />
90 - 100<br />
125 - 145<br />
(64 - 72)<br />
(89 - 104)<br />
IM-S03-11 ST Issue 1
Fig. 7 <strong>HM</strong> Series shown<br />
IM-S03-11 ST Issue 1 9<br />
6<br />
5<br />
8<br />
10<br />
2<br />
Valve seat<br />
assembly<br />
4<br />
11<br />
7<br />
12<br />
14<br />
13<br />
2
10<br />
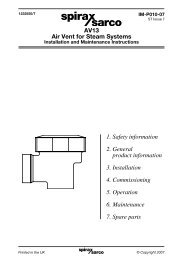
7� Spare parts<br />
The spare parts available are shown in heavy outline. Parts drawn in broken line are not supplied<br />
as spares.<br />
Available spares<br />
Valve <strong>and</strong> seat assembly 5, 6 (2 off), 8, 10<br />
<strong>Bucket</strong> 4<br />
Cover gasket <strong>and</strong> ferrule (packet of 3 each) 7, 11<br />
Strainer screen 12<br />
Strainer screen gasket (packet of 3) 14<br />
Set of cover bolts <strong>and</strong> nuts (set of 6) 2<br />
How to order spares<br />
Always order spares by using the description given in the column headed 'Available spares' <strong>and</strong><br />
state the size <strong>and</strong> series of the trap.<br />
Example: 1 - Valve <strong>and</strong> seat assembly for DN15 <strong>HM</strong>34/7 <strong>Spirax</strong> <strong>Sarco</strong> inverted bucket steam trap.<br />
IM-S03-11 ST Issue 1
Fig. 8 <strong>HM</strong> Series shown<br />
IM-S03-11 ST Issue 1 11<br />
6<br />
5<br />
8<br />
10<br />
2<br />
Valve seat<br />
assembly<br />
4<br />
11<br />
7<br />
12<br />
14<br />
13<br />
2
12<br />
IM-S03-11 ST Issue 1