Video Analysis of a Bicycle Wheel Gyroscope
Video Analysis of a Bicycle Wheel Gyroscope
Video Analysis of a Bicycle Wheel Gyroscope

You also want an ePaper? Increase the reach of your titles
YUMPU automatically turns print PDFs into web optimized ePapers that Google loves.
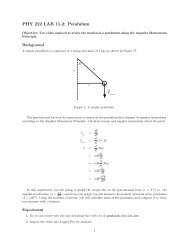
Figure 11.63 Side view showing externalforces acting on the gyroscope and therotational angular momentum vector.There is a torque around the center <strong>of</strong>mass, into the page, due to the F N force.WτL rotciple for the gyroscope?The remaining element we need for the Angulartorque that acts around the center <strong>of</strong> mass, at theLook again at the force diagram (Figure 11.63), and<strong>of</strong> the torque about the center <strong>of</strong> mass is RF N =the torque is into the page. Seen from above, the tto the rotational angular momentum (Figure 11.Momentum Principle yields∣d ⃗L rotdt∣ = L rot = τ CMView from aboveFigure 11.64 View from above, showingthe torque vector and the rotationalangular Figuremomentum 2: Top view vector. <strong>of</strong> the gyroscope.whereL rot = Iω, and τ CM = RMg. Solving for thewe have = τ CM= RMgL rot IωThis is a surprisingly simple result for such a compat least qualitatively with observations. A smallerlarger precession rate .Conversely,agyroscopetvery slowly. If possible, your instructor will providtheory quantitatively by observing an actual gyrossion rates can be measured.3. Open the Clip Settings window by clicking on the Clip Settings icon (shown in Figure 3) which ispart <strong>of</strong> the video control toolbar that is below the video clip.*ReflectionReflect on how we arrived at this result. Look okey point is that the rotational angular momentumvarying in magnitude, and the magnitude <strong>of</strong> the ratFigure 3: The Clip Settings icon.angular momentum is simply times L rot .Thisratangular momentum is equal to the net torque actincenter <strong>of</strong> mass).4. In the Clip Settings pop-up window, enter a frame rate <strong>of</strong> 300 fps, as shown in Figure 4Figure 4: The Clip Settings icon.REVISED5. A meterstick is shown in the first frame <strong>of</strong> video. Use this to calibrate distance in the video.6. Since there are 300 frames <strong>of</strong> video recorded per second, the time interval between frames is quitesmall. As a result, we can skip frames between marking the ball and thus take fewer data points. Clickon the Step Size button, as shown in Figure 5 and change it to 5.Figure 5: Change the step size in order to skip frames.7. Step forward to the first frame that the wheel is rotating. Place the origin at the axle (at the center<strong>of</strong> the closest white disk at the hub <strong>of</strong> the wheel in the video).8. Click the Create button in the toolbar and create a new point mass.2