2011-2013 Honda CBR250R Z-Fi Installation Instructions P ... - Bazzaz
2011-2013 Honda CBR250R Z-Fi Installation Instructions P ... - Bazzaz
2011-2013 Honda CBR250R Z-Fi Installation Instructions P ... - Bazzaz

Create successful ePaper yourself
Turn your PDF publications into a flip-book with our unique Google optimized e-Paper software.
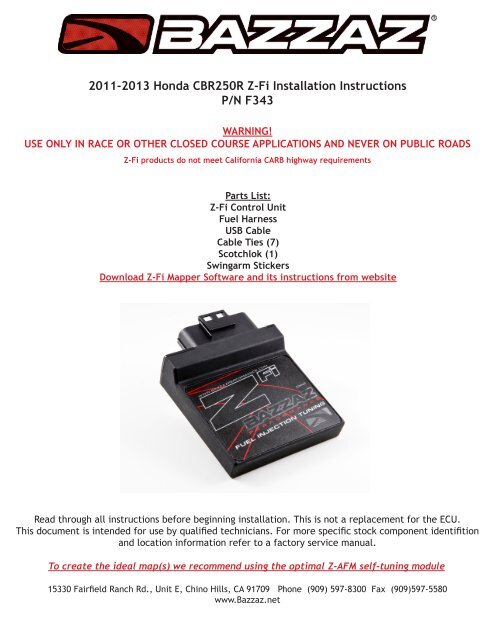
<strong>2011</strong>-<strong>2013</strong> <strong>Honda</strong> <strong>CBR250R</strong> Z-<strong>Fi</strong> <strong>Installation</strong> <strong>Instructions</strong>P/N F343WARNING!USE ONLY IN RACE OR OTHER CLOSED COURSE APPLICATIONS AND NEVER ON PUBLIC ROADSZ-<strong>Fi</strong> products do not meet California CARB highway requirementsParts List:Z-<strong>Fi</strong> Control UnitFuel HarnessUSB CableCable Ties (7)Scotchlok (1)Swingarm StickersDownload Z-<strong>Fi</strong> Mapper Software and its instructions from websiteRead through all instructions before beginning installation. This is not a replacement for the ECU.This document is intended for use by qualified technicians. For more specific stock component identifitionand location information refer to a factory service manual.To create the ideal map(s) we recommend using the optimal Z-AFM self-tuning module15330 Fairfield Ranch Rd., Unit E, Chino Hills, CA 91709 Phone (909) 597-8300 Fax (909)597-5580www.<strong>Bazzaz</strong>.net
BAZZAZ HARNESS CONNECTOR IDENTIFICATION+ 12 V Switched Power(orange tag)InjectorMap selectThrottle PositionSensor (TPS)Speed Sensor& NeutralZ-AFMCrank PositionSensor (CKPS)GroundFUEL HARNESS
1. Prior to installing the <strong>Bazzaz</strong> kit remove seats, left and right sidefairings, gas tank and air box.2. Place the <strong>Bazzaz</strong> control module in tail section of the bike andconnect the main connector of the fuel harness to the control module.Starting from the tail section follow the factory harness on theleft side of the bike to the front (photo 1).3. Route the <strong>Bazzaz</strong> ground back to the same location as the factorygrounds on the regulator rectifier (on the left side of bike) andinstall (photo 2).Photo 1factory connectorsPhoto 24. Locate the Crank Position/Neutral sensor and pluginline with the <strong>Bazzaz</strong> CKPS. The connector is locatedon the left side of the bike under the airbox next to thethrottle body (photo 3).<strong>Bazzaz</strong>connectorsPhoto 3
5. Next locate the factory speed sensor and plug inline with the <strong>Bazzaz</strong> speed sensor (photo 4).The connector is located on the leftside of the bike under the airbox nextto the throttle body.<strong>Bazzaz</strong>speed connectorsfactoryspeedsensorsPhoto 46. Locate the TPS on the left side of the throttlebody and disconnect the factory harness connector.Pull back the harness sheathing to expose thewires of the factory harness and crimp on a suppliedscotch lok connector onto the yellow wire.Insert the <strong>Bazzaz</strong> throttle position sensor T-tapconnector (blue wire) into the scotch lok and reinstallthe factory harness connector onto the sensor(photo 5).Photo 5factory injector7. Route the remainder of the harness to the frontof the bike and locate the factory injector on thetop of the throttle body. Plug inline with the <strong>Bazzaz</strong>injector (photo 6).Photo 6<strong>Bazzaz</strong> injectors
8. Now locate the factory +12V switched power and plug the <strong>Bazzaz</strong> +12V switch (orange tag) inline. Connectorlocated at the front of the bike close to the coil, under the air box (photo 7).<strong>Bazzaz</strong> +12V switchedfactory +12V switched powerPhoto 79. Verify proper installation and secure harnesses with cable ties. <strong>Fi</strong>nally reinstall the components removedin step one of these instructions.The <strong>Bazzaz</strong> controller is capable of storing two maps. These maps can be selected through the use of amap select switch which can be mounted on the handlebar for easy access and can be purchased seperately.Or these maps can be selected by connecting or disconnecting the map select jumper supplied withthe kit. When the map selet jumper is connected the control unit is operating using map 1. When themap select jumper is disconnected the contol unit is operating using map 2.Map 1 Map 2Note: Due to this bike running very lean from the factory the numbers in the <strong>Bazzaz</strong> map are large.It is recommended if using the Z-AFM self mapping kit to use the provided slip-on map as a basestarting point.