Non-Thermostatic Shower Panel
Non-Thermostatic Shower Panel
Non-Thermostatic Shower Panel

You also want an ePaper? Increase the reach of your titles
YUMPU automatically turns print PDFs into web optimized ePapers that Google loves.
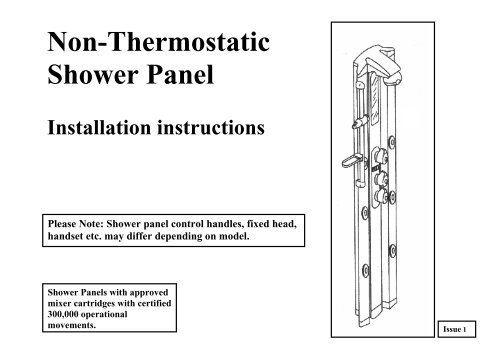
<strong>Non</strong>-<strong>Thermostatic</strong><strong>Shower</strong> <strong>Panel</strong>Installation instructionsPlease Note: <strong>Shower</strong> panel control handles, fixed head,handset etc. may differ depending on model.<strong>Shower</strong> <strong>Panel</strong>s with approvedmixer cartridges with certified300,000 operationalmovements.Issue 1
Dear Customer,We would like to thank you for having chosen this product.This <strong>Shower</strong> <strong>Panel</strong> is distinctly different from all other similarproducts on the market, the result both of a unique blend offunction and form that endows them with characteristicpersonality and visual appeal.This type of <strong>Shower</strong> <strong>Panel</strong> is the fruit of many years of researchand experience, and has been created by selecting the bestmaterials to guarantee perfect operation and lasting qualityfor a product that will become an irreplaceable complementto your daily well-being.To ensure that your new purchase maintains its efficiency over theyears, we recommend that you follow the enclosed InstallationInstructions carefully.Thank you once again for purchasing this product.. 1 .
INSTALLATION INSTRUCTIONS:WALL MOUNTING (see Fig No 2)1. Determine the ideal height (see Figs 5,6,7) to fix Wall Bracket “B”.Mark the position, drill and secure bracket (specialised wall fixings may be required – not supplied).2. Connect <strong>Panel</strong> “A” to the water supply.Note: Hot supply is on the left, Cold supply on the right as viewedlooking at the wall.3. Position <strong>Panel</strong>”A” against the wall and secure with the 2 off M5 x 20screws “D” to Wall Bracket “B”.Note: Care MUST be taken not to trap or severely twist the flexible StainlessSteel water feed pipes as this could obstruct the flow of water.CORNER MOUNTING (see Fig No 3)1. Determine the ideal height (see Figs 5,6,7) to fix Corner Wall Bracket “C”.Mark the position, drill and secure bracket (specialised wall fixings may be required – not supplied).2. Fix Wall Bracket “B” on <strong>Panel</strong> and secure with the 2 off M5 x 20 screws “D”,if not already fitted.3. Connect <strong>Panel</strong> “A” to the water supply.Note: Hot supply is on the left, Cold supply on the right as viewedlooking at the wall.4. Position <strong>Panel</strong>”A” by hanging Wall Bracket “B” onto Corner Wall Bracket “C”.Note: Care MUST be taken not to trap or severely twist the flexible StainlessSteel water feed pipes as this could obstruct the flow of water.INSTALLATION EXAMPLES (see Pages 6, 7). 2 .
CONTENTS:A. <strong>Shower</strong> <strong>Panel</strong>.B. Wall bracket (fitted to panel).C. Corner wall bracket.D. Two M5 x 20mm countersunkheaded screws (fitted to panel,securing Wall Bracket).E. Two screws & 8mm wall plugs.ABCFor installation you require:DEPlease Note: <strong>Shower</strong> panel control handles, fixed head, handset etc.may differ depending on model.. 3 .
. 4 .