Photoshop Shortcuts
Photoshop Shortcuts
Photoshop Shortcuts
You also want an ePaper? Increase the reach of your titles
YUMPU automatically turns print PDFs into web optimized ePapers that Google loves.
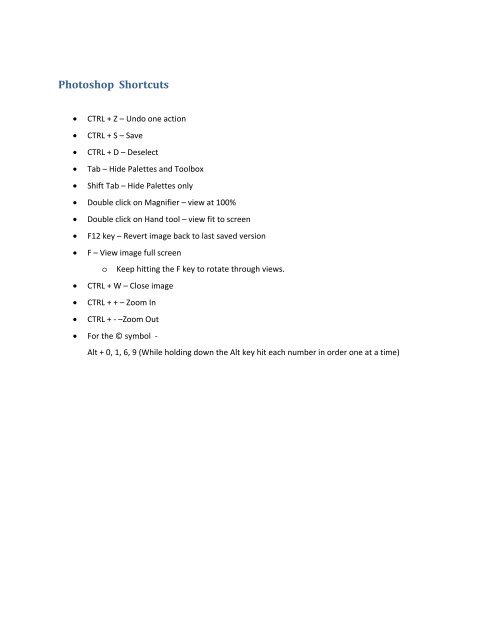
<strong>Photoshop</strong> <strong>Shortcuts</strong>• CTRL + Z – Undo one action• CTRL + S – Save• CTRL + D – Deselect• Tab – Hide Palettes and Toolbox• Shift Tab – Hide Palettes only• Double click on Magnifier – view at 100%• Double click on Hand tool – view fit to screen• F12 key – Revert image back to last saved version• F – View image full screeno Keep hitting the F key to rotate through views.• CTRL + W – Close image• CTRL + + – Zoom In• CTRL + ‐ –Zoom Out• For the © symbol ‐Alt + 0, 1, 6, 9 (While holding down the Alt key hit each number in order one at a time)
Healing Photos1. Open Old Image fileUse file browser to locate fileDouble click to open imageZoom In so the details are more pronounced2. Choose the healing toolSet brush size on Option Bar (click on small black triangle in the brush box in theoption bar) Start with a size of about 15 with 50% hardnessSet mode to replaceCheck sampled sourceLeave align unchecked3. Move cursor close to area to be “healed” (covered)Choose a spot that is as similar as possible to the damaged areaHold down the Alt key and click mouse buttonRelease Alt key and mouse buttonMove cursor to area to be healed and click mouse button4. Repeat as necessaryIf the effect does not look right, undo and try a different source pointYou may have to change the brush size as you work to fit in very small areasTo change the brush size on the fly use the [ ] keys[ makes it smaller, ] makes it largerIf there are hard edges select the area to be healed first and the healing will onlybe applied to the selected area
Working with Selections and LayersOpen Peppers image1. Create a duplicate layer by going to Layer Menu > Duplicate. Name the layerpeppers. Click OK2. Select the background of the image with the magic wand tool. Click on themagic wand tool. Look at the option bar. Set the tolerance to 32. Checkcontiguous. Make sure the Peppers layer is selected. Click on thebackground. If it doesn’t include all of the background, hold down theshift key and click again. The shift key makes the wand add to theselection. There is also an add to selection button on the option bar.3. Now we are going to select the peppers by inverting our selection. Go toSelect >Inverse. Because the peppers are all different colors and shapesthis is the easiest way to select them.4. Create a new layer containing the peppers and tomatoes.Go to Layer Menu> New> Layer via cut (we want to take the peppers outof the picture) or right click in the selection and choose layer via cutRename the layer by double clicking on the layer name in the layer palette.Name it Veggies.5. Turn off and on the visibility of the layers by clicking on the eye iconLeave the background layer off.6. Select the Peppers layer (the selected or active layer is highlighted blue andshows a paintbrush icon). We will add a gradient to the background.Choose the gradient tool. It may be behind the paint bucket. Look at theoptions bar. You can open the gradient picker by clicking on the smallblack triangle. There are several preset gradients or if you click on thecolor area the gradient editor will open and you can create your owngradient. Just pick one for now by double clicking on one of the choices.Place your cursor on the left side of the image (making sure you are on theright layer). Click and drag a line across the image. When you let go ofthe mouse, you should have a new background.7. Now choose the Veggies layer. Let’s play with filters with this layer. Go toFilter and look at all the choices. Try the colored pencil by going toFilter>Artistic> Colored Pencil. Click OK to apply. Undo that by going toEdit on the Menu bar and choosing undo. Try the liquefy command. .Undo that by pressing CTRL + Z. Then try one more and undo that bygoing to the history palette and click and dragging the tile that says thename of the filter to the trash can at the bottom of the History palette.8. To save this file we would always want to save it as a .psd file to preserve anylayers we have created. Then to save it for the web we would also want to“flatten” all the layers to make the file smaller and then go to save for weband choose the best image. Go to the Layer Menu> Flatten Image.
Opening and Saving files and file sizes1) Open Cacti fileUse file browser to locate the fileDouble click to open image2) Go to view menu and look at different viewsLook at magnification %Look at the image in Actual Pixels (View > Actual Pixels)Use navigator palette to move around the image - Try the zoom sliders – Zoom buttons3) Change image for print, go to Image > Image SizeChange resolution to 300–constrain proportions (checked) – no resample (unchecked)-Click on OK to apply changesAt first it appears as nothing has happened, but go to View > Print size. It is smaller inlooks, but still the same number of pixels.4) If we want to use the picture for the web.First crop your pictureChoose the crop toolClick and drag to enclose the part of the picture to be keptTo complete the crop, go to Image > Cropor right click in the enclosed area and choose cropView actual pixels – still way too big for the webTo resize for the web, go to image > image sizeThis time we will resample (resample adds or subtracts pixels)Constrain properties to keep the height and width consistentFill in 200 pixels for width - the height will fill in automatically – clickOK or press Enter to apply the changeView actual pixels – this is what it will look like on a web page5) Save for webGo to File > Save for webLook at different ways to save. Two up, four up. It is important for web imagesthat we keep the file as small as possible without sacrificing quality.Look at saving as a gif file and a jpeg file. Which is better (smaller)?Choose the image file you like the best and click on Save.
Vignette1. Open Cacti file that was saved for web.2. Verify size by going to Image > Image Size3. Make new Image by going to File > Newmake the size just a little bit bigger than the cacti filemake sure the resolution of both are the same 72Set the mode at RGB (the same as the cacti file)Transparent background4. Fill with your choice of color. Click on the foreground thumbnail to open the colorpicker. Choose your color. Click OK5. Select the Cacti image. Choose the elliptical marquee tool. On the option box, set thefeather at 20px. Make your elliptical selection. If you need to adjust the selection,go to Select > transform selection and make the adjustments. Press Enter toapply.6. Choose move tool and click and drag selection to new file. Now you have a vignette.
Increase Resolution (dpi) for printingOpen the Image Size dialog box from the Image Menu.1. Uncheck the Resample Image checkbox as shown2. Change the Resolution to 3003. Then recheck the Resolution checkbox4. The next step is to increase the pixel dimensionsby 10%.Type in 110 in the Width text box and in the dropdown choose %Click OK**Make sure you use the drop downto change from pixel to percent**5. Repeat step #4 until the image size is back to what you need. (Width and Height)6. When you get very close to the proper size you can (for the final step) change one size value tothe exact size you need and <strong>Photoshop</strong> will change the other size for you keeping theproportions correct.


