OWNERS MANUAL - BR250-DN250 Go Kart - Baja Motorsports
OWNERS MANUAL - BR250-DN250 Go Kart - Baja Motorsports
OWNERS MANUAL - BR250-DN250 Go Kart - Baja Motorsports

Create successful ePaper yourself
Turn your PDF publications into a flip-book with our unique Google optimized e-Paper software.
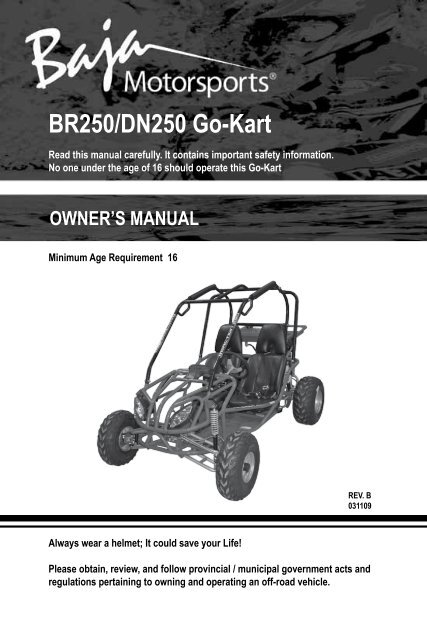
<strong>BR250</strong>/<strong>DN250</strong> <strong>Go</strong>-<strong>Kart</strong>Read this manual carefully. It contains important safety information.No one under the age of 16 should operate this <strong>Go</strong>-<strong>Kart</strong>OWNER’S <strong>MANUAL</strong>Minimum Age Requirement 16REV. B031109Always wear a helmet; It could save your Life!Please obtain, review, and follow provincial / municipal government acts andregulations pertaining to owning and operating an off-road vehicle.
Congratulations on your purchase of the<strong>Baja</strong> Inc. <strong>BR250</strong>/<strong>DN250</strong> <strong>Go</strong>-<strong>Kart</strong>.It is warranted to be free of manufacturing defects in the materialand workmanship for a period of 90 days from the date ofpurchase. During the warranty period BAJA, INC. will at its option,repair, provide replacement parts or replace your <strong>Baja</strong> Inc. <strong>BR250</strong>/<strong>DN250</strong> <strong>Go</strong>-<strong>Kart</strong> at no charge. This warranty does not cover normalwear items or damage caused by neglect or misuse of the product.Engine Warranty – 90 daysFrame Warranty – 90 daysWarranty is void if:Frame is bent or broken due to abuseWheels are bent or brokenFender bent or broken due to abuseAny sign of impact, accident, jumping, spin-outs or roll over.BAJA, INC. is not liable for any damage claim or liability claimperson or otherwise resulting from the operation of this product inany way.Should you experience a problem with your vehicle, please call <strong>Baja</strong> Inc.customer service line toll free at 1-888-863-2252 between the hours of7am and 5pm Monday through Friday MST (Mountain Standard Time).MDT (Mountain Daylight Time) during the daylight saving time. You will beinstructed how to proceed.A COPY OF THE SALES RECEIPT IS REQUIRED.II
!WARNINGThis manual should be considered as a permanentpart of the vehicle and should remain with thevehicle when resold or otherwise transferred toa new user or operator. The manual containsimportant safety information and instructionswhich should be read carefully before operatingthe vehicle.!WARNINGThe engine exhaust from this product containschemicals known to the State of California to causecancer, birth defects or other reproductive harm.CALIFORNIA PROPOSITION 65III
TABLE OF CONTENTSFORWARD.................................................................................... 2NOTICE TO USERS....................................................................... 3<strong>BR250</strong>/<strong>DN250</strong> GO-KART.............................................................. 9FUEL AND OIL............................................................................. 10WARNING LABELS..................................................................... 11CONTROL PANEL AND IGNITION SWITCH............................... 14THROTTLE AND BRAKE PEDAL................................................ 15PARKING BRAKE......................................................... 15SEAT ADJUSTMENT.................................................................... 16RIDING YOUR GO-KART............................................................. 17INSPECTION BEFORE RIDING................................................... 18SAFETY GEAR............................................................................. 20BREAK-IN..................................................................................... 21DRIVE SELECT LEVER............................................................... 22CARBURETOR ADJUSTMENT................................................... 23CHAIN AND SHOCK ADJUSTMENT........................................... 24MAINTENANCE........................................................................... 25BATTERY INSTALLATION........................................................... 27BATTERY REPLACEMENT.......................................... 30ENGINE OIL.................................................................................. 31CLEANING OIL FILTER............................................................... 32TRANSMISSION OIL................................................... 33RADIATOR................................................................................... 34AIR FILTER................................................................................... 35TIRES............................................................................................ 37BRAKING...................................................................................... 39BRAKE INSPECTION................................................... 40TROUBLESHOOTING................................................................... 41IGNITION SYSTEM CHECK......................................... 42TRANSPORTING........................................................................... 43CLEANING PROCEDURE............................................................. 44PREPARATION FOR CLEANING................................. 44WASHING YOUR GO-KART......................................................... 45INSPECTION AFTER CLEANING................................. 45STORAGE PROCEDURE............................................................... 46SERIAL NUMBER LOCATION....................................................... 47WIRE DIAGRAM............................................................................. 48SPECIFICATIONS........................................................................... 49EMISSION CONTROL SYSTEM WARRANTY................................ 501
FORWARDPlease read this manual and follow all instructions carefully. To emphasizethe special information, the symbol and the words WARNING or CAUTIONhave some special meanings. Pay great attention to the messages.WARNINGIndicates a potential hazard that could result! WARNINGin death or injury.!CAUTIONIndicates a potential hazard that could resultin vehicle damage.NOTE: Indicating special information which is to make maintenance easier orinstructions clearer.WARNING and CAUTION are arranged like this:!!WARNINGCAUTIONThe first part will identify a POTENTIAL HAZARD.The second part will describe WHAT COULDHAPPEN if you ignore the WARNING or CAUTION.The third part will describe HOW TO AVOID THEHAZARD.This user’s manual contains important safety and maintenance information.Read it carefully before riding. Failing to follow the warnings contained inthis manual could result in INJURY or DEATH.It is important that this manual remain with the vehicle when you transfer it toanother user or owner.All information, illustrations, photographs and specifications contained inthis manual are based on the latest product information available at the timeof publication. Due to improvements or other changes, there will be somediscrepancies in this manual. We reserve the right to make product changesat any time, without notice and without incurring any obligation to make thesame or similar changes to the vehicle previously built or sold.2
NOTICE TO USERSThis off-road product IS NOT A TOY AND CAN BE HAZARDOUS TOOPERATE. This product handles differently from other vehicles includingATV’s and motorcycles. A collision or rollover can occur quickly, even duringroutine maneuvers such as turning and riding on hills or over obstacles.To help you make informed decisions about safety, you will find provided inthis manual operating procedures and other safety procedures which mustbe followed. In addition to the safety information in this manual, you will findsafety labels on the product. FOLLOW ALL WARNING BOTH IN THIS <strong>MANUAL</strong>AND ON THE PRODUCT.Information which is particularly important is distinguished in this manual bythe following notations:!WARNINGFAILURE TO FOLLOW WARNING INSTRUCTIONSCOULD RESULT IN SEVERE INJURY OR DEATHTO THE OPERATOR OR PASSENGER, ABYSTANDER OR A PERSON INSPECTING ORREPAIRING THE PRODUCT.!CAUTIONCAUTION INSTRUCTIONS ARE PROCEDURESTO PREVENT DAMAGE TO THE VEHICLE ORINJURY TO THE OPERATOR OR PASSENGER, ABYSTANDER OR A PERSON INSPECTING ORREPAIRING THE PRODUCT.NOTE:clearer.A NOTE provides key information to make procedures easier or3
NOTICE TO USERSIMPORTANT RULES FOR SAFE OPERATION!WARNING1. This vehicle is not licensable. IT IS NOT TO BE OPERATED ON ANYPUBLIC ROAD, STREET, HIGHWAY, PARKING LOT, SIDEWALK, OR ALLEYTo do so would be in violation of local law. This vehicle may be operatedonly on private property and upon areas approved by local law. Avoidoperating this vehicle in any area with stationary objects that the vehiclecould travel under. Do not ride in areas where other recreational vehiclesare being operated. Be respectful of landowners and the environment.2. This vehicle should NEVER be operated indoors. The exhaust from theengine contains carbon monoxide, which is a tasteless, odorless, andpoisonous gas.3. Unless otherwise specified in this manual, all screws, nuts, and boltsmust be kept tight to ensure that the vehicle is in safe operatingcondition. The engine must be kept free of all dirt and other accumulations,paying particular attention to throttle linkage area.4. Prevailing-Torque-type locknuts lose their locking capability with repeateduse and require replacement. Ensure locknuts are functioning properly.5. The tire pressure should be checked prior to each use. The recommendedinflation pressure is the maximum tire pressure as printed on the tire’ssidewall. IMPROPER TIRE PRESSURE MAY CAUSE INSTABILITY AND MAYPREVENT PROPER BRAKING OR STEERING.6. Modifications of this vehicle or removal of any original equipment or safetydecal may render the vehicle unsafe or illegal. NEVER REMOVE ANYPROTECTIVE GUARDS OR BELT GUARDS. These covers are for operatorpassenger’s protection. If any guards are removed for maintenance orservicing of the vehicle, ensure that they are secured in place prior tooperating the vehicle.4
NOTICE TO USERS7. THE VEHICLE SHOULD NEVER BE STARTED WITHOUT FIRST CHECKINGTO SEE THAT THE THROTTLE IS IN IDLE POSITION. Do not start enginewithout verifying proper function of the throttle. Never attempt to startthis vehicle without having the operator seated in the proper position.When starting with the operator in the seat, the operator should have theirleft foot on the brake.8. This vehicle is not designed or intended for racing, any form ofcompetition.9. The operator’s ability to operate this off-road vehicle safely is largelydependent upon the operator’s ability to exercise proper judgment. Anoperator also must not be too small or too large for controlled operation.The operator must be of sufficient age, understanding, mental capacity,and physical capability to safely operate this vehicle. This vehicle shouldonly be operated after mature, supervised instruction and sufficientpractice. Safe operation includes responsibility for the safety of apassenger (if any).10. A DOUBLE SEAT VEHICLE IS DESIGNED FOR ONE OPERATOR ANDONE PASSENGER. No one should ever attempt to ride on this vehiclewithout being seated, with the seat belt properly secured. For double seatvehicles ridden without passenger, the passenger seat belt must be secureto prevent it from getting caught up in operating components. Anypassenger must be of sufficient age, understanding, mental capacity, andphysical capability to act to protect himself/herself. ALWAYS FOLLOW THERECOMMENDED AGE RESTRICTION OF 16 YEARS FOR OPERATORS ANDPASSENGERS.11. The engine should be stopped when the vehicle is not in use.12. The operator and passenger (if any) of this vehicle should always wear ahelmet approved by agencies such as Department of Transportation (DOT),Safety Helmet Council of America (SHCA), or Snell Memorial Foundation(SNELL). Most off-road vehicle accident fatalities are due to head injuries.The operator should also wear face shields or goggles, boots orclosed-toe shoes, gloves, and other appropriate protective clothing.5
NOTICE TO USERS13. LOOSE CLOTHING, LONG HAIR, OR ARTICLES WORN BY ANYOPERATOR OR PASSENGER MUST BE FULLY CONTAINED OR COVEREDTO PREVENT THEM FROM POSSIBLY BEING CAUGHT IN ROTATINGPARTS OF THE VEHICLE OR THE SURROUNDING ENVIRONMENT WHILERIDING. FAILURE TO OBEY COULD ENDANGER THE PERSONAL SAFETYOF THE OPERATOR OR PASSENGER.14. DO NOT PLACE HANDS, FEET, OR ANY OTHER PART OF THE BODY ORANY CLOTHING NEAR THE ENGINE, MUFFLER, WHEELS, CHAIN ANDOTHER ROTATING PARTS OF THE VEHICLE WHILE RIDING OR RUNNINGTHE ENGINE. Caution must be used in performing required maintenanceon or near an operating engine. Special caution should be taken after theengine has been running, since the engine and other drive componentsmay be extremely hot.15. Wet, slippery, rough, or steep terrain is potentially dangerous and mayresult in injury if proper caution in not observed. Slow speeds are requiredto safely operate this vehicle under these conditions. The operator mustuse mature judgment, skill, and experience to choose a speed suitable forterrain and riding conditions.16. The governor settings for this vehicle’s engine must not be tamperedwith, altered, or changed. The governor is set by the engine manufacturerand limits the maximum speed of the engine (and vehicle) and protectsthe engine from damage. Excessive speeds are potentially dangerous tothe operator/passenger, and the engine.17. Each time before using this vehicle, the fuel supply should checked. Thefuel tank should never be filled while the engine is running or while theengine is hot. Do not fill tank in a closed area such as a garage, whilesmoking, or in the vicinity of an open flame. Do not overfill the tank. Thereshould not be any fuel in the filler neck. Replace cap tightly to preventspillage of fuel and potential fire hazard. After filling tank, move thevehicle at least 15 feet away from the spot of filling before starting.18. If the vehicle should start making unusual noise or vibrating abnormally,the engine should be stopped and the spark plug wire disconnected. Thevehicle should then be checked for damage. Excessive noise or vibrationis generally a warning of loose or worn parts.6
NOTICE TO USERS19. When making repairs or adjustments to the vehicle which do not involveadjustments to the engine, the spark plug wire must be disconnected andkept away from the spark plug to prevent accidental starting. Whenworking on or around, or when restarting engine, use extreme caution toavoid contact with the muffler, cylinder head, or any other potentially hotarea on or around the engine.20. Always perform a pre-ride inspection before starting the engine. SeePre-Ride Inspection section in this manual.21. When storing the vehicle, it must be kept in a place where gasoline fumeswill not reach an open flame or spark. For long period storage, such as forwinter, the fuel tank should be drained in an open, cool area. The enginemust be allowed to cool before storage in any enclosure. Read and keepall printed material supplied with this vehicle. Timely and specificinstructions and an Operator’s Manual revisions are included insupplements. If any printed material is unclear, contact the manufacturer.22. NEVER OPERATE THIS VEHICLE WHILE UNDER THE INFLUENCE OFALCOHOL, DRUGS, OR MEDICATION OF ANY KIND. SUCH OPERATIONCOULD BE DANGEROUS TO YOURSELF AND/OR OTHERS.23. Always slow down when turning. High speed turning may cause loss ofcontrol, possible turnover of the vehicle, and/or possible injury to theoperator or passenger.24. While making a turn, knobby tires may increase the risk of loss of control.ALWAYS SLOW DOWN! A collision or rollover can occur quickly, evenduring routine maneuvers such as turning and riding on a hill or overobstacles.25. DO NOT RACE, JUMP, PERFORM “STUNT” RIDING OR “SPIN OUTS”WHEN OPERATING THIS VEHICLE. THIS VEHICLE IS NOT DESIGNED ORINTENDED FOR SUCH OPERATION.7
NOTICE TO USERS26. This manual, along with the other supplements provided with your vehicle,provide guidelines for the assembly, maintenance, and operation of thisvehicle and is not intended as a service manual.27. Assembly, maintenance, and/or repair of this vehicle should only beperformed by persons of sufficient mechanical skill, experience, andjudgment (such as outdoor equipment dealers, motorcycle dealer/shops,or small engine dealers) so that no unsafe condition or modification ismade.28. Always use extreme caution when starting the engine. Avoid touchingthe engine, muffler, or drive components. These areas could cause burnson contact.29. The battery (if applicable) contains sulfuric acid and must not come incontact with skin, eyes, or clothing since this will cause severe burnspossibly causing disfigurement. Also, battery may generate explosivegases and must not be exposed to sparks, flame, cigarettes, or anythingflammable or an explosion may result causing severe injury. Protectivegloves and face protection must be worn when servicing the battery.30. ANY OPERATOR OR PASSENGER UNDER 18 YEARS OF AGE MUSTALWAYS BE APPROPRIATELY SUPERVISED BY AN ADULT AT ALL TIMESWHILE OPERATING THE VEHICLE.31. Operating this vehicle requires skills acquired through practice over aperiod of time. Take the time to learn the basic techniques well beforeattempting to operate the vehicle.32. Operate only on safe and familiar terrain. Avoid loose gravel and rocks. Becareful on wet surfaces and allow for extra braking distance.8
<strong>BR250</strong>/<strong>DN250</strong>Brush guard barHeadlightsSteeringwheelRear rackRadiatorFront wheelRear wheelForward/Reverse shifter[Left]Rear shockabsorberExhaust pipeFuel tankSeatsControl panelFront shockabsorberOil fill plugParking brake[Right]9
FUEL AND OILFUELThe proper fuel is very important for the engine. Ensure that there is nodust, dirt, or water which has mixed in the fuel. Please use regular unleadedgasolineENGINE OILYour 250cc <strong>Go</strong>-kart has a four-stroke engine. Please use oil as describedin the chart below. By using the prescribe oil, you will realize the bestlubrication for the engine.ENGINESAE 10W-30TEMP.°C -30 -20 -10 0 10 20 30 40°F -22 -4 14 32 50 68 86 104Use the chart to select a viscosity rating based on the temperature range inyour area.10
WARNING LABELSRead and follow all of the warnings labels on your <strong>Go</strong>-kart. Make sure youunderstand all the labels. Keep the labels on the <strong>Go</strong>-kart. Do not removethem for any reason. If a label comes off or becomes difficult to read, youshould get a replacement by contacting <strong>Baja</strong> <strong>Motorsports</strong>.12312!WARNINGTHIS GO-KART CAN BE HAZARDOUS TO OPERATEif driven carelesslyINJURIES can result if you do not follow theseinstructions:-READ OWNER’S <strong>MANUAL</strong> AND ALL LABELS BEFOREYOU OPERATE THIS GO-KART.-NEVER OPERATE THIS GO-KART WITHOUT PROPERINSTRUCTIONS. Beginners require mature supervision.-NEVER OPERATE THIS GO-KART ON PUBLIC ROADS.it is intened off-road use only.-NEVER OPERATE THIS GO-KART AT EXCESSIVE SPEEDS.NEVER ATTEMPT WHEELIES, JUMPS, OR OTHER STUNTS.!WARNINGLOSS OF CONTROL, COLLISION, OR GETTING CAUGHT IN MOVING PARTSCAN RESULT IN SERIOUS INJURIESAdult supervision for under 16 years oldswear a D.O.T. approved motorcycle helmetSecure long hair and loose clothingWear protective eye wear and clothingKeep arms, legs and feet inside kartDo not use alcohol or drugs3!WARNINGSeat Belt Must Be Worn At All TimesCAUTIONTHIS VEHICLE MANUFACTUREDFOR OFF-ROAD USE ONLY.DO NOT OPERATE ON PUBLICSTREETS, ROADS OR HIGHWAYS.11
WARNING LABELSLocated on brush guardnear control panel45 64!WARNINGNever attempt to switch gears while vehicle is moving!This will result in severe damage to reverse mechanism.Only switch gears when vehicle is completely still.5 6ParkingRDParking BrakeReverse Lever12
WARNING LABELS7Located on the fuel tank98107!WARNINGNOLONG9LOAD LIMITWARNING22lbs (10kg )NEVER sit hereHAIRALL HAIR MUST BE TIED UP ANDSECURED AT OR ABOVE SHOULDER LENGTH.ALL LOOSE CLOTHING MUST BE SECURED.ALL NECKLACES AND SCARVES MUST BESECURED.10!WARNING8!WARNINGNO RIDING-Moving partscan crush andcut.-Keep handsclear.-Do not operatewith guardremoved.13
CONTROL PANEL AND IGNITION SWITCHLight switchWater temperatureindicator lightIgnition key switchEngine stop switchWater temperature indicator light - This light will illuminate when the engine istoo hot.Ignition key switch - To start vehicle insert key into ignition switch and turnCW (clockwise).Light switch- When switch is in “ON” position lights will illuminate.Engine stop switch - When engine is running move Stop switch to “OFF”position. The engine should stop when switch is depressed. If the switch failsto stop engine, consult your nearest service center.14
THROTTLE, BRAKE PEDAL AND PARKINGBRAKE LEVERBrakePedalBrake fluid reservoirThrottlePedalDrive select leverForwardParkingBrake leverReverseBrake pedalDepressing the brake pedal draws the brake calipers against the brake rotorand slows or stops the go-kart.Throttle pedalDepressing the throttle pedal will engage the clutch and move the go-kartforward.Brake fluid reservoirContains brake fluid which helps to stop the go-kart. Use DOT3 or DOT4 brakefluid.Drive select LeverThis lever allows you to drive the vehicle in forward or reverse.Parking brakeWhile starting the engine or parking the machine, especially on a slope, applythe parking brake by pulling lever up.15
SEAT ADJUSTMENTPull seat adjustment handle upward to disengage the seat slide. Move theseat to desired position. Be sure the handle snaps back into place and thatthe seat is locked into positionSeat adjustment handle!WARNINGBefore attempting to adjust the seat, ensure that the engine is notrunning.Never operate go-kart when the seat is not securely adjusted. It couldresult in personal injuries or loss of life.The seat must always be securely adjusted to the position which affordsthe best control of the foot pedals, steering wheel and engine stop switchfor the operator.16
RIDING YOUR GO-KARTWHAT YOU SHOULD KNOW BEFORE RIDINGBefore riding, you should read all the following information carefully. If youare properly prepared, you will have a more enjoyable ride.Before riding, you should find a good place to practice the skills. Find a flat,open area with enough space to practice the new skills.Make sure that it is legal to ride in the area you selected. Review the local laws andmake sure you are not trespassing. Call the police if you don’t know where youcan ride.Protect your riding areas. When you are riding, remember to keep the terrain ingood condition. Don’t destroy plants, trees or other vegetation. Don’t litter anddon’t bother wildlife. With your help, your riding area can remain open for usein the future.After you have found a good place to practice, review the control system onyour <strong>Go</strong>-kart before riding. Learn to find these controls without looking forthem, because you will not have time to look for them when you are riding.Canadian residents must obtain, review, and follow all provincial and municipalgovernment acts and regulations pertaining to owning and operating an off-roadvehicle.17
INSPECTION BEFORE RIDINGITEM TO CHECKSteeringBrakesTiresFuelEngine stop switchEngine oilThrottleGeneral conditionCONTENTSmoothness; No restriction of movement; No play orloosenessEnough brake force; Parking brake effectivenessProper air pressure; Enough tread depth; No cracks,rips, or other damagesEnough fuel for the intended trip; Fuel hose connectedsecurely; No damage to fuel tank or cap; Fuel tank capclosed securelyProper operationProper level – Check oil by inspecting Engine Oil DipStick. The engine oil should be between the Minimumand Maximum lines.Smooth response; quick return to idle positionBolts and nuts are tight; no rattle from any parts ofthe engine when running, no visible evidence ofDamage!WARNINGFailing to inspect the <strong>Go</strong>-kart before operating could behazardous. Failing to perform proper maintenance couldalso be hazardous.Failing to inspect and maintain your <strong>Go</strong>-kart could increasesthe chances of an accident or equipment damageAlways inspect your <strong>Go</strong>-kart each time before riding, and makesure it is in a safe operating condition. Refer to the INSPECTIONAND MAINTENANCE section in this manual.18
!INSPECTION BEFORE RIDINGWARNINGOverloading could be hazardous.Overloading could cause changes in vehicle handling and could lead to anaccident.Never exceed the stated load capacity for this <strong>Go</strong>-kart.! WARNINGOperating this <strong>Go</strong>-kart with improper modifications could be hazardous.Improper installation of accessories or modifications to this vehicle maycause changes in handling. In some situations, this could lead to anaccident.Never modify this <strong>Go</strong>-kart through improper installation or use ofaccessories.Check the condition of the <strong>Go</strong>-kart to make sure that the <strong>Go</strong>-kart does not havemechanical problems or you could get stranded when you ride. Before ridingthe <strong>Go</strong>-kart, be sure to check the above items. Be sure your <strong>Go</strong>-kart is in goodcondition to ensure the safety of the rider.!WARNINGChecking maintenance items when the engine is running could behazardous.You could be severely injured if your hands or clothing get caught inmoving <strong>Go</strong>-kart parts.Shut the engine off when performing maintenance checks, exceptchecking the engine stop switch and throttle.19
SAFETY GEARA DOT approved motorcycle helmet is the most important part of you safetygear. A DOT approved motorcycle helmet can help prevent a serious headinjury. Choose a helmet that fits snugly. Motorcycle dealers can help inselecting a good quality helmet which fits properly.!WARNINGOperating this <strong>Go</strong>-kart without wearing an approved DOT motorcyclehelmet, eye protection, and protective clothing could be hazardous.Operating without an approved DOT motorcycle helmet or eyeprotection increases your chances of a severe head injury or death inan accident. Operating without protective clothing also increases yourchances of severe injury in an accident.Always wear an approved DOT motorcycle helmet which fits properly.Always wear eye protection (goggles or face shield). You should alsowear gloves, boots, long sleeve shirt or jacket, and long pants.You should wear eye protection when you ride. If a rock or a branch hits youreyes, you could be severely injured. Wear goggles or a face shield.Wear proper clothing when you ride. The proper clothes can protect you frominjury. Wear a good pair of gloves, strong boots that are over the ankle, longpants, and a long sleeve shirt.20
BREAK-INThe first month is the most important in the life of your vehicle. Properoperation during this break-in period will be helpful for assuring maximumlife and performance of your new vehicle. The following guidelines explainproper break-in procedures.Maximum Throttle Opening RecommendationDuring the first 10 hours of operation, you should always use less than ½throttle opening.Vary the Engine Rotating SpeedVary the engine rotating speed during the break-in period. This allows theparts to “load” and then “unload” (allowing the parts to cool). Although it isessential to place some stress on the engine components during break-in,you must be careful not to load the engine too much.Avoid Constant Low Rotating SpeedOperating the engine at constant low rotating speed (light load) can causeparts to glaze and not seal properly. Allow the engine to accelerate freelywithout exceeding the maximum throttle limit.Allow the Engine Oil to Circulate Before RidingAllow enough idling time after warm or cold engine starting. This allows thelubricating oil to reach all critical engine components.Observe Your Initial and Most Critical ServiceThe initial service (break-in maintenance) is the most important service thatyour vehicle will receive. Observing a proper break-in operation, will helpengine components seal properly. Maintenance required as part of the initialservice includes proper adjustments, tightening of all bolts & nuts, andreplacement of dirty oil. Timely performance of this service will help you getthe best service life and performance of the engine.21
DRIVE SELECT LEVERThe drive select lever shifts the <strong>Go</strong>-kart in either forward or reverseTo shift <strong>Go</strong>-kart in either forward or reverse:1. Release throttle2. Apply brakes coming to a complete stop.4. Shift lever in the reverse or forward position.5. Check for people or obstacles around you.6. Depress the throttle pedal gradually continuing to watch for people orobstacles around you.ReverseForwardDrive select lever adjustment:Nut #1 Nut #21. Press down the lever to the “D” position so that the unit can moveforward.2 Pull back the lever to “R” so that the unit can move backward.3. Loosen Nut #1 at the end of the cable.4. Adjust Nut #2 accordingly to adjust the mesh status inside the gear box;rotate the nut to adjust the cable, and make sure that the cable isn’t tootight or too loose.5. Make sure to re-tighten Nut #1 when adjustment is complete.!WARNINGNot looking behind vehicle before and while going in reverse could behazardous.Failure to look behind while backing could cause the <strong>Go</strong>-kart to run intoan obstacle or person resulting in an injury.Before going in reverse and while backing, look behind the vehicle forany obstacles or people to avoid.22
CARBURETOR ADJUSTMENTNever make unnecessary adjustments. The manufacturer recommendedsettings are correct for most applications. You will need a tachometer tomake some of the adjustments. This should only be performed by a trainedmechanic.Idle speedadjustment screw1. Warm up the engine for about 5-10 minutes.2. Connect the tachometer, and adjust the throttle idle speed(standard value is 1700 RPM).23
CHAIN AND SHOCK ADJUSTMENTCHAIN ADJUSTMENTCheck the chain adjustment after the first two hours of use. Readjust if it hasmore than 1/2” flex.1. Loosen nut 1.2. Loosen nut 2.3. Tighten or loosen adjusting cap accordingly to obtain the correct free play.4. Once the correct free play has been achieved, tighten nut 2 then nut 1.Nut 2AdjustingcapNut 1FRONT SHOCK ADJUSTMENTThere are five adjustable positions on the front shock. The default position isin the middle set by the manufacturer.Use a round nut wrench as you adjust the shock. The tension of shock springwill increase as you screw to the left and decrease as you screw to the right.Spring adjustment cam24
MAINTENANCE SCHEDULEIt is very important to inspect and maintain your <strong>Go</strong>-kart regularly. Follow theguidelines in the chart. The intervals between periodic services in months areshown. At the end of each interval be sure to perform the maintenance listed.Periodic Check and ServiceThe maintenance intervals in the following table are based upon averageriding conditions.ITEMS 1ST WEEK MONTHLY QUARTERLY YEARLYFuel lines I I IAir Cleaner C C I I* Throttle controls I A I A* Spark plug C I R* Valve clearance I I IEngine oilGearbox oilDuring running-in period, replace every 150 miles.After running-in period, replace every 600 miles.* Engine oil filter screen C C I IDrive chain L A I* Battery I* Disk brake IBrake systemIElectrical partsIBolts, nut and fasteners I IFuel tank I I* Tire pressure/wear I I* Steering system AChassis I INote:1. A=Adjust C=Clean I=Inspect, clean or replace if necessary L=Lubricate R=Replace2. The items with “*” must be inspected and repaired by professionals. If you yourselfare a professional follow this owners manual and use qualified tools.3. Driving in unusually wet or dusty areas requires more frequent services. Driving insandy or rocky areas especially requires more frequent services.25
MAINTENANCE SCHEDULE!WARNINGImproper maintenance or failing to perform recommended maintenancecould be hazardous.If you perform improper maintenance or do not maintain your <strong>Go</strong>-kartyou may have an accident.Keep your <strong>Go</strong>-kart in good condition. Ask your authorized servicecenter or a qualified mechanic to do the maintenance items markedwith an asterisk (*). You may perform the unmarked maintenance itemsby referring to the instructions in this section if you have mechanicalexperience. If you are not sure how to do the maintenance ask yourauthorized service or call <strong>Baja</strong> <strong>Motorsports</strong>.!WARNINGIf you use your <strong>Go</strong>-kart under severe conditions, it will need maintenancemore often than shown in the chart.Operating your <strong>Go</strong>-kart under severe conditions causes more wear on your<strong>Go</strong>-kart. Severe conditions include operating under frequent full throttle, or industy, wet, sandy, or muddy areas. These conditions could cause the <strong>Go</strong>-kartto wear more quickly.Perform maintenance more often than shown in the chart. If you haveany questions regarding maintenance intervals, consult your authorizedservice center or call <strong>Baja</strong> <strong>Motorsports</strong>.!WARNINGUsing poor quality replacement parts could damage your <strong>Go</strong>-kart.Poorly-made replacement parts could cause your <strong>Go</strong>-kart to wear morequickly and shorten its useful life.When replacing parts on your vehicle, use only genuine replacementparts or their equivalent.26
BATTERY INSTALLATIONINITIAL SERVICE AND INSTALLATION OF BATTERY:!WARNINGThe following procedure is very dangerous and should be performed withutmost care and attention. Wear protective eye wear, rubber gloves, andhave water available should electrolyte come in contact with skin or eyes.KEEP ALL CHILDREN AWAY FROM THE AREA WHILE THIS PROCEDURE ISBEING PERFORMED.POISON – CAUSES SEVERE BURNSContains sulfuric acid.Avoid contact with skin, eyes, or clothingTo prevent accidents, rinse empty container with water.ANTIDOTE:External – flush with waterInternal – Call physician immediately. Drink large quantities of water or milk.Follow with milk of magnesia, beaten eggs or vegetable.Eyes – Flush with water for 15 minutes and get prompt medical attention.KEEP OUT OF REACH OF CHILDREN.27
BATTERY INSTALLATIONNote: The following page is for vehicles with battery’s containing separateelectrolyte pack. Most battery’s will come with the electrolyte already sealedinto the battery.Preparing the battery:· Place battery on level surface. Remove sealing tapefrom top. (see figure A)· Take the electrolyte container out of the plastic bag.· Place electrolyte container upside down with thesealed silver mouths of the electrolyte bottles in linewith the six filler holes of the battery. (see figure B)· Push the container down strongly enough to breakthe silver seals. (see figure B)· As electrolyte starts flowing into battery, airbubbles will come up from the mouths of the plasticelectrolyte bottles.· Leave bottles upside down in battery holes untilelectrolyte is completely drained.· Never leave children unattended around battery.· If air bubbles cease to float to the top of theelectrolyte bottles, tap lightly on top.· DO NOT remove container from battery while it isdraining.· Never cut or pierce electrolyte container.· After all the electrolyte has drained from the bottlesinto the battery, pull plastic electrolyte bottles gentlyout of the battery.· Discard empty electrolyte bottles in a waste areathat is inaccessible to children and animals.· After filling let battery stand for at least 30 minutesbefore charging. This allows the electrolyte topenetrate plates for optimum performance andensures longer battery life.· After 30 minutes the battery is ready for its initialcharge. Place cap strip loosely over the filling holesas shown in the picture. (see figure C)Figure AFigure BFigure C28
BATTERY INSTALLATIONHow to Initially Charge the battery:1. Connect the red positive (+) cable to the redpositive (+) pole of the battery.(see figure D)2. Connect the black negative (-) cable to theblack negative (-) pole of the battery. (seefigure E)Note: The red positive (+) cable has a largerdiameter than the black negative y cable.3. Charging rate: Charge battery @ 0.7 Amps for5 ~ 10 hours.• After charging is complete, press downfirmly with both hands to seat the caps.(Do not pound or hammer.) The battery isnow sealed. (see figure F)• Install battery into battery compartment.The battery terminals should be facingthe front (see figure G)• Once battery is firmly seated in batterycompartment attach the red positive wire tothe red positive terminal on the battery.• Then attach the black negative wire to theblack negative terminal on the battery.Figure DFigure EFigure F• Install the battery cover and straps(see figure G)!WARNINGNEVER REMOVE THE STRIP OF CAPS NORADD ANY WATER OR ELECTROLYTE.Figure G29
To check oil level:1. Park vehicle on level ground.Oil cap and dipstickENGINE OIL2. Remove dip stick and wipe off with a clean rag. Insert the dipstick in thefiller hole.3. Remove the dipstick and inspect the oil level.4. Oil level should be in between the Lower index line and Upper index linemarks on the dipstick.5. Add oil if oil is below lower mark on dipstick . Do Not fill above upper mark.Refer to page 10 for correct engine oil type.Engine oil replacement:The engine oil should be changed every 20 to 40 hours of operation. It shouldbe changed more often in dirty and dusty areas.1. Park vehicle on level ground.2. Remove engine oil drain bolt (located on bottom right side of engine).3. Drain oil into a catch basin and dispose of properly at an oil reclaimfacility.Engine oil drain bolt31
RADIATORWARNINGRemoving radiator cap while engine is hot can be hazardous.You can be seriously burned or injured by removing radiator cap whileengine is hot.NEVER open radiator cap while engine is hot.RadiatorCoolant overflowbottleRadiator capCoolant overflowbottleFilling the radiator1. Remove cap and fill radiator with radiator fluid until full.2. Remove cap and fill coolant over-flow bottle up to the Max. line3. After engine has been turned on and ran for awhile check coolantover-flow bottle and fill to Max. line if needed.Remove hose todrain radiator fluidDraining the radiator1. Remove hose and allow fluid to drain completely.2. When radiator has completely drained, replace hose.34
AIR FILTERThe air filter element must be kept clean to provide good engine power. Ifyou use your vehicle under normal, low-tension conditions, you shouldservice the air filter at the intervals specified. If you ride in dusty, wet, ormuddy conditions, you will need to inspect the air filter element much morefrequently. Use the following procedures to remove the element and inspectit.AIR FILTER REMOVAL AND CLEANING1. Locate Air Filter Box under rear rack on left side, remove cover.2. Remove air filter.3. Tap the Air filter element gently to remove most of the dust and dirt. Blowout remaining dust with compressed air. If the element is damaged,replace it.4. Reinstall air filter and close cover.Air filter coverRemove (unscrew)Air Filter35
!WARNINGAIR FILTEROperating the engine without the air filter element in place could behazardous.If the air filter element did not filter dirt, severe engine damage wouldoccur if the dirt entered the running engine.Never run the engine without the air filter element in place.!CAUTIONFailing to inspect the air filter element frequently if the vehicle is used industy, wet, or muddy conditions could damage your <strong>Go</strong>-kart.The air filter element could become clogged under these conditions, andengine damage may result.Always check the air filter element after riding in severe conditions.Clean or replace the elements as necessary. If water gets in the air filtercase, immediately clean the element and the inside of the case.!CAUTIONA torn air filter could damage your <strong>Go</strong>-kart.Dirt and dust may get inside of the engine if the element is torn.Examine carefully the element for tears before and after cleaning it.Replace the element with a new one if it is torn.!CAUTIONFailing to position the air cleaner element properly could damage your<strong>Go</strong>-kart.Air will bypass the air cleaner element if the element is not positionedproperly. This will cause the engine parts to wear more rapidly.Be sure to position the air cleaner element properly.36
!Overfilling the air to the tires could be hazardous.If you put too much air into the tire, may burst, and causing severeinjury.Check the air pressure from time to time while inflating the tiregradually, until the specified air pressure is obtained.Tire ReplacementYour <strong>Go</strong>-kart has low-pressure tubeless tires. Air is sealed by the contactsurfaces of the inner wheel rim and the tire bead. If the inner wheel rim ortire bead is damaged, air may leak. Be extremely careful not to damage thesesections when replacing tires.It is very important to use the proper tools when repairing or replacing tiresin order to protect the tire bead or wheel rims. Have this work done by yourauthorized service center or a qualified tire repair station.When breaking the tire bead loose from the wheel, be extremely careful not todamage the inner wheel rim surface or the tire bead.!WARNINGWARNINGTIRESUsing tires that have been installed incorrectly could be hazardous.The <strong>Go</strong>-kart may have unusual handling if the tires are installedincorrectly.The tires are intended to rotate in a specific direction, as indicated bythe arrows on the sidewall of each tire. Install tires correctly so theyrotate in the proper direction.Tubeless Tire RepairIf a leak or flat tire occurs due to a puncture, the tire may be repaired usinga plug type patch. If the damage is from a cut, or if the puncture cannot berepaired using a plug, the tire should be replaced. When operating your<strong>Go</strong>-kart in areas where transportation or service facilities are not readilyavailable, it is strongly recommended that you bring a plug type repair kit anda tire air pump with you.38
BRAKINGThe <strong>Go</strong>-kart has Hydraulic disk brakes on all four wheels.!WARNINGFailing to inspect and maintain your <strong>Go</strong>-kart’s brake system properlycould be hazardous.Improper maintenance of the brake increases your chance of having anaccident.Be sure to inspect the brake before riding according to the INSPECTIONBEFORE RIDING section. Always maintain your brakes according to theMAINTENANCE SCHEDULE.!WARNINGOperating the <strong>Go</strong>-kart in harsh conditions could be hazardous if you donot inspect brake wear often.Operating in mud, water, sand, or other extreme conditions can causeaccelerated brake wear. This could lead to an accident.If you operate your vehicle under these conditions, the brake mustbe inspected more often than recommended in the MAINTENANCESCHEDULE.39
FRONT AND REAR HYDRAULIC DISKBRAKE INSPECTIONBrake fluid reservoirFront disk brakecaliperBrake hoseBrake diskBrake diskBrake hoseBrakehoseRear diskbrake caliper1. Inspect the front disk brake caliper for leakage. If brake fluid leaks, thesafety of riding could be affected.2. Inspect the brake hose for cracks/damage and the joint for leakage.3. Check the brake fluid level in the brake fluid reservoir. If level is at or belowthe LOWER mark, inspect brake pads for wear and hydraulic system for leaks.4. To add brake fluid, remove the 2 screws on top of the brake fluid reservoir.Add DOT3 or DOT4 brake fluid. DO NOT mix brake fluid types.!WARNINGFailing to maintain the brake shoes or pads could be hazardous.Riding with worn brake shoes, pads, or shoes that are seriously worn,will increase your chance of having an accident.If you need to replace brake shoe pads, have your authorized servicecenter do the work. Inspecting and maintaining the brake shoe pads isrecommended. Replace the shoe pads in sets.40
TROUBLESHOOTINGThe following information is provided to help you identify probable questionsyou may have concerning the operation of you <strong>Go</strong>-kart. See your authorizedservice center with any additional questions you may have.Engine turns over but fails to startNo fuelOn/Off flip switchis in “off” positionWater in fuelSpark plugEngine compression155 lbs.Replenish fuelDrain systemNo spark tospark plugNo compressionClogged fuelfilterContact service centerEngine stops or looses powerNo fuelSpark plug fouledEngine overheatedReplenish fuelAir filter cloggedClean radiator screenFuel vent line kinked orpluggedExhaust cloggedClean engine exteriorWater in fuelContact service centerDrain system41
IGNITION SYSTEM CHECK1. Remove the spark plug and reattach it to the spark plug lead.2. Turn ignition key switch CW (clockwise) to “ON” and push electric startbutton. Be sure the parking brake is set If the ignition system is operatingproperly, a blue spark should jump across the spark plug gap. If there isno spark, take your machine to your service center.!WARNINGPerforming the spark test improperly could be hazardous.You could get a high voltage electrical shock if you are not familiar with thisprocedure.Do not perform this check if you are not familiar with the procedure. Donot point the spark plug near the spark plug hole during this test. Do notdo this test if you have a heart condition or wear a pacemaker. Do notperform this test is any near any open fuel containers for near fuel whichhas spilled on the ground, on the engine, or any part of the <strong>Go</strong>-kart.COMPLAINT: Engine stalls1. Make sure there is enough fuel in the fuel tank.2. Check to see that the spark plug is not fouled. Remove the spark plugand clean it. Replace it, if necessary.3. Make sure the fuel valve is not clogged, and the fuel tank is not clogged,either.4. Check the idle speed. If necessary, adjust it using a tachometer. Thecorrect idle speed is 1400~1600 r/min.42
TRANSPORTINGIt is best to transport the <strong>Go</strong>-kart in the normal position.Drain screwBefore transporting the <strong>Go</strong>-kart drain the fuel from the carburetor as follows:1. Drain fuel from carburetor into an empty container by loosening thecarburetor drain screw located on bottom of carburetor.2. When the fuel has been drained, retighten the drain screw.!Draining fuel from the carburetor could be hazardous.Fuel could catch fire if you do not handle it properly.When draining fuel from the carburetor, be sure to shut the engine off. Donot smoke, and never drain or refuel in an area where there are open flamesor sparks. Do not spill the fuel or you may create a fire hazard. Dispose ofthe drained fuel properly.!WARNINGWARNINGFailing to secure the <strong>Go</strong>-kart properly could be hazardous.Failing to secure the vehicle properly may result in an accident ordamage to the vehicle.When transporting the <strong>Go</strong>-kart, lock the parking brake lever and tie downthe vehicle securely with straps, rope, or some other suitable means.Use extra tie downs when you transport the vehicle in the standingposition.43
CLEANING PROCEDUREA thorough cleaning of your <strong>Go</strong>-kart is a necessary part of maintenance. It willhelp keep your <strong>Go</strong>-kart looking and performing best. Proper cleaning can alsoextend the life of your <strong>Go</strong>-kart.It is important to clean and inspect your <strong>Go</strong>-kart after every ride, especially ifit is used in mud, brush, grass, water, salt water, or very dusty conditionsThe build-up of mud, brush, grass, etc. especially on the engine and exhaustsystem, can reduce engine cooling ability, conceal damage, or increase wearof certain parts. It is important to remove all debris during cleaning.PREPARATION FOR CLEANINGWash the <strong>Go</strong>-kart before any mud dries on the <strong>Go</strong>-kart.Block or seal the end of the exhaust pipe (muffler) and air filter using a pieceof plastic wrap, cloth rag or another method to prevent water from enteringengine.!CAUTIONHigh pressure washers could damage your <strong>Go</strong>-kart.High pressure washers such as those found at coin-operated carwashes have enough pressure to damage the parts of your <strong>Go</strong>-kart. Itmay cause rust, corrosion and increase wear.Do not use high pressure washers to clean your <strong>Go</strong>-kart.44
WASHING YOUR GO-KARTWith some care, your <strong>Go</strong>-kart can be washed in a similar manner to washingan automobile.Note: Avoid spraying or allowing water to flow over the following places:· Ignition switch· Spark plug· Fuel tank cap· Carburetor· Air filterUse a garden hose at low pressure to remove the majority of dirt or otherdebris. Hand wash your <strong>Go</strong>-kart with mild soap or detergent and water. Try tothoroughly remove all dirt and debris without excessive water pressure, evenat remote areas such as between engine cooling fins, linkages or mountingbrackets. Cloth rags, washing mitts or cleaning brushes can be used. Becareful with brushes as they may scratch plastic or painted surfaces. Rinsethe <strong>Go</strong>-kart thoroughly with clean water. Dry all areas using a chamois or softabsorbent cloth.INSPECTION AFTER CLEANINGRemove the rags or wrapping from the exhaust pipe. For extended life of your<strong>Go</strong>-kart, lubricate according to GENERAL LUBRICATION section.Follow the procedures in the INSPECTION BEFORE RIDING section to checkyour <strong>Go</strong>-kart for any problems that may have occurred during your last ride.!WARNINGOperating the <strong>Go</strong>-kart with wet brakes could be hazardous.Wet brakes may not provide as much stopping power as dry brakes.This could lead to an accident.Test your brakes after washing the <strong>Go</strong>-kart, riding at a slow speed. Ifnecessary, apply brake several times to let the friction dry out thelinings.45
STORAGE PROCEDUREIf you do not use your <strong>Go</strong>-kart for a long time, it will need special servicerequiring appropriate materials, equipment and skill. For this reason, werecommend that you trust this maintenance work to your authorized servicecenter. If you wish to service the machine for storage yourself, follow thegeneral guidelines below:VEHICLEPlace the vehicle on level ground and wash the entire vehicle.FUELDrain the fuel from the fuel tank by a hand pump. Drain the fuel from thecarburetor by releasing the carburetor drain screw.!WARNINGDraining the fuel could be hazardous.Fuel could catch fire if you do not handle it properly.When draining the fuel from the fuel tank, be sure to shut the engine off.Do not smoke, and never drain fuel in an area where there are open flamesor sparks. Keep pets and children away from the fuel, and dispose of thedrained fuel properly.TIRESInflate tires to the normal pressure.EXTERNAL1. Spray all vinyl and rubber parts with rubber protection.2. Spray unpainted surfaces with rust preventative.3. Coat painted surfaces with car wax.PROCEDURE FOR RETURNING TO SERVICE1. Clean the entire vehicle.2. Make sure that the vehicle is properly lubricated.3. Perform the INSPECTION BEFORE RIDING as listed in this manual.4. Start the vehicle as outlined in this manual.46
SERIAL NUMBER LOCATIONYou need to know the frame and engine serial numbers to get title documentsfor your <strong>Go</strong>-kart. You also need these numbers to help your authorizedservice center or <strong>Baja</strong> <strong>Motorsports</strong> order parts.The Frame number is stamped on the frame behind the gas tank. The enginenumber is located on the left side of the engine housing.Frame numberWrite down the serial numbers here for your future referenceFrame No.:Engine serial numberEngine No.:47
WIRE DIAGRAMTemperature switchHeadlightFan generatorTemperature switchHeadlightGBrBrGMagnetoIgnition switchLight switchB BrR B Y/RR GG B/WR Y YYPilot lightKill switchRectifierResistorG YY Y YG L/WMagnetoL/W GB/YCDIStartingrelayR/WBattery+ -MagnetoY/R GFuse15AB B/WIgnition coilSpark plugStarting relayTail lightBrG48
SPECIFICATIONSDIMENSIONSOverall length............................................................2450mm (96.46 in.)Overall width.............................................................1427mm (56.18 in.)Overall height............................................................1512mm (59.53 in.)Wheelbase.................................................................1865mm (73.43 in.)Dry weight .................................................................250kg (551 lbs.)Weight limit................................................................150kg (330 lbs.)ENGINEType............................................................................Forced water-cooled,singlecylinder,4-StrokeDisplacement.............................................................244.3mlBore X Stroke............................................................72mm X 60mmMax power..................................................................11kw/7000rpmFuel type..........................................................................SAE 90# or above (unleaded)Lubricate oil.....................................................................SAE 10W/30SFIgnition.............................................................................C.D.I.Starting............................................................................ElectricSpark plug.......................................................................DPR7EADrive system...................................................................Chain driveCarburetor.......................................................................Vacuum diaphragmAir cleaner.......................................................................Paper elementTransmission...................................................................Automatic (C.V.T. system)Gear-shifting....................................................................Automatic,CentrifugalCooling.............................................................................Water-cooledCooling fluid....................................................................Anticorrosive. anti-freezeCAPACITIESFuel tank....................................................................10L (2.6 gal)Top speed...................................................................70km/h (43mph)CHASSISBrake system.............................................................Hydraulic disc,left foot controlTIRE PRESSUREFront tire size............................................................19x7-8Rear tire size..............................................................20x10-1049
EMISSION CONTROL SYSTEM WARRANTYBAJA MOTORSPORTS – EMISSION CONTROL SYSTEM WARRANTYYOUR WARRANTY RIGHTS AND OBLIGATIONSThe emission control system warranty period for this vehicle begins on the date the vehicle isdelivered to the first purchaser other than an authorized dealer, or the date it is first used as ademonstrator, lease, or company vehicle, whichever comes first and continues for 60 monthsafter that date, or 5,000km, whichever comes first, provided there has been no abuse, neglect orimproper maintenance of your vehicle. Where a warrantable condition exists, theDistributor will repair your vehicle at no cost to you, including diagnosis, parts and labor. If anemission-related part on your vehicle is defective, the part will be repaired or replaced by theDistributor. This is your emission control defects warranty.OWNER’S WARRANTY RESPONSIBILITIESAs the vehicle owner, you are responsible for the performance of the required maintenance. Youshould maintain a record of all maintenance performed on your vehicle and retain all receiptscovering maintenance on your vehicle. You may not be denied a warranty claim solely becauseof your failure to ensure the performance of all scheduled maintenance or lack of maintenancerecords or receipts. You are responsible for presenting your vehicle to an authorized dealer assoon as a problem exists. The warranty repairs should be completed in a reasonable amount oftime, not to exceed 30 days.As the vehicle owner, you should be aware that you may be denied your warranty coverage ifyour vehicle or a part has failed due to abuse, neglect, improper maintenance, or unapprovedmodifications.WARRANTY COVERAGEThe Distributor warrants that each new 2009 and later vehicle:• is designed, built, and equipped so as to conform at the time of initial retail purchasewith all applicable regulations of the United States Environmental Protection Agency, and theCalifornia Air Resources Board; and• is free from defects in material and workmanship which cause such vehicle to fail toconfirm with applicable regulations of the United States Environmental Protection Agency or theCalifornia Air Resources Board for the periods specified above.Your emission control system warranty covers components whose failure would increase anengine’s emission, including electronic controls, fuel injection system, carburetor, the ignitionsystem, catalytic converter, or any other system utilized in this vehicle to control emission if it isoriginally equipped. Also included may be hoses, connectors and other emission-relatedassemblies. Replacing or repairing other components (including parts, labor, and other costs)not covered by this emission control system warranty or the standard warranty is theresponsibility of the owner.Coverage of repairs under this warranty applies only when repairs are completed at an authorizeddealer or repair facility. The Distributor will not cover repairs performed outside of an authorizeddealer or repair facility. The use of replacement parts not equivalent to the original parts mayimpair the effectiveness of your vehicle’s emission control system. If such a replacement part isused and an authorized dealer determines it is defective or causes a failure of a warranted part,your claim for repair to bring your vehicle into compliance with applicable standards may bedenied.This Emission Control System Warranty is in addition to the standard Limited Warranty.50
EMISSION CONTROL SYSTEM WARRANTYEXCLUSIONS AND LIMITATIONSThis warranty does not cover the following:• Failures or malfunctions of the emission control systems caused by abuse, alteration,accident, misuse, the use of leaded gasoline.• Replacement of expendable maintenance items unless they are original equipmentdefective in material or workmanship under normal use, and the first required replacement intervalfor the item has not been reached. Expendable maintenance items include but not limited tospark plugs, filters, coolant, lubricants, gaskets, hoses, and belts.• Replacements of parts and other services and adjustments for required maintenance.• Any vehicle equipped with an odometer or hour meter where the reading is altered sothat actual mileage cannot be readily determined.• Repairs or replacements as a result of:oAccidentoMisuseoUse of replacement parts or accessories not conforming to the original specificationswhich adversely affect performance• Physical damage, corrosion, or defects caused by fire, explosions or similar causesbeyond the control of the Distributor.• Failures not caused by a defect in material or workmanship.Use of the vehicle in any type of competitive racing or related events immediately and completelyvoids this and all other warranties.LIMITED LIABILITYThe liability of the Distributor under this Emission Control System Warranty is limited solely tothe remedying of defects in material workmanship by an authorized dealer at its place of businessduring customary business hours. This warranty does not cover inconvenience or loss of use ofthe vehicle or transportation of the vehicle to/from the authorized dealer. The Distributor is notliable to any person for incidental, consequential or special damages of any description, whetherarising out of express or implied warranty or any other contract, negligence or other tort orotherwise.No express emission control system warranty is given by the Distributor except as specificallyset forth herein. Any emission control system warranty implied by law, including any warranty ofmerchantability or fitness for a particular purpose is limited to the express emission control systemwarranty terms stated in this warranty. The foregoing statements of warranty are exclusiveand in lieu of all other remedies. All express warranties not stated in this warranty are disclaimed.Some states do not allow limitations on how long an implied warranty lasts, so the above limitationsmay not apply if it is inconsistent with the controlling state law.No dealer is authorized to modify this Emission Control System Warranty. If you have any questionsregarding your warranty rights and responsibilities, you should contact BAJAMOTORSPORTS.51
<strong>Baja</strong>, INC.P.O. Box 61150Phoenix, AZ 85082Tel: 602-443-9180Toll Free: 888-863-225252